Enhancing mail flow with MTA-STS
Support for the SMTP MTA Strict Transport Security (MTA-STS) standard is added to Exchange Online. The standard was developed to ensure that TLS is always used for connections between email servers. It also provides a way for sending servers to validate that the receiving server has a trusted certificate. If either TLS isn't offered or the certificate isn't valid, the sender refuses to deliver messages. These new checks improve the overall security of SMTP and protect against man-in-the-middle attacks.
MTA-STS can be broken down into two scenarios: Inbound and Outbound Protection. Inbound protection covers the protection of domains hosted in Exchange Online with MTA-STS. Outbound protection covers the MTA-STS validations performed by Exchange Online when sending emails to MTA-STS-protected domains.
Tip
If you're not an E5 customer, use the 90-day Microsoft Purview solutions trial to explore how additional Purview capabilities can help your organization manage data security and compliance needs. Start now at the Microsoft Purview trials hub. Learn details about signing up and trial terms.
Outbound Protection
All messages sent outbound from Exchange Online to MTA-STS-protected recipients are being validated with these extra security checks set out by the MTA-STS standard. There's nothing administrators need to do to apply it. Our outbound implementation respects the wishes of the recipient domain owners via their MTA-STS policy. MTA-STS forms part of the security infrastructure of Exchange Online, and it's therefore always turned on (like other core SMTP features).
Outbound MTA-STS may prevent emails from being delivered depending on the results of the MTA-STS validation against the destination domain. If the domain isn't secure and the MTA-STS policy is set to Enforce, an NDR may be returned to the sender with one of the following error codes:
| Error code | Description | Possible cause | Additional information |
|---|---|---|---|
| 5.4.8 | MX hosts of '{domain}' failed MTA-STS validation | The destination MX host wasn't the host expected per the domain’s STS policy. | This error usually indicates an issue with the destination domain’s MTA-STS policy not containing the MX host. For more information about MTA-STS, see https://datatracker.ietf.org/doc/html/rfc8461. |
| 5.7.5 | Remote certificate failed MTA-STS validation. Reason: {validityStatus} | The destination mail server's certificate must chain to a trusted root Certificate Authority, and the Common Name or Subject Alternative Name must contain an entry for the host name in the STS policy. | This error usually indicates an issue with the destination mail server’s certificate. For more information about MTA-STS, see https://datatracker.ietf.org/doc/html/rfc8461. |
Inbound Protection
Domain owners can take action to protect emails sent to their domains with MTA-STS, if their MX record points to Exchange Online. If your MX record points to an intermediary third-party service, you'll need to whether MTA-STS requirements are met by them, and then follow their instructions.
Once MTA-STS is set up for your domain, any messages sent from senders who support MTA-STS will perform the validations laid out by the standard to ensure a secure connection. If you're receiving an email from a sender who doesn't support MTA-STS, the email will still be delivered without the extra protection. Likewise, there's no disruption to messages if you aren't using MTA-STS yet but the sender supports it. The only scenario where messages aren't delivered is when both sides are using MTA-STS and MTA-STS validation fails.
How To Adopt MTA-STS
MTA-STS allows a domain to declare support for TLS and communicate the MX record and destination certificate to expect. It also indicates what a sending server must do if there's a problem. This communication is done through a combination of a DNS TXT record and a policy file that's published as an HTTPS webpage. The HTTPS-protected policy introduces another security protection that attackers must overcome.
A domain's MTA-STS TXT record indicates MTA-STS support to a sender, after which the domain's HTTPS-based MTA-STS policy is retrieved by the sender. The TXT record should contain v=STSv1; until STSv2 is supported, and the id for the policy. The id MUST be unique for the domain owner and policy, as a change in the id signals to senders that they need to re-fetch the policy. The id doesn't need to be globally unique, don’t worry about other domain owner’s policy id’s. After any MTA-STS policy updates, you need to update the id, or senders will keep using cached policies for your domain until the max_age of the cached policy expires.
A repeatable pattern for setting a unique id is to use UTC time as such:
id=<yyyymmddhh0000>Z;
The following TXT record is an example that declares support for MTA-STS, the id was set at 8 am January 1, 2022 UTC time:
_mta-sts.contoso.com. 3600 IN TXT v=STSv1; id=20220101080000Z;
A domain's MTA-STS policy needs to be located at a predefined URL that's hosted by the domain's web infrastructure. The URL syntax is https://mta-sts.<domain name>/.well-known/mta-sts.txt. For example, Microsoft.com's policy is found at: https://mta-sts.microsoft.com/.well-known/mta-sts.txt.
version: STSv1
mode: enforce
mx: *.mail.protection.outlook.com
max_age: 604800
Any customer whose MX records point directly to Exchange Online can specify in their own policy the same values that are shown in https://mta-sts.microsoft.com/.well-known/mta-sts.txt. The unique required information in the policy is the MX record that points to Exchange Online (*.mail.protection.outlook.com) and the same certificate is shared by all Exchange Online customers. Exchange Online only allows one organization to receive emails for a given domain so that using a wildcard doesn't weaken security; however, that may not be the case for other email services. It's possible to publish your policy in testing mode to ensure it's valid before changing it to enforce mode. There are third-party validation tools out there that can check your configuration.
These policies aren't something that Exchange Online can host on behalf of customers; so, customers must configure their domain's STS policy using the services they prefer. Azure services can be easily used for policy hosting and there's a configuration walk-through later in this article. The policy needs to be protected by HTTPS with a certificate for the subdomain mta-sts.<domain name>.
Once the DNS TXT record is created and the policy file is available at the required HTTPS URL, the domain will be protected by MTA-STS. Details about MTA-STS are available in RFC 8461.
Configuring Inbound MTA-STS with Azure Services
Note
These configuration flows were developed to help Microsoft Exchange Online customers host their MTA-STS policy using Azure resources. This configuration flow assumes that you're an Exchange Online customer who is aware of how MTA-STS works and of its requirements. For more information about the protocol beyond this topic, see RFC8461.
There are two Azure resources that can be used to host the MTA-STS policy: Azure Static Web App and Azure Functions. Although this article describes how to deploy the policy using both the resources, the recommended method is Azure Static Web App as it’s designed for hosting static pages such as the STS policy, and Azure simplifies the configuration by providing a TLS certificate for the MTA-STS webpage out of the box, without requiring more configuration. If you aren't able to use Azure Static Web App, you can also host your policy as serverless code using Azure Functions. This approach isn't the preferred method because Azure Functions is a feature designed for other scenarios and it doesn’t issue a TLS certificate automatically, unlike Azure Static Web Apps. So using Azure Functions for MTA-STS requires that you issue your own “mta-sts.[your domain]” certificate and bind it to the function.
Regardless of which approach you've taken, we encourage you to validate whether your policy has been properly configured and whether the response time is acceptable – timeout per RFC guidance is 60 seconds.
These configuration flows are intended to provide only technical information about Azure features that can be used to host the MTA-STS policy and doesn't provide any information about Azure features’ charging or costs. If you want to know Azure features' costs, use the Azure Pricing Calculator.
Option 1 (RECOMMENDED): Azure Static Web App
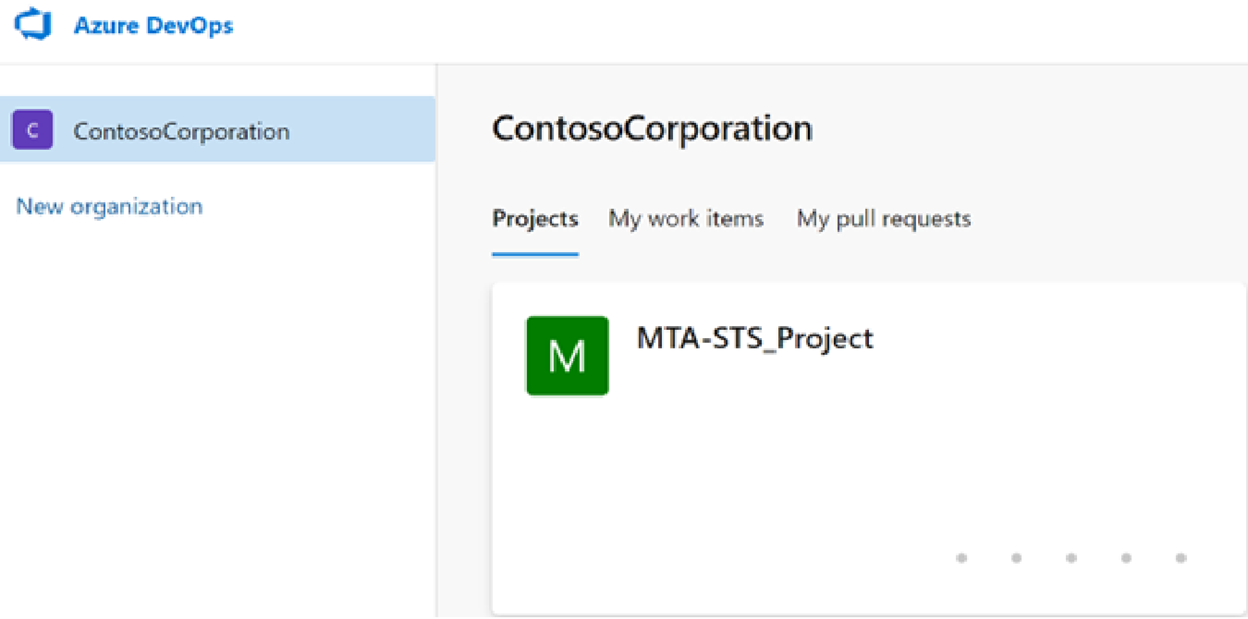
Create an Azure DevOps organization or use an organization that already exists. In this example, an organization called “ContosoCorporation” will be used to host the MTA-STS policy.
In Repos > Files, clone your repository in any IDE that you prefer. In this example, the repo will be cloned in Visual Studio.
Once the repo is cloned, create the folder path
home\.well-known\. Then, create the following files:File 1: home.well-known\mta-sts.txt
Note
This configuration allows only Exchange Online to receive messages on behalf of your domain. If you're using multiple email providers, you need to reference MX hosts for those other providers' domains as well. Wildcards or ‘*’ must not be used as the MX prefix in all MTA-STS scenarios; the settings below are specific to Exchange Online only and must NOT be used as general guidance for configuring MTA-STS.
Input the following text into the
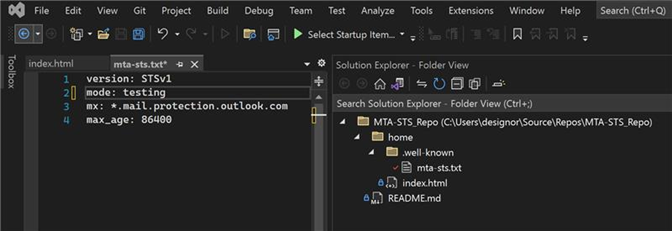
mta-sts.txtfile:version: STSv1 mode: testing mx: *.mail.protection.outlook.com max_age: 604800Note
It's recommended that the policy mode be initially set as testing. Then, at the end of the configuration and after validating that the policy is working as expected, update the
mta-sts.txtfile such that the mode is enforce.The file must only contain the content as shown in the following screenshot:
File 2: home\index.html
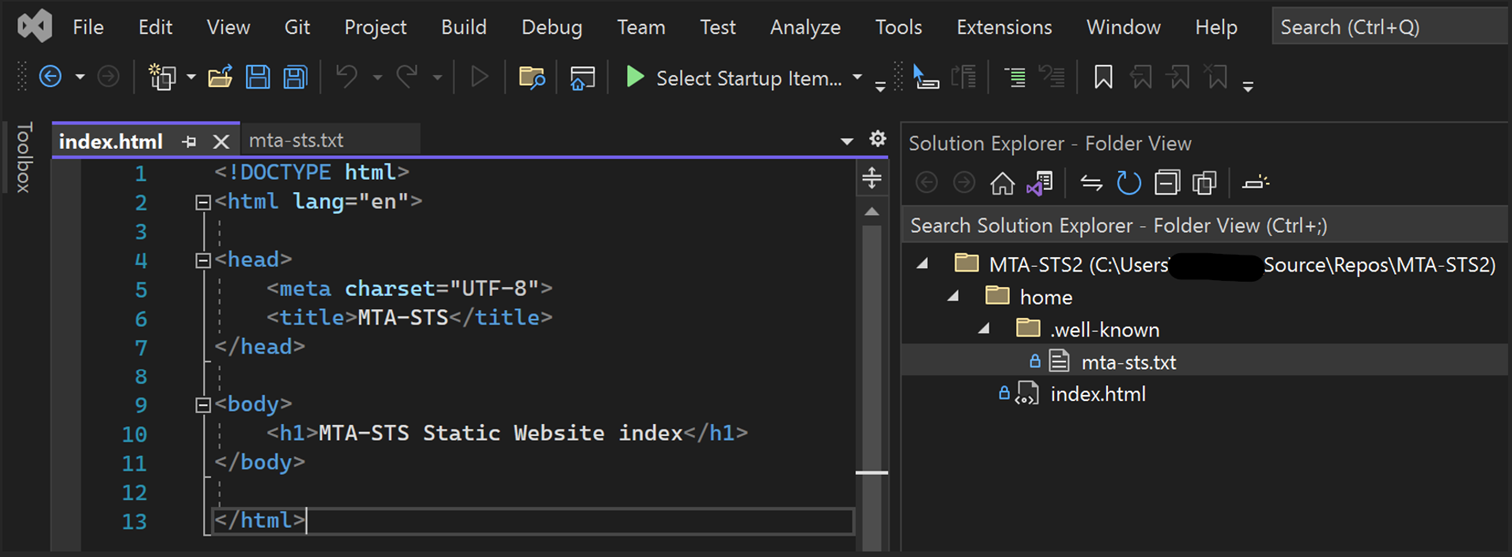
Create an
index.htmlfile and input the following code into it:<!DOCTYPE html> <html lang="en"> <head> <meta charset="UTF-8"> <title>MTA-STS</title> </head> <body> <h1>MTA-STS Static Website index</h1> </body> </html>The file must only contain the content as shown in the following screenshot:
Once the folder path and files are created, don’t forget to commit the changes and push them into your main branch.
Create a new Azure Static Web App with the following configuration:
- Name: MTA-STS-StaticWebApp
- Plan type: Standard
- Deployment Details: Azure DevOps
- Organization: ContosoCorporation
- Project: MTA-STS_Project
- Repository: MTA-STS_Project
- Branch: master
- Build Presets: Angular
- App Location: /home
Once the Static Web App creation is done and the resource is provisioned, go to Overview > Manage deployment token; then copy the token as it will be used in the next step.
Go to Pipelines > Create Pipeline > Azure Repos Git > MTA-STS_Project, and perform the following subtasks:
Go to Variables > New Variable and type the following:
- Name: token
- Value: (paste the token that you previously copied, in Step 5)
Once the variable is saved, return to Review your pipeline YAML and paste the following yml, save and run it:
trigger:
- main

pool:
vmImage: ubuntu-latest

steps:
- checkout: self
submodules: true
- task: AzureStaticWebApp@0
inputs:
 app_location: '/home'
 azure_static_web_apps_api_token: $(token)
In Azure DevOps, during deployment, if you experience the error No hosted parallelism has been purchased or granted, either request through this form or implement a configuration through Organization Settings > Parallel jobs > Microsoft Hosted > Change > Paid Parallel jobs such that “Paid parallel jobs” are allowed.
Once the job finishes successfully, you can validate the deployment through the Azure portal by going to Azure Static Web App > Environment > Browser. You must see the
index.htmlfile's content.Add your vanity domain in Azure Static Web App > Custom domains > Add. You'll be required to create a CNAME record through your DNS provider (for example, GoDaddy) to validate whether the zone belongs to you. Once the validation is finished, Azure will issue a certificate and bind it to your Static Web App automatically.
Validate whether your MTA-STS policy is published through: https://mta-sts.[your domain]/.well-known/mta-sts.txt.
Create the MTA-STS TXT DNS record through your DNS provider. The format is:
Hostname: _mta-sts.<domain name>
TTL: 3600 (recommended)
Type: TXT
Text: v=STSv1; id=<ID unique for your domain’s STS policy>Z;
Note
An example MTA-STS TXT record can be found in How To Adopt MTA-STS.
Once the TXT record is available in DNS, validate your MTA-STS configuration. Once the configuration has been successfully validated, update the
mta-sts.txtfile so that the policy mode is enforce; then update your policy ID in the TXT record.
Option 2: Azure Function
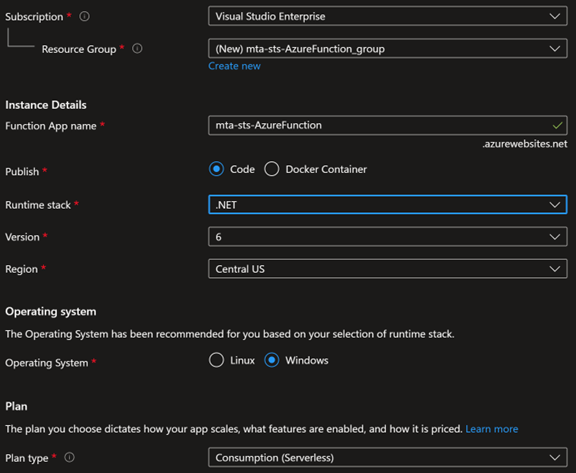
Create a new Azure Function App with the following configuration:
- Function App name: [As your choice]
- Publish: Code
- Runtime stack: .NET
- Version: 6
- Operating System: Windows
- Plan Type: [As your choice]
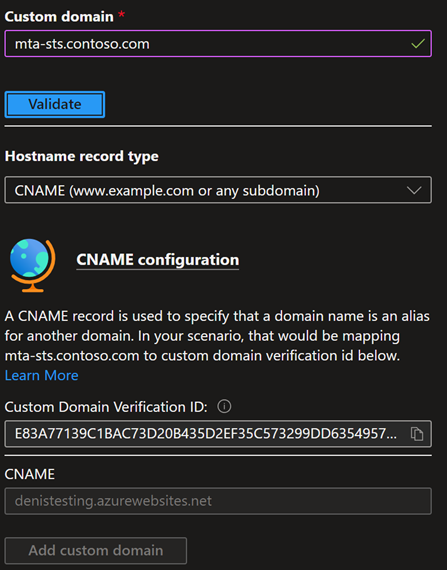
Add your custom domain to the Function App. You'll be required to create a CNAME record to validate whether the domain belongs to you.
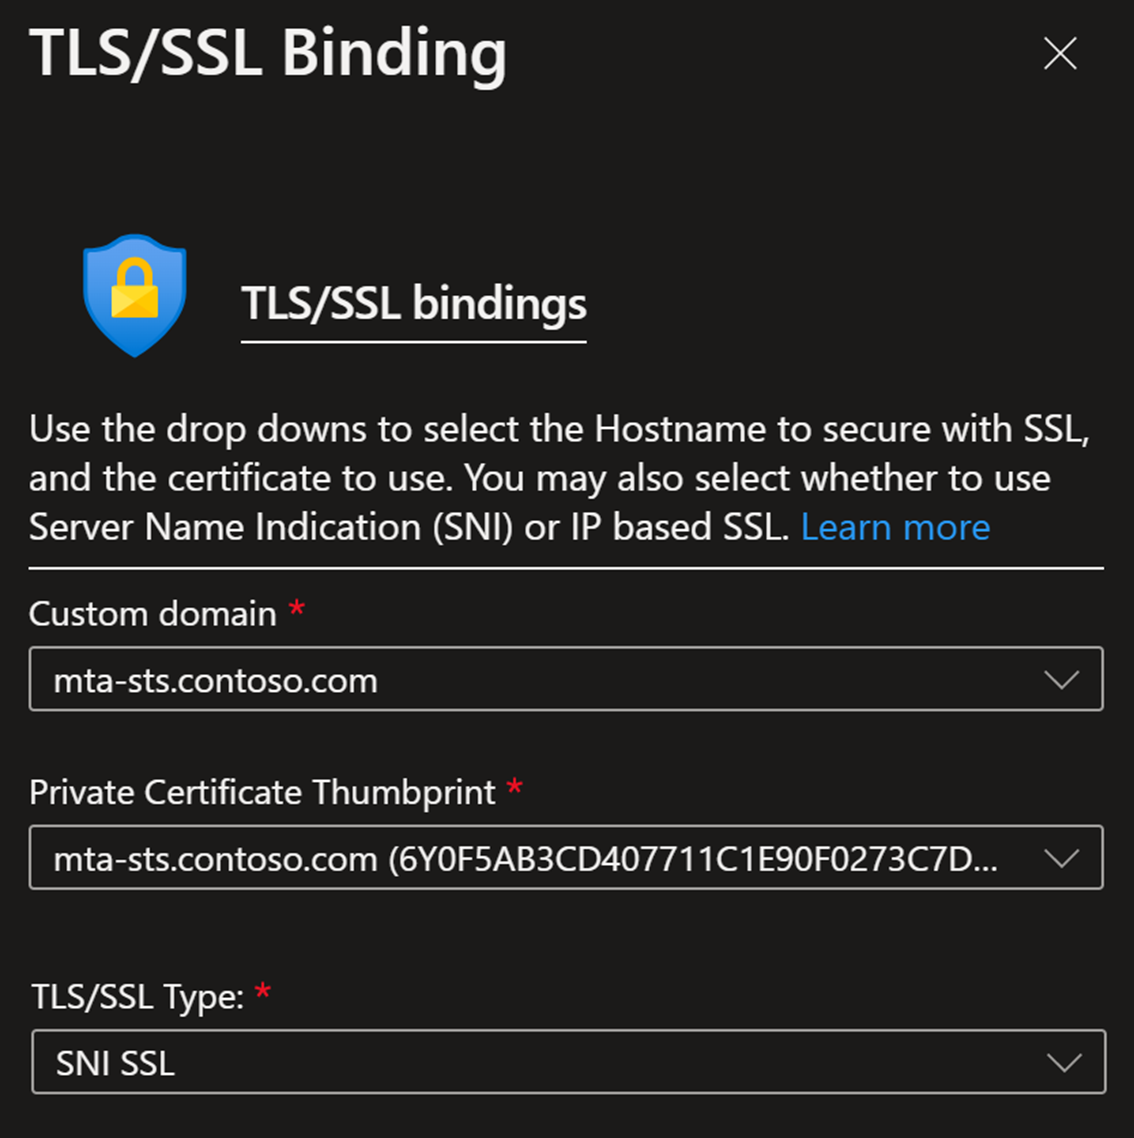
Bind your "mta-sts.[your domain]" to the Function App.
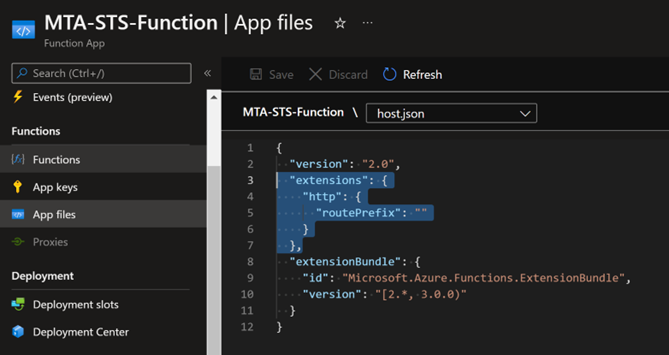
In App File, add the following extension to the host.json of your Function App to eliminate the routePrefix. This addition is necessary to remove the /api from the function URL.
"extensions": {
  "http": {
    "routePrefix": ""
  }
}
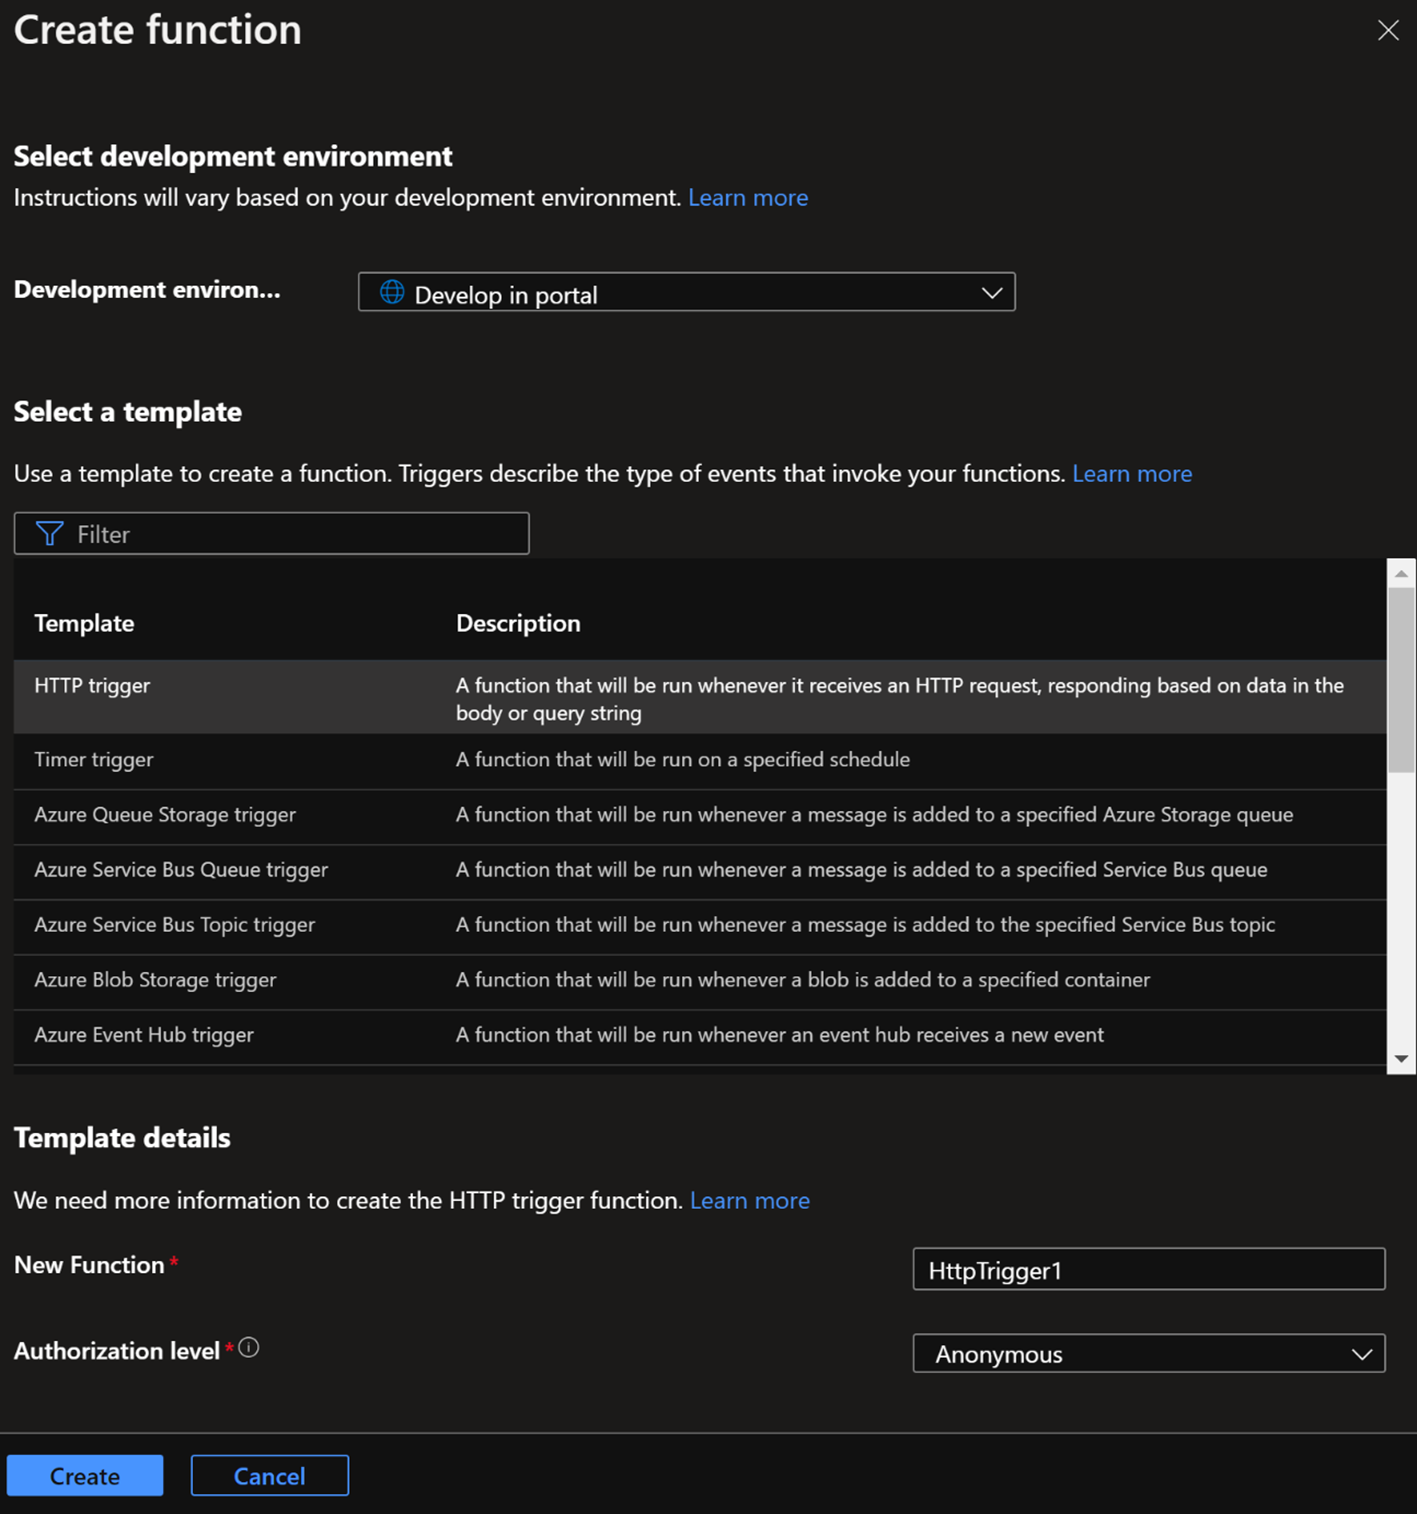
In your Function App, go to Functions > Create and configure the following parameters:
Note
Although this example describes the function development through the portal, you're free to use VS Code, or any other tool that you prefer.
- Development environment: [As your choice; this example will use “Develop in Portal”]
- Select a template: HTTP trigger
- New Function: [As your choice]
- Authorization level: Anonymous
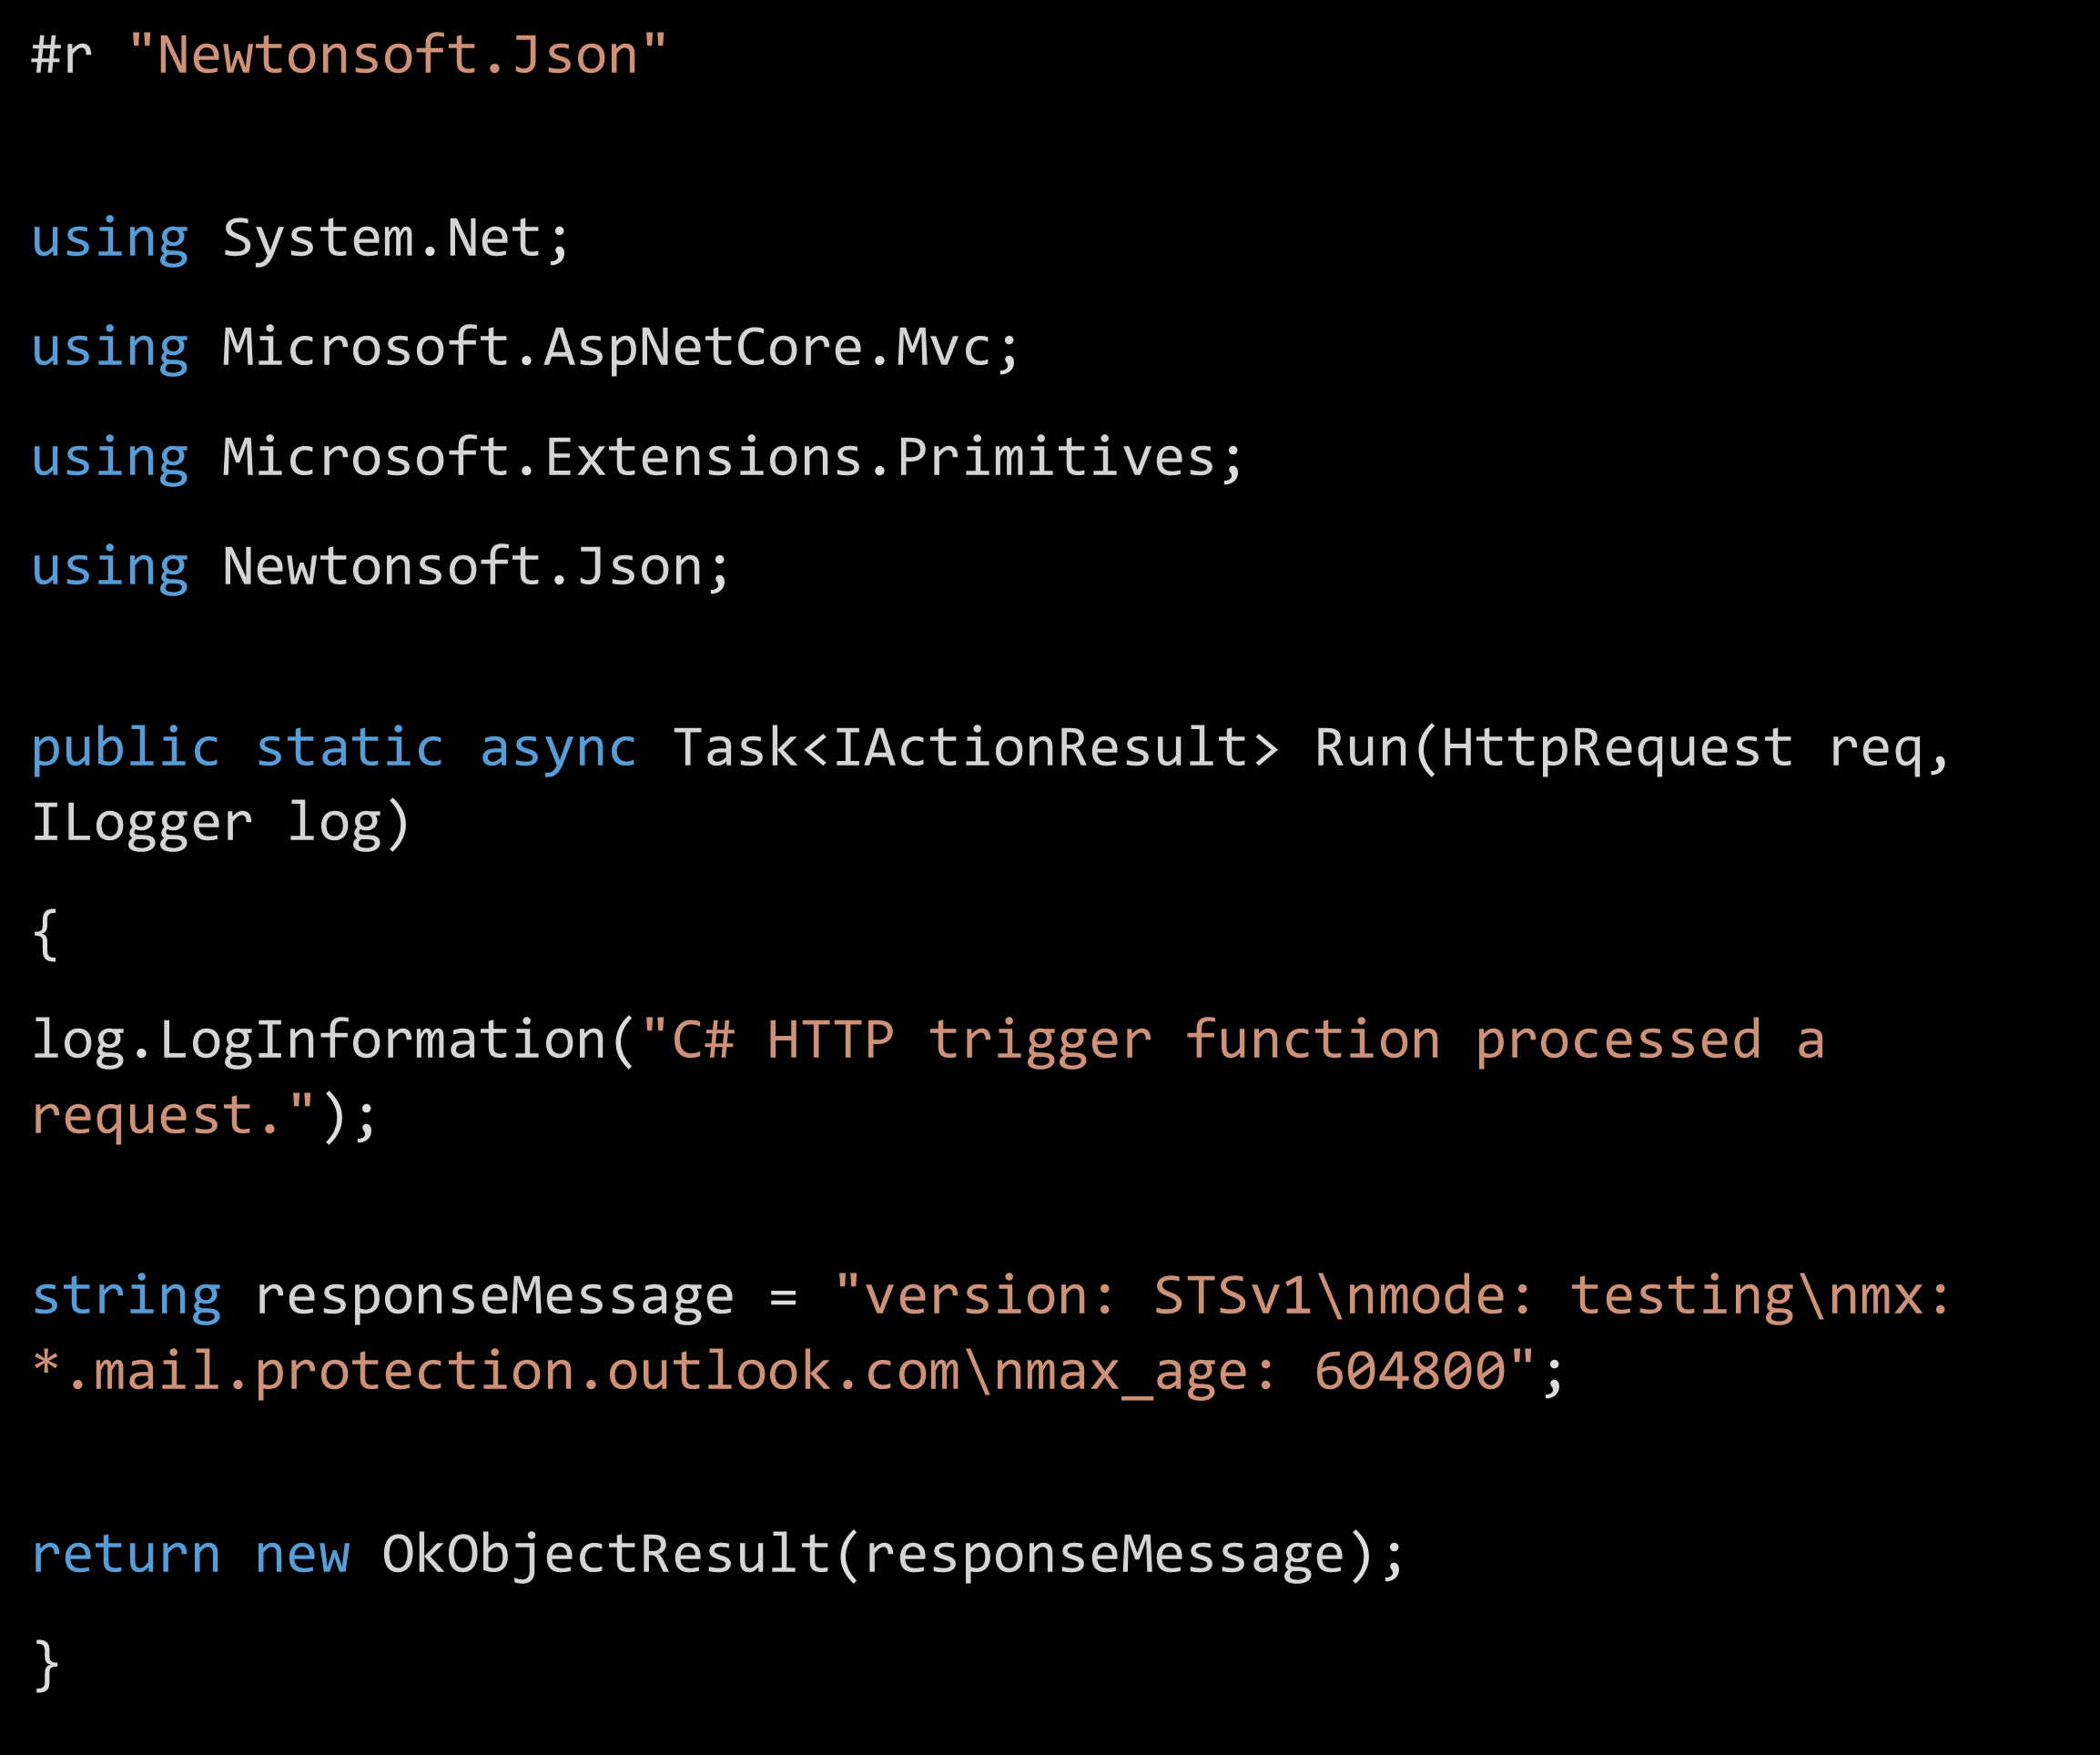
Once the function is created, open Code + Test and develop in C# a simple async HTTP response that will be your MTA-STS policy. The following example indicates that Exchange Online is expected to receive emails:
Note
It's recommended that the policy mode be initially set as testing. Then, at the end of the configuration and after validating that the policy is working as expected, update the
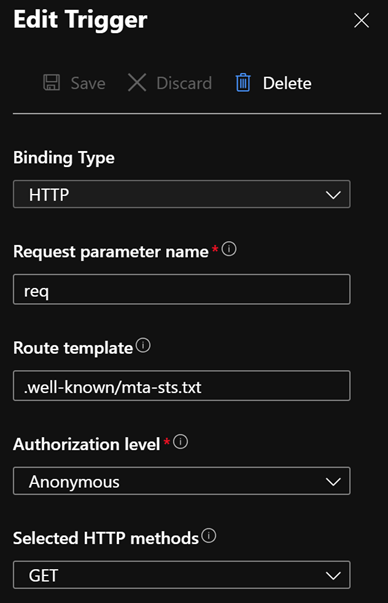
mta-sts.txtfile such that the mode is enforce.In Integration > HTTP (req), edit the trigger to the following values:
- Route Template: .well-known/mta-sts.txt
- Selected HTTP methods: GET
Validate that your MTA-STS policy is published through: https://mta-sts.[your domain]/.well-known/mta-sts.txt.
Create the MTA-STS TXT DNS record through your DNS provider in the following format:
Hostname: _mta-sts.<domain name>
TTL: 3600 (recommended)
Type: TXT
Text: v=STSv1; id=<ID unique for your domain’s STS policy>Z;
Note
An example MTA-STS TXT record can be found in How To Adopt MTA-STS.
Once the TXT record is available in DNS, validate your MTA-STS configuration. Once the configuration has been successfully validated, update the
mta-sts.txtfile such that the policy mode is enforce; then update your policy ID in the TXT record.
