Error remediation when processing data
Important
This article applies only to the classic eDiscovery experience. The classic eDiscovery experience will be retired in August 2025 and won't be available as an experience option in the Microsoft Purview portal after retirement.
We recommend that you start planning for this transition early and start using the new eDiscovery experience in the Microsoft Purview portal. To learn more about using the most current eDiscovery capabilities and features, see Learn about eDiscovery.
Error remediation allows eDiscovery administrators the ability to rectify data issues that prevent Microsoft Purview eDiscovery (Premium) from properly processing the content. For example, files that are password protected can't be processed since the files are locked or encrypted. Using error remediation, eDiscovery administrators can download files with such errors, remove the password protection, and then upload the remediated files.
Use the following workflow to remediate files with errors in eDiscovery (Premium) cases.
Tip
If you're not an E5 customer, use the 90-day Microsoft Purview solutions trial to explore how additional Purview capabilities can help your organization manage data security and compliance needs. Start now at the Microsoft Purview trials hub. Learn details about signing up and trial terms.
Create an error remediation session to remediate files with processing errors
Note
If the the error remediation workflow is closed at any time during the following procedure, you can return to the error remediation session from the Processing tab by selecting Remediations in the View drop-down menu.
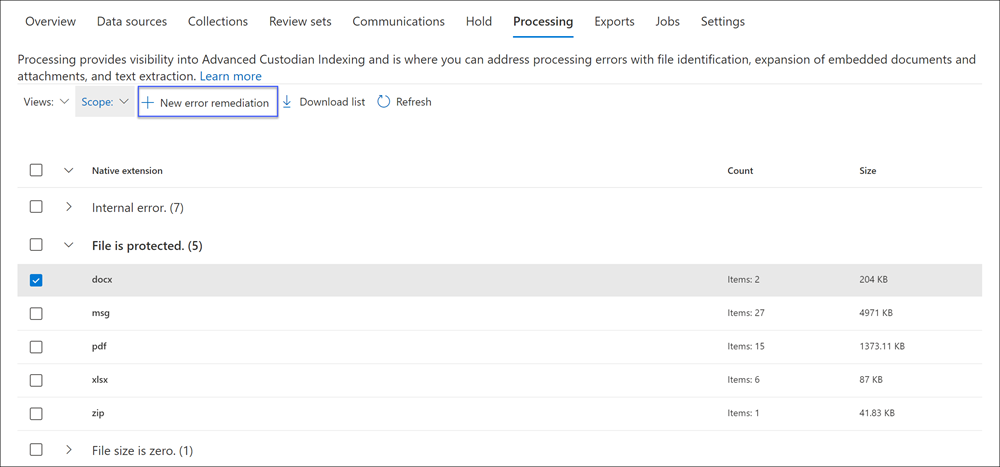
On the Processing tab in the eDiscovery (Premium) case, select Errors in the View drop-down menu and then select a review set in the Scope drop-down menu. You must select a review set in the scope to start the remediation of any errors. After you've selected the scope, this section displays errors from the specific review set.

Select the errors you want to remediate by selecting either the error type or file type option. In the following example, we're remediating a password protected file.
Select New error remediation.
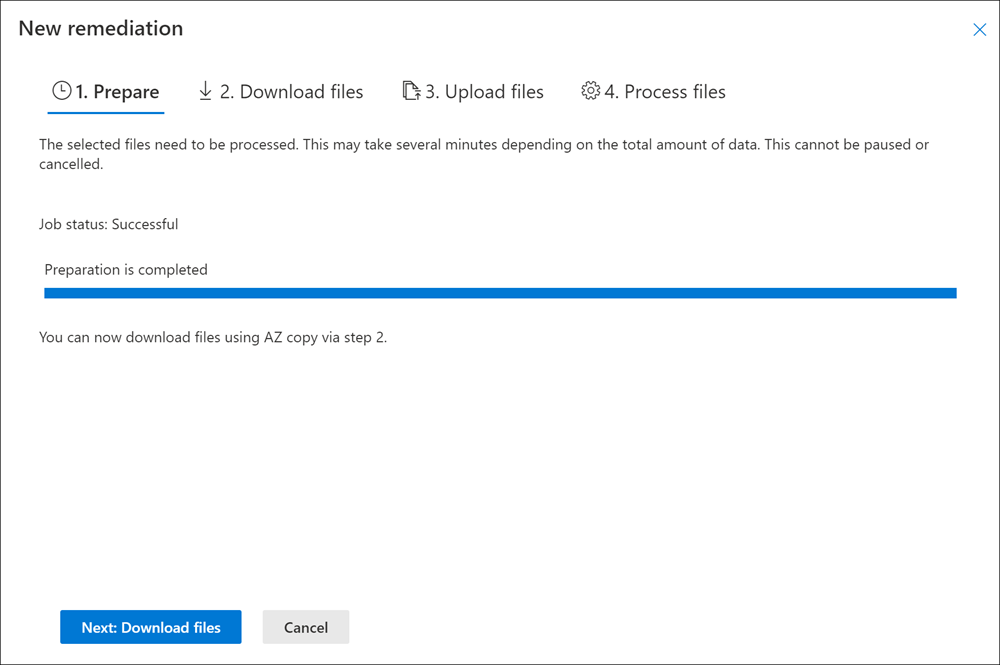
The error remediation workflow starts with a preparation stage where the files with errors are copied to a Microsoft-provided Azure Storage location so that you can download them to your local computer to remediate.

After the preparation is complete, select Next: Download files to proceed with download.

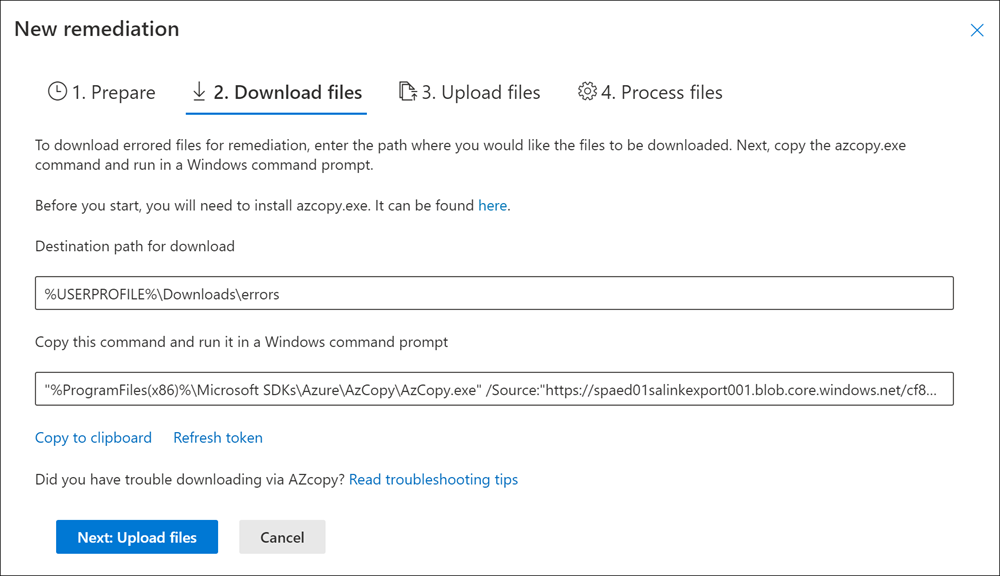
To download files, specify the Destination path for download. This is a path to the parent folder on your local computer where the file will be downloaded. The default path, %USERPROFILE%\Downloads\errors, points to the logged-in user's downloads folder. You can change this path if desired. If you do change it, we recommend that you use a local file path for the best performance. Don't use a remote network path. For example, you could use the path C:\Remediation.
The path to the parent folder is automatically added to AzCopy command (as the value of the /Dest parameter).
Copy the predefined command by selecting Copy to clipboard. Open a Windows Command Prompt, paste the AzCopy command, and then press Enter.
Note
You should use the latest version of AzCopy to successfully use the command that's provided on the Download files page. You also must use AzCopy to upload the files in step 10. To install the latest version of AzCopy, see Get started with AzCopy. If the supplied AzCopy command fails, see Troubleshoot AzCopy in eDiscovery (Premium).
The files that you selected are downloaded to the location that you specified in step 5. In the parent folder (for example, C:\Remediation), the following subfolder structure is automatically created:
<Parent folder>\Subfolder 1\Subfolder 2\<file>- Subfolder 1 is named with the ID for the case or the review set, depending on the scope that you selected in step 1.
- Subfolder 2 is named with the file ID of the downloaded file
- The downloaded file is located in Subfolder 2 and is also named with the file ID.
Here's an example of the folder path and error file name that's created when items are downloaded to the C:\Remediation parent folder:
C:\Remediation\232f8b7e-089c-4781-88c6-210da0615d32\d1459499146268a096ea20202cd029857d64087706e6d6ca2a224970ae3b8938\d1459499146268a096ea20202cd029857d64087706e6d6ca2a224970ae3b8938.docxIf multiple files are downloaded, each one is downloaded to a subfolder that's named with the file ID.
Important
When you upload files in step 9 and step 10, the remediated files must have that same filename and be located in the same subfolder structure. The subfolder and file names are used to associated the remediated file with the original error file. If the folder structure or file names are changed, you'll receive the following error:
Cannot apply Error Remediation to the current Workingset. To prevent any issues, we recommend that keep the remediated files in the same parent folder and subfolder structure.After downloading the files, you can remediate them with an appropriate tool. For password-protected files, there are several password cracking tools you can use. If you know the passwords for the files, you can open them and remove the password protection.
Return to eDiscovery (Premium) and the error remediation workflow and then select Next: Upload files. This moves to the next page where you can now upload the files.

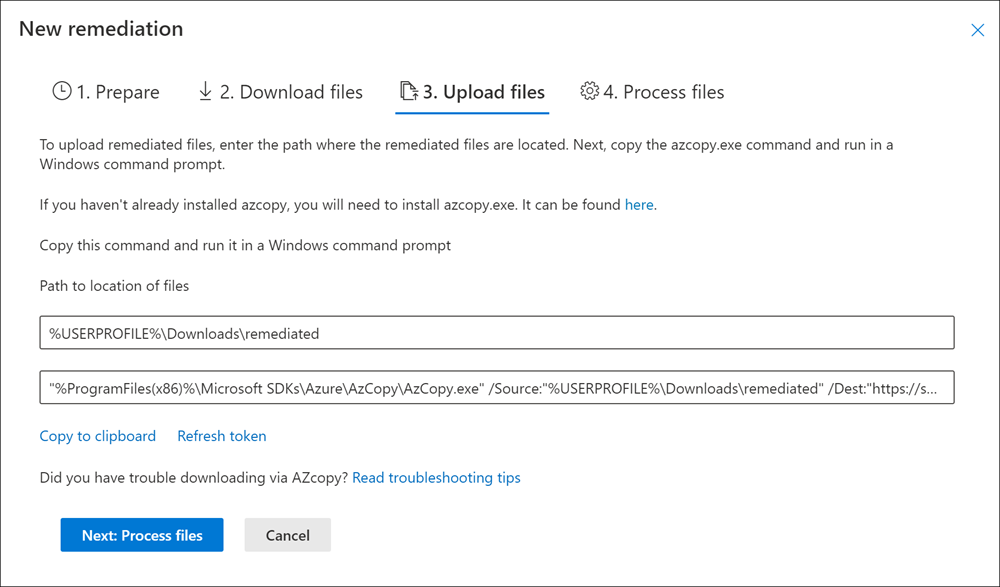
Specify the parent folder where the remediated files are located in the Path to location of files text box. Again, the parent folder must have the same subfolder structure that was created when you downloaded the files.
The path to the parent folder is automatically added to AzCopy command (as the value of the /Source parameter).
Copy the predefined command by selecting Copy to clipboard. Open a Windows Command Prompt, paste the AzCopy command, and then press Enter. upload the files.
After you run the AzCopy command, select Next: Process files.
When processing is complete, you can go to review set and view the remediated files.
Remediating errors in container files
In situations when the contents of a container file (such as a .zip file) can't be extracted by eDiscovery (Premium), the containers can be downloaded and the contents expanded into the same folder in which the original container resides. The expanded files will be attributed to the parent container as if it was originally expanded by eDiscovery (Premium). The process works as described previously except for uploading a single file as the replacement file. When you upload remediated files, don't include the original container file.
Remediating errors by uploading the extracted text
Sometimes it's not possible to remediate a file to native format that eDiscovery (Premium) can interpret. But you can replace the original file with a text file that contains the original text of the native file (in a process called text overlay). To do this, follow the steps described in this article but instead of remediating the original file in the native format, you would create a text file that contains the extracted text from the original file, and then upload the text file using the original filename appended with a .txt suffix.
For example, you download a file during error remediation with the filename 335850cc-6602-4af0-acfa-1d14d9128ca2.abc. You open the file in the native application, copy the text, and then paste it into a new file named 335850cc-6602-4af0-acfa-1d14d9128ca2.abc.txt. When you do this, be sure to remove the original file in the native format from the remediated file location on your local computer before uploading the remediated text file to eDiscovery (Premium).
Note
The number of of files used in error remediation upload must match the number of files downloaded from the review set. If the number of uploaded files doesn't match the number of downloaded files, the matching process will fail (even if AzCopy reports that the upload was successful).
What happens when files are remediated
When remediated files are uploaded, the original metadata is preserved except for the following fields:
- ExtractedTextSize
- HasText
- IsErrorRemediate
- LoadId
- ProcessingErrorMessage
- ProcessingStatus
- Text
- WordCount
- WorkingsetId
For a definition of all metadata fields in eDiscovery (Premium), see Document metadata fields.