Table Views in Xamarin.Mac
This article covers working with table views in a Xamarin.Mac application. It describes creating table views in Xcode and Interface Builder and interacting with them in code.
When working with C# and .NET in a Xamarin.Mac application, you have access to the same Table Views that a developer working in Objective-C and Xcode does. Because Xamarin.Mac integrates directly with Xcode, you can use Xcode's Interface Builder to create and maintain your Table Views (or optionally create them directly in C# code).
A Table View displays data in a tabular format containing one or more columns of information in multiple rows. Based on the type of Table View being created, the user can sort by column, reorganize columns, add columns, remove columns or edit the data contained within the table.
In this article, we'll cover the basics of working with Table Views in a Xamarin.Mac application. It is highly suggested that you work through the Hello, Mac article first, specifically the Introduction to Xcode and Interface Builder and Outlets and Actions sections, as it covers key concepts and techniques that we'll be using in this article.
You may want to take a look at the Exposing C# classes / methods to Objective-C section of the Xamarin.Mac Internals document as well, it explains the Register and Export commands used to wire-up your C# classes to Objective-C objects and UI Elements.
Introduction to Table Views
A Table View displays data in a tabular format containing one or more columns of information in multiple rows. Table Views are displayed inside of Scroll Views (NSScrollView) and starting with macOS 10.7, you can use any NSView instead of Cells (NSCell) to display both rows and columns. That said, you can still use NSCell however, you'll typically subclass NSTableCellView and create your custom rows and columns.
A Table View does not store it's own data, instead it relies on a Data Source (NSTableViewDataSource) to provide both the rows and columns required, on a as-needed basis.
A Table View's behavior can be customized by providing a subclass of the Table View Delegate (NSTableViewDelegate) to support table column management, type to select functionality, row selection and editing, custom tracking, and custom views for individual columns and rows.
When creating Table Views, Apple suggests the following:
- Allow the user to sort the table by clicking on a Column Headers.
- Create Column Headers that are nouns or short noun phrases that describe the data being shown in that column.
For more information, please see the Content Views section of Apple's OS X Human Interface Guidelines.
Creating and Maintaining Table Views in Xcode
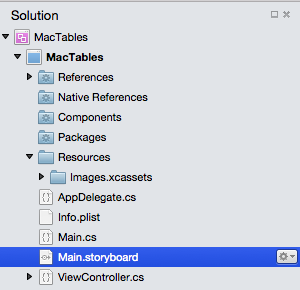
When you create a new Xamarin.Mac Cocoa application, you get a standard blank, window by default. This windows is defined in a .storyboard file automatically included in the project. To edit your windows design, in the Solution Explorer, double click the Main.storyboard file:
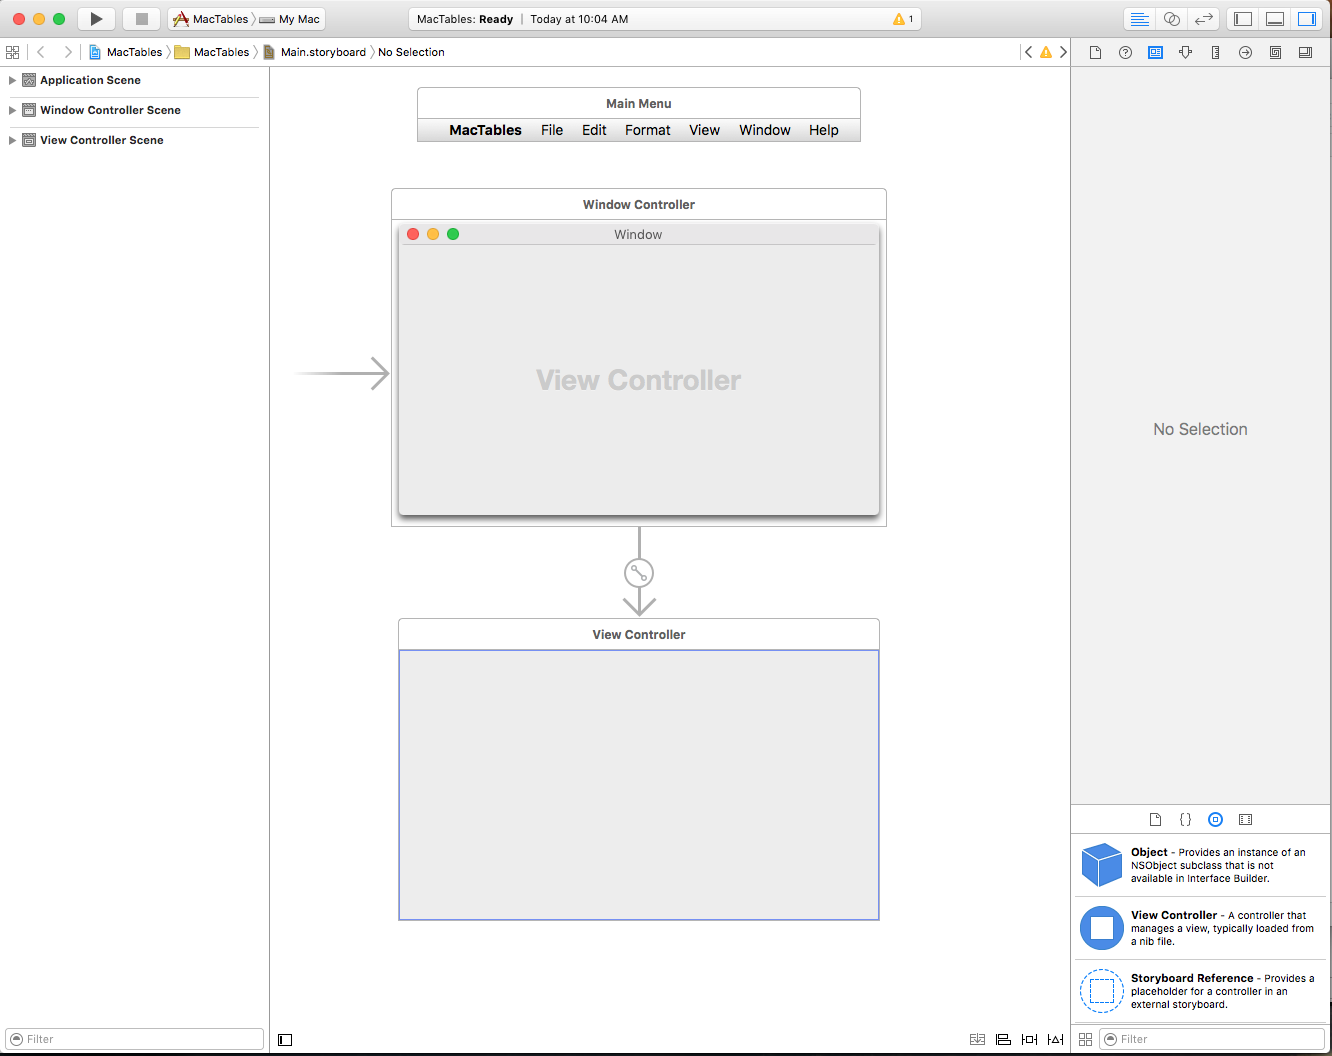
This will open the window design in Xcode's Interface Builder:
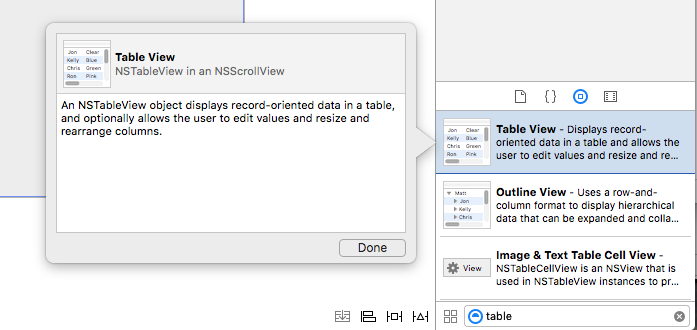
Type table into the Library Inspector's Search Box to make it easier to find the Table View controls:
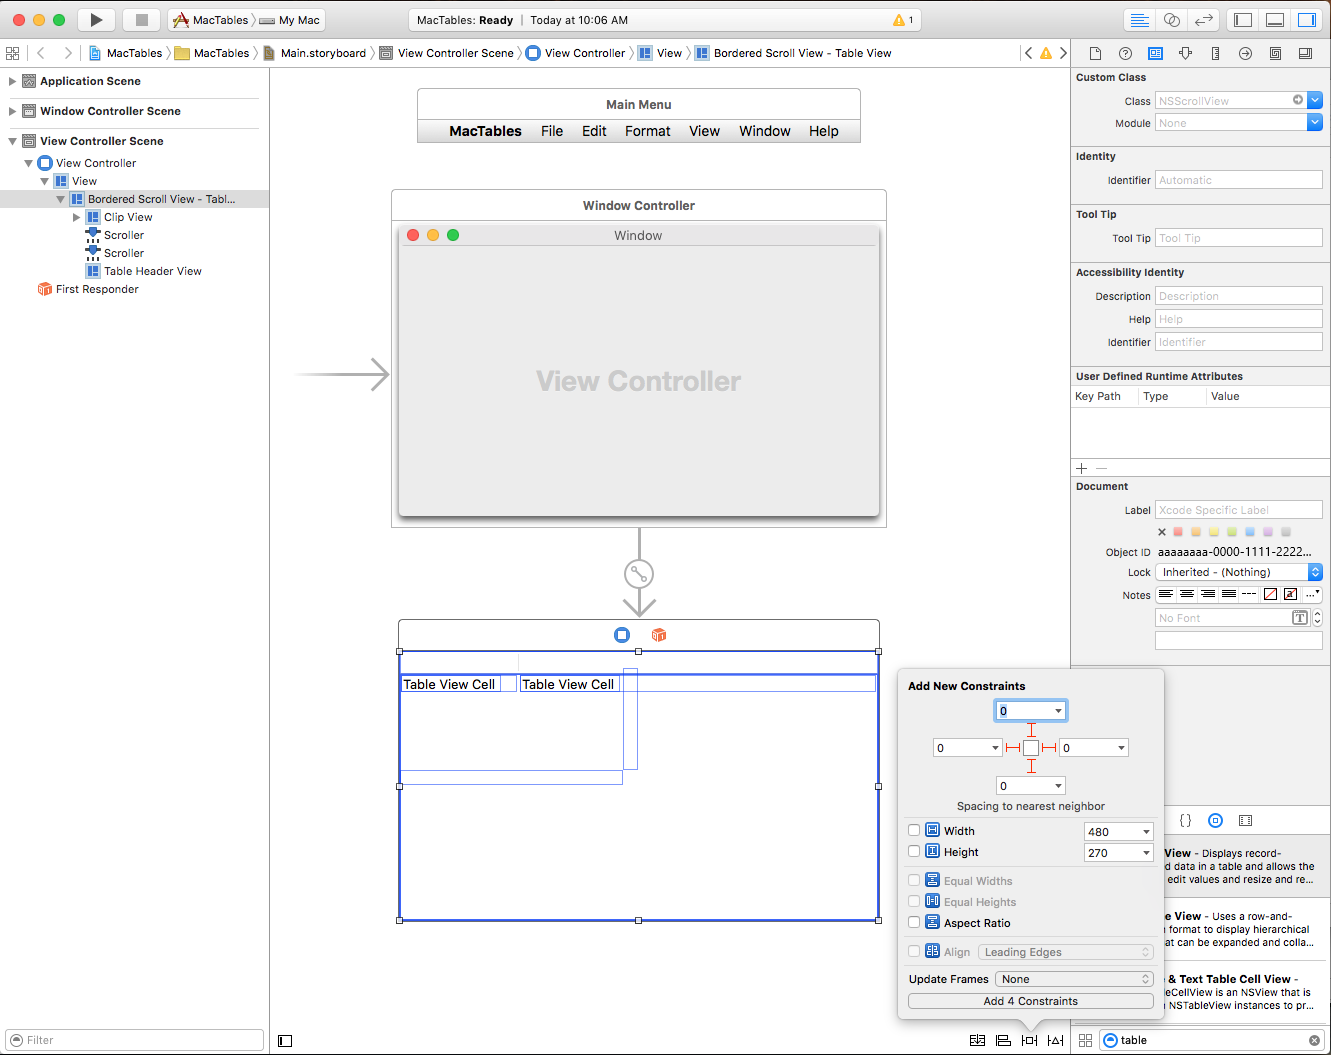
Drag a Table View onto the View Controller in the Interface Editor, make it fill the content area of the View Controller and set it to where it shrinks and grows with the window in the Constraint Editor:
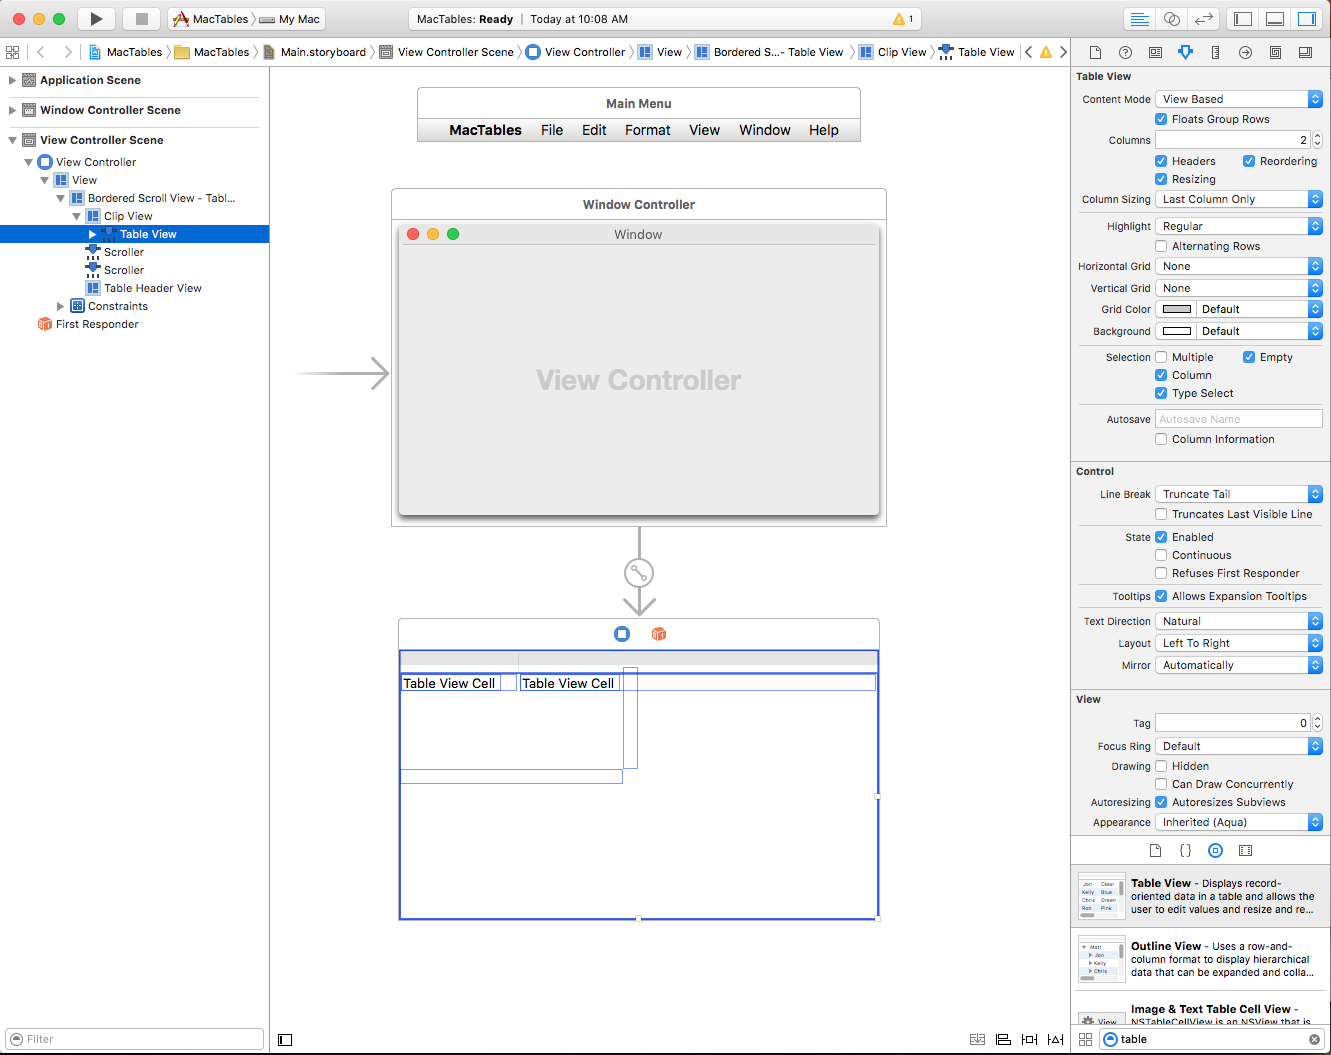
Select the Table View in the Interface Hierarchy and the following properties are available in the Attribute Inspector:
- Content Mode - Allows you to use either Views (
NSView) or Cells (NSCell) to display the data in the rows and columns. Starting with macOS 10.7, you should use Views. - Floats Group Rows - If
true, the Table View will draw grouped cells as if they are floating. - Columns - Defines the number of columns displayed.
- Headers - If
true, the columns will have Headers. - Reordering - If
true, the user will be able to drag reorder the columns in the table. - Resizing - If
true, the user will be able to drag column Headers to resize columns. - Column Sizing - Controls how the table will auto size columns.
- Highlight - Controls the type of highlighting the table uses when a cell is selected.
- Alternate Rows - If
true, ever other row will have a different background color. - Horizontal Grid - Selects the type of border drawn between cells horizontally.
- Vertical Grid - Selects the type of border drawn between cells vertically.
- Grid Color - Sets the cell border color.
- Background - Sets the cell background color.
- Selection - Allow you to control how the user can select cells in the table as:
- Multiple - If
true, the user can select multiple rows and columns. - Column - If
true,the user can select columns. - Type Select - If
true, the user can type a character to select a row. - Empty - If
true, the user is not required to select a row or column, the table allows for no selection at all.
- Multiple - If
- Autosave - The name that the tables format is automatically save under.
- Column Information - If
true, the order and width of the columns will be automatically saved. - Line Breaks - Select how the cell handles line breaks.
- Truncates Last Visible Line - If
true, the cell will be truncated in the data can not fit inside it's bounds.
Important
Unless you are maintaining a legacy Xamarin.Mac application, NSView based Table Views should be used over NSCell based Table Views. NSCell is considered legacy and may not be supported going forward.
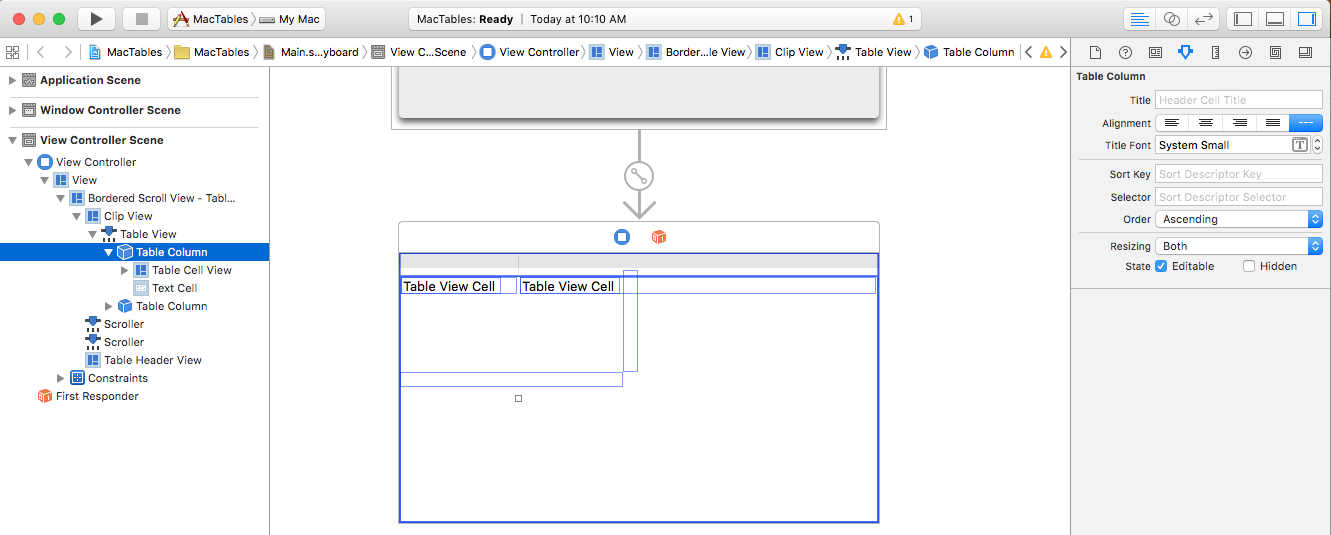
Select a Table Column in the Interface Hierarchy and the following properties are available in the Attribute Inspector:
- Title - Sets the title of the column.
- Alignment - Set the alignment of the text within the cells.
- Title Font - Selects the font for the cell's Header text.
- Sort Key - Is the key used to sort data in the column. Leave blank if the user cannot sort this column.
- Selector - Is the Action used to perform the sort. Leave blank if the user cannot sort this column.
- Order - Is the sort order for the columns data.
- Resizing - Selects the type of resizing for the column.
- Editable - If
true, the user can edit cells in a cell based table. - Hidden - If
true, the column is hidden.
You can also resize the column by dragging it's handle (vertically centered on the column's right side) left or right.
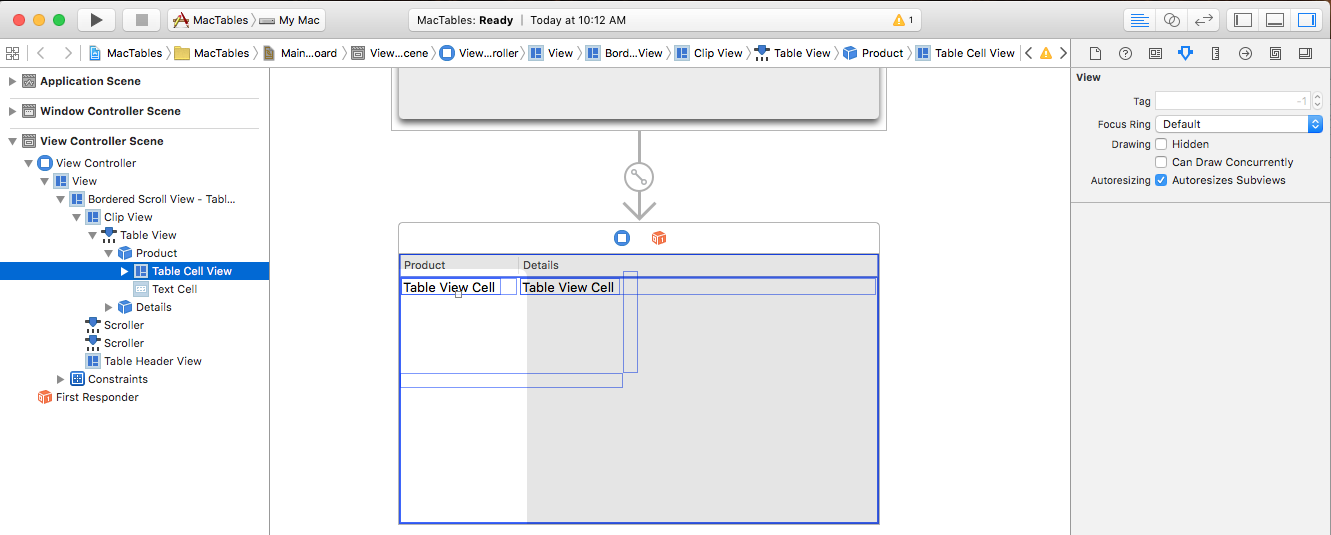
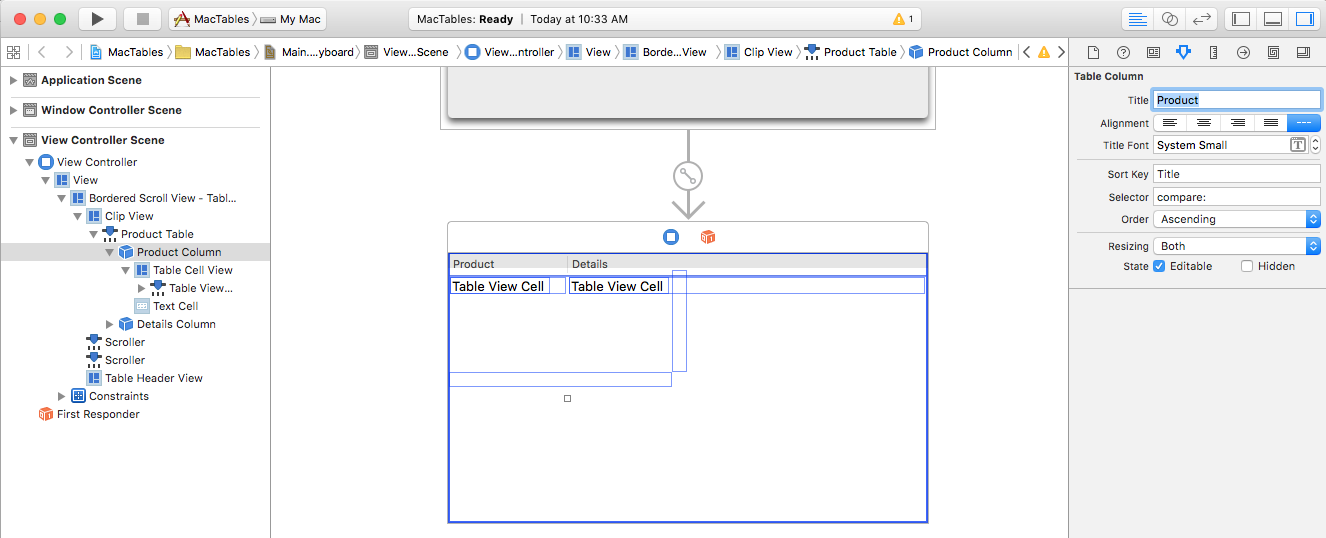
Let's select the each Column in our Table View and give the first column a Title of Product and the second one Details.
Select a Table Cell View (NSTableViewCell) in the Interface Hierarchy and the following properties are available in the Attribute Inspector:
These are all of the properties of a standard View. You also have the option of resizing the rows for this column here.
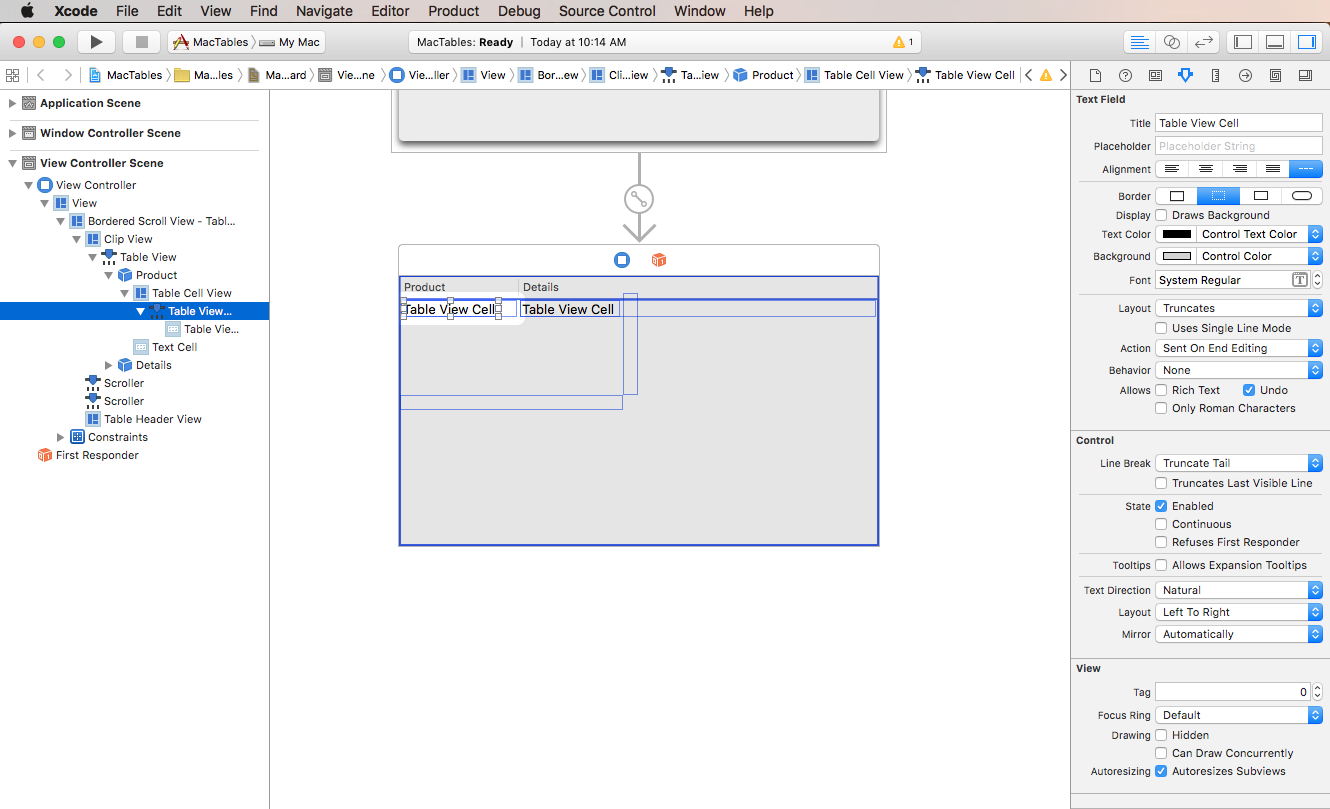
Select a Table View Cell (by default, this is a NSTextField) in the Interface Hierarchy and the following properties are available in the Attribute Inspector:
You'll have all the properties of a standard text field to set here. By default, a standard Text Field is used to display data for a cell in a column.
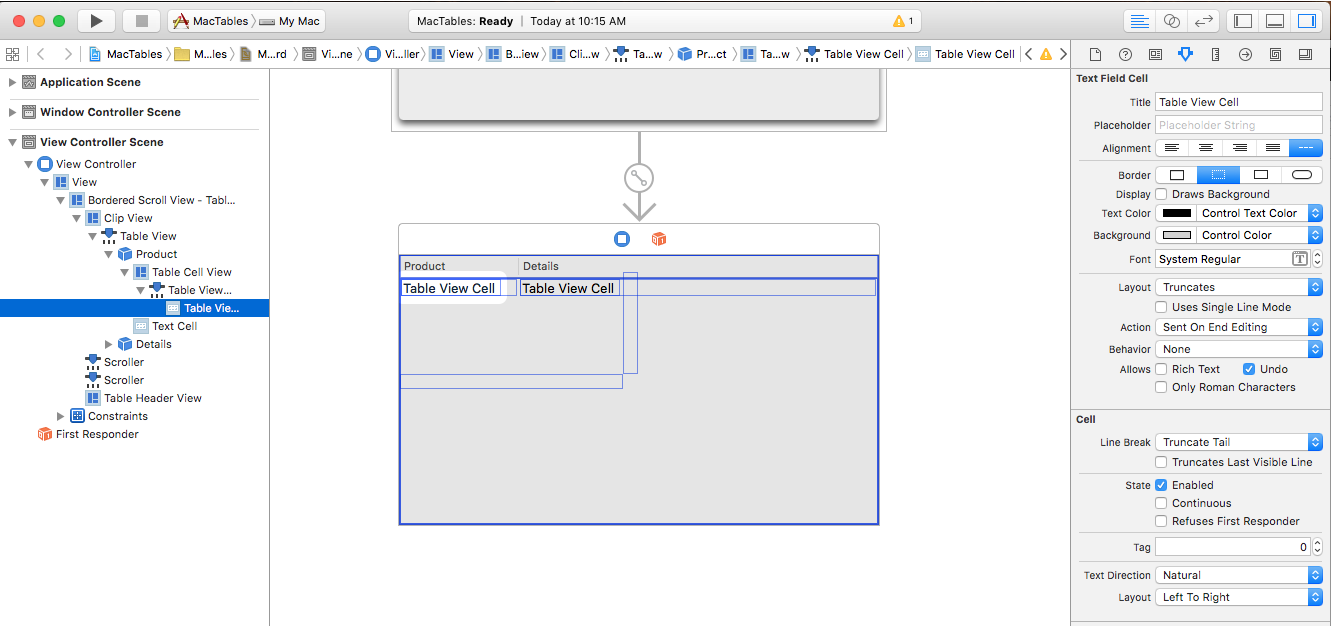
Select a Table Cell View (NSTableFieldCell) in the Interface Hierarchy and the following properties are available in the Attribute Inspector:
The most important settings here are:
- Layout - Select how cells in this column are laid out.
- Uses Single Line Mode - If
true, the cell is limited to a single line. - First Runtime Layout Width - If
true, the cell will prefer the width set for it (either manually or automatically) when it is displayed the first time the application is run. - Action - Controls when the Edit Action is sent for the cell.
- Behavior - Defines if a cell is selectable or editable.
- Rich Text - If
true, the cell can display formatted and styled text. - Undo - If
true, the cell assumes responsibility for it's undo behavior.
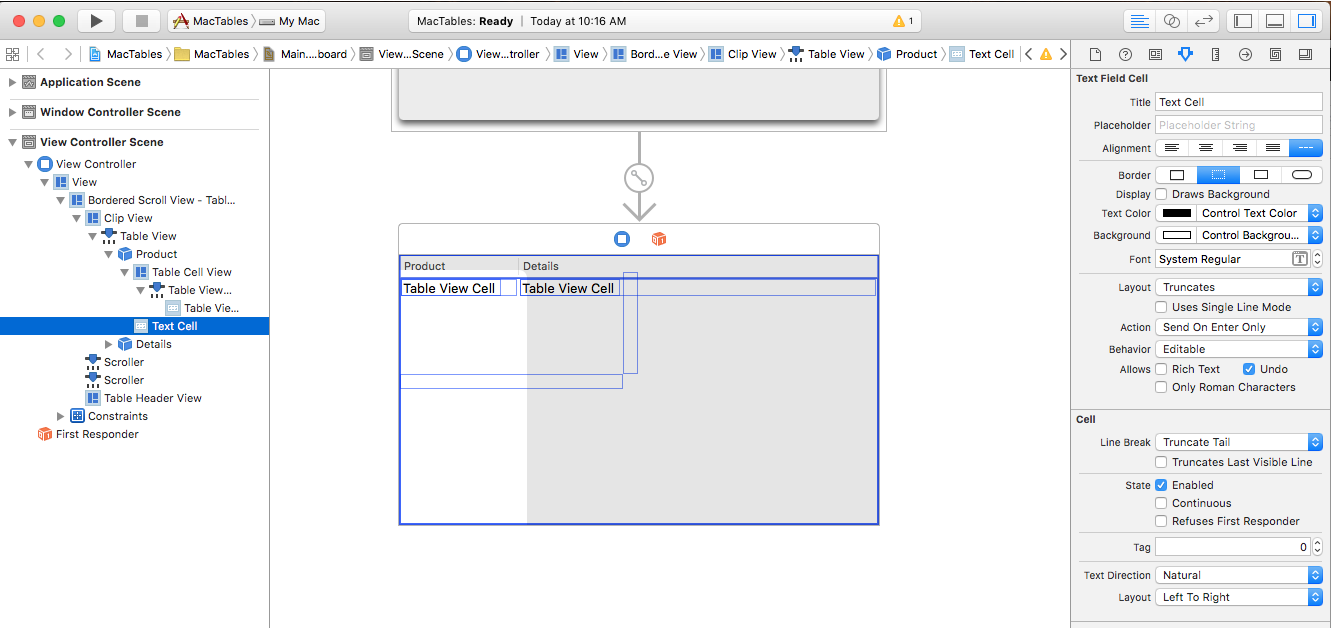
Select the Table Cell View (NSTableFieldCell) at the bottom of a Table Column in the Interface Hierarchy:
This allows you to edit the Table Cell View used as the base Pattern for all cells created for the given column.
Adding Actions and Outlets
Just like any other Cocoa UI control, we need to expose our Table View and it's columns and cells to C# code using Actions and Outlets (based on the functionality required).
The process is the same for any Table View element that we want to expose:
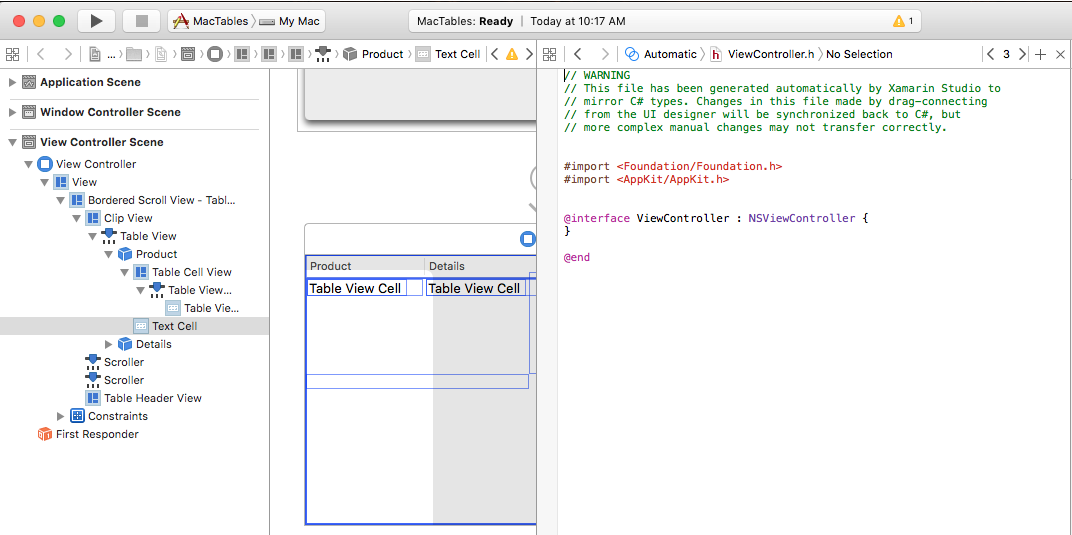
Switch to the Assistant Editor and ensure that the
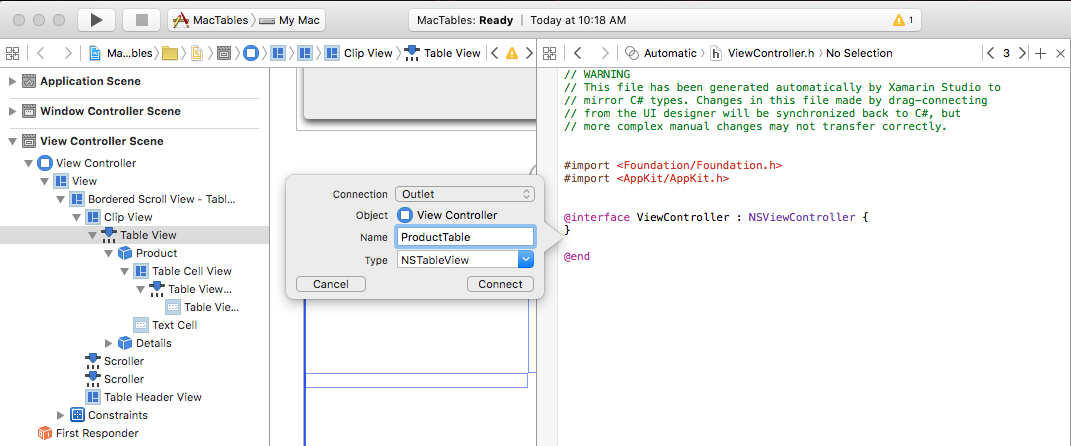
ViewController.hfile is selected:Select the Table View from the Interface Hierarchy, control-click and drag to the
ViewController.hfile.Create an Outlet for the Table View called
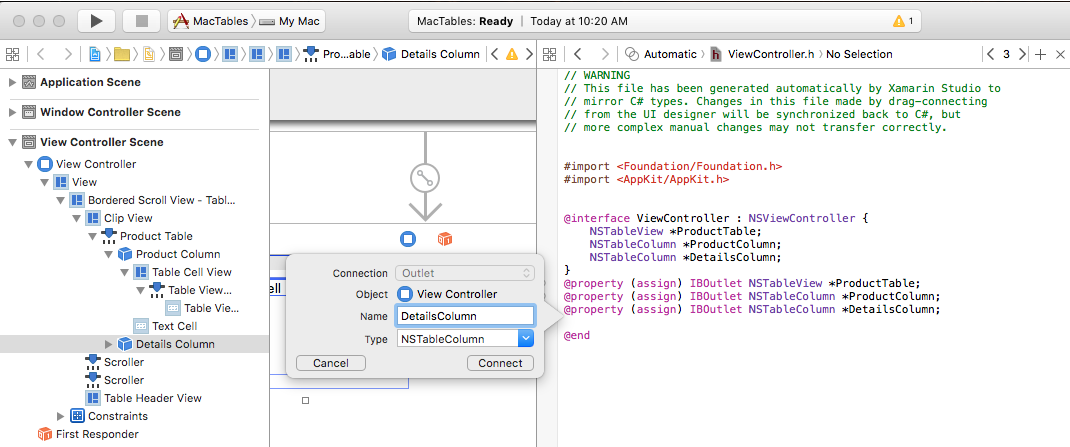
ProductTable:Create Outlets for the tables columns as well called
ProductColumnandDetailsColumn:Save you changes and return to Visual Studio for Mac to sync with Xcode.
Next, we'll write the code display some data for the table when the application is run.
Populating the Table View
With our Table View designed in Interface Builder and exposed via an Outlet, next we need to create the C# code to populate it.
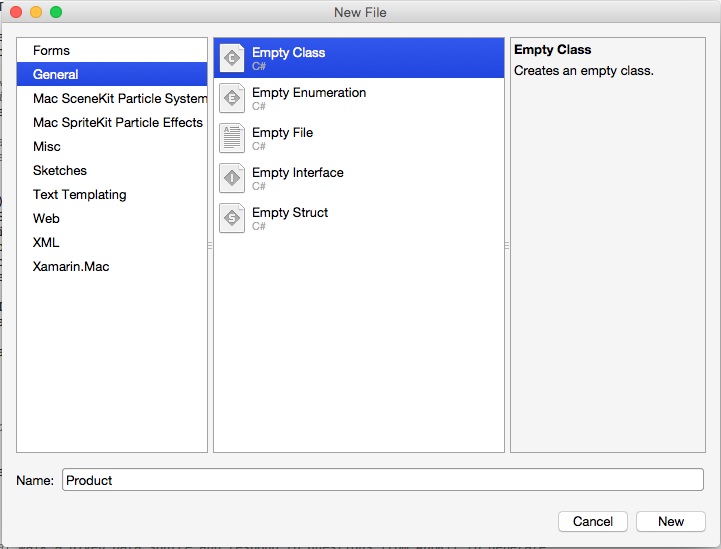
First, let's create a new Product class to hold the information for the individual rows. In the Solution Explorer, right-click the Project and select Add > New File... Select General > Empty Class, enter Product for the Name and click the New button:
Make the Product.cs file look like the following:
using System;

namespace MacTables
{
  public class Product
  {
    #region Computed Properties
    public string Title { get; set;} = "";
    public string Description { get; set;} = "";
    #endregion

    #region Constructors
    public Product ()
    {
    }

    public Product (string title, string description)
    {
      this.Title = title;
      this.Description = description;
    }
    #endregion
  }
}
Next, we need to create a subclass of NSTableDataSource to provide the data for our table as it is requested. In the Solution Explorer, right-click the Project and select Add > New File... Select General > Empty Class, enter ProductTableDataSource for the Name and click the New button.
Edit the ProductTableDataSource.cs file and make it look like the following:
using System;
using AppKit;
using CoreGraphics;
using Foundation;
using System.Collections;
using System.Collections.Generic;

namespace MacTables
{
  public class ProductTableDataSource : NSTableViewDataSource
  {
    #region Public Variables
    public List<Product> Products = new List<Product>();
    #endregion

    #region Constructors
    public ProductTableDataSource ()
    {
    }
    #endregion

    #region Override Methods
    public override nint GetRowCount (NSTableView tableView)
    {
      return Products.Count;
    }
    #endregion
  }
}
This class has storage for our Table View's items and overrides the GetRowCount to return the number of rows in the table.
Finally, we need to create a subclass of NSTableDelegate to provide the behavior for our table. In the Solution Explorer, right-click the Project and select Add > New File... Select General > Empty Class, enter ProductTableDelegate for the Name and click the New button.
Edit the ProductTableDelegate.cs file and make it look like the following:
using System;
using AppKit;
using CoreGraphics;
using Foundation;
using System.Collections;
using System.Collections.Generic;

namespace MacTables
{
  public class ProductTableDelegate: NSTableViewDelegate
  {
    #region Constants
    private const string CellIdentifier = "ProdCell";
    #endregion

    #region Private Variables
    private ProductTableDataSource DataSource;
    #endregion

    #region Constructors
    public ProductTableDelegate (ProductTableDataSource datasource)
    {
      this.DataSource = datasource;
    }
    #endregion

    #region Override Methods
    public override NSView GetViewForItem (NSTableView tableView, NSTableColumn tableColumn, nint row)
    {
      // This pattern allows you reuse existing views when they are no-longer in use.
      // If the returned view is null, you instance up a new view
      // If a non-null view is returned, you modify it enough to reflect the new data
      NSTextField view = (NSTextField)tableView.MakeView (CellIdentifier, this);
      if (view == null) {
        view = new NSTextField ();
        view.Identifier = CellIdentifier;
        view.BackgroundColor = NSColor.Clear;
        view.Bordered = false;
        view.Selectable = false;
        view.Editable = false;
      }

      // Setup view based on the column selected
      switch (tableColumn.Title) {
      case "Product":
        view.StringValue = DataSource.Products [(int)row].Title;
        break;
      case "Details":
        view.StringValue = DataSource.Products [(int)row].Description;
        break;
      }

      return view;
    }
    #endregion
  }
}
When we create an instance of the ProductTableDelegate, we also pass in an instance of the ProductTableDataSource that provides the data for the table. The GetViewForItem method is responsible for returning a view (data) to display the cell for a give column and row. If possible, an existing view will be reused to display the cell, if not a new view must be created.
To populate the table, let's edit the ViewController.cs file and make the AwakeFromNib method look like the following:
public override void AwakeFromNib ()
{
  base.AwakeFromNib ();

  // Create the Product Table Data Source and populate it
  var DataSource = new ProductTableDataSource ();
  DataSource.Products.Add (new Product ("Xamarin.iOS", "Allows you to develop native iOS Applications in C#"));
  DataSource.Products.Add (new Product ("Xamarin.Android", "Allows you to develop native Android Applications in C#"));
  DataSource.Products.Add (new Product ("Xamarin.Mac", "Allows you to develop Mac native Applications in C#"));

  // Populate the Product Table
  ProductTable.DataSource = DataSource;
  ProductTable.Delegate = new ProductTableDelegate (DataSource);
}
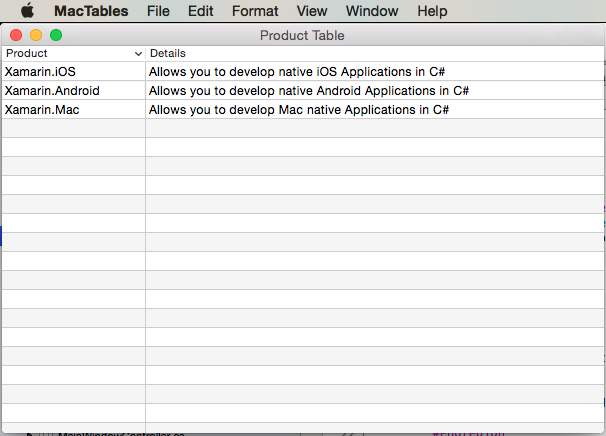
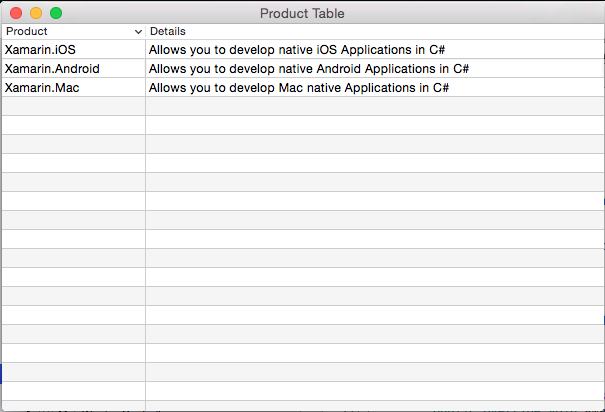
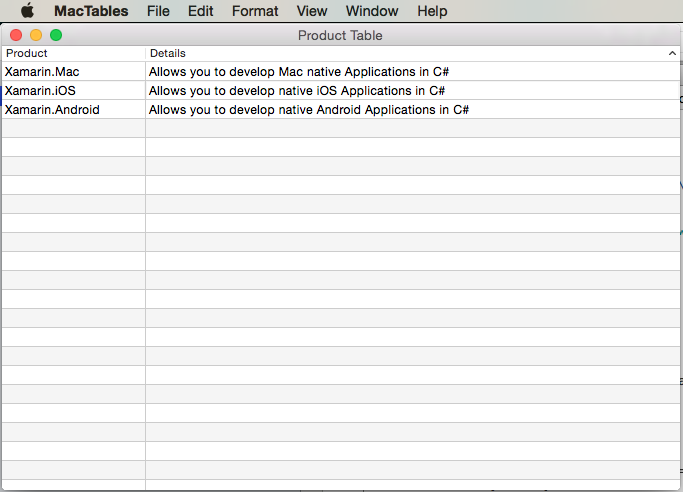
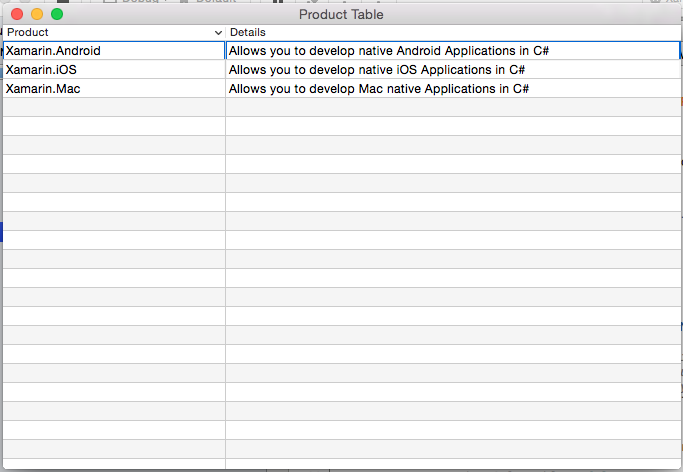
If we run the application, the following is displayed:
Sorting by Column
Let's allow the user to sort the data in the table by clicking on a Column Header. First, double-click the Main.storyboard file to open it for editing in Interface Builder. Select the Product column, enter Title for the Sort Key, compare: for the Selector and select Ascending for the Order:
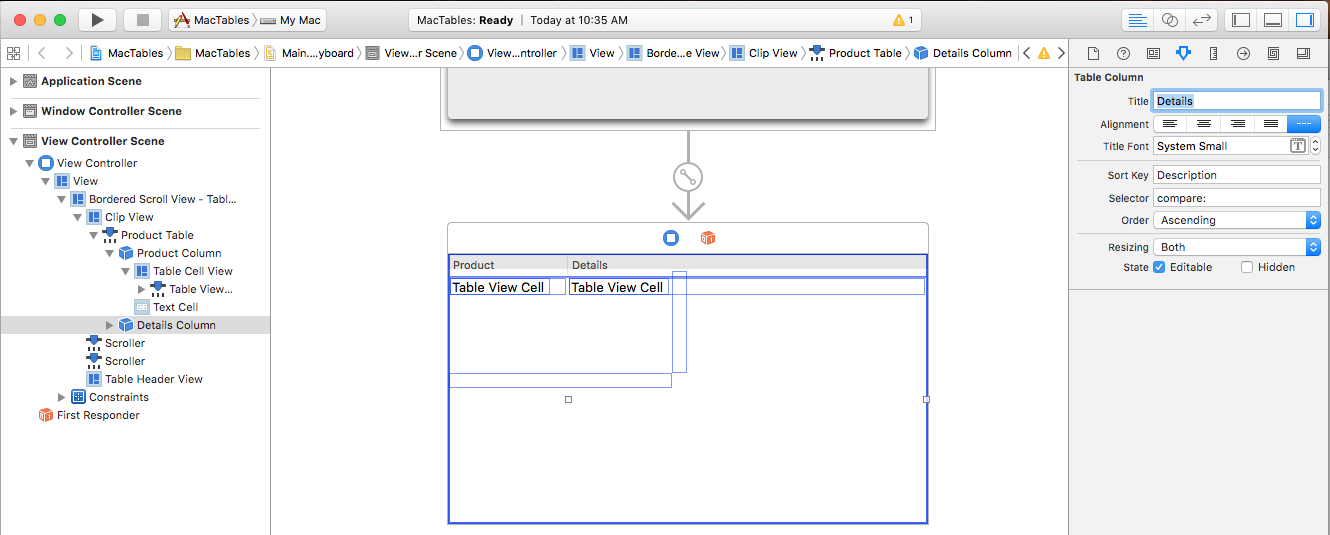
Select the Details column, enter Description for the Sort Key, compare: for the Selector and select Ascending for the Order:
Save your changes and return to Visual Studio for Mac to sync with Xcode.
Now let's edit the ProductTableDataSource.cs file and add the following methods:
public void Sort(string key, bool ascending) {

  // Take action based on key
  switch (key) {
  case "Title":
    if (ascending) {
      Products.Sort ((x, y) => x.Title.CompareTo (y.Title));
    } else {
      Products.Sort ((x, y) => -1 * x.Title.CompareTo (y.Title));
    }
    break;
  case "Description":
    if (ascending) {
      Products.Sort ((x, y) => x.Description.CompareTo (y.Description));
    } else {
      Products.Sort ((x, y) => -1 * x.Description.CompareTo (y.Description));
    }
    break;
  }

}

public override void SortDescriptorsChanged (NSTableView tableView, NSSortDescriptor[] oldDescriptors)
{
  // Sort the data
  if (oldDescriptors.Length > 0) {
    // Update sort
    Sort (oldDescriptors [0].Key, oldDescriptors [0].Ascending);
  } else {
    // Grab current descriptors and update sort
    NSSortDescriptor[] tbSort = tableView.SortDescriptors;
    Sort (tbSort[0].Key, tbSort[0].Ascending);
  }

  // Refresh table
  tableView.ReloadData ();
}
The Sort method allow us to sort the data in the Data Source based on a given Product class field in either ascending or descending order. The overridden SortDescriptorsChanged method will be called every time the use clicks on a Column Heading. It will be passed the Key value that we set in Interface Builder and the sort order for that column.
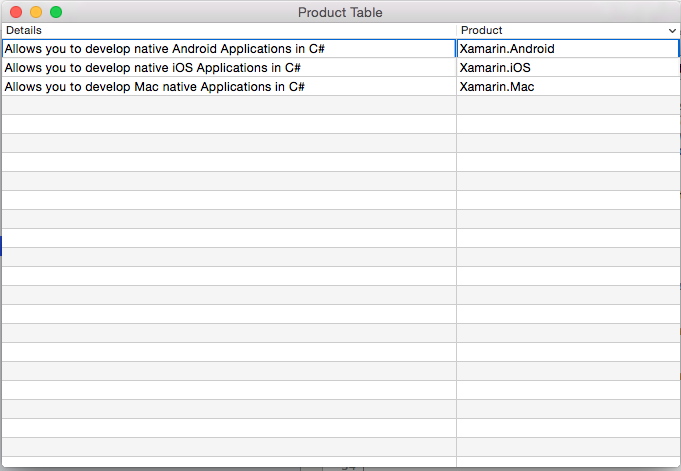
If we run the application and click in the Column Headers, the rows will be sorted by that column:
Row Selection
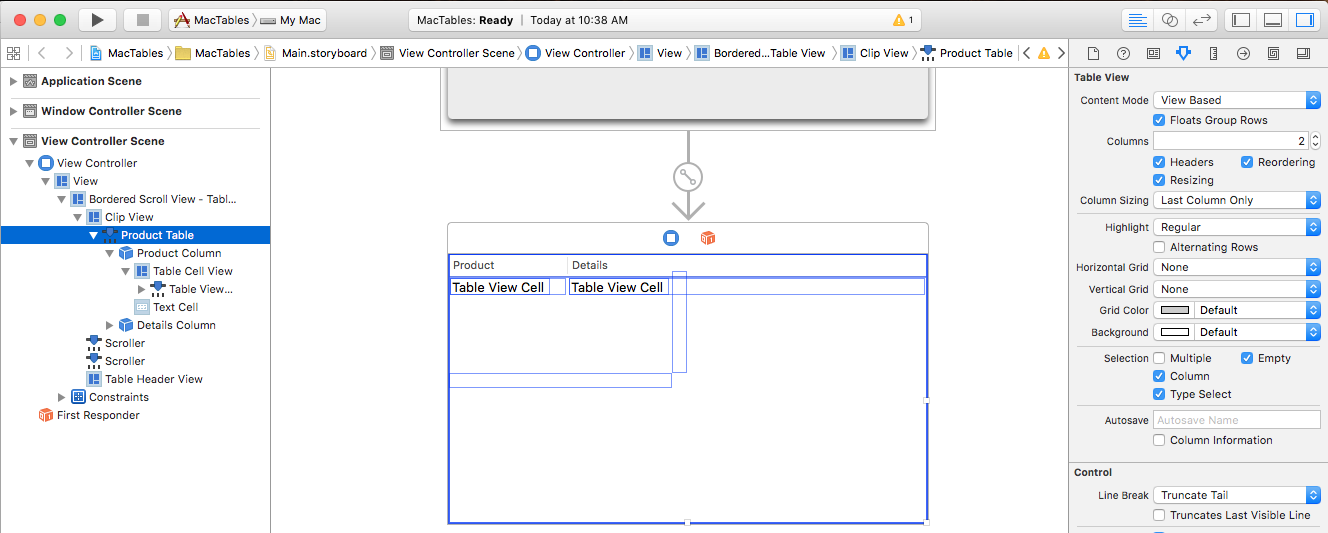
If you want to allow the user to select a single row, double-click the Main.storyboard file to open it for editing in Interface Builder. Select the Table View in the Interface Hierarchy and uncheck the Multiple checkbox in the Attribute Inspector:
Save your changes and return to Visual Studio for Mac to sync with Xcode.
Next, edit the ProductTableDelegate.cs file and add the following method:
public override bool ShouldSelectRow (NSTableView tableView, nint row)
{
  return true;
}
This will allow the user to select any single row in the Table View. Return false for the ShouldSelectRow for any row that you don't want the user to be able to select or false for every row if you don't want the user to be able to select any rows.
The Table View (NSTableView) contains the following methods for working with row selection:
DeselectRow(nint)- Deselects the given row in the table.SelectRow(nint,bool)- Selects the given row. Passfalsefor the second parameter to select only one row at a time.SelectedRow- Returns the current row selected in the table.IsRowSelected(nint)- Returnstrueif the given row is selected.
Multiple Row Selection
If you want to allow the user to select a multiple rows, double-click the Main.storyboard file to open it for editing in Interface Builder. Select the Table View in the Interface Hierarchy and check the Multiple checkbox in the Attribute Inspector:
Save your changes and return to Visual Studio for Mac to sync with Xcode.
Next, edit the ProductTableDelegate.cs file and add the following method:
public override bool ShouldSelectRow (NSTableView tableView, nint row)
{
  return true;
}
This will allow the user to select any single row in the Table View. Return false for the ShouldSelectRow for any row that you don't want the user to be able to select or false for every row if you don't want the user to be able to select any rows.
The Table View (NSTableView) contains the following methods for working with row selection:
DeselectAll(NSObject)- Deselects all rows in the table. Usethisfor the first parameter to send in the object doing the selecting.DeselectRow(nint)- Deselects the given row in the table.SelectAll(NSobject)- Selects all rows in the table. Usethisfor the first parameter to send in the object doing the selecting.SelectRow(nint,bool)- Selects the given row. Passfalsefor the second parameter clear the selection and select only a single row, passtrueto extend the selection and include this row.SelectRows(NSIndexSet,bool)- Selects the given set of rows. Passfalsefor the second parameter clear the selection and select only a these rows, passtrueto extend the selection and include these rows.SelectedRow- Returns the current row selected in the table.SelectedRows- Returns aNSIndexSetcontaining the indexes of the selected rows.SelectedRowCount- Returns the number of selected rows.IsRowSelected(nint)- Returnstrueif the given row is selected.
Type to Select Row
If you want to allow the user to type a character with the Table View selected and select the first row that has that character, double-click the Main.storyboard file to open it for editing in Interface Builder. Select the Table View in the Interface Hierarchy and check the Type Select checkbox in the Attribute Inspector:
Save your changes and return to Visual Studio for Mac to sync with Xcode.
Now let's edit the ProductTableDelegate.cs file and add the following method:
public override nint GetNextTypeSelectMatch (NSTableView tableView, nint startRow, nint endRow, string searchString)
{
  nint row = 0;
  foreach(Product product in DataSource.Products) {
    if (product.Title.Contains(searchString)) return row;

    // Increment row counter
    ++row;
  }

  // If not found select the first row
  return 0;
}
The GetNextTypeSelectMatch method takes the given searchString and returns the row of the first Product that has that string in it's Title.
If we run the application and type a character, a row is selected:
Reordering Columns
If you want to allow the user to drag reorder columns in the Table View, double-click the Main.storyboard file to open it for editing in Interface Builder. Select the Table View in the Interface Hierarchy and check the Reordering checkbox in the Attribute Inspector:
If we give a value for the Autosave property and check the Column Information field, any changes we make to the table's layout will automatically be saved for us and restored the next time the application is run.
Save your changes and return to Visual Studio for Mac to sync with Xcode.
Now let's edit the ProductTableDelegate.cs file and add the following method:
public override bool ShouldReorder (NSTableView tableView, nint columnIndex, nint newColumnIndex)
{
  return true;
}
The ShouldReorder method should return true for any column that it want to allow to be drag reordered into the newColumnIndex, else return false;
If we run the application, we can drag Column Headers around to reorder our columns:
Editing Cells
If you want to allow the user to edit the values for a given cell, edit the ProductTableDelegate.cs file and change the GetViewForItem method as follows:
public override NSView GetViewForItem (NSTableView tableView, NSTableColumn tableColumn, nint row)
{
  // This pattern allows you reuse existing views when they are no-longer in use.
  // If the returned view is null, you instance up a new view
  // If a non-null view is returned, you modify it enough to reflect the new data
  NSTextField view = (NSTextField)tableView.MakeView (tableColumn.Title, this);
  if (view == null) {
    view = new NSTextField ();
    view.Identifier = tableColumn.Title;
    view.BackgroundColor = NSColor.Clear;
    view.Bordered = false;
    view.Selectable = false;
    view.Editable = true;

    view.EditingEnded += (sender, e) => {

      // Take action based on type
      switch(view.Identifier) {
      case "Product":
        DataSource.Products [(int)view.Tag].Title = view.StringValue;
        break;
      case "Details":
        DataSource.Products [(int)view.Tag].Description = view.StringValue;
        break;
      }
    };
  }

  // Tag view
  view.Tag = row;

  // Setup view based on the column selected
  switch (tableColumn.Title) {
  case "Product":
    view.StringValue = DataSource.Products [(int)row].Title;
    break;
  case "Details":
    view.StringValue = DataSource.Products [(int)row].Description;
    break;
  }

  return view;
}
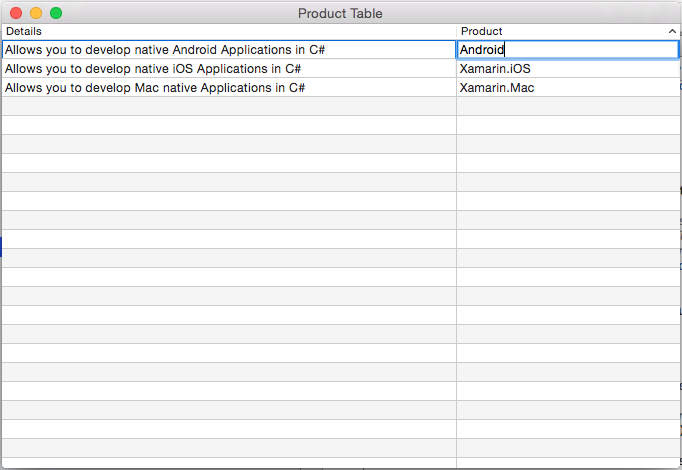
Now if we run the application, the user can edit the cells in the Table View:
Using Images in Table Views
To include an image as part of the cell in a NSTableView, you'll need to change how the data is returned by the Table View's NSTableViewDelegate's GetViewForItem method to use a NSTableCellView instead of the typical NSTextField. For example:
public override NSView GetViewForItem (NSTableView tableView, NSTableColumn tableColumn, nint row)
{

  // This pattern allows you reuse existing views when they are no-longer in use.
  // If the returned view is null, you instance up a new view
  // If a non-null view is returned, you modify it enough to reflect the new data
  NSTableCellView view = (NSTableCellView)tableView.MakeView (tableColumn.Title, this);
  if (view == null) {
    view = new NSTableCellView ();
    if (tableColumn.Title == "Product") {
      view.ImageView = new NSImageView (new CGRect (0, 0, 16, 16));
      view.AddSubview (view.ImageView);
      view.TextField = new NSTextField (new CGRect (20, 0, 400, 16));
    } else {
      view.TextField = new NSTextField (new CGRect (0, 0, 400, 16));
    }
    view.TextField.AutoresizingMask = NSViewResizingMask.WidthSizable;
    view.AddSubview (view.TextField);
    view.Identifier = tableColumn.Title;
    view.TextField.BackgroundColor = NSColor.Clear;
    view.TextField.Bordered = false;
    view.TextField.Selectable = false;
    view.TextField.Editable = true;

    view.TextField.EditingEnded += (sender, e) => {

      // Take action based on type
      switch(view.Identifier) {
      case "Product":
        DataSource.Products [(int)view.TextField.Tag].Title = view.TextField.StringValue;
        break;
      case "Details":
        DataSource.Products [(int)view.TextField.Tag].Description = view.TextField.StringValue;
        break;
      }
    };
  }

  // Tag view
  view.TextField.Tag = row;

  // Setup view based on the column selected
  switch (tableColumn.Title) {
  case "Product":
    view.ImageView.Image = NSImage.ImageNamed ("tags.png");
    view.TextField.StringValue = DataSource.Products [(int)row].Title;
    break;
  case "Details":
    view.TextField.StringValue = DataSource.Products [(int)row].Description;
    break;
  }

  return view;
}
For more information, please see the Using Images with Table Views section of our Working with Image documentation.
Adding a Delete Button to a Row
Based on the requirements of your app, there might be occasions where you need to supply an action button for each row in the table. As an example of this, let's expand the Table View example created above to include a Delete button on each row.
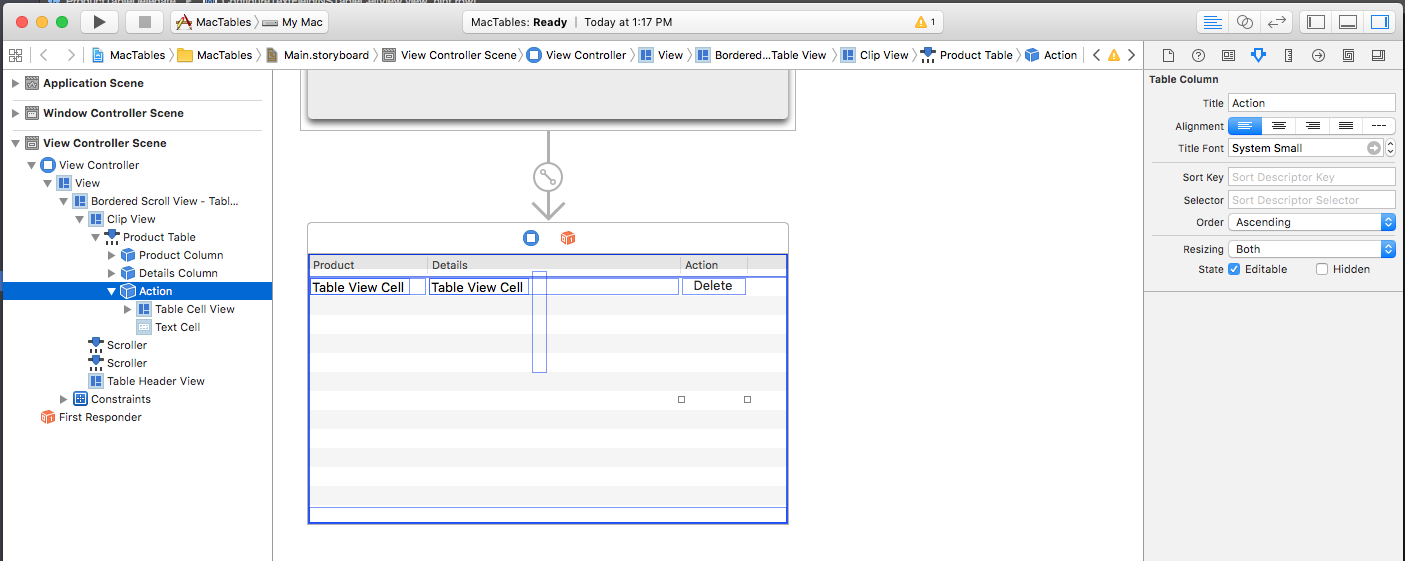
First, edit the Main.storyboard in Xcode's Interface Builder, select the Table View and increase the number of columns to three (3). Next, change the Title of the new column to Action:
Save the changes to the Storyboard and return to Visual Studio for Mac to sync the changes.
Next, edit the ViewController.cs file and add the following public method:
public void ReloadTable ()
{
  ProductTable.ReloadData ();
}
In the same file, modify the creation of the new Table View Delegate inside of ViewDidLoad method as follows:
// Populate the Product Table
ProductTable.DataSource = DataSource;
ProductTable.Delegate = new ProductTableDelegate (this, DataSource);
Now, edit the ProductTableDelegate.cs file to include a private connection to the View Controller and to take the controller as a parameter when creating a new instance of the delegate:
#region Private Variables
private ProductTableDataSource DataSource;
private ViewController Controller;
#endregion

#region Constructors
public ProductTableDelegate (ViewController controller, ProductTableDataSource datasource)
{
  this.Controller = controller;
  this.DataSource = datasource;
}
#endregion
Next, add the following new private method to the class:
private void ConfigureTextField (NSTableCellView view, nint row)
{
  // Add to view
  view.TextField.AutoresizingMask = NSViewResizingMask.WidthSizable;
  view.AddSubview (view.TextField);

  // Configure
  view.TextField.BackgroundColor = NSColor.Clear;
  view.TextField.Bordered = false;
  view.TextField.Selectable = false;
  view.TextField.Editable = true;

  // Wireup events
  view.TextField.EditingEnded += (sender, e) => {

    // Take action based on type
    switch (view.Identifier) {
    case "Product":
      DataSource.Products [(int)view.TextField.Tag].Title = view.TextField.StringValue;
      break;
    case "Details":
      DataSource.Products [(int)view.TextField.Tag].Description = view.TextField.StringValue;
      break;
    }
  };

  // Tag view
  view.TextField.Tag = row;
}
This takes all of the Text View configurations that were previously being done in the GetViewForItem method and places them in a single, callable location (since the last column of the table does not include a Text View but a Button).
Finally, edit the GetViewForItem method and make it look like the following:
public override NSView GetViewForItem (NSTableView tableView, NSTableColumn tableColumn, nint row)
{

  // This pattern allows you reuse existing views when they are no-longer in use.
  // If the returned view is null, you instance up a new view
  // If a non-null view is returned, you modify it enough to reflect the new data
  NSTableCellView view = (NSTableCellView)tableView.MakeView (tableColumn.Title, this);
  if (view == null) {
    view = new NSTableCellView ();

    // Configure the view
    view.Identifier = tableColumn.Title;

    // Take action based on title
    switch (tableColumn.Title) {
    case "Product":
      view.ImageView = new NSImageView (new CGRect (0, 0, 16, 16));
      view.AddSubview (view.ImageView);
      view.TextField = new NSTextField (new CGRect (20, 0, 400, 16));
      ConfigureTextField (view, row);
      break;
    case "Details":
      view.TextField = new NSTextField (new CGRect (0, 0, 400, 16));
      ConfigureTextField (view, row);
      break;
    case "Action":
      // Create new button
      var button = new NSButton (new CGRect (0, 0, 81, 16));
      button.SetButtonType (NSButtonType.MomentaryPushIn);
      button.Title = "Delete";
      button.Tag = row;

      // Wireup events
      button.Activated += (sender, e) => {
        // Get button and product
        var btn = sender as NSButton;
        var product = DataSource.Products [(int)btn.Tag];

        // Configure alert
        var alert = new NSAlert () {
          AlertStyle = NSAlertStyle.Informational,
          InformativeText = $"Are you sure you want to delete {product.Title}? This operation cannot be undone.",
          MessageText = $"Delete {product.Title}?",
        };
        alert.AddButton ("Cancel");
        alert.AddButton ("Delete");
        alert.BeginSheetForResponse (Controller.View.Window, (result) => {
          // Should we delete the requested row?
          if (result == 1001) {
            // Remove the given row from the dataset
            DataSource.Products.RemoveAt((int)btn.Tag);
            Controller.ReloadTable ();
          }
        });
      };

      // Add to view
      view.AddSubview (button);
      break;
    }

  }

  // Setup view based on the column selected
  switch (tableColumn.Title) {
  case "Product":
    view.ImageView.Image = NSImage.ImageNamed ("tag.png");
    view.TextField.StringValue = DataSource.Products [(int)row].Title;
    view.TextField.Tag = row;
    break;
  case "Details":
    view.TextField.StringValue = DataSource.Products [(int)row].Description;
    view.TextField.Tag = row;
    break;
  case "Action":
    foreach (NSView subview in view.Subviews) {
      var btn = subview as NSButton;
      if (btn != null) {
        btn.Tag = row;
      }
    }
    break;
  }

  return view;
}
Let's look at several sections of this code in more detail. First, if a new NSTableViewCell is being created action is taken based on the name of the Column. For the first two columns (Product and Details), the new ConfigureTextField method is called.
For the Action column, a new NSButton is created and added to the Cell as a Sub View:
// Create new button
var button = new NSButton (new CGRect (0, 0, 81, 16));
button.SetButtonType (NSButtonType.MomentaryPushIn);
button.Title = "Delete";
button.Tag = row;
...

// Add to view
view.AddSubview (button);
The Button's Tag property is used to hold the number of the Row that is currently being processed. This number will be used later when the user requests a row to be deleted in the Button's Activated event:
// Wireup events
button.Activated += (sender, e) => {
  // Get button and product
  var btn = sender as NSButton;
  var product = DataSource.Products [(int)btn.Tag];

  // Configure alert
  var alert = new NSAlert () {
    AlertStyle = NSAlertStyle.Informational,
    InformativeText = $"Are you sure you want to delete {product.Title}? This operation cannot be undone.",
    MessageText = $"Delete {product.Title}?",
  };
  alert.AddButton ("Cancel");
  alert.AddButton ("Delete");
  alert.BeginSheetForResponse (Controller.View.Window, (result) => {
    // Should we delete the requested row?
    if (result == 1001) {
      // Remove the given row from the dataset
      DataSource.Products.RemoveAt((int)btn.Tag);
      Controller.ReloadTable ();
    }
  });
};
At the start of the event handler, we get the button and the product that is on the given table row. Then an Alert is presented to the user confirming the row deletion. If the user chooses to delete the row, the given row is removed from the Data Source and the table is reloaded:
// Remove the given row from the dataset
DataSource.Products.RemoveAt((int)btn.Tag);
Controller.ReloadTable ();
Finally, if the Table View Cell is being reused instead of being created new, the following code configures it based on the Column being processed:
// Setup view based on the column selected
switch (tableColumn.Title) {
case "Product":
  view.ImageView.Image = NSImage.ImageNamed ("tag.png");
  view.TextField.StringValue = DataSource.Products [(int)row].Title;
  view.TextField.Tag = row;
  break;
case "Details":
  view.TextField.StringValue = DataSource.Products [(int)row].Description;
  view.TextField.Tag = row;
  break;
case "Action":
  foreach (NSView subview in view.Subviews) {
    var btn = subview as NSButton;
    if (btn != null) {
      btn.Tag = row;
    }
  }
  break;
}
For the Action column, all Sub Views are scanned until the NSButton is found, then it's Tag property is updated to point at the current Row.
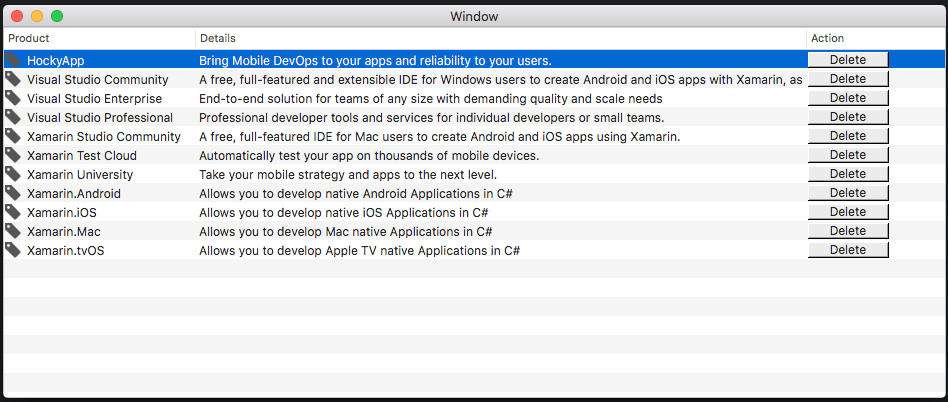
With these changes in place, when the app is run each row will have a Delete button:
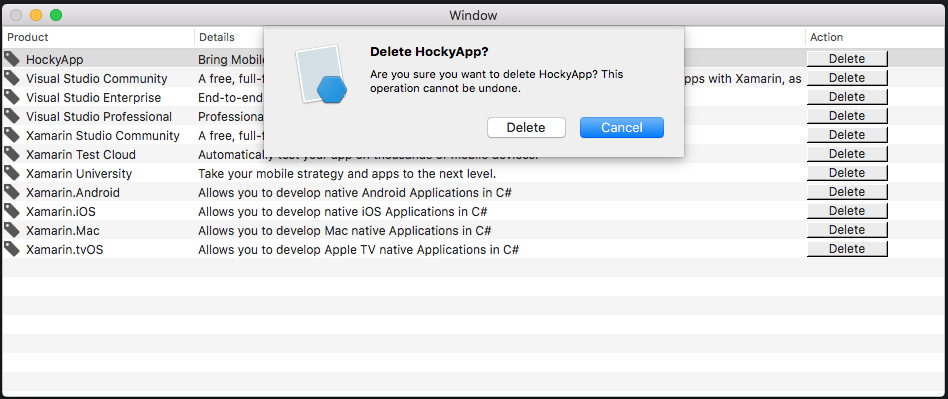
When the user clicks a Delete button, an alert will be displayed asking them to delete the given Row:
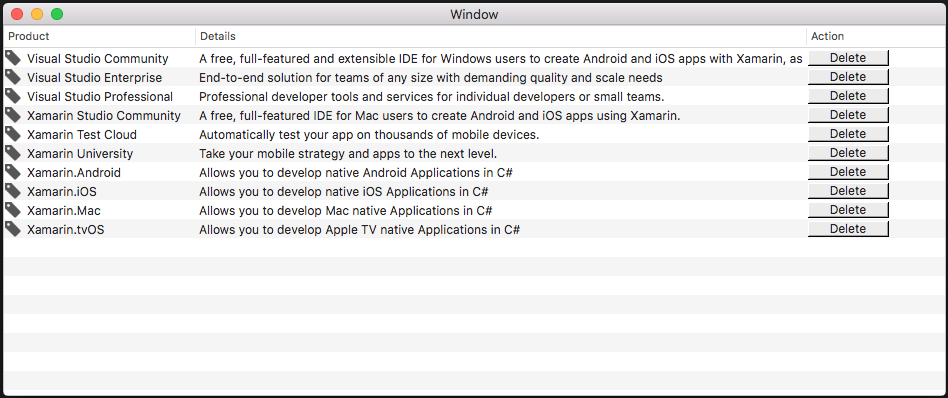
If the user chooses delete, the row will be removed and the table will be redrawn:
Data Binding Table Views
By using Key-Value Coding and Data Binding techniques in your Xamarin.Mac application, you can greatly decrease the amount of code that you have to write and maintain to populate and work with UI elements. You also have the benefit of further decoupling your backing data (Data Model) from your front end User Interface (Model-View-Controller), leading to easier to maintain, more flexible application design.
Key-Value Coding (KVC) is a mechanism for accessing an object’s properties indirectly, using keys (specially formatted strings) to identify properties instead of accessing them through instance variables or accessor methods (get/set). By implementing Key-Value Coding compliant accessors in your Xamarin.Mac application, you gain access to other macOS features such as Key-Value Observing (KVO), Data Binding, Core Data, Cocoa bindings, and scriptability.
For more information, please see the Table View Data Binding section of our Data Binding and Key-Value Coding documentation.
Summary
This article has taken a detailed look at working with Table Views in a Xamarin.Mac application. We saw the different types and uses of Table Views, how to create and maintain Table Views in Xcode's Interface Builder and how to work with Table Views in C# code.
