Configure Send connectors to proxy outbound mail
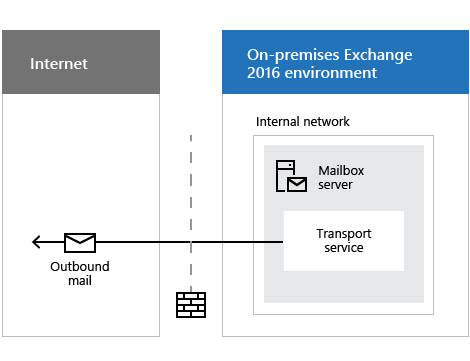
When you create Send connectors, outbound mail flows through the Send connector in the Transport service on the Mailbox server or servers you specify, as shown in the following diagram.

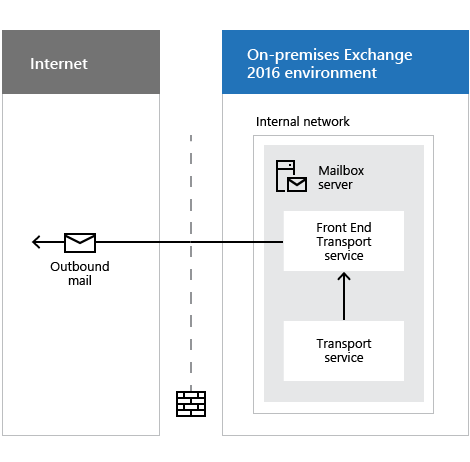
However, you can configure a Send connector to relay or proxy outbound mail through the Front End Transport service on the Mailbox server, as shown in the following diagram.

By default, all inbound mail enters your Exchange organization through the Front End Transport service, and the Front End Transport service proxies inbound mail to the Transport service. For more information, see Mail flow and the transport pipeline.
When you configure a Send connector to proxy outbound mail through the Front End Transport service, the Receive connector named "Outbound Proxy Frontend <Mailbox server name>" in the Front End Transport service listens for these outbound messages from the Transport service, and then the Front End Transport service sends the messages to the internet.
What do you need to know before you begin?
Estimated time to complete: less than 5 minutes
You need to be assigned permissions before you can perform this procedure or procedures. To see what permissions you need, see the "Send connectors" entry in the Mail flow permissions topic.
For information about keyboard shortcuts that may apply to the procedures in this topic, see Keyboard shortcuts in the Exchange admin center.
Tip
Having problems? Ask for help in the Exchange forums. Visit the forums at: Exchange Server, Exchange Online, or Exchange Online Protection.
Configure Send connectors to proxy outbound mail through the Front End Transport service
Use the EAC to configure Send connectors to proxy outbound mail
In the Exchange admin center (EAC), you can only configure existing Send connectors to proxy outbound mail.
In the EAC, navigate to Mail flow > Send connectors, select the Send connector, and then click Edit
 .
.On the General tab, in the Connector status section, select Proxy through client access server, and then click Save.
Use PowerShell to configure Send Connectors to proxy outbound mail
In the Exchange Management Shell, you can configure new or existing Send connectors to proxy outbound mail.
For information about how to open the Exchange Management Shell, see Open the Exchange Management Shell.
To configure a new Send connector to proxy outbound mail, add
-FrontEndProxyEnabled $trueto the New-SendConnector command.To configure an existing Send connector to proxy outbound mail, run the following command:
Set-SendConnector <Send connector identity> -FrontEndProxyEnabled $trueThis example configures the existing Send connector named "Contoso.com Outbound" to proxy outbound mail.
Set-SendConnector "Contoso.com Outbound" -FrontendProxyEnabled $true
How do you know this worked?
To verify that a Send connector is configured for outbound proxy, perform either of the following procedures:
In the EAC, navigate to Mail flow > Send connectors, select the Send connector, and then click Edit
 . On the General tab, in the Connector status section, verify Proxy through client access server is selected.
In the Exchange Management Shell, run the following command:
Get-SendConnector | Format-Table -Auto Name,FrontEndProxyEnabledVerify the FrontEndProxyEnabled value is
Truefor the Send connector.