Code First to an Existing Database
This step-by-step walkthrough provides an introduction to Code First development targeting an existing database. Code First allows you to define your model using C# or VB.Net classes. Optionally additional configuration can be performed using attributes on your classes and properties or by using a fluent API.
Pre-Requisites
You will need to have Visual Studio 2012 or Visual Studio 2013 installed to complete this walkthrough.
You will also need version 6.1 (or later) of the Entity Framework Tools for Visual Studio installed. See Get Entity Framework for information on installing the latest version of the Entity Framework Tools.
1. Create an Existing Database
Typically when you are targeting an existing database it will already be created, but for this walkthrough we need to create a database to access.
Let's go ahead and generate the database.
Open Visual Studio
View -> Server Explorer
Right click on Data Connections -> Add Connection…
If you haven’t connected to a database from Server Explorer before you’ll need to select Microsoft SQL Server as the data source
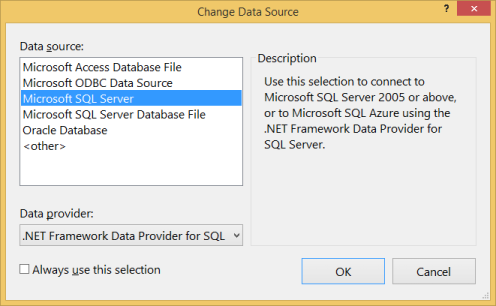
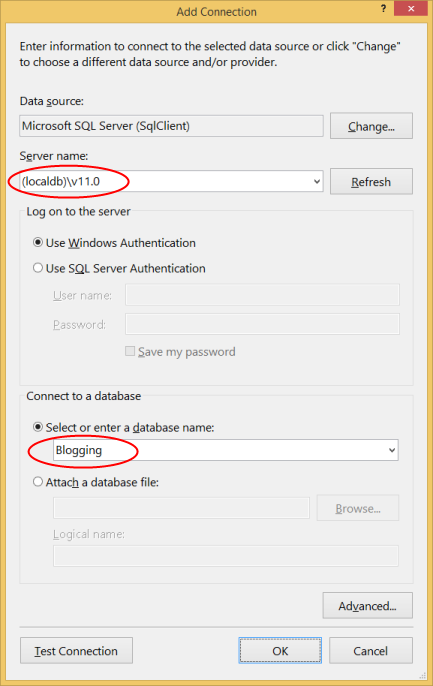
Connect to your LocalDB instance, and enter Blogging as the database name
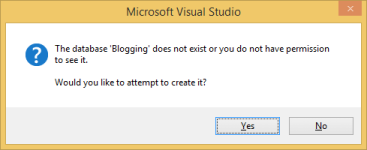
Select OK and you will be asked if you want to create a new database, select Yes
The new database will now appear in Server Explorer, right-click on it and select New Query
Copy the following SQL into the new query, then right-click on the query and select Execute
CREATE TABLE [dbo].[Blogs] (
    [BlogId] INT IDENTITY (1, 1) NOT NULL,
    [Name] NVARCHAR (200) NULL,
    [Url]  NVARCHAR (200) NULL,
    CONSTRAINT [PK_dbo.Blogs] PRIMARY KEY CLUSTERED ([BlogId] ASC)
);

CREATE TABLE [dbo].[Posts] (
    [PostId] INT IDENTITY (1, 1) NOT NULL,
    [Title] NVARCHAR (200) NULL,
    [Content] NTEXT NULL,
    [BlogId] INT NOT NULL,
    CONSTRAINT [PK_dbo.Posts] PRIMARY KEY CLUSTERED ([PostId] ASC),
    CONSTRAINT [FK_dbo.Posts_dbo.Blogs_BlogId] FOREIGN KEY ([BlogId]) REFERENCES [dbo].[Blogs] ([BlogId]) ON DELETE CASCADE
);

INSERT INTO [dbo].[Blogs] ([Name],[Url])
VALUES ('The Visual Studio Blog', 'http://blogs.msdn.com/visualstudio/')

INSERT INTO [dbo].[Blogs] ([Name],[Url])
VALUES ('.NET Framework Blog', 'http://blogs.msdn.com/dotnet/')
2. Create the Application
To keep things simple we will build a basic console application that uses Code First to do the data access:
- Open Visual Studio
- File -> New -> Project…
- Select Windows from the left menu and Console Application
- Enter CodeFirstExistingDatabaseSample as the name
- Select OK
3. Reverse Engineer Model
We will use the Entity Framework Tools for Visual Studio to help us generate some initial code to map to the database. These tools are just generating code that you could also type by hand if you prefer.
Project -> Add New Item…
Select Data from the left menu and then ADO.NET Entity Data Model
Enter BloggingContext as the name and click OK
This launches the Entity Data Model Wizard
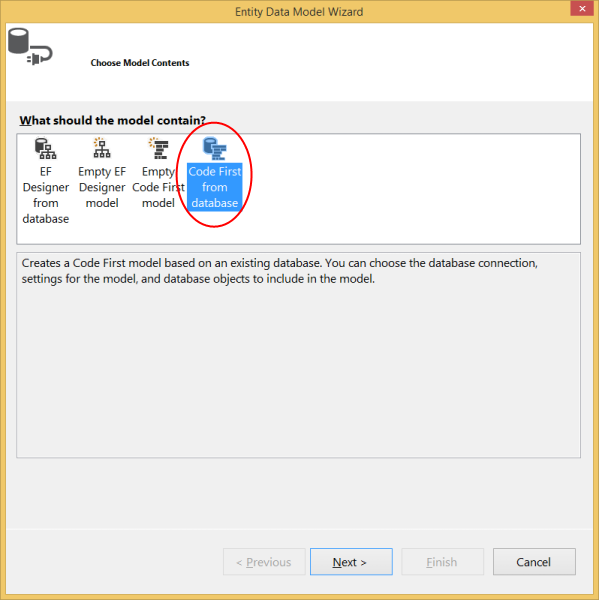
Select Code First from Database and click Next
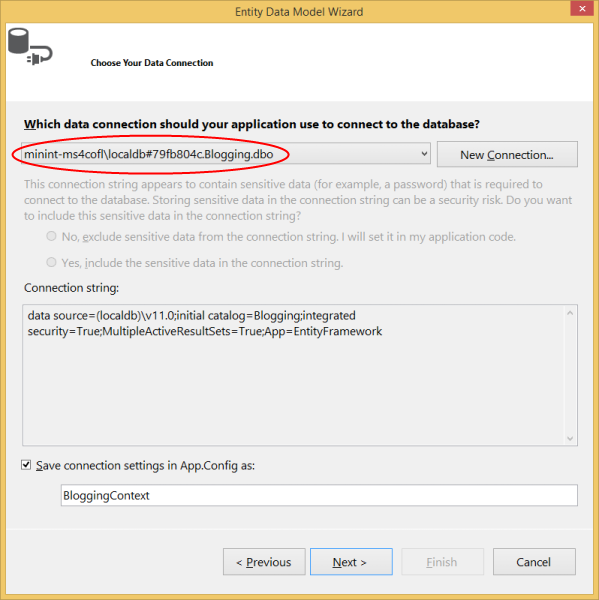
Select the connection to the database you created in the first section and click Next
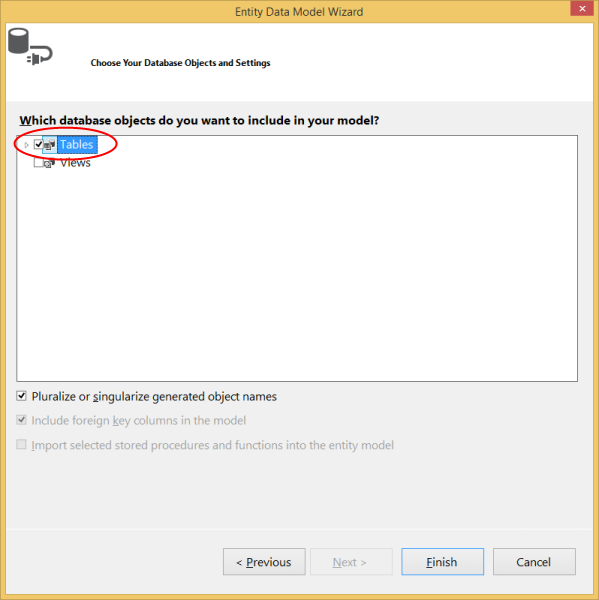
Click the checkbox next to Tables to import all tables and click Finish
Once the reverse engineer process completes a number of items will have been added to the project, let's take a look at what's been added.
Configuration file
An App.config file has been added to the project, this file contains the connection string to the existing database.
<connectionStrings>
  <add
    name="BloggingContext"
    connectionString="data source=(localdb)\mssqllocaldb;initial catalog=Blogging;integrated security=True;MultipleActiveResultSets=True;App=EntityFramework"
    providerName="System.Data.SqlClient" />
</connectionStrings>
You’ll notice some other settings in the configuration file too, these are default EF settings that tell Code First where to create databases. Since we are mapping to an existing database these setting will be ignored in our application.
Derived Context
A BloggingContext class has been added to the project. The context represents a session with the database, allowing us to query and save data. The context exposes a DbSet<TEntity> for each type in our model. You’ll also notice that the default constructor calls a base constructor using the name= syntax. This tells Code First that the connection string to use for this context should be loaded from the configuration file.
public partial class BloggingContext : DbContext
    {
        public BloggingContext()
            : base("name=BloggingContext")
        {
        }

        public virtual DbSet<Blog> Blogs { get; set; }
        public virtual DbSet<Post> Posts { get; set; }

        protected override void OnModelCreating(DbModelBuilder modelBuilder)
        {
        }
    }
You should always use the name= syntax when you are using a connection string in the config file. This ensures that if the connection string is not present then Entity Framework will throw rather than creating a new database by convention.
Model classes
Finally, a Blog and Post class have also been added to the project. These are the domain classes that make up our model. You'll see Data Annotations applied to the classes to specify configuration where the Code First conventions would not align with the structure of the existing database. For example, you'll see the StringLength annotation on Blog.Name and Blog.Url since they have a maximum length of 200 in the database (the Code First default is to use the maximum length supported by the database provider - nvarchar(max) in SQL Server).
public partial class Blog
{
    public Blog()
    {
        Posts = new HashSet<Post>();
    }

    public int BlogId { get; set; }

    [StringLength(200)]
    public string Name { get; set; }

    [StringLength(200)]
    public string Url { get; set; }

    public virtual ICollection<Post> Posts { get; set; }
}
4. Reading & Writing Data
Now that we have a model it’s time to use it to access some data. Implement the Main method in Program.cs as shown below. This code creates a new instance of our context and then uses it to insert a new Blog. Then it uses a LINQ query to retrieve all Blogs from the database ordered alphabetically by Title.
class Program
{
    static void Main(string[] args)
    {
        using (var db = new BloggingContext())
        {
            // Create and save a new Blog
            Console.Write("Enter a name for a new Blog: ");
            var name = Console.ReadLine();

            var blog = new Blog { Name = name };
            db.Blogs.Add(blog);
            db.SaveChanges();

            // Display all Blogs from the database
            var query = from b in db.Blogs
                        orderby b.Name
                        select b;

            Console.WriteLine("All blogs in the database:");
            foreach (var item in query)
            {
                Console.WriteLine(item.Name);
            }

            Console.WriteLine("Press any key to exit...");
            Console.ReadKey();
        }
    }
}
You can now run the application and test it.
Enter a name for a new Blog: ADO.NET Blog
All blogs in the database:
.NET Framework Blog
ADO.NET Blog
The Visual Studio Blog
Press any key to exit...
What if My Database Changes?
The Code First to Database wizard is designed to generate a starting point set of classes that you can then tweak and modify. If your database schema changes you can either manually edit the classes or perform another reverse engineer to overwrite the classes.
Using Code First Migrations to an Existing Database
If you want to use Code First Migrations with an existing database, see Code First Migrations to an existing database.
Summary
In this walkthrough we looked at Code First development using an existing database. We used the Entity Framework Tools for Visual Studio to reverse engineer a set of classes that mapped to the database and could be used to store and retrieve data.
