Handoff overview
Important
Handoff functionality is disabled by default. To use this feature activate handoff from your management portal. Navigate to Configuration > Conversation > Human handoff and enable handoff.
The healthcare agent service can be used to provide end users with chat support from live agents. In some cases, it’s preferable to transfer end users from a bot interaction, to a human conversation. For example, a triage flow can be handed off to a doctor or nurse as part of a telehealth flow or support agents can resolve issues that require nongeneric assistance.
Handoff to a live agent using the healthcare agent service provides an optimal end user experience. Users are seamlessly transferred to a human and remain in their originally chosen engagement channel. Agents can easily extend the handoff experience to voice channels (such as phone and Skype) by providing sending the end user a reference number or providing a callback service once an initial live chat connection has been established.
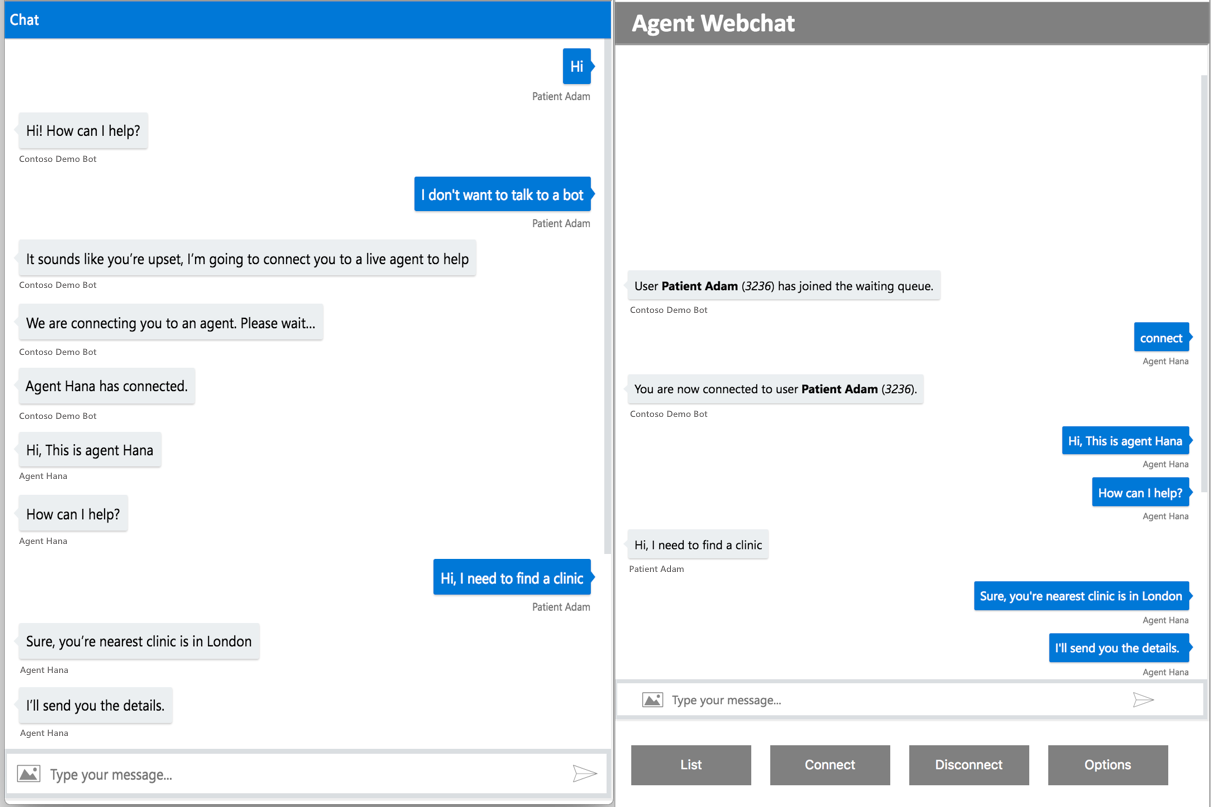
Use cases
The healthcare agent service can support different types of handoff use cases:
- Specific scenario steps: Trigger hand-off to a live agent at critical steps in your custom scenario flows to ensure that customers receive the right service at the right time.
- End user requests: Trigger hand-off to a live agent when an end user explicitly asks to be transferred to a human. End users can simply type the "agent" command to invoke the built-in handoff scenario.
- Sentiment analysis: Proactively transfer end users to chat with a live agent when you detect a negative sentiment. Use a LUIS model and perform sentiment analysis on end user utterances to trigger hand-off as an interrupting scenario when a specified negative sentiment threshold is reached.
Implementation considerations
Providing handoff to a live agent requires special implementation considerations. There are three key requirements that you should consider when planning an healthcare agent service solution with Handoff. You'll need to:
- Deploy agent webchat: Implement and deploy an agent portal (with sign in page) that will expose the agent webchat to authorized agents.
- Train agents: Train and assign staff to monitor the live agent channels. You may also need to plan internal processes to support this other engagement channel if your organization doesn’t already provide live chat.
- Author handoff scenarios: Create your handoff scenario logic (or configuring the built-in handoff scenario) in your management portal according to your business requirements.
Implementation examples
Below are directions on where to find examples of handoff implementations that can help deploying your own implementation.
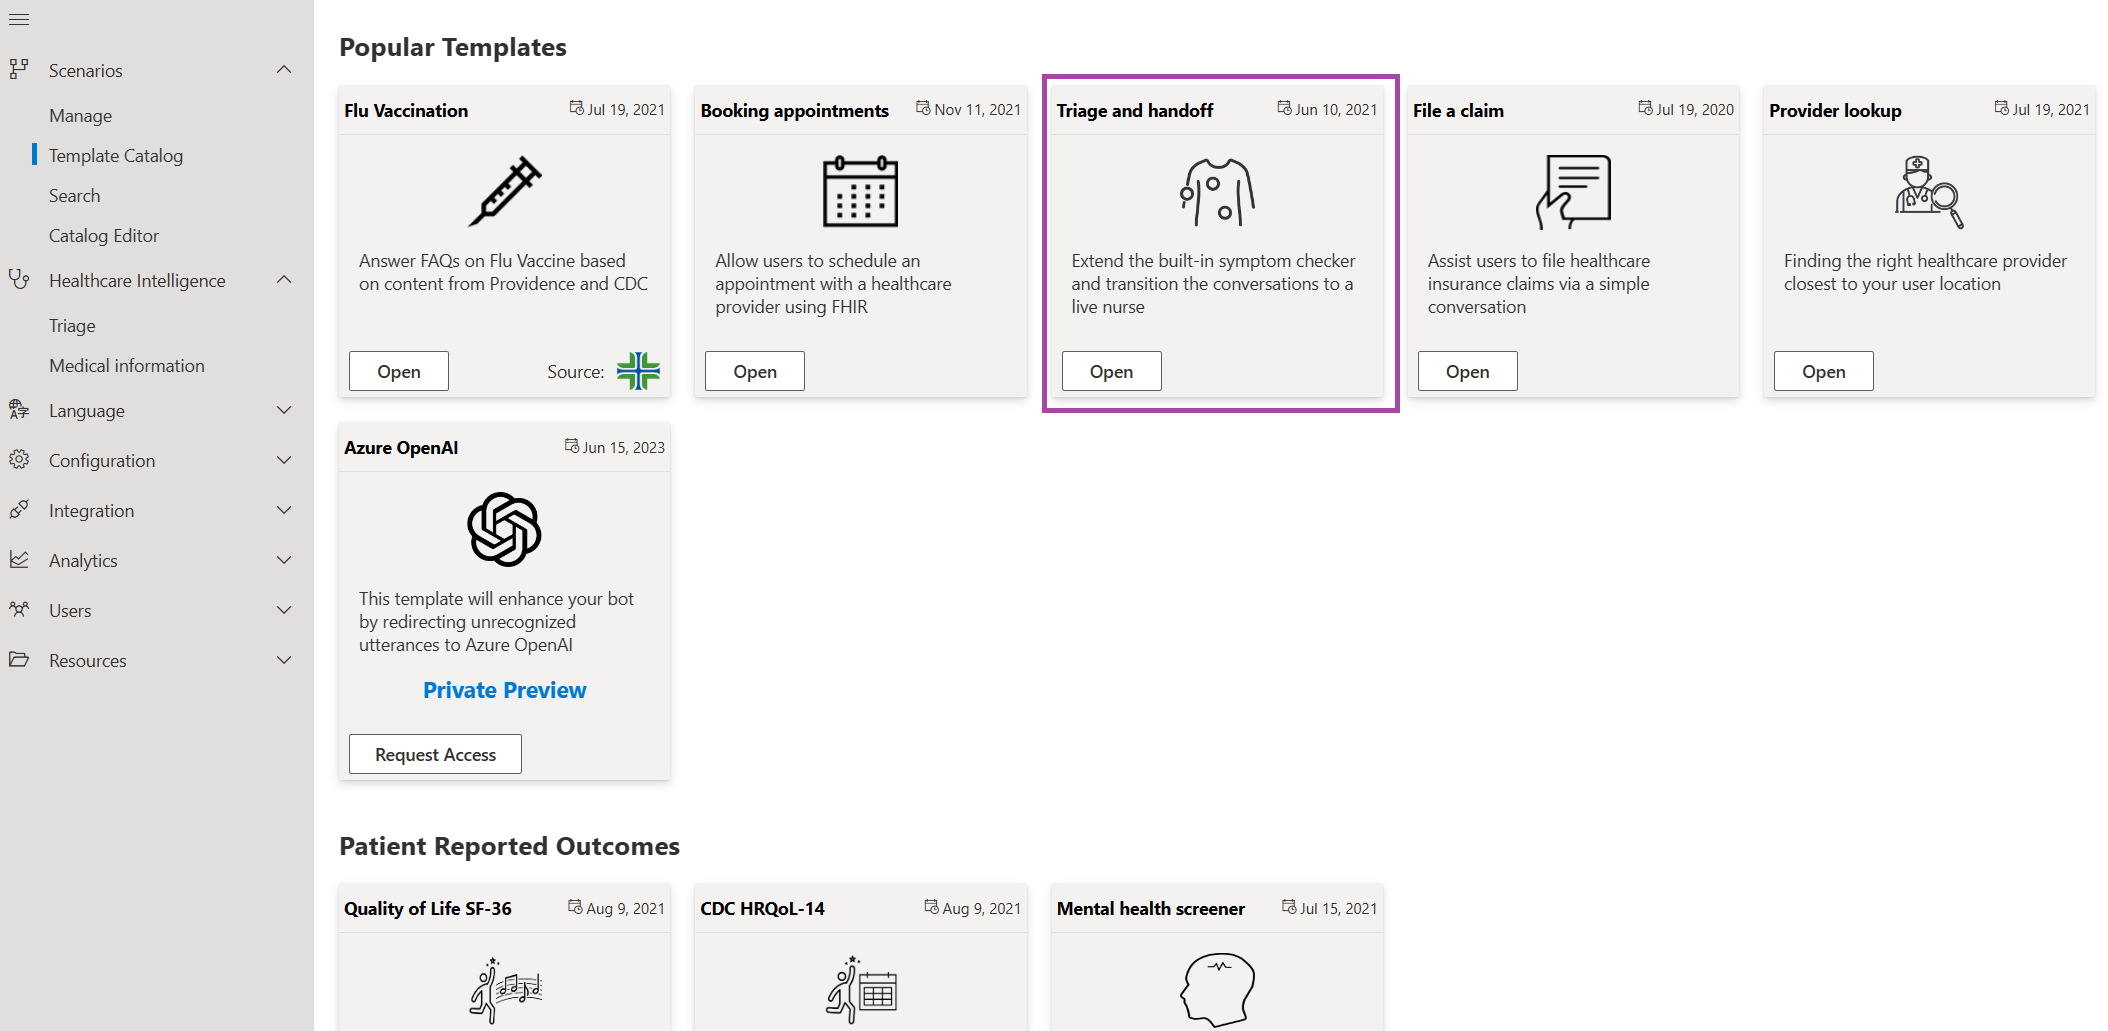
Handoff scenarios: In the management portal you can navigate to scenario catalog. Select the "Triage with handoff" template to see an example of how to use the built-in handoff scenario. In this template handoff is triggered at the end of the triage based on the patient’s disposition and the urgency of the care required.
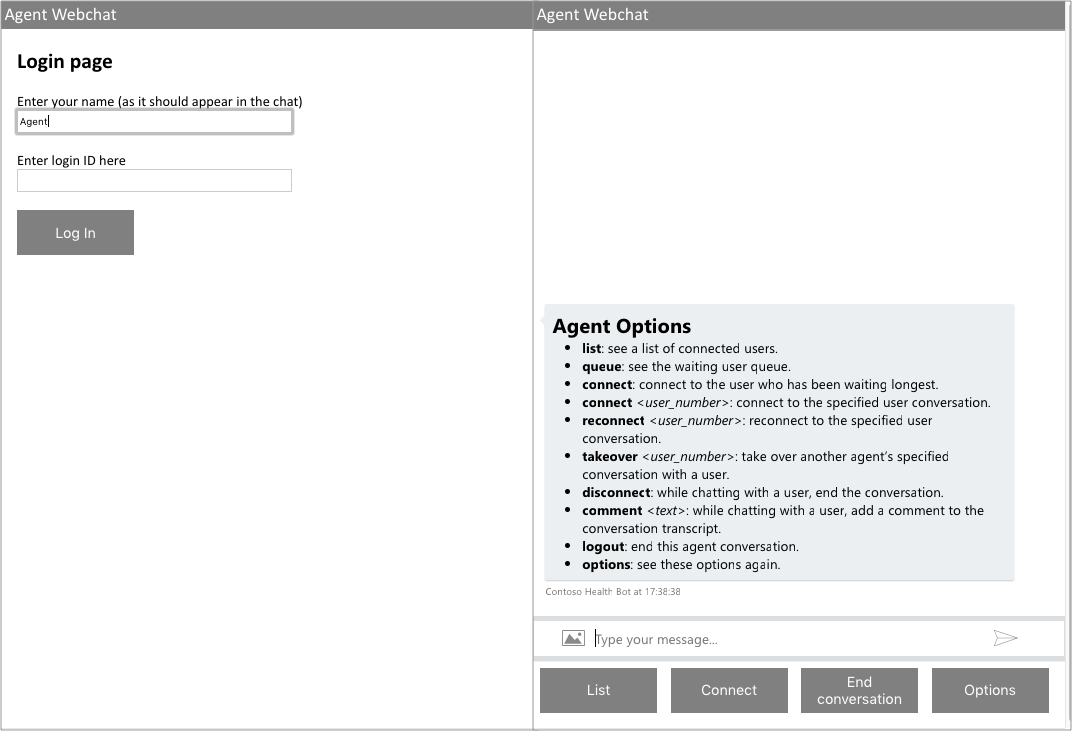
Agent webchat: We also provide an example agent webchat application. You can download the sample agent webchat code here. The sample application is unauthenticated and is intended for testing purposes only. The sign in page is for demonstration purposes and will allow any user to access the application. You can also use the sample code as a basis for your own agent webchat application.
Important Note: Adding an authentication mechanism for your agents is crucial part of a production implementation. The agent webchat grants access to end user data and allows agents to represent your organization.
Conversation states
When using the Handoff feature, other conversation states are introduced into your bot runtime.
- Bot state: The end user is speaking with the bot. This is the typical conversation state.
- Waiting state: The end user has triggered a handoff scenario and is waiting to be connected with an agent.
- Agent state: The end user has been connected to an agent and they're having a conversation.
When the end user is speaking with a live agent the bot plays a passive role. Essentially the bot becomes a router of the conversation between the end user and the agent.
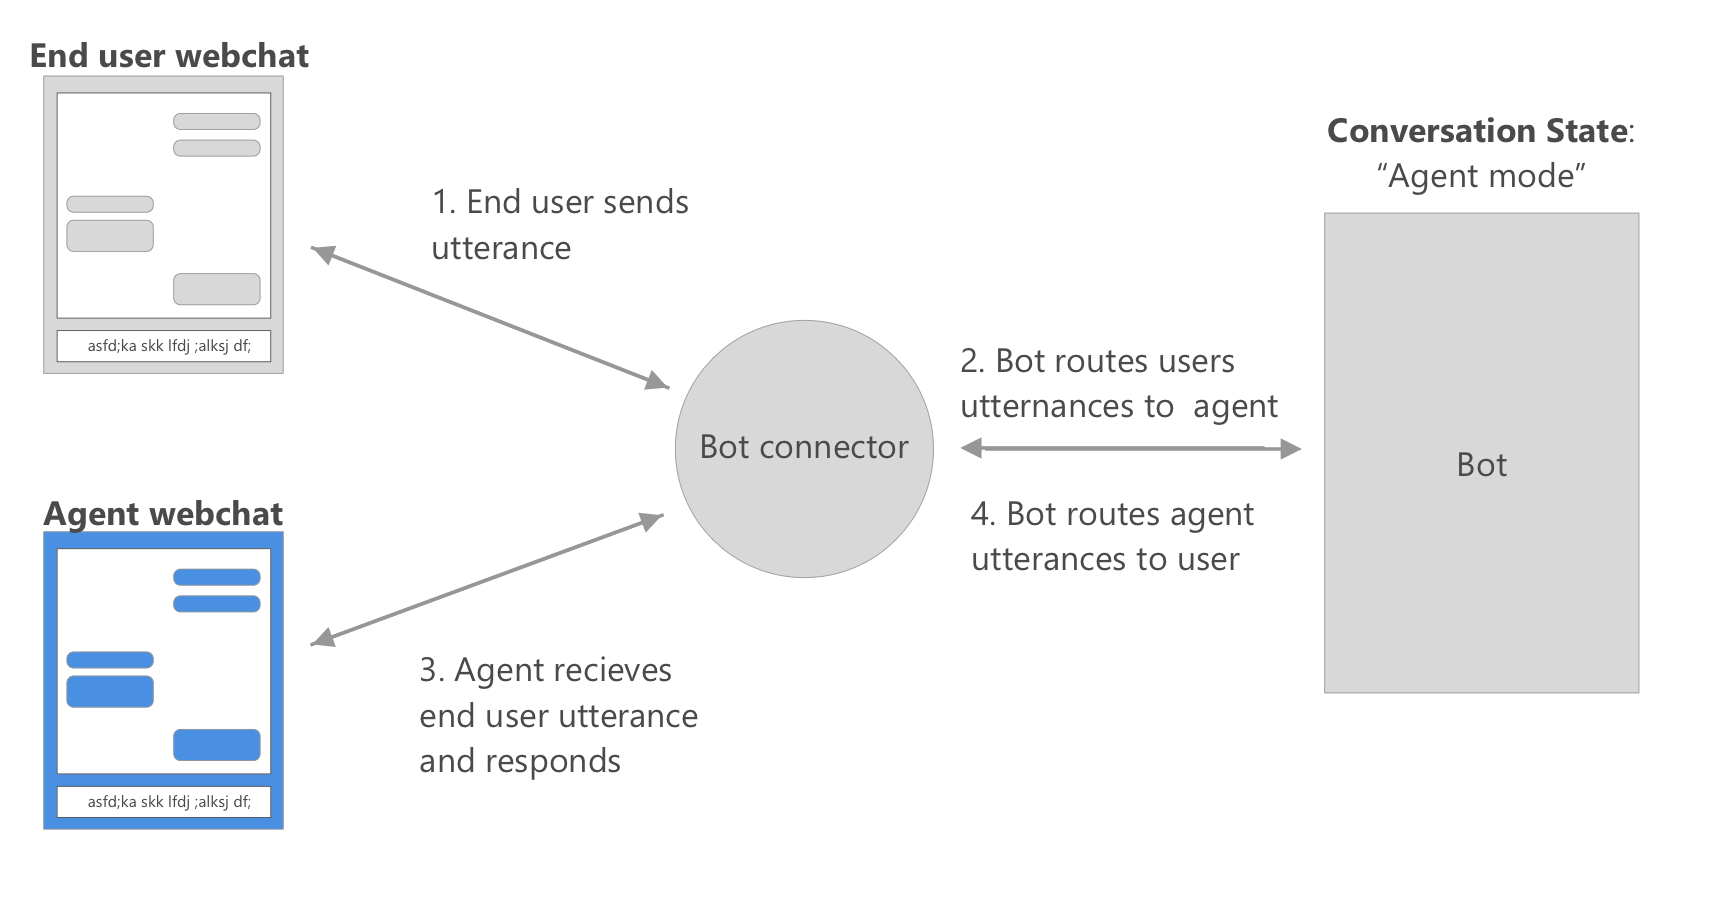
The experience for the end user and agent depends on the current state of the conversation. Agents have visibility into the current state for end users interacting with your bot instance. For example, they can use the "list" command in the agent webchat to see the state for each end user.
![A screenshot of the agent "list" command]./media/handoff_dynamics/list-command.png)
End user experience
Connecting to agent: If there are online agents, the end user and agent go through a connection sequence before the live chat begins.
- The end user says something that triggers the handoff connection sequence
- The end user is advised that they'll soon be connected to an agent
- The end user is added to the queue and the agents receive a push notification
- The agent uses a "Connect" command to talk to the end user that has been in the queue the longest.
- A connection is established between the agent and end user
- The end user receives a notification they're talking with an agent
- The live chat continues until the agent ends the interaction.
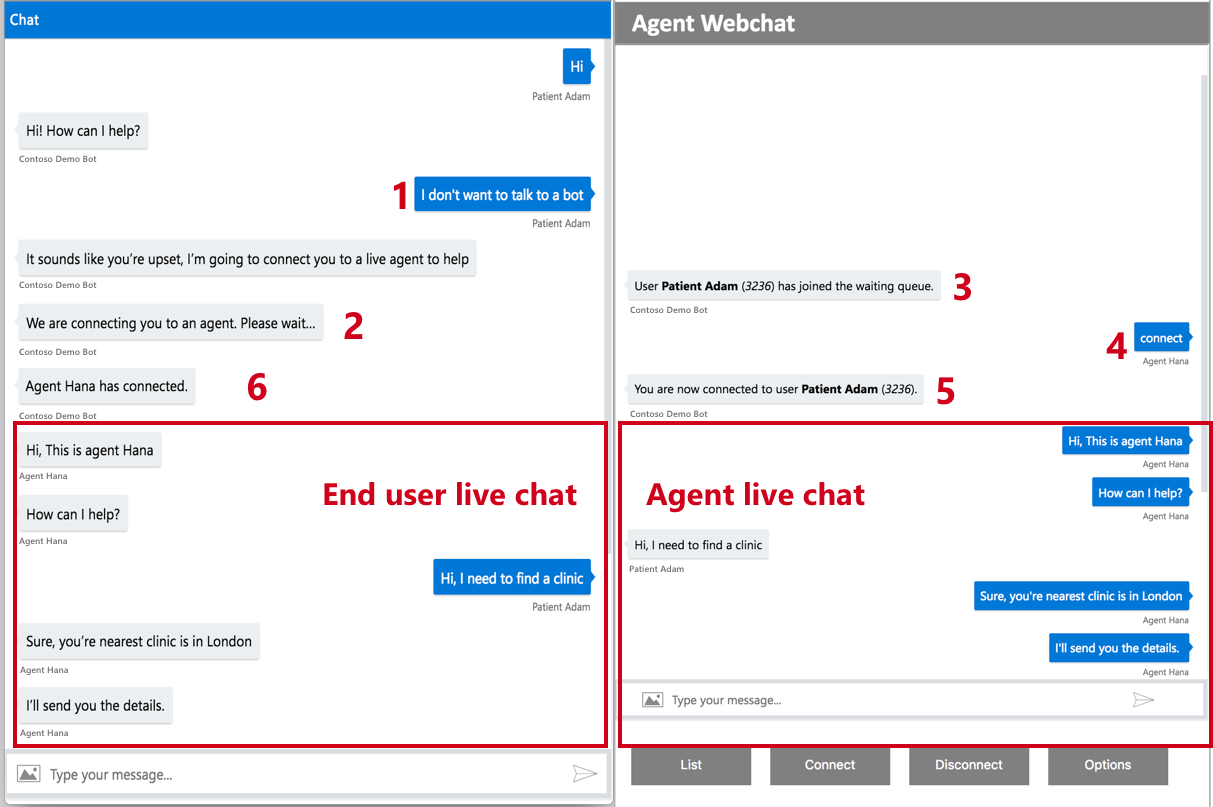
During the conversation the bot is passive, and no scenarios can be triggered by the end user of the agent.
Disconnecting an agent: The live conversation is ended by the agent by disconnecting from the conversation.
- The agent issues the disconnect command
- The end user is notified the agent left the conversation
- The agent is notified that the end user has left the conversation

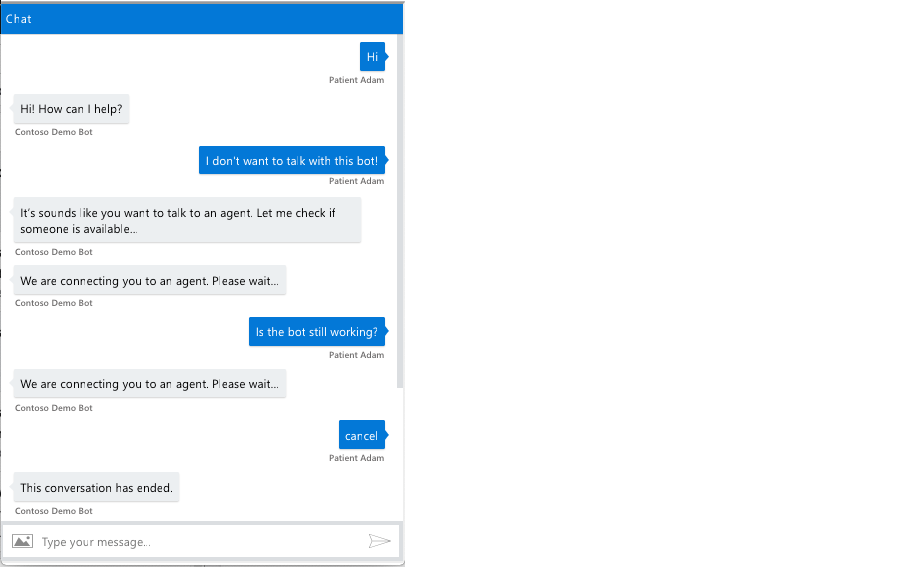
Waiting for an agent
During this state, the end user can’t talk with the bot. They can only wait for an agent or cancel the connection attempt, by using the "Cancel" command.
Agent webchat commands
The agent webchat includes built-in commands for managing the active users currently interacting with the bot or waiting for an agent.
- Options: Type options to see a list of available commands

- List: Type "list" to see a list of the users connected to your bot instance

- Queue: Type "queue" to see a filtered list of only the users that are waiting to speak to an agent
- Connect <user list number>: Connect to a specific user in the list by passing their list number as a parameter to the connect command. You can also connect to an end user that isn't waiting for an agent.

- Connect: If no parameter is passed to the connect command, the agent is connected to the longest waiting user
- Disconnect: Type this command to leave the live chat with an end user and end the handoff scenario

- Reconnect: Type this command to join a conversation that you accidentally left. For example, if you closed your browser window you can reconnect to the same conversation.
- Takeover: Type this command to takeover a conversation that is currently active with a different agent.
- Comment: Type this command to suppress any internal comments that shouldn't be displayed to the end user. The comment should immediately follow the command and they'll be included in the handoff summary output.

- logout: Type this command to sign out from the agent webchat if you no longer wish to monitor end user interactions.
Conversation Context
Before agents connect with an end user, it is important to give context for the conversation. This improves the support experience for the end user and the agent, since information they have provided to the bot isn't repeated. In the handoff step you can pass through any information from the scenario. For example, you can send patient profile information or a triage summary that will be visible to the agent before they connect with the user. The information passed through can be displayed as a simple message or as an adaptive card. If you have a large amount of information, an adaptive card is better suited for displaying rich formatting.
To use the context feature in your scenario you should pass through optional arguments in the begin step that define the context message and the way it's displayed.
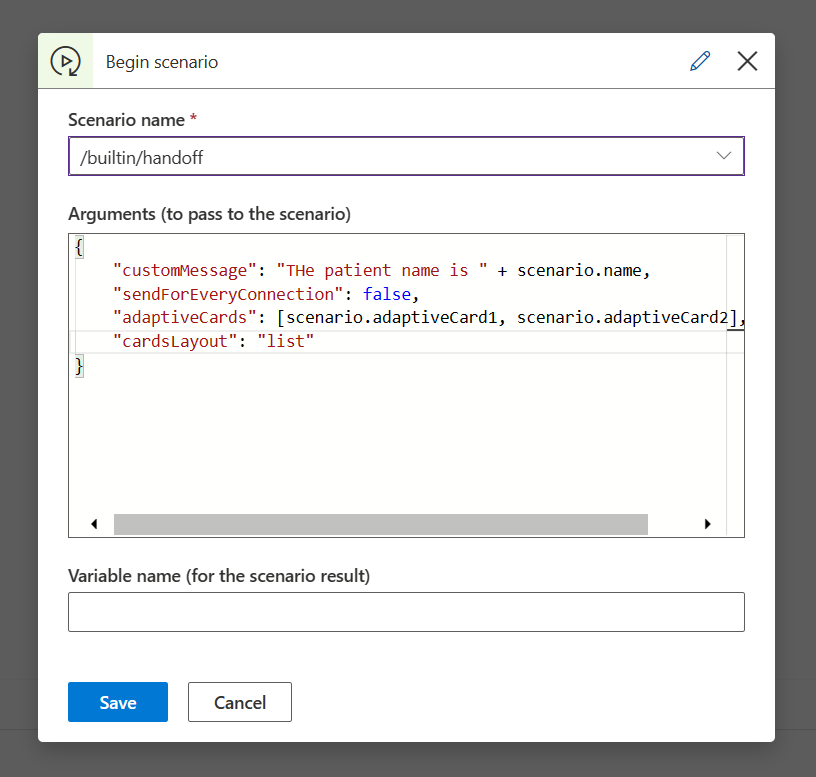
- customMessage: Here you pass any information that should be displayed as a simple statement. This message can be built dynamically using JavaScript expressions and supports mark down.
- sendForEveryConnection: You can control the agent context experience. When this parameter is set to "true" it shows the context message automatically each time a new use joins the queue. This will increase the message count for your bot.
- adaptiveCards: This accepts a single card or an array of cards. You should pass a JSON representation of the adaptive card based on the official schema. Learn more about adaptive cards. The adaptive cards can be built dynamically using JavaScript expressions.
- cardsLayout: If no value is provided this will default to a carousel experience (for multiple cards). If the "list" property is passed the adaptive cards will be shown sequentially in the thread.
Here's an example of the arguments that could be passed using a sample from the Adaptive card sample library
{
	customMessage: "The patient name is Matt",
	sendForEveryConnection: false,
    adaptiveCards: {
  "$schema": "http://adaptivecards.io/schemas/adaptive-card.json",
  "type": "AdaptiveCard",
  "version": "1.0",
  "body": [
    {
      "type": "TextBlock",
      "text": "Publish Adaptive Card Schema",
      "weight": "bolder",
      "size": "medium"
    },
    {
      "type": "ColumnSet",
      "columns": [
        {
          "type": "Column",
          "width": "auto",
          "items": [
            {
              "type": "Image",
              "url": "https://pbs.twimg.com/profile_images/3647943215/d7f12830b3c17a5a9e4afcc370e3a37e_400x400.jpeg",
              "size": "small",
              "style": "person"
            }
          ]
        },
        {
          "type": "Column",
          "width": "stretch",
          "items": [
            {
              "type": "TextBlock",
              "text": "Matt Hidinger",
              "weight": "bolder",
              "wrap": true
            },
            {
              "type": "TextBlock",
              "spacing": "none",
              "text": "Created {{DATE(2017-02-14T06:08:39Z, SHORT)}}",
              "isSubtle": true,
              "wrap": true
            }
          ]
        }
      ]
    },
    {
      "type": "TextBlock",
      "text": "Now that we have defined the main rules and features of the format, we need to produce a schema and publish it to GitHub. The schema will be the starting point of our reference documentation.",
      "wrap": true
    },
    {
      "type": "FactSet",
      "facts": [
        {
          "title": "Board:",
          "value": "Adaptive Cards"
        },
        {
          "title": "List:",
          "value": "Backlog"
        },
        {
          "title": "Assigned to:",
          "value": "Matt Hidinger"
        },
        {
          "title": "Due date:",
          "value": "Not set"
        }
      ]
    }
  ],
    "actions": [
        {
            "type": "Action.ShowCard",
            "title": "Set due date",
            "card": {
                "type": "AdaptiveCard",
                "body": [
                    {
                        "type": "Input.Date",
                        "id": "dueDate"
                    },
                    {
                        "type": "Input.Text",
                        "id": "comment",
                        "placeholder": "Add a comment",
                        "isMultiline": true
                    }
                ],
                "actions": [
                    {
                        "type": "Action.Submit",
                        "title": "OK"
                    }
                ],
                "$schema": "http://adaptivecards.io/schemas/adaptive-card.json"
            }
        },
        {
            "type": "Action.OpenUrl",
            "title": "View",
            "url": "https://adaptivecards.io"
        }
    ]
},
    cardsLayout: "list"
}
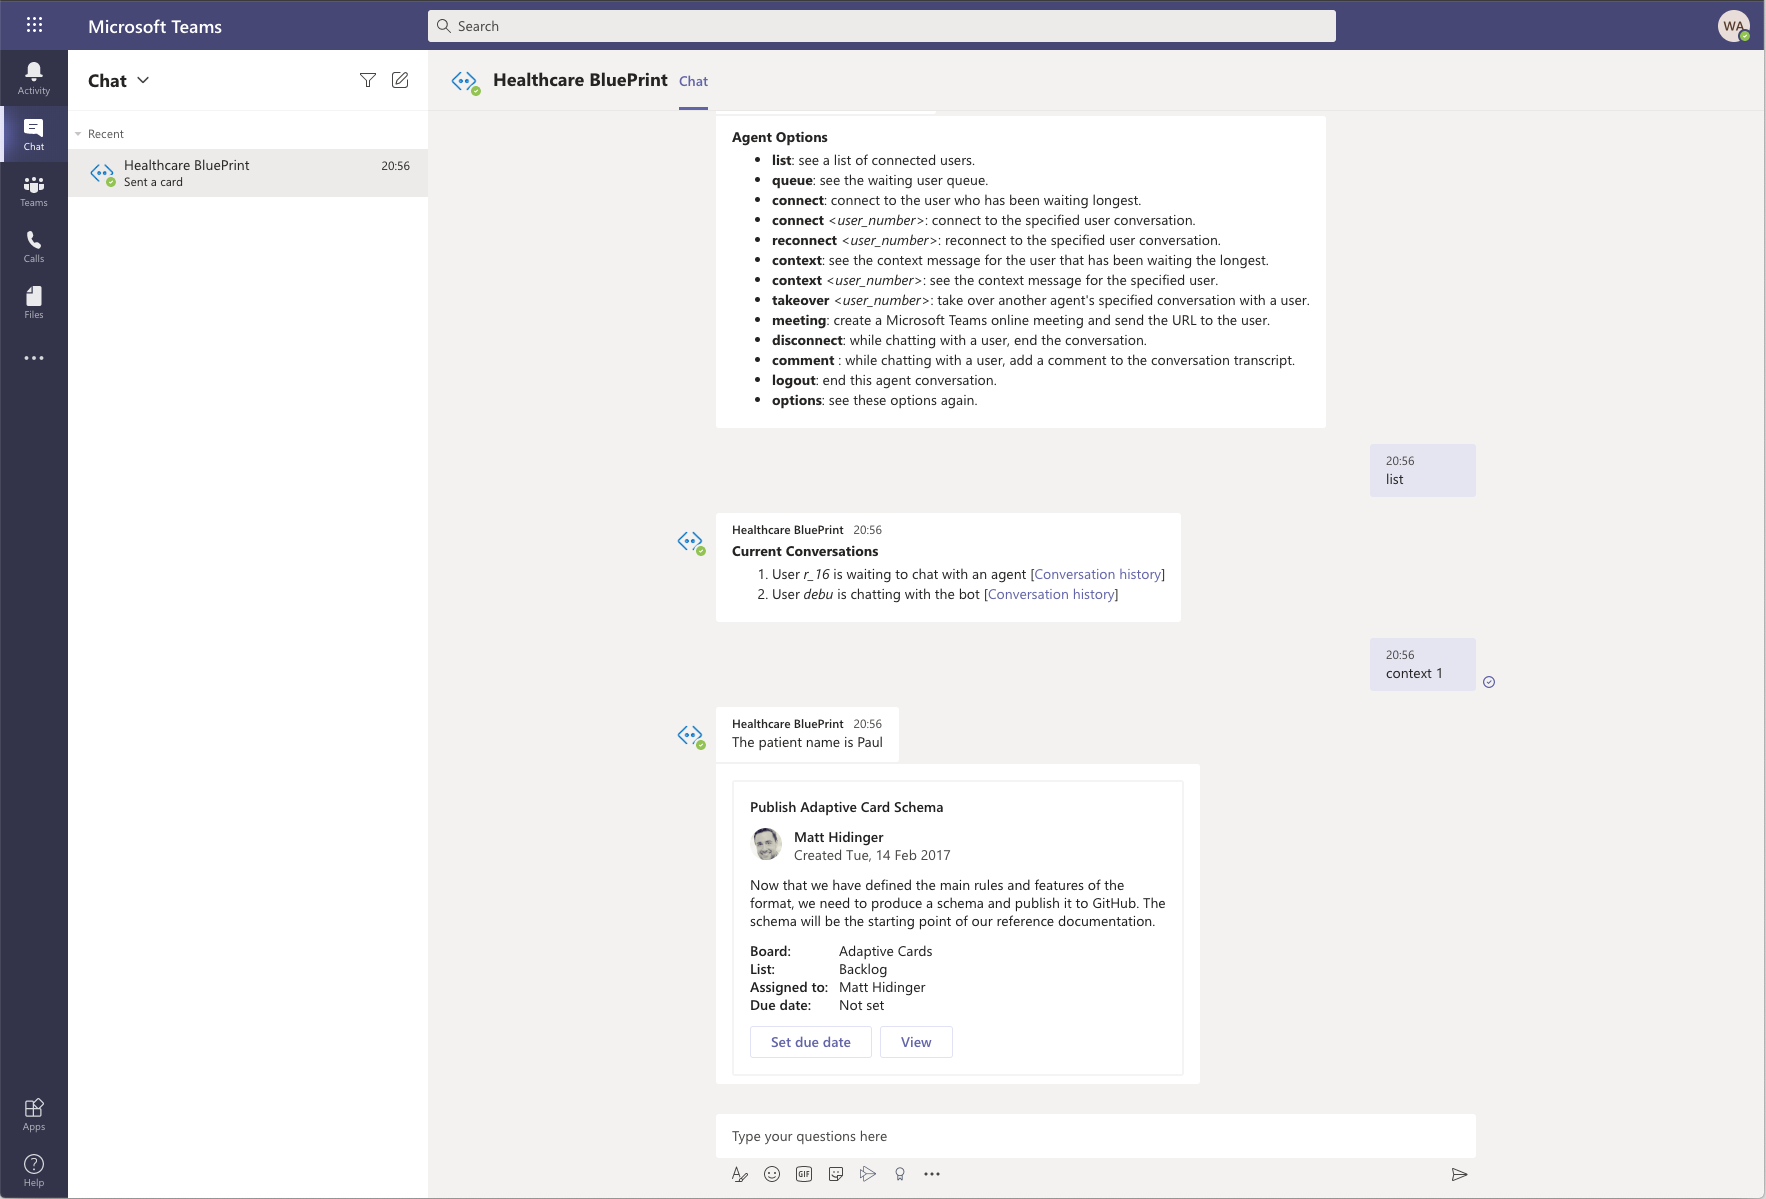
When the sample is used this is the experience that an agent sees. The agent needs to type the "context <user_number>" command to see the context message. The user number is the number in the queue.
Conversation History
In some cases, an agent wants to look at the full conversation history for the end user. For example, if they want other context. The conversation history for the end user is accessible from the agent webchat. There are two methods for retrieving a link to the conversation history:
- From the "list" and "queue" commands
- From the "Connect" command.
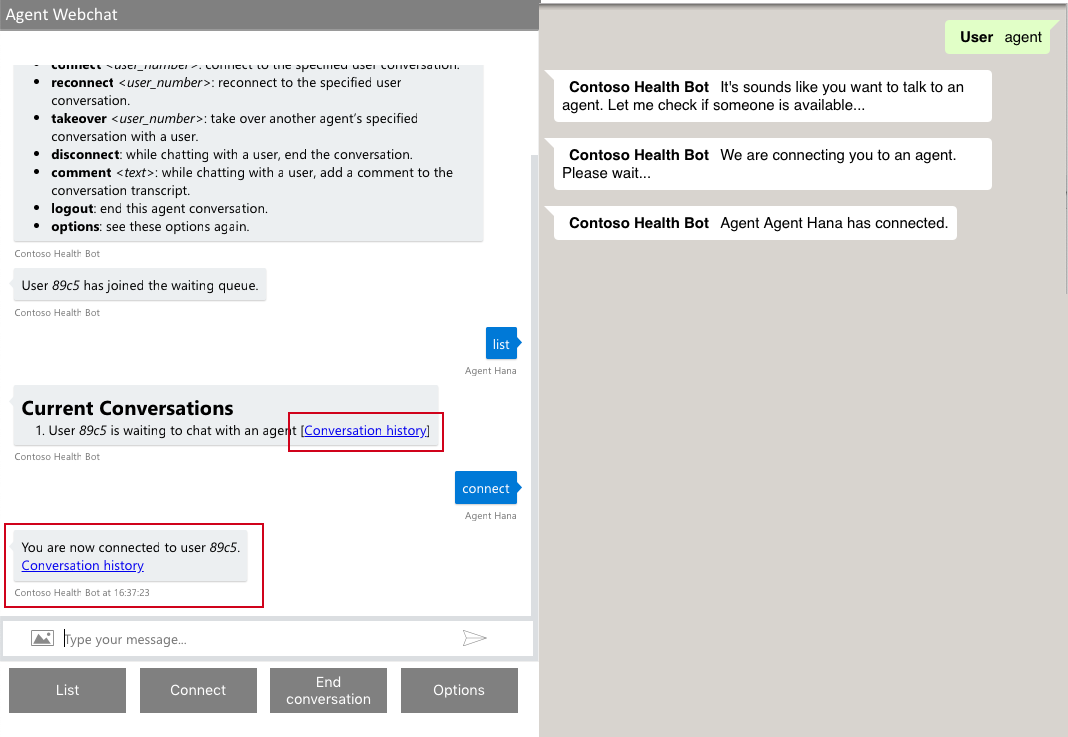
Clicking on the conversation history link will open a new tab with a transcript of the end users conversation. The link to the conversation history has a limited lifetime and will expire 15 minutes after creation.
Conversation summary
When the interaction with the end user is complete, the agent should issue the "disconnect" command to end the conversation. This sends a JSON formatted handoff summary to scenario results variable.
The hand off summary includes the following information:
- requestTime: Time stamp of when the end user requested an agent
- chatStartTime: Time stamp of when the end user stopped waiting and the conversation started
- AgentName: The name of the first agent that connected to conversation
- Transcript: Full conversation transcript excluding any internal comments.
- Comments: Agent utterances that were suppressed using the "comments" command or system comments (such as when an agent takes control of the conversation from a different agent)
- chatEndTime: Time stamp of when the agent ended the conversations
- status: An indication whether the full handoff flow ended successfully or no agents were available.
Example of the JSON payload that comes out of the handoff scenario.
{
    "requestTime": "2018-10-14T09:59:30.5370194Z",
    "chatStartTime": "2018-10-14T09:59:48Z",
    "agentName": "Adam",
    "transcript": [
        {
            "role": "User",
            "text": "Hi agent adam",
            "timestamp": "2018-10-14T09:59:57.6972098Z"
        },
        {
            "role": "Agent",
            "text": "Hi patient adam",
            "timestamp": "2018-10-14T10:00:15Z"
        },
        {
            "role": "Agent",
            "text": "How can I help?",
            "timestamp": "2018-10-14T10:00:31Z"
        },
        {
            "role": "User",
            "text": "I was wondering what the time is?",
            "timestamp": "2018-10-14T10:00:39.8688415Z"
        },
        {
            "role": "Agent",
            "text": "It’s 1300 ",
            "timestamp": "2018-10-14T10:00:46Z"
        },
        {
            "role": "User",
            "text": "Great, thanks",
            "timestamp": "2018-10-14T10:00:52.2272521Z"
        },
        {
            "role": "Agent",
            "text": "You’re welcome",
            "timestamp": "2018-10-14T10:00:58Z"
        }
    ],
    "comments": [],
    "chatEndTime": "2018-10-14T10:01:05Z",
    "status": "Chat Ended"
}
The JSON output can be consumed in the result variable of the "Begin" step in your scenario. You can then manipulate the data, for example can send it to your data warehouse or reporting software.
Queueing mechanism
The queuing mechanism is active when there are online agents that are logged into an agent webchat application. If no agents are available, the end user won't be able to join the queue. Instead, the end user sees a message that "No agents are currently available".
The handoff feature uses a FIFO (first in first out) queuing mechanism. When issuing the "List" command the end users are displayed to the agent in the order that they connected to the webchat. If the user changes to a new conversation state, they're bumped to the top of the list.
When agent uses the "Connect" command they'll automatically be connected with the end user that has been waiting the longest.
Handoff timeout
In some cases, it's unclear if the end user or agent have left the conversation. For example, the user can leave the webchat and become unresponsive.
In these cases, we disconnect the user if we see that their conversation has become idle. The handoff timeout mechanism removes the agent or the end user from the handoff list after a configurable period of inactivity.
The end user and agent timeout durations can be configured individually. Navigate to Configuration > Conversation > Handoff to modify these settings.
Multiple chats
Agents and end users can open multiple chat windows. Each window is considered as a separate conversation. For example, an agent can chat with two end users in different tabs or an end user can talk with the bot in one window and with the agent in another window.
Deploying the Agent Webchat
The agent webchat is an other channel that is connected to your bot instance. The healthcare agent service recognizes agents based on a flag, which is enabled by tenant after the agent is authenticated.
The agent webchat should be deployed as a separate application to the end user webchat. It can be deployed on a local network (your internal corporate network) however it will need a connection to the internet to communicate with the bot.
When deploying the webchat you'll also need to think about how you authenticate agents. If you already have a corporate authentication mechanism you'll need to perform the authentication first. You'll then need to build out custom logic into the webchat function that will check if your agent is authenticated:
Learn more about deploying the Agent webchat and download agent webchat sample code