Kom igång med Azure Communication Services UI-bibliotekssamtal till Teams Voice Apps
Det här projektet syftar till att vägleda utvecklare att initiera ett samtal från Azure Communication Services Calling Web SDK till Teams samtalskö och automatisk dirigering med hjälp av Azure Communication UI Library.
Enligt dina krav kan du behöva erbjuda dina kunder ett enkelt sätt att nå ut till dig utan någon komplex konfiguration.
Samtal till Teams samtalskö och automatisk dirigering är ett enkelt men effektivt koncept som underlättar omedelbar interaktion med kundsupport, finansiell rådgivare och andra kundinriktade team. Målet med den här självstudien är att hjälpa dig att initiera interaktioner med dina kunder när de klickar på en knapp på webben.
Om du vill prova kan du ladda ned koden från GitHub.
Om du följer den här självstudien kommer du att:
- Gör att du kan styra dina kunders ljud- och videoupplevelse beroende på ditt kundscenario
- Lär dig hur du skapar en widget för att starta anrop på din webbapp med hjälp av användargränssnittsbiblioteket.

Förutsättningar
De här stegen behövs för att följa den här självstudien. Kontakta Teams-administratören för de två sista objekten för att se till att du har konfigurerats på rätt sätt.
- Visual Studio Code på någon av plattformarna som stöds.
- Node.js rekommenderas Active LTS (långsiktig support) och versionerna Node 20.
node --versionAnvänd kommandot för att kontrollera din version. - En Azure Communication Services-resurs. Skapa en kommunikationsresurs
- Slutför konfigurationen av Teams-klientorganisationen för interoping med din Azure Communication Services-resurs
- Arbeta med Teams samtalsköer och Azure Communication Services.
- Arbeta med Automatisk dirigering i Teams och Azure Communication Services.
Söker efter Node och Visual Studio Code
Du kan kontrollera att Node har installerats korrekt med det här kommandot.
node -v
Utdata anger vilken version du har, det misslyckas om Node inte har installerats och lagts till i din PATH. Precis som med Node kan du kontrollera om VS Code har installerats med det här kommandot.
code --version
Precis som med Node misslyckas det här kommandot om det uppstod ett problem med att installera VS Code på datorn.
Komma igång
Den här självstudien innehåller 7 steg och i slutet kan appen anropa ett Teams-röstprogram. Stegen är:
- Konfigurera projektet
- Hämta dina beroenden
- Inledande appkonfiguration
- Skapa widgeten
- Formatera widgeten
- Konfigurera identitetsvärden
- Kör appen
1. Konfigurera projektet
Använd bara det här steget om du skapar ett nytt program.
För att konfigurera react-appen använder create-react-app vi kommandoradsverktyget. Det här verktyget skapar ett enkelt TypeScript-program som drivs av React.
Kontrollera att Node är installerat på datorn genom att köra det här kommandot i PowerShell eller terminalen för att se nodversionen:
node -v
Om du inte har create-react-app installerat på datorn kör du följande kommando för att installera det som ett globalt kommando:
npm install -g create-react-app
När kommandot har installerats kör du nästa kommando för att skapa ett nytt React-program för att skapa exemplet i:
# Create an Azure Communication Services App powered by React.
npx create-react-app ui-library-calling-widget-app --template typescript

# Change to the directory of the newly created App.
cd ui-library-calling-widget-app
När dessa kommandon har slutförts vill du öppna det skapade projektet i VS Code. Du kan öppna projektet med följande kommando.
code .
2. Hämta dina beroenden
Sedan måste du uppdatera beroendematrisen i så att den package.json innehåller några paket från Azure Communication Services för widgetupplevelsen som vi ska skapa för att fungera:
"@azure/communication-calling": "^1.23.1",
"@azure/communication-chat": "^1.4.0",
"@azure/communication-react": "^1.15.0",
"@azure/communication-calling-effects": "1.0.1",
"@azure/communication-common": "2.3.0",
"@fluentui/react-icons": "~2.0.203",
"@fluentui/react": "~8.98.3",
Om du vill installera de nödvändiga paketen kör du följande Node Package Manager-kommando.
npm install
När du har installerat de här paketen är du redo att börja skriva koden som skapar programmet. I den här självstudien ändrar vi filerna i src katalogen.
3. Inledande appkonfiguration
För att komma igång ersätter vi det angivna App.tsx innehållet med en huvudsida som gör följande:
- Lagra all Information om Azure-kommunikation som vi behöver för att skapa en CallAdapter för att driva vår samtalsupplevelse
- Visa vår widget som exponeras för slutanvändaren.
Filen App.tsx bör se ut så här:
src/App.tsx
import "./App.css";
import {
  CommunicationIdentifier,
  MicrosoftTeamsAppIdentifier,
} from "@azure/communication-common";
import {
  Spinner,
  Stack,
  initializeIcons,
  registerIcons,
  Text,
} from "@fluentui/react";
import { CallAdd20Regular, Dismiss20Regular } from "@fluentui/react-icons";
import logo from "./logo.svg";

import { CallingWidgetComponent } from "./components/CallingWidgetComponent";

registerIcons({
  icons: { dismiss: <Dismiss20Regular />, callAdd: <CallAdd20Regular /> },
});
initializeIcons();
function App() {
  /**
   * Token for local user.
   */
  const token = "<Enter your ACS Token here>";

  /**
   * User identifier for local user.
   */
  const userId: CommunicationIdentifier = {
    communicationUserId: "Enter your ACS Id here",
  };

  /**
   * Enter your Teams voice app identifier from the Teams admin center here
   */
  const teamsAppIdentifier: MicrosoftTeamsAppIdentifier = {
    teamsAppId: "<Enter your Teams Voice app id here>",
    cloud: "public",
  };

  const widgetParams = {
    userId,
    token,
    teamsAppIdentifier,
  };

  if (!token || !userId || !teamsAppIdentifier) {
    return (
      <Stack verticalAlign="center" style={{ height: "100%", width: "100%" }}>
        <Spinner
          label={"Getting user credentials from server"}
          ariaLive="assertive"
          labelPosition="top"
        />
      </Stack>
    );
  }

  return (
    <Stack
      style={{ height: "100%", width: "100%", padding: "3rem" }}
      tokens={{ childrenGap: "1.5rem" }}
    >
      <Stack tokens={{ childrenGap: "1rem" }} style={{ margin: "auto" }}>
        <Stack
          style={{ padding: "3rem" }}
          horizontal
          tokens={{ childrenGap: "2rem" }}
        >
          <Text style={{ marginTop: "auto" }} variant="xLarge">
            Welcome to a Calling Widget sample
          </Text>
          <img
            style={{ width: "7rem", height: "auto" }}
            src={logo}
            alt="logo"
          />
        </Stack>

        <Text>
          Welcome to a Calling Widget sample for the Azure Communication
          Services UI Library. Sample has the ability to connect you through
          Teams voice apps to a agent to help you.
        </Text>
        <Text>
          As a user all you need to do is click the widget below, enter your
          display name for the call - this will act as your caller id, and
          action the <b>start call</b> button.
        </Text>
      </Stack>
      <Stack
        horizontal
        tokens={{ childrenGap: "1.5rem" }}
        style={{ overflow: "hidden", margin: "auto" }}
      >
        <CallingWidgetComponent
          widgetAdapterArgs={widgetParams}
          onRenderLogo={() => {
            return (
              <img
                style={{ height: "4rem", width: "4rem", margin: "auto" }}
                src={logo}
                alt="logo"
              />
            );
          }}
        />
      </Stack>
    </Stack>
  );
}

export default App;
I det här kodfragmentet registrerar vi två nya ikoner <Dismiss20Regular/> och <CallAdd20Regular>. Dessa nya ikoner används i widgetkomponenten som vi skapar i nästa avsnitt.
4. Skapa widgeten
Nu måste vi skapa en widget som kan visas i tre olika lägen:
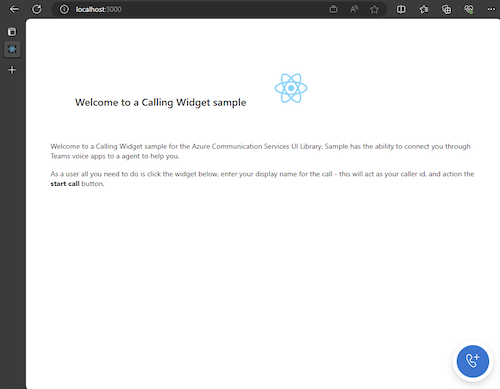
- Väntar: Det här widgettillståndet är hur komponenten ska vara i före och efter att ett anrop har gjorts
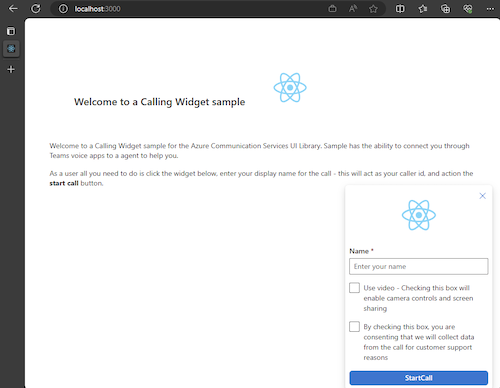
- Installation: Det här tillståndet är när widgeten frågar efter information från användaren som deras namn.
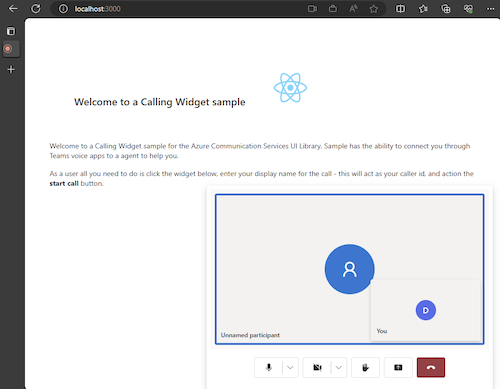
- I ett anrop: Widgeten ersätts här med UI-biblioteket Call Composite. Det här widgetläget är när användaren anropar röstappen eller pratar med en agent.
Låter skapa en mapp med namnet src/components. I den här mappen skapar du en ny fil med namnet CallingWidgetComponent.tsx. Den här filen bör se ut som följande kodfragment:
CallingWidgetComponent.tsx
import {
  IconButton,
  PrimaryButton,
  Stack,
  TextField,
  useTheme,
  Checkbox,
  Icon,
  Spinner,
} from "@fluentui/react";
import React, { useEffect, useRef, useState } from "react";
import {
  callingWidgetSetupContainerStyles,
  checkboxStyles,
  startCallButtonStyles,
  callingWidgetContainerStyles,
  callIconStyles,
  logoContainerStyles,
  collapseButtonStyles,
} from "../styles/CallingWidgetComponent.styles";

import {
  AzureCommunicationTokenCredential,
  CommunicationUserIdentifier,
  MicrosoftTeamsAppIdentifier,
} from "@azure/communication-common";
import {
  CallAdapter,
  CallAdapterState,
  CallComposite,
  CommonCallAdapterOptions,
  StartCallIdentifier,
  createAzureCommunicationCallAdapter,
} from "@azure/communication-react";
// lets add to our react imports as well
import { useMemo } from "react";

import { callingWidgetInCallContainerStyles } from "../styles/CallingWidgetComponent.styles";

/**
 * Properties needed for our widget to start a call.
 */
export type WidgetAdapterArgs = {
  token: string;
  userId: CommunicationUserIdentifier;
  teamsAppIdentifier: MicrosoftTeamsAppIdentifier;
};

export interface CallingWidgetComponentProps {
  /**
   *  arguments for creating an AzureCommunicationCallAdapter for your Calling experience
   */
  widgetAdapterArgs: WidgetAdapterArgs;
  /**
   * Custom render function for displaying logo.
   * @returns
   */
  onRenderLogo?: () => JSX.Element;
}

/**
 * Widget for Calling Widget
 * @param props
 */
export const CallingWidgetComponent = (
  props: CallingWidgetComponentProps
): JSX.Element => {
  const { onRenderLogo, widgetAdapterArgs } = props;

  const [widgetState, setWidgetState] = useState<"new" | "setup" | "inCall">(
    "new"
  );
  const [displayName, setDisplayName] = useState<string>();
  const [consentToData, setConsentToData] = useState<boolean>(false);
  const [useLocalVideo, setUseLocalVideo] = useState<boolean>(false);
  const [adapter, setAdapter] = useState<CallAdapter>();

  const callIdRef = useRef<string>();

  const theme = useTheme();

  // add this before the React template
  const credential = useMemo(() => {
    try {
      return new AzureCommunicationTokenCredential(widgetAdapterArgs.token);
    } catch {
      console.error("Failed to construct token credential");
      return undefined;
    }
  }, [widgetAdapterArgs.token]);

  const adapterOptions: CommonCallAdapterOptions = useMemo(
    () => ({
      callingSounds: {
        callEnded: { url: "/sounds/callEnded.mp3" },
        callRinging: { url: "/sounds/callRinging.mp3" },
        callBusy: { url: "/sounds/callBusy.mp3" },
      },
    }),
    []
  );

  const callAdapterArgs = useMemo(() => {
    return {
      userId: widgetAdapterArgs.userId,
      credential: credential,
      targetCallees: [
        widgetAdapterArgs.teamsAppIdentifier,
      ] as StartCallIdentifier[],
      displayName: displayName,
      options: adapterOptions,
    };
  }, [
    widgetAdapterArgs.userId,
    widgetAdapterArgs.teamsAppIdentifier.teamsAppId,
    credential,
    displayName,
  ]);

  useEffect(() => {
    if (adapter) {
      adapter.on("callEnded", () => {
        /**
         * We only want to reset the widget state if the call that ended is the same as the current call.
         */
        if (
          adapter.getState().acceptedTransferCallState &&
          adapter.getState().acceptedTransferCallState?.id !== callIdRef.current
        ) {
          return;
        }
        setDisplayName(undefined);
        setWidgetState("new");
        setConsentToData(false);
        setAdapter(undefined);
        adapter.dispose();
      });

      adapter.on("transferAccepted", (e) => {
        console.log("transferAccepted", e);
      });

      adapter.onStateChange((state: CallAdapterState) => {
        if (state?.call?.id && callIdRef.current !== state?.call?.id) {
          callIdRef.current = state?.call?.id;
          console.log(`Call Id: ${callIdRef.current}`);
        }
      });
    }
  }, [adapter]);

  /** widget template for when widget is open, put any fields here for user information desired */
  if (widgetState === "setup") {
    return (
      <Stack
        styles={callingWidgetSetupContainerStyles(theme)}
        tokens={{ childrenGap: "1rem" }}
      >
        <IconButton
          styles={collapseButtonStyles}
          iconProps={{ iconName: "Dismiss" }}
          onClick={() => {
            setDisplayName(undefined);
            setConsentToData(false);
            setUseLocalVideo(false);
            setWidgetState("new");
          }}
        />
        <Stack tokens={{ childrenGap: "1rem" }} styles={logoContainerStyles}>
          <Stack style={{ transform: "scale(1.8)" }}>
            {onRenderLogo && onRenderLogo()}
          </Stack>
        </Stack>
        <TextField
          label={"Name"}
          required={true}
          placeholder={"Enter your name"}
          onChange={(_, newValue) => {
            setDisplayName(newValue);
          }}
        />
        <Checkbox
          styles={checkboxStyles(theme)}
          label={
            "Use video - Checking this box will enable camera controls and screen sharing"
          }
          onChange={(_, checked?: boolean | undefined) => {
            setUseLocalVideo(!!checked);
            setUseLocalVideo(true);
          }}
        ></Checkbox>
        <Checkbox
          required={true}
          styles={checkboxStyles(theme)}
          disabled={displayName === undefined}
          label={
            "By checking this box, you are consenting that we will collect data from the call for customer support reasons"
          }
          onChange={async (_, checked?: boolean | undefined) => {
            setConsentToData(!!checked);
            if (callAdapterArgs && callAdapterArgs.credential) {
              setAdapter(
                await createAzureCommunicationCallAdapter({
                  displayName: displayName ?? "",
                  userId: callAdapterArgs.userId,
                  credential: callAdapterArgs.credential,
                  targetCallees: callAdapterArgs.targetCallees,
                  options: callAdapterArgs.options,
                })
              );
            }
          }}
        ></Checkbox>
        <PrimaryButton
          styles={startCallButtonStyles(theme)}
          onClick={() => {
            if (displayName && consentToData && adapter) {
              setWidgetState("inCall");
              adapter?.startCall(callAdapterArgs.targetCallees, {
                audioOptions: { muted: false },
              });
            }
          }}
        >
          {!consentToData && `Enter your name`}
          {consentToData && !adapter && (
            <Spinner ariaLive="assertive" labelPosition="top" />
          )}
          {consentToData && adapter && `StartCall`}
        </PrimaryButton>
      </Stack>
    );
  }

  if (widgetState === "inCall" && adapter) {
    return (
      <Stack styles={callingWidgetInCallContainerStyles(theme)}>
        <CallComposite
          adapter={adapter}
          options={{
            callControls: {
              cameraButton: useLocalVideo,
              screenShareButton: useLocalVideo,
              moreButton: false,
              peopleButton: false,
              displayType: "compact",
            },
            localVideoTile: !useLocalVideo ? false : { position: "floating" },
          }}
        />
      </Stack>
    );
  }

  return (
    <Stack
      horizontalAlign="center"
      verticalAlign="center"
      styles={callingWidgetContainerStyles(theme)}
      onClick={() => {
        setWidgetState("setup");
      }}
    >
      <Stack
        horizontalAlign="center"
        verticalAlign="center"
        style={{
          height: "4rem",
          width: "4rem",
          borderRadius: "50%",
          background: theme.palette.themePrimary,
        }}
      >
        <Icon iconName="callAdd" styles={callIconStyles(theme)} />
      </Stack>
    </Stack>
  );
};
CallAdapterOptionsI ser vi några ljudfiler som refereras till, de här filerna ska använda funktionen Samtalsljud i CallComposite. Om du är intresserad av att använda ljuden kan du läsa den färdiga koden för att ladda ned ljudfilerna.
5. Formatera widgeten
Vi måste skriva några formatmallar för att se till att widgeten ser lämplig ut och kan innehålla vårt anropskomposit. Dessa format bör redan användas i widgeten om du kopierar kodfragmentet som vi lade till i filen CallingWidgetComponent.tsx.
Låt oss skapa en ny mapp som heter src/styles i den här mappen och skapa en fil med namnet CallingWidgetComponent.styles.ts. Filen bör se ut som följande kodfragment:
import {
  IButtonStyles,
  ICheckboxStyles,
  IIconStyles,
  IStackStyles,
  Theme,
} from "@fluentui/react";

export const checkboxStyles = (theme: Theme): ICheckboxStyles => {
  return {
    label: {
      color: theme.palette.neutralPrimary,
    },
  };
};

export const callingWidgetContainerStyles = (theme: Theme): IStackStyles => {
  return {
    root: {
      width: "5rem",
      height: "5rem",
      padding: "0.5rem",
      boxShadow: theme.effects.elevation16,
      borderRadius: "50%",
      bottom: "1rem",
      right: "1rem",
      position: "absolute",
      overflow: "hidden",
      cursor: "pointer",
      ":hover": {
        boxShadow: theme.effects.elevation64,
      },
    },
  };
};

export const callingWidgetSetupContainerStyles = (
  theme: Theme
): IStackStyles => {
  return {
    root: {
      width: "18rem",
      minHeight: "20rem",
      maxHeight: "25rem",
      padding: "0.5rem",
      boxShadow: theme.effects.elevation16,
      borderRadius: theme.effects.roundedCorner6,
      bottom: 0,
      right: "1rem",
      position: "absolute",
      overflow: "hidden",
      cursor: "pointer",
      background: theme.palette.white,
    },
  };
};

export const callIconStyles = (theme: Theme): IIconStyles => {
  return {
    root: {
      paddingTop: "0.2rem",
      color: theme.palette.white,
      transform: "scale(1.6)",
    },
  };
};

export const startCallButtonStyles = (theme: Theme): IButtonStyles => {
  return {
    root: {
      background: theme.palette.themePrimary,
      borderRadius: theme.effects.roundedCorner6,
      borderColor: theme.palette.themePrimary,
    },
    textContainer: {
      color: theme.palette.white,
    },
  };
};

export const logoContainerStyles: IStackStyles = {
  root: {
    margin: "auto",
    padding: "0.2rem",
    height: "5rem",
    width: "10rem",
    zIndex: 0,
  },
};

export const collapseButtonStyles: IButtonStyles = {
  root: {
    position: "absolute",
    top: "0.2rem",
    right: "0.2rem",
    zIndex: 1,
  },
};

export const callingWidgetInCallContainerStyles = (
  theme: Theme
): IStackStyles => {
  return {
    root: {
      width: "35rem",
      height: "25rem",
      padding: "0.5rem",
      boxShadow: theme.effects.elevation16,
      borderRadius: theme.effects.roundedCorner6,
      bottom: 0,
      right: "1rem",
      position: "absolute",
      overflow: "hidden",
      cursor: "pointer",
      background: theme.semanticColors.bodyBackground,
    },
  };
};
6. Konfigurera identitetsvärden
Innan vi kör appen går du till App.tsx och ersätter platshållarvärdena där med dina Azure Communication Services-identiteter och resurskontoidentifieraren för ditt Teams Voice-program. Här är indatavärden för token, userId och teamsAppIdentifier.
./src/App.tsx
/**
 * Token for local user.
 */
const token = "<Enter your ACS Token here>";

/**
 * User identifier for local user.
 */
const userId: CommunicationIdentifier = {
  communicationUserId: "Enter your ACS Id here",
};

/**
 * Enter your Teams voice app identifier from the Teams admin center here
 */
const teamsAppIdentifier: MicrosoftTeamsAppIdentifier = {
  teamsAppId: "<Enter your Teams Voice app id here>",
  cloud: "public",
};
7. Kör appen
Slutligen kan vi köra programmet för att göra våra anrop! Kör följande kommandon för att installera våra beroenden och kör appen.
# Install the new dependencies
npm install

# run the React app
npm run start
När appen körs kan du se den i http://localhost:3000 webbläsaren. Du bör se följande välkomstskärm:

När du sedan åtgärdar widgetknappen bör du se en liten meny:

När du har fyllt i ditt namn klickar du på Starta samtal så ska samtalet börja. Widgeten bör se ut så här när du har startat ett anrop:

Nästa steg
Mer information om Teams röstprogram finns i vår dokumentation om automatiska Teams-dirigeringar och Teams samtalsköer. Eller se vår självstudie om hur du skapar en liknande upplevelse med JavaScript-paket.
Snabbstart: Ansluta din samtalsapp till en automatisk Teams-dirigering