How To Build A Chatbot FAQ With The Azure Bot Service
Editor's note: The following post was written by Visual Studio and Development Technologies MVP Joe Mayo *as part of our Technical Tuesday series. Mia Chang of the Technical Committee served as the Technical Reviewer of this piece. *
On December 13th 2017, Microsoft announced the general availability of the Azure Bot Service. In a nutshell, the Azure Bot Service helps you build conversational applications. If you’re new to chatbots, think of them as something like apps, except they excel in situations where conversation is more natural. A great example of this is Frequently Asked Questions (FAQs).
Think of all the times you’ve visited a product FAQ and encountered many pages of information. The volume of data and time it takes to hunt for an answer can take a while. Wouldn’t it be nice to ask someone who knows the answer right away? This is a good scenario for a chatbot. You can ask a question in plain language and receive an answer.
This post shows how easy it is to build a chatbot FAQ with the Azure Bot Service:
The approach
There are different tools available to accomplish building a chatbot, and this section describes the choices. The Azure Bot Service supports two languages: C# and node.js. We’ll use C#. We could also use the Azure Bot Service tools built into Azure, or use the Bot Builder SDK with Visual Studio. I’ll be using the latter strategy, using the Visual Studio Bot Application project template.
This chatbot will use the Microsoft QnA Maker service, which helps automate the FAQ. Later, I’ll show how to import an existing FAQ, streamlining the process of getting data into the QnA Maker. The particular FAQ will be for my open source project, LINQ to Twitter, a LINQ provider for the Twitter API.
Setting up the chatbot project
To get started, you’ll need to install the Bot Application project template, which you can find on Microsoft’s Bot Builder Quick Start page. We’ll also be using the Bot Dialog template in this post. Once you have the project and item templates installed, open Visual Studio and select File | New | Project. Select the Bot Application project, name your project (I called mine LinqToTwitterFAQ), and click OK. Make sure your project builds. Next, update NuGet packages, by right-clicking the project and and selecting Update NuGet packages. Go to the Updates tab and update all the packages to get the latest version of the Bot Builder SDK and related dependencies.
The QnA Maker is part of the Microsoft Cognitive Services and is a REST API. This means you can access it via HTTP, using HttpClient or whatever your favorite library is for accessing a REST service. Rather than write all that code, this post takes advantage of a NuGet package that simplifies integrating QnA Maker with a Bot Builder chatbot. To load this package, open NuGet, navigate to the Browse tab and type Microsoft.Bot.Builder.CognitiveServices, which you can see in the following figure:
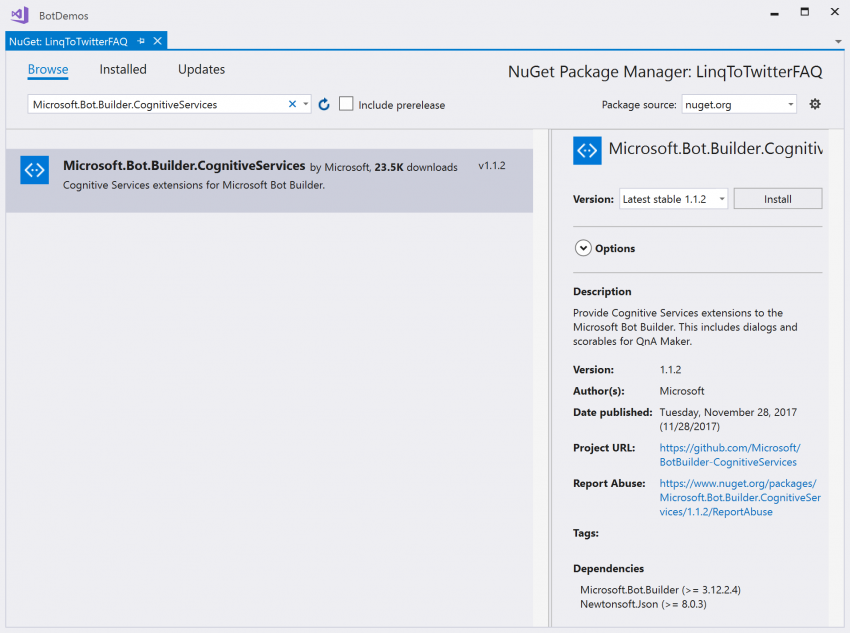
Click Install to add the package. Note that the code for this post works with v1.1.2 in Visual Studio 2017 – so, if something changes in the future, you might need to adjust your software versions to get this to work.
Like much of the other software that Microsoft produces these days, the Cognitive Services libraries are open source, which you can find on the Bot Builder Cognitive Services GitHub page. Now the chatbot project is ready for adding QnA Maker code. Before doing that, lets set up the QnA Maker FAQ.
Setting up the QnA Maker FAQ
The QnA Maker is a Microsoft Cognitive Services product that you can set up via website at https://qnamaker.ai/. To get started, sign in and click on the Create new service tab. The following Figure shows the Creating a QnA service page, after filling in a couple fields:
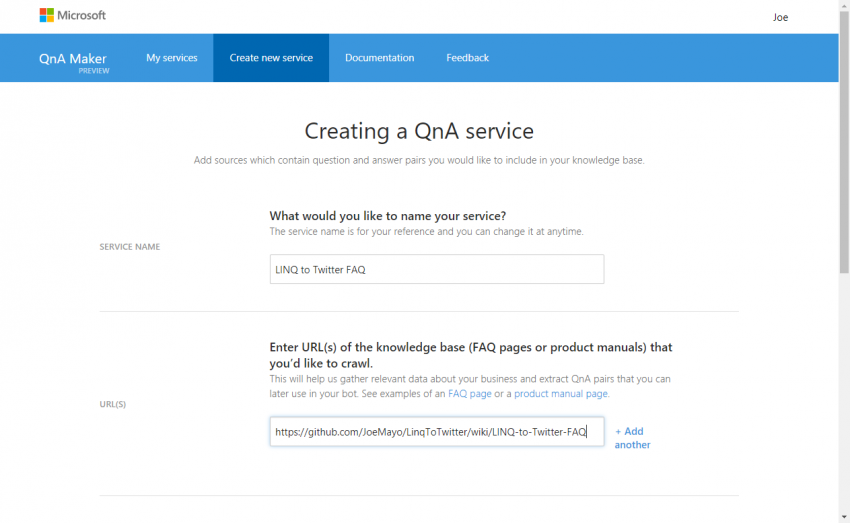
In the Creating a QnA service page, SERVICE NAME is a unique name for the FAQ, I used LINQ to Twitter FAQ. QnA Maker gives you three ways to create the FAQ: via a web page URL, uploading a file, or manually entering questions and answers. Since LINQ to Twitter already has a FAQ on the GitHub wiki for the project, I added the URL: https://github.com/JoeMayo/LinqToTwitter/wiki/LINQ-to-Twitter-FAQ.
The FILES option lets you upload a file in various formats, like tab-separated variable, PDF, MS-Word, or Excel. Whether you use a URL or file, QnA Maker infers which lines are questions and which lines are the answers. QnA maker is very smart at this, as the LINQ to Twitter FAQ has questions formatted in Markdown like this:
    <h3>1. I get a <em>401 Unauthorized</em> Exception. How to I
figure out the problem?</h3>
    <p>A <em>401 Unauthorized</em> message means that the Twitter
server is unable to authorize you. There are several causes for this
problem and the following checklist should help you work through the
problems:</p>
The actual HTML is more complex than that, but QnA Maker figures out that the <h3> content is the question and the <p> content is the answer. After specifying name and content options, scroll to the bottom of the page and click the Create button. QnA Maker then reads the data and opens an editor where you can modify questions and answers, shown in the figure below: 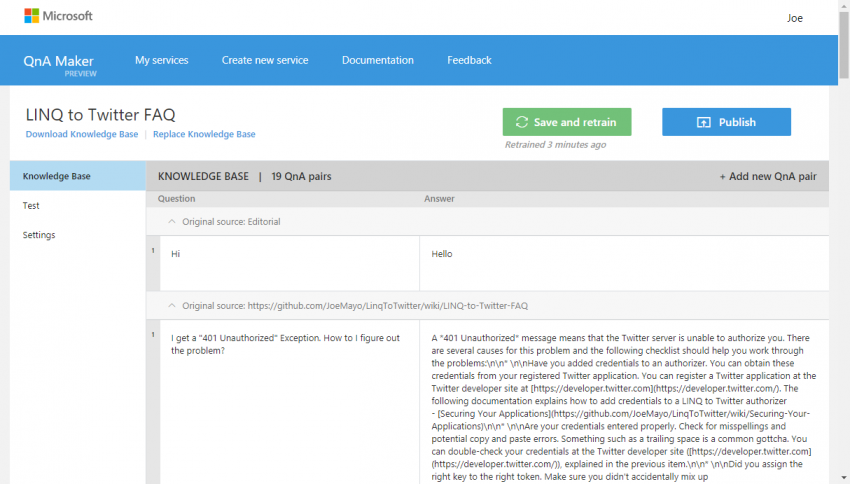
As good as QnA Maker is at figuring out questions and matching answers, it isn’t perfect – especially considering the myriad of ways people can write and format a FAQ. That means you should review the results of importing a FAQ to ensure it worked properly.
Things to check include making sure that each question has a matching answer, content doesn’t have strange characters, and that URLs are formatted properly. Sometimes it will catch a question, but only part of the answer if it interprets formatting that makes it believe an answer has ended. The service is continuously improving over time, but at a minimum, this saves you a ton of time by avoiding all the manual data entry. That said, remember that there is a manual data entry option, allowing you to copy and paste questions and answers into the editing grid, which you can do by clicking the Add new QnA pair button above the editing grid.
Tip: As you’re editing, be aware that QnA Maker supports Markdown format. Markdown is a quick way to write readable text that can also be translated to HTML. You can learn more about it with a quick Bing search. This is important to know because some normal characters will be interpreted as Markdown, causing the text to not appear the way you would expect.
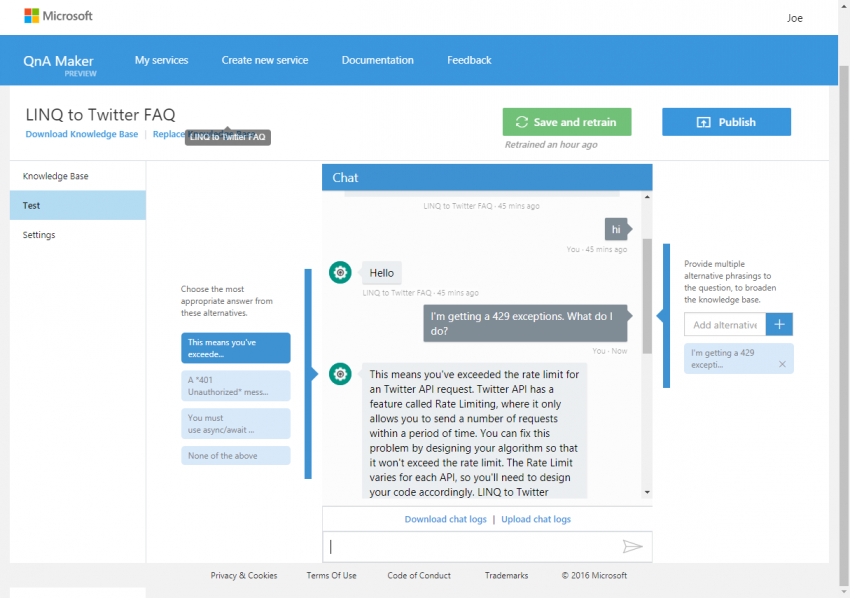
Click the Save and retrain button to save the FAQ. The retrain part is because QnA Maker uses machine learning to match plain text user questions with answers. After Save and retrain, click on the Test tab (left side of screen) to see how the FAQ works. The following figure shows the Test console:
Testing and training the QnA Maker FAQ
The Test console isn’t a normal chat interface because it has some training options on the left and right. In the Figure, I asked the question “I’m getting a 429 exceptions. What do I do?”
First of all, notice that I misspelled the word “exceptions” as plural. Also, the text doesn’t match the question from the original FAQ, which is “I received an Exception with HTTP Status 429. What does that mean?”. Yet, QnA maker replied with the correct answer. This is the machine learning part, where the user doesn’t have to ask an exact question or spell every word correctly.
On the left of the Figure, notice that it also highlighted the chosen answer in blue. Had QnA Maker accidentally chosen the wrong answer, I could have clicked on one of the other answers to let it know which was correct. As you might have noticed, the 401 answer was the next in the list, which seems like a close (yet inaccurate) alternative.
On the right of the Figure is an edit box that lets you add alternative phrases for this question. When initially creating a FAQ, you’ll likely have only one question for a given answer. This is fine for a print FAQ, but people will ask questions in many different ways. You can anticipate this by adding different questions that a user might ask. Through entering questions, selecting appropriate answers, and adding alternative phrases, you can make a FAQ smarter. When you’re done. click the Save and retrain button to let QnA Maker
incorporate your changes. Next, click the Publish button, review changes, and click Publish again, which shows a screen containing HTTP POST instructions, similar to the following:
 POST /knowledgebases/<Knowledge Base ID>/generateAnswer
Host: https://westus.api.cognitive.microsoft.com/qnamaker/v2.0
Ocp-Apim-Subscription-Key: <Subscription Key>
Content-Type: application/json
{"question":"hi"}
While you can use that information to write code that makes a request to the service, we’ll be building a chatbot that makes the code simpler. Copy the Knowledge Base ID and the Subscription Key. You’ll need those for the next section when adding code to make a chatbot call QnA Maker.
Connecting the chatbot to the QnA Maker FAQ
Earlier, we created a project to set up the chatbot with the Bot Builder SDK. Now, we’re going to connect this chatbot with the LINQ to Twitter FAQ. Go back to the LINQ to Twitter FAQ chatbot, right-click on the Dialogs folder, select Add, select New Item, and you’ll see the Add New Item window. Click the Visual C# folder, click on the Bot Dialog template, name the dialog (I used LinqToTwitterDialog), and click Add. Note: If you didn’t install the Bot Dialog item template, just create a new class file. Modify the code in LinqToTwitterDialog.cs so it looks like the Listing below:
 using System;
using Microsoft.Bot.Builder.CognitiveServices.QnAMaker;

namespace LinqToTwitterFAQ.Dialogs
{
 [Serializable]
 [QnAMaker(
 subscriptionKey: "<Your Subscription Key>",
 knowledgebaseId: "<Your Knowledge Base ID")]
 public class LinqToTwitterDialog : QnAMakerDialog
 {
 }
}
In the code above, add your Subscription Key and Knowledge Base ID to the QnAMaker attribute. In addition to having the QnAMaker attribute, LinqToTwitterDialogderives from QnAMakerDialog, which comes from the Microsoft.Bot.Builder.CognitiveServices NuGet package you referenced earlier. The final coding task is to tell the chatbot to use this new dialog by modifying MessagesController, shown below:
       public async Task Post([FromBody]Activity activity)
        {
           if (activity.Type == ActivityTypes.Message)
           {
               await Conversation.SendAsync(activity, () => new
Dialogs.LinqToTwitterDialog());
            }
            else
            {
                HandleSystemMessage(activity);
             }
             var response =
Request.CreateResponse(HttpStatusCode.OK);
      return response;
        }
The only thing that changes in MessagesController is the second argument to SendAsync, instantiating LinqToTwitterDialog, rather than RootDialog. You now have working code and are ready to test.
Testing the chatbot
To test a chatbot, run the chatbot project and then open the Bot Framework Channel Emulator. Microsoft’s docs for Debugging bots with the Bot Framework Emulator explains how to download and configure the emulator if you haven’t already done so. Observe the URL in the browser from running the chatbot and add that URL to the emulator to communicate with the chatbot. Tip: don’t forget to append /api/messages to the end of the URL. The following image shows the Emulator communicating with the LINQ to Twitter FAQ chatbot: 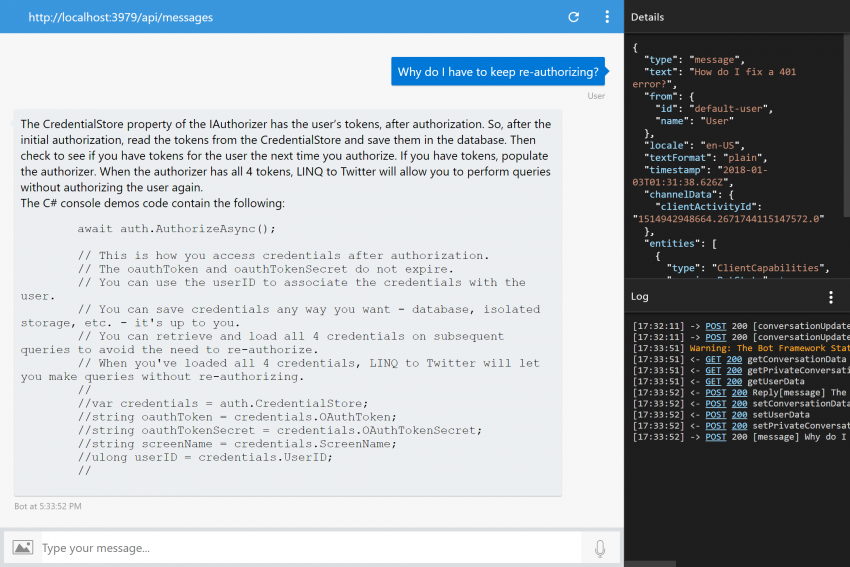
Again, I asked the chatbot a question that wasn’t exactly like the original question and QnA Maker still figured out what the answer was. You now have a working chatbot that understands natural language queries and answers based on a FAQ list.
Where to from here
This blog post showed how to build a chatbot and test it in the emulator, but you’ll want to deploy the chatbot to a channel, where users can find it. You can find more information on how to register a chatbot and configure a channel in the Microsoft Azure Bot Service documentation. Another resource is my recently released book, Programming the Microsoft Bot Framework - Programming the Microsoft Bot Framework: A Multiplatform Approach to Building Chatbots/Microsoft Press (aka.ms/botbook).
QnA Maker has even more features, like Active Learning and message customizations that enhance the user experience. You can learn more about those features at the Bot Builder Cognitive Services GitHub site.
All the code for this post is in my Bot Demos project on GitHub.
You can find me on Twitter at @JoeMayo.
 Joe Mayo is an author and independent software consultant, specializing in Microsoft technologies. He has written several books, including Programming the Microsoft Bot Framework by Microsoft Press. A long-time MVP with several years of awards, he lives in Las Vegas, NV and tweets (as @JoeMayo) about #BotFramework and #AI on Twitter.