Anteckning
Åtkomst till den här sidan kräver auktorisering. Du kan prova att logga in eller ändra kataloger.
Åtkomst till den här sidan kräver auktorisering. Du kan prova att ändra kataloger.
The Managed Extensibility Framework (MEF) supports you in creating loosely coupled and partitioned applications. To embrace those paradigms makes sense for many reasons. Some of the various benefits are:
- Share work across multiple developers or development team and have a well defined boundaries for the work items of the teams based on MEF components
- Dynamic extension or updates of application parts or components without a complete redeployment and long downtimes
MEF has been around in the .Net Framework for quite some time and since the current release of Silverlight 4 it is also available for use in Silverlight applications.
Especially for the use in Silverlight and to introduce application partitioning on with having application XAP files as physical component boundaries it was necessary to alter the capabilities of the DirectoryCatalog class as now the the application parts are not sitting in a local file system directory as assemblies but as XAP archives on a remote web server.
Therefore the DirectoryCatalog was replaced by the DeploymentCatalog in Silverlight. However as far as I understand this comes with one shortcoming which is that you need to specify an direct URL to the XAP files that you want to include into your application. As long as you do not externalize a component that provides those URLs you won not much in terms of loose coupling. But if you do externalize the URL “injection” you have all possibilities MEF offers with respect to dynamically compose applications. Even more you then also have better possibilities to use Windows Azure as the hosting environment for your Silverlight Application. In this Blog post I will demonstrate how this can work in an easy example.
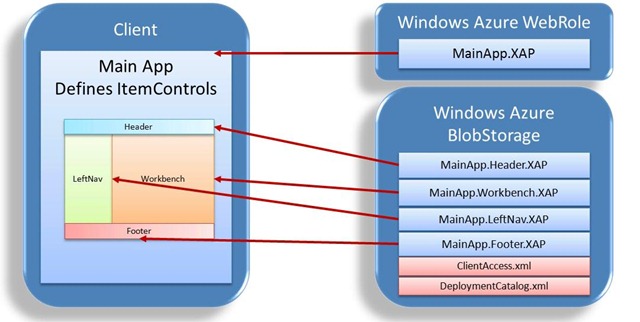
The sample application is partitioned based on UI components to make the concept as obvious as possible. First the main application simply defines some UI areas with an ItemsControl as placeholder for the actual partial UI coming from the external XAPs. So you can more or less say that we define a shell and content modules. From the UI point of view this feels quite a bit like the Composite Application Library (CAL) for Silverlight however the CAL still goes a little bit beyond what we want to accomplish here. The overall application structure looks like the following.
First thing to mention is that we have actually two locations were application parts are stored and served from. As this might seem a bit odd it is however necessary due to the nature of how application packages are deployed on Windows Azure and due to the fact that you do not have direct access to the directories of the web server and the websites. So in order to be able to deploy and provide application parts after the initial deployment we need a place where we put the extending XAP files and were the main application can pick it up. In our case the XAPs are provided through the Windows Azure Blob Storage. This comes in handy as you can use your own or some third party tools to put your XAPs and the related artifacts into the Windows Azure storage.
There is however one thing to be aware of which is that now with having two different locations the cross domain restrictions of Silverlight will intercept and prevent Silverlight or to be more precise MEF from downloading the extending XAPs from blob storage.
Therefore we need to deploy a Silverlight policy file on the target server which in our case is the root of our blob storage account. The file needs to be named ClientAccess.xml. An excellent example how to deploy such kind of file can be found in this blog post by Steve Marx.
What you also need is some kind of external artifact to the application that tells the main application where and which XAPs to download and integrate as parts into the application. In my case I chose to define that in a simple XML file
 <?xml version="1.0" encoding="utf-8" ?>
 <Deployment>
     <Catalog>
         <PartFile name="mefparts/DynamicCloudRIA.Header.xap" />
         <PartFile name="mefparts/DynamicCloudRIA.LeftNav.xap" />
         <PartFile name="mefparts/DynamicCloudRIA.Workbench.xap" />
         <PartFile name="mefparts/DynamicCloudRIA.Footer.xap" />
     </Catalog>
 </Deployment>
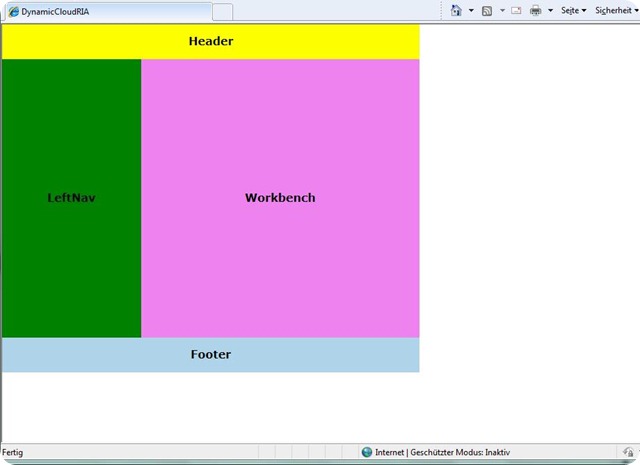
So now that I have this prerequisites I can start creating the main application and the application parts. The following screenshot shows the result of this demonstration which is actually a very simple UI which is composed from 5 different XAP files. It is important to note that implementation of functionality does not matter for this sample but the structure and the coupling of the different UI parts through MEF.
To start off I created a new Cloud Project in Visual Studio 2010 with one WebRole and then added a Silverlight Project to the cloud solution which is referenced by the WebRole project. The main UI layout is defined in the main Silverlight application. In this sample a Grid is defined with three rows and two columns. Then a placeholder for each area is defined as an ItemsControl. The XAML for this simple main layout looks like this (I used a fixed size layout for simplicity):
 <Grid x:Name="LayoutRoot" Background="White">
     <Grid.ColumnDefinitions>
         <ColumnDefinition Width="200" />
         <ColumnDefinition />
     </Grid.ColumnDefinitions>
     <Grid.RowDefinitions>
         <RowDefinition Height="50" />
         <RowDefinition />
         <RowDefinition Height="50" />
     </Grid.RowDefinitions>
     <ItemsControl x:Name="header" Grid.ColumnSpan="2" Grid.Row="0" />
     <ItemsControl x:Name="leftnav" Grid.ColumnSpan="1" Grid.Row="1" />
     <ItemsControl x:Name="workbench" Grid.ColumnSpan="1" Grid.Row="1" Grid.Column="1" />
     <ItemsControl x:Name="footer" Grid.ColumnSpan="2" Grid.Row="2" />
 </Grid>
Next we have to implement some basic “infrastructure” for this sample in order to make it work. First is we have to define a MetadataAttribute in order to allow us to filter the UserControls inside the asynchronous downloaded XAPs for the area they want to attach to. To get to know more about that I recommend to watch the Silverlight TV Episode 5: Using Metadata with MEF. For my sample I added the following class to my main application project.
 [MetadataAttribute]
 [AttributeUsage(AttributeTargets.Class, AllowMultiple = false)]
 public class ExportPart : ExportAttribute
 {
     public ExportPart() : base(typeof(UserControl)) { }

     public bool IsHeaderPart { get; set; }
     public bool IsFooterPart { get; set; }
     public bool IsLeftNavPart { get; set; }
     public bool IsWorkbenchPart { get; set; }
 }
As we want to access the metadata or better say filter for the metadata in a strongly typed fashion we need to define an interface with matching read only properties to those exposed in the MetadataAttribute. This allows us to import the application parts with such an ExportAttribute with lazy initialization using the Type System.Lazy<T, TMetadata> . This looks like the following in this sample:
 public interface IPartAttributes
 {
     bool IsHeaderPart { get; }
     bool IsFooterPart { get; }
     bool IsLeftNavPart { get; }
     bool IsWorkbenchPart { get; }
 }
That’s it for the moment. In the next part I will discuss how to import parts handle the XAP retrieval and do the deployment. So stay tuned.

