File nesting in Solution Explorer
Applies to: ![]() Visual Studio
Visual Studio ![]() Visual Studio for Mac
Visual Studio for Mac
Note
This article applies to Visual Studio 2017. If you're looking for the latest Visual Studio documentation, see Visual Studio documentation. We recommend upgrading to the latest version of Visual Studio. Download it here
Solution Explorer nests related files to help organize them and make them easier to locate. For example, if you add a Windows Forms form to a project, the code file for the form is nested below the form in Solution Explorer. In ASP.NET Core projects, file nesting can be taken a step further. You can choose between the file nesting presets Off, Default, and Web. You can also customize how files are nested or create solution-specific and project-specific settings.
Note
The feature is currently only supported for ASP.NET Core projects.
File nesting options
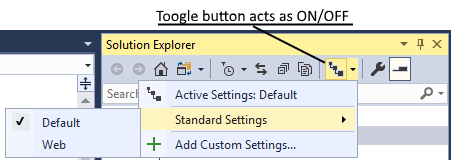
The available options for non-customized file nesting are:
Off: This option gives you a flat list of files without any nesting.
Default: This option gives you the default file nesting behavior in Solution Explorer. If no settings exist for a given project type, then no files in the project are nested. If settings exist, for example, for a web project, nesting is applied.
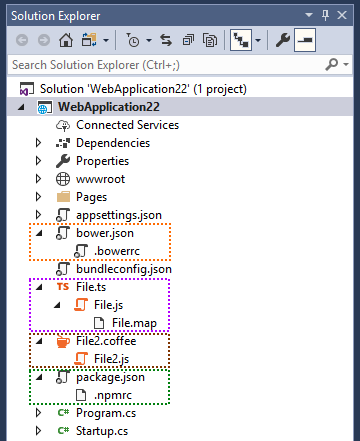
Web: This option applies the Web file nesting behavior to all the projects in the current solution. It has numerous rules, and we encourage you to check it out and tell us what you think. The following screenshot highlights just a few examples of the file nesting behavior that you get with this option:
Customize file nesting
If you don’t like what you get out-of-the-box, you can create your own, custom file nesting settings that instruct Solution Explorer how to nest files. You can add as many custom file nesting settings as you like, and you can switch between them as desired. To create a new custom setting, you can start with an empty file, or you can use the Web settings as your starting point:
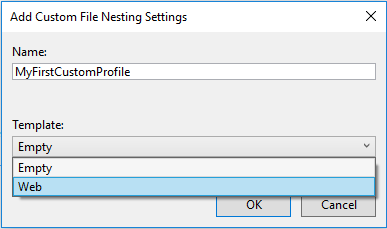
We recommend you use Web settings as your starting point because it’s easier to work with something that already functions. If you use the Web settings as your starting point, the .filenesting.json file looks similar to the following file:
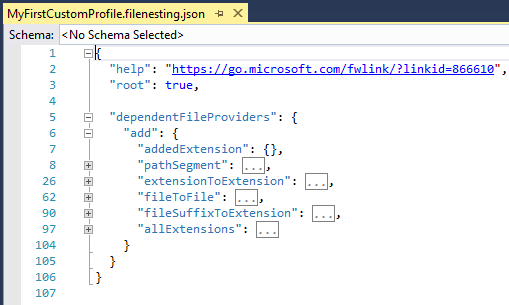
Let’s focus on the node dependentFileProviders and its child nodes. Each child node is a type of rule that Visual Studio can use to nest files. For example, having the same filename, but a different extension is one type of rule. The available rules are:
extensionToExtension: Use this type of rule to nest file.js under file.ts
fileSuffixToExtension: Use this type of rule to nest file-vsdoc.js under file.js
addedExtension: Use this type of rule to nest file.html.css under file.html
pathSegment: Use this type of rule to nest jquery.min.js under jquery.js
allExtensions: Use this type of rule to nest file.* under file.js
fileToFile: Use this type of rule to nest bower.json under .bowerrc
The extensionToExtension provider
This provider lets you define file nesting rules using specific file extensions. Consider the following example:
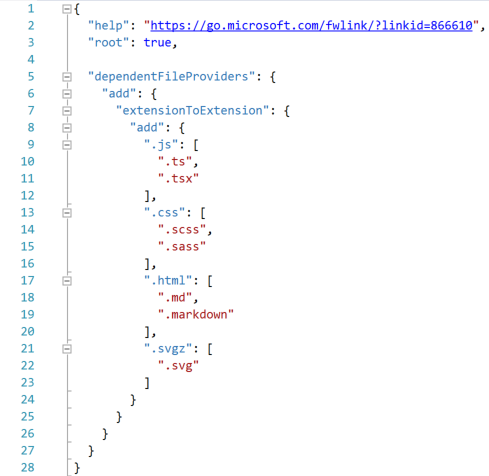
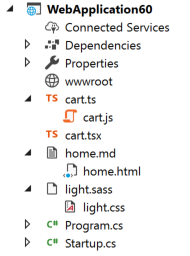
cart.js is nested under cart.ts because of the first extensionToExtension rule
cart.js is not nested under cart.tsx because .ts comes before .tsx in the rules, and there can only be one parent
light.css is nested under light.sass because of the second extensionToExtension rule
home.html is nested under home.md because of the third extensionToExtension rule
The fileSuffixToExtension provider
This provider works just like the extensionToExtension provider, with the only difference being that the rule looks at the suffix of the file instead of just the extension. Consider the following example:
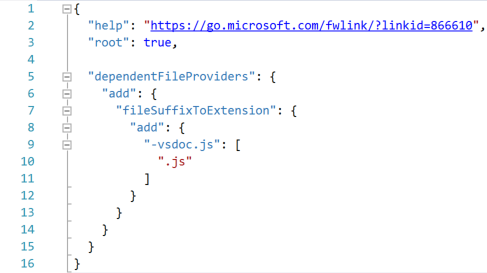

portal-vsdoc.js is nested under portal.js because of the fileSuffixToExtension rule
every other aspect of the rule works the same way as extensionToExtension
The addedExtension provider
This provider nests files with an additional extension under the file without an additional extension. The additional extension can only appear at the end of the full filename.
Consider the following example:
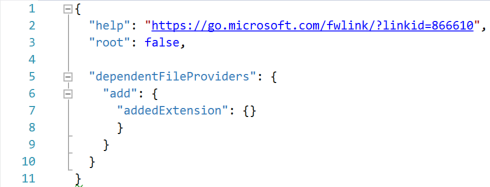
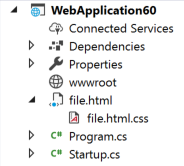
- file.html.css is nested under file.html because of the addedExtension rule
Note
You don't specify any file extensions for the addedExtension rule; it automatically applies to all file extensions. That is, any file with the same name and extension as another file plus an additional extension on the end is nested under the other file. You cannot limit the effect of this provider to just specific file extensions.
The pathSegment provider
This provider nests files with an additional extension under a file without an additional extension. The additional extension can only appear at the middle of the full filename.
Consider the following example:
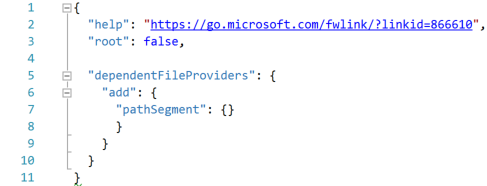
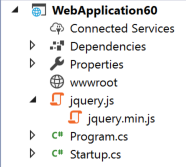
- jquery.min.js is nested under jquery.js because of the pathSegment rule
Note
If you don't specify any specific file extensions for the
pathSegmentrule, it applies to all file extensions. That is, any file with the same name and extension as another file plus an additional extension in the middle is nested under the other file.You can limit the effect of the
pathSegmentrule to specific file extensions by specifying them in the following way:"pathSegment": { "add": { ".*": [ ".js", ".css", ".html", ".htm" ] } }
The allExtensions provider
This provider lets you define file nesting rules for files with any extension but the same base file name. Consider the following example:
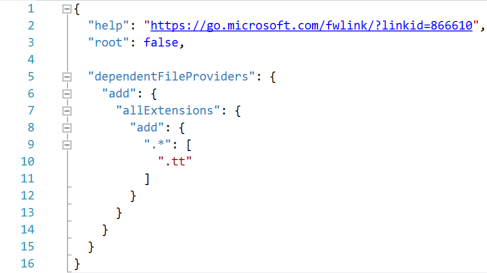
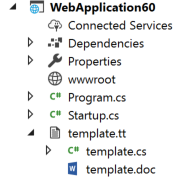
- template.cs and template.doc are nested under template.tt because of the allExtensions rule.
The fileToFile provider
This provider lets you define file nesting rules based on entire filenames. Consider the following example:
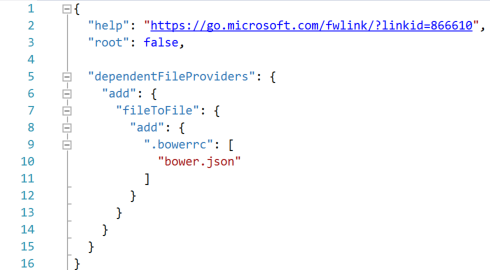

- .bowerrc is nested under bower.json because of the fileToFile rule
Rule order
Ordering is important in every part of your custom settings file. You can change the order in which rules are executed by moving them up or down inside of the dependentFileProvider node. For example, if you have one rule that makes file.js the parent of file.ts and another rule that makes file.coffee the parent of file.ts, the order in which they appear in the file dictates the nesting behavior when all three files are present. Since file.ts can only have one parent, whichever rule executes first wins.
Ordering is also important for rule sections themselves, not just for files within a section. As soon as a pair of files is matched with a file nesting rule, other rules further down in the file are ignored, and the next pair of files is processed.
File nesting button
You can manage all settings, including your own custom settings, through the same button in Solution Explorer:
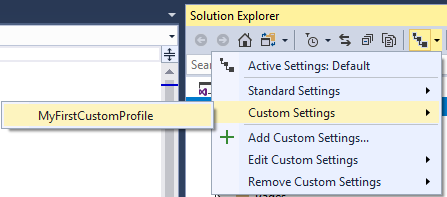
Create project-specific settings
You can create solution-specific and project-specific settings through the right-click menu (context menu) of each solution and project:
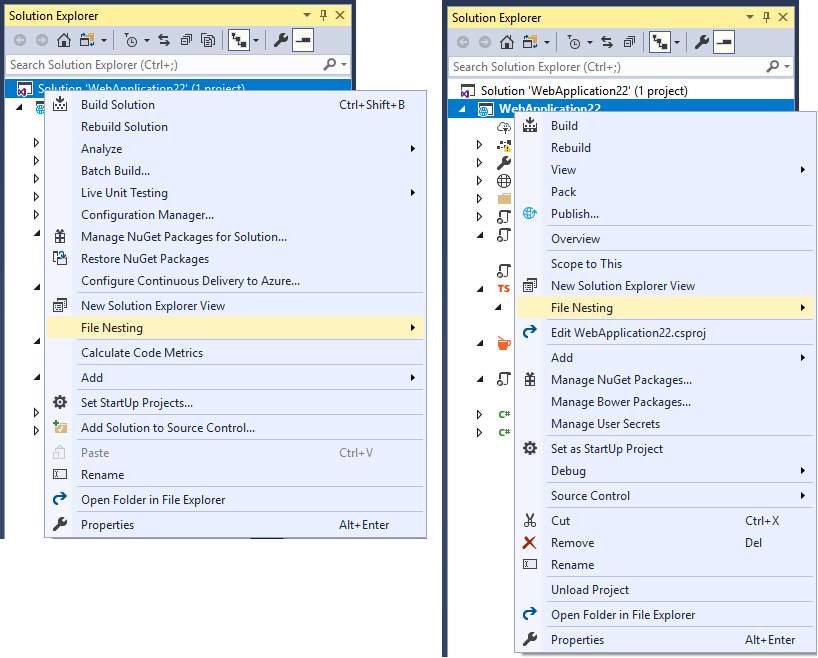
Solution-specific and project-specific settings are combined with the active Visual Studio settings. For example, you may have a blank project-specific settings file, but Solution Explorer is still nesting files. The nesting behavior is coming from either the solution-specific settings or the Visual Studio settings. The precedence for merging file nesting settings is: Visual Studio > Solution > Project.
You can tell Visual Studio to ignore solution-specific and project-specific settings, even if the files exist on disk, by enabling the option Ignore solution and project settings under Tools > Options > ASP.NET Core > File Nesting.
You can do the opposite and tell Visual Studio to only use the solution-specific or the project-specific settings, by setting the root node to true. Visual Studio stops merging files at that level and doesn't combine it with files higher up the hierarchy.
Solution-specific and project-specific settings can be checked into source control, and the entire team that works on the codebase can share them.
Disable file nesting rules for a project
You can disable existing global file nesting rules for specific solutions or projects by using the remove action for a provider instead of add. For example, if you add the following settings code to a project, all pathSegment rules that may exist globally for this specific project are disabled:
"dependentFileProviders": {
  "remove": {
    "pathSegment": {}
  }
}