Руководство. Добавление входа и выхода в SPA Angular для внешнего клиента
Это окончательная часть серии, демонстрирующая создание одностраничного приложения Angular (SPA) и подготовка его к проверке подлинности с помощью Центра администрирования Microsoft Entra. В части 3 этой серии вы добавили потоки проверки подлинности в одностраничное приложение Angular и настроили потоки для работы с внешним клиентом. В этой статье вы узнаете, как добавить функции входа и выхода в приложение. Наконец, вы протестируете приложение.
В этом руководстве;
- Добавьте функции входа и выхода в приложение.
- Тестирование приложения
Необходимые компоненты
Вход и выход пользователей
Откройте src/app/app.component.ts и замените код следующим образом, чтобы войти в систему пользователя, используя точку присутствия (POP)up. Этот код использует библиотеку MSAL Angular для входа пользователя.
  import { Component, OnInit, Inject, OnDestroy } from '@angular/core';
  import {
    MsalService,
    MsalBroadcastService,
    MSAL_GUARD_CONFIG,
    MsalGuardConfiguration,
  } from '@azure/msal-angular';
  import {
    AuthenticationResult,
    InteractionStatus,
    InteractionType,
    PopupRequest,
    RedirectRequest,
    EventMessage,
    EventType
  } from '@azure/msal-browser';
  import { Subject } from 'rxjs';
  import { filter, takeUntil } from 'rxjs/operators';

  @Component({
    selector: 'app-root',
    templateUrl: './app.component.html',
    styleUrls: ['./app.component.css'],
  })
  export class AppComponent implements OnInit, OnDestroy {
    title = 'Microsoft identity platform';
    loginDisplay = false;
    isIframe = false;

    private readonly _destroying$ = new Subject<void>();

    constructor(
      @Inject(MSAL_GUARD_CONFIG) private msalGuardConfig: MsalGuardConfiguration,
      private authService: MsalService,
      private msalBroadcastService: MsalBroadcastService,
    ) { }

    ngOnInit(): void {
      this.isIframe = window !== window.parent && !window.opener;
      this.setLoginDisplay();
      this.authService.instance.enableAccountStorageEvents(); // Optional - This will enable ACCOUNT_ADDED and ACCOUNT_REMOVED events emitted when a user logs in or out of another tab or window

      /**
       * You can subscribe to MSAL events as shown below. For more info,
       * visit: https://github.com/AzureAD/microsoft-authentication-library-for-js/blob/dev/lib/msal-angular/docs/v2-docs/events.md
       */
      this.msalBroadcastService.inProgress$
        .pipe(
          filter(
            (status: InteractionStatus) => status === InteractionStatus.None
          ),
          takeUntil(this._destroying$)
        )
        .subscribe(() => {
          this.setLoginDisplay();
          this.checkAndSetActiveAccount();
        });

      this.msalBroadcastService.msalSubject$
        .pipe(
          filter(
            (msg: EventMessage) => msg.eventType === EventType.LOGOUT_SUCCESS
          ),
          takeUntil(this._destroying$)
        )
        .subscribe((result: EventMessage) => {
          this.setLoginDisplay();
          this.checkAndSetActiveAccount();
        });

      this.msalBroadcastService.msalSubject$
        .pipe(
          filter(
            (msg: EventMessage) => msg.eventType === EventType.LOGIN_SUCCESS
          ),
          takeUntil(this._destroying$)
        )
        .subscribe((result: EventMessage) => {
          const payload = result.payload as AuthenticationResult;
          this.authService.instance.setActiveAccount(payload.account);
        });
    }

    setLoginDisplay() {
      this.loginDisplay = this.authService.instance.getAllAccounts().length > 0;
    }

    checkAndSetActiveAccount() {
      /**
       * If no active account set but there are accounts signed in, sets first account to active account
       * To use active account set here, subscribe to inProgress$ first in your component
       * Note: Basic usage demonstrated. Your app may require more complicated account selection logic
       */
      let activeAccount = this.authService.instance.getActiveAccount();

      if (!activeAccount && this.authService.instance.getAllAccounts().length > 0) {
        let accounts = this.authService.instance.getAllAccounts();
        // add your code for handling multiple accounts here
        this.authService.instance.setActiveAccount(accounts[0]);
      }
    }

    login() {
      if (this.msalGuardConfig.interactionType === InteractionType.Popup) {
        if (this.msalGuardConfig.authRequest) {
          this.authService.loginPopup({
            ...this.msalGuardConfig.authRequest,
          } as PopupRequest)
            .subscribe((response: AuthenticationResult) => {
              this.authService.instance.setActiveAccount(response.account);
            });
        } else {
          this.authService.loginPopup()
            .subscribe((response: AuthenticationResult) => {
              this.authService.instance.setActiveAccount(response.account);
            });
        }
      } else {
        if (this.msalGuardConfig.authRequest) {
          this.authService.loginRedirect({
            ...this.msalGuardConfig.authRequest,
          } as RedirectRequest);
        } else {
          this.authService.loginRedirect();
        }
      }
    }

    logout() {

      if (this.msalGuardConfig.interactionType === InteractionType.Popup) {
        this.authService.logoutPopup({
          account: this.authService.instance.getActiveAccount(),
        });
      } else {
        this.authService.logoutRedirect({
          account: this.authService.instance.getActiveAccount(),
        });
      }
    }

    // unsubscribe to events when component is destroyed
    ngOnDestroy(): void {
      this._destroying$.next(undefined);
      this._destroying$.complete();
    }
  }
Тестирование приложения
Запустите веб-сервер, выполнив следующие команды в командной строке из папки приложения:
npm install
npm start
В браузере введите
http://localhost:4200, чтобы открыть приложение.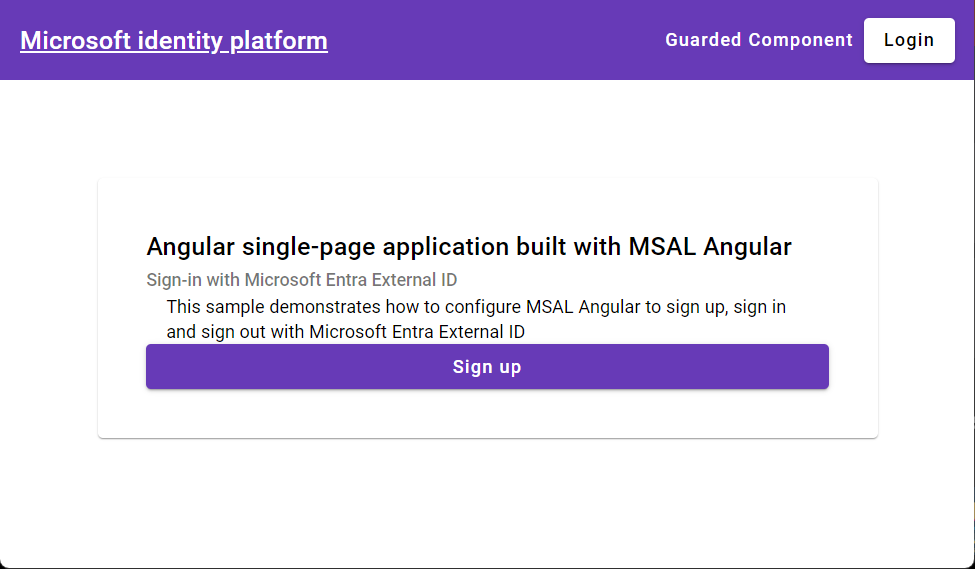
Нажмите кнопку "Войти" в правом верхнем углу экрана.
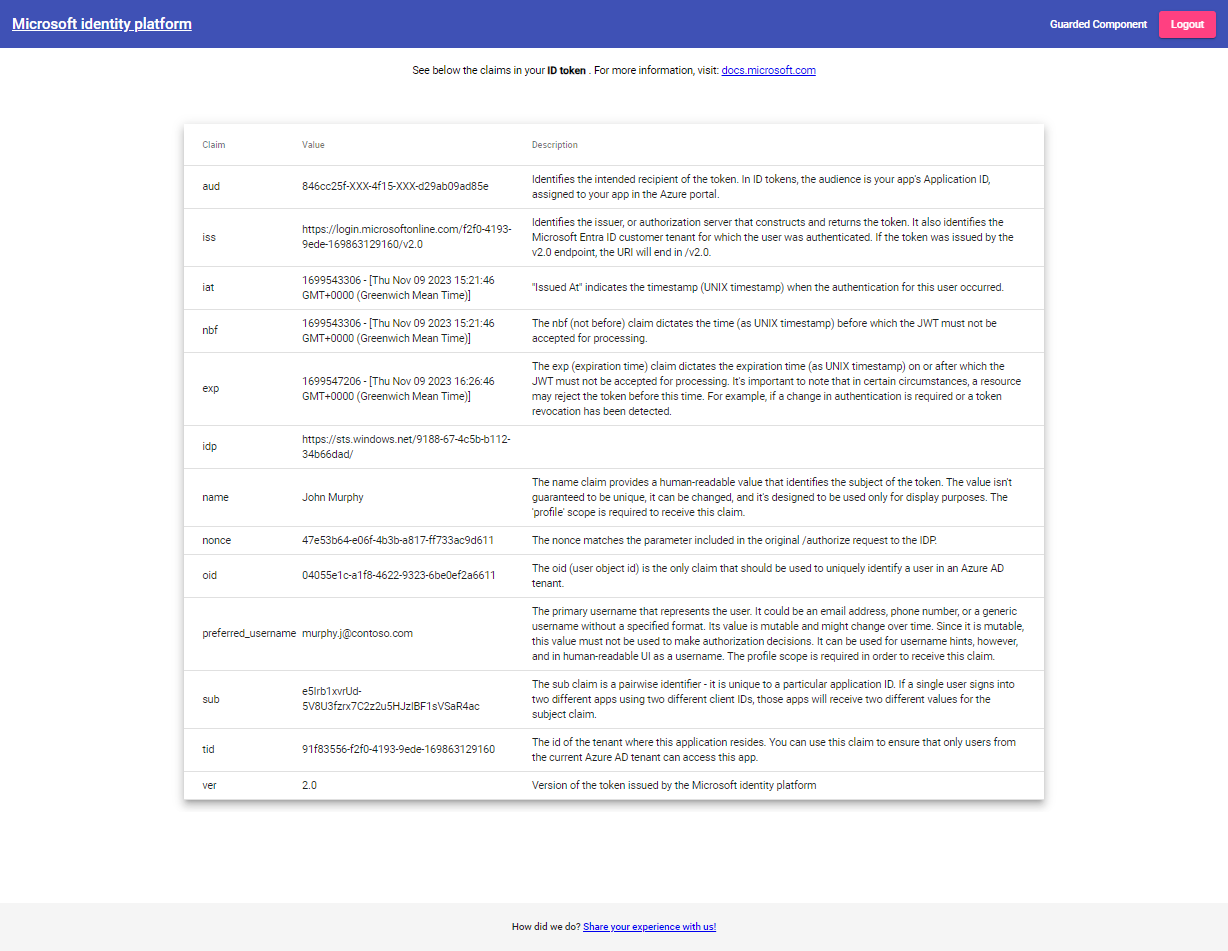
После входа вы увидите сведения о профиле, отображаемые на странице.
Нажмите кнопку выхода в правом верхнем углу экрана, чтобы выйти.
См. также
После выполнения этого руководства вам может потребоваться узнать больше о том, как: