Практическое руководство. Создание GeometryDrawing
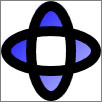
В этом примере показано, как создать и отобразить GeometryDrawing. GeometryDrawing позволяет создать фигуру с заливкой и контуром, связав Pen и Brush с Geometry. Geometry описывает структуру фигуры, Brush описывает заливку фигуры, а Pen описывает контур фигуры.
Пример
В следующем примере для отрисовки фигуры используется GeometryDrawing. Фигура описывается с помощью GeometryGroup и двух объектов EllipseGeometry. Интерьер фигуры рисуется LinearGradientBrushBlackс Pen помощью контура. GeometryDrawing отображается с помощью ImageDrawing и элемента Image.
using System;
using System.Windows;
using System.Windows.Controls;
using System.Windows.Media;
using System.Windows.Media.Animation;
using System.Windows.Shapes;

namespace SDKSample
{
    public class GeometryDrawingExample : Page
    {
        public GeometryDrawingExample()
        {

            //
            // Create the Geometry to draw.
            //
            GeometryGroup ellipses = new GeometryGroup();
            ellipses.Children.Add(
                new EllipseGeometry(new Point(50,50), 45, 20)
                );
            ellipses.Children.Add(
                new EllipseGeometry(new Point(50, 50), 20, 45)
                );

            //
            // Create a GeometryDrawing.
            //
            GeometryDrawing aGeometryDrawing = new GeometryDrawing();
            aGeometryDrawing.Geometry = ellipses;

            // Paint the drawing with a gradient.
            aGeometryDrawing.Brush =
                new LinearGradientBrush(
                    Colors.Blue,
                    Color.FromRgb(204,204,255),
                    new Point(0,0),
                    new Point(1,1));

            // Outline the drawing with a solid color.
            aGeometryDrawing.Pen = new Pen(Brushes.Black, 10);

            //
            // Use a DrawingImage and an Image control
            // to display the drawing.
            //
            DrawingImage geometryImage = new DrawingImage(aGeometryDrawing);

            // Freeze the DrawingImage for performance benefits.
            geometryImage.Freeze();

            Image anImage = new Image();
            anImage.Source = geometryImage;
            anImage.Stretch = Stretch.None;
            anImage.HorizontalAlignment = HorizontalAlignment.Left;

            //
            // Place the image inside a border and
            // add it to the page.
            //
            Border exampleBorder = new Border();
            exampleBorder.Child = anImage;
            exampleBorder.BorderBrush = Brushes.Gray;
            exampleBorder.BorderThickness = new Thickness(1);
            exampleBorder.HorizontalAlignment = HorizontalAlignment.Left;
            exampleBorder.VerticalAlignment = VerticalAlignment.Top;
            exampleBorder.Margin = new Thickness(10);

            this.Margin = new Thickness(20);
            this.Background = Brushes.White;
            this.Content = exampleBorder;
        }
    }
}
<Page
  xmlns="http://schemas.microsoft.com/winfx/2006/xaml/presentation"
  xmlns:x="http://schemas.microsoft.com/winfx/2006/xaml"
  xmlns:PresentationOptions="http://schemas.microsoft.com/winfx/2006/xaml/presentation/options"
  xmlns:mc="http://schemas.openxmlformats.org/markup-compatibility/2006"
  mc:Ignorable="PresentationOptions"
  Margin="20" Background="White">

  <Border BorderBrush="Gray" BorderThickness="1"
    HorizontalAlignment="Left" VerticalAlignment="Top"
    Margin="10">
    <Image Stretch="None" HorizontalAlignment="Left">
      <Image.Source>
        <DrawingImage PresentationOptions:Freeze="True">
          <DrawingImage.Drawing>

            <GeometryDrawing>
              <GeometryDrawing.Geometry>

                <!-- Create a composite shape. -->
                <GeometryGroup>
                  <EllipseGeometry Center="50,50" RadiusX="45" RadiusY="20" />
                  <EllipseGeometry Center="50,50" RadiusX="20" RadiusY="45" />
                </GeometryGroup>
              </GeometryDrawing.Geometry>
              <GeometryDrawing.Brush>

                <!-- Paint the drawing with a gradient. -->
                <LinearGradientBrush>
                  <GradientStop Offset="0.0" Color="Blue" />
                  <GradientStop Offset="1.0" Color="#CCCCFF" />
                </LinearGradientBrush>
              </GeometryDrawing.Brush>
              <GeometryDrawing.Pen>

                <!-- Outline the drawing with a solid color. -->
                <Pen Thickness="10" Brush="Black" />
              </GeometryDrawing.Pen>
            </GeometryDrawing>
          </DrawingImage.Drawing>
        </DrawingImage>
      </Image.Source>
    </Image>
  </Border>


</Page>
Нарисованная фигура GeometryDrawing показана на рисунке ниже.

Чтобы создать более сложные рисунки, можно объединить несколько объектов рисования в один составной рисунок с помощью DrawingGroup.
См. также
.NET Desktop feedback
