Step 1: Use the WCF LOB Adapter Development Wizard to Create the Echo Adapter Project

Time to complete: 15 minutes
In this step, you will create a project using Visual Studio and the Adapter Development Wizard. The Adapter Development Wizard will guide you through steps involved in developing a custom adapter for the system. It collects information about message exchange patterns, metadata features, adapter properties, and connection properties. Once the wizard successfully completes, it generates a set of files.
Prerequisites
You must possess the knowledge described in Before You Begin the Tutorial and have successfully set up your computer for your adapter development by using the WCF LOB Adapter SDK.
Choose WCF LOB Adapter Plug-in in Visual Studio
Start Visual Studio and then on the File menu, point to New, and then click Project.
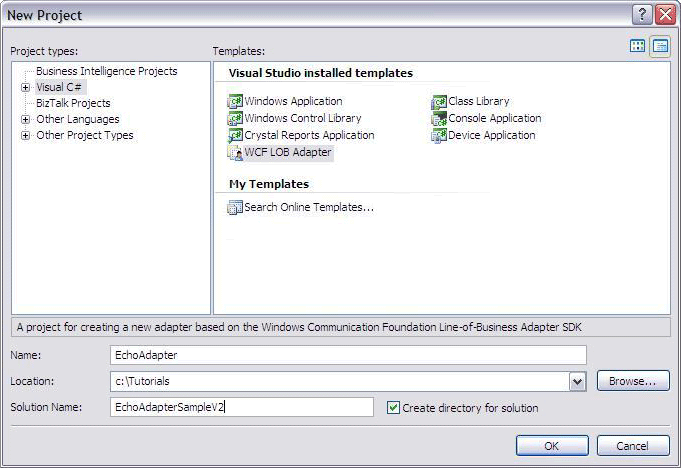
In the New Project dialog box, do the following:
Use this To do this Project types Click Visual C#. Templates Click WCF LOB Adapter. Name Type EchoAdapter. Location Type C:\Tutorials. Create directory for solution Select this check box to create a directory for the solution files. Solution Name Type EchoAdapterSampleV2. The following figure shows the New Project dialog box.
Click OK.
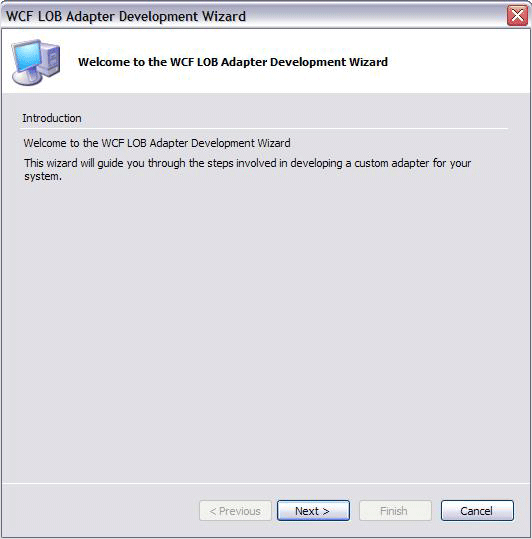
On the Welcome page, click Next. The following figure shows the Welcome page.
Click Next.
Enter the scheme and namespace information
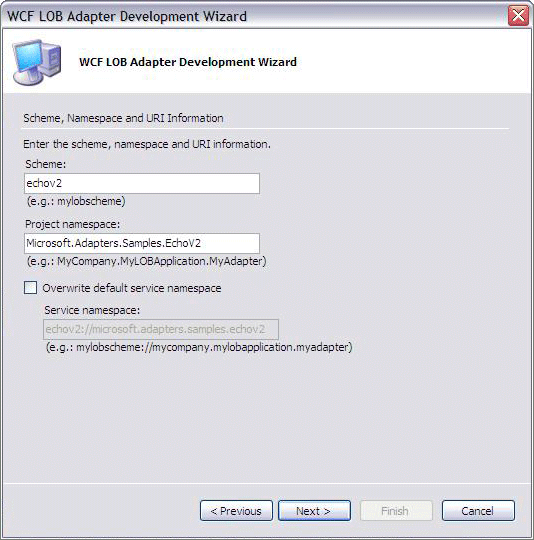
On the Scheme, Namespace, and URI Information page, do the following:
Use this To do this Scheme Type echov2. Project namespace Type Microsoft.Adapters.Samples.EchoV2. The following figure shows the Scheme, Namespace, and URI Information page.
Click Next.
Enter the data flow and metadata features
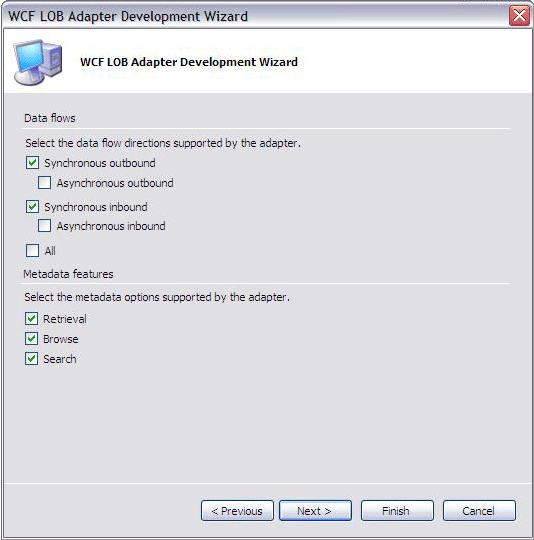
On the Data Flows and Metadata Features page, do the following:
Message Exchange Patterns
Use this To do this Synchronous outbound Select the check box. Synchronous inbound Select the check box. Metadata Features
Use this To do this Retrieval Select the check box. Browse Select the check box. Search Select the check box. Note
Data flows in this context means the same as message exchange patterns, the term used in the conceptual topics.
The following figure shows the Data Flows and Metadata Features page.
Click Next.
Enter the adapter properties
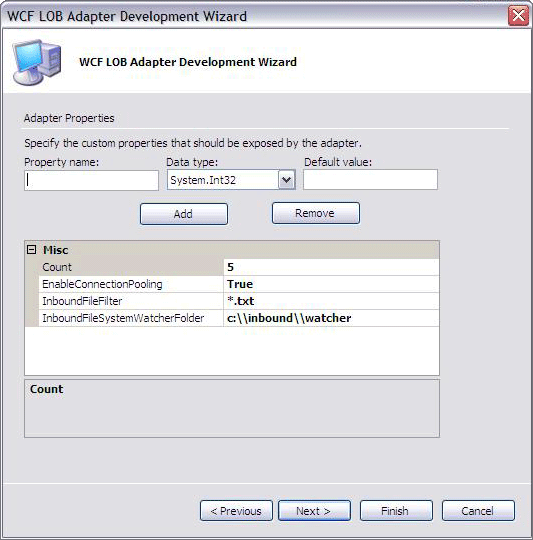
On the Adapter Properties page, do the following:
Add a property called Count. This number is used by every operation of the echo adapter. Each operation will return the input value the Count number of times.
Use this To do this Property name Type Count. Data type Select System.Int32. Default value Type 5. Add Click to add the new adapter property. Add a property called EnableConnectionPooling. This flag is used by the WCF LOB Adapter SDK to enable or disable the runtime connection pooling.
Use this To do this Property name Type EnableConnectionPooling. Data type Select System.Boolean. Default value Type true. Add Click to add the new adapter property. Add a property called InboundFileFilter. This property is used by the FileSystemWatcher to monitor files of this extension. This property is applicable for the inbound scenario only.
Use this To do this Property name Type InboundFileFilter. Data type Select System.String. Default value Type *.txt. Add Click to add the new adapter property. Add a property called InboundFileSystemWatcherFolder. This property is used to set the folder where the files will be dropped for FileSystemWatcher to raise notification to the adapter. This property is applicable for the inbound scenario only.
Use this To do this Property name Type InboundFileSystemWatcherFolder. Data type Select System.String. Default value Type C:\\inbound\\watcher. Add Click to add the new adapter property. The following figure shows the Adapter Properties page.
Click Next.
Enter the connection properties
On the Connection Properties page, do the following:
Add a property called Application. This property is for illustrative purpose only. The echo adapter does not involve any LOB system.
Use this To do this Property name Type Application. Data type Select System.String. Default value Type lobapplication. Add Click to add the new adapter property. Add a property called EnableAuthentication. When
true, the adapter expects a value in the username field within the client credentials.Use this To do this Property name Type EnableAuthentication. Data type Select System.Boolean. Default value Type false. Add Click to add the new adapter property. Add a property called HostName. This property is for illustrative purpose only, similar to property Application.
Use this To do this Property name Type Hostname. Data type Select System.String. Default value Type lobhostname. Add Click to add the new adapter property. Add a property called EchoInUpperCase. This property controls whether some operations convert echoed strings to upper case or leave them in their original format.
Use this To do this Property name Type EchoInUpperCase. Data type Select System.Boolean. Default value Type False. Add Click to add the new adapter property. Click Next.
End the wizard
On the Summary page, click Finish. The following figure shows Solution Explorer with the EchoAdapter project.
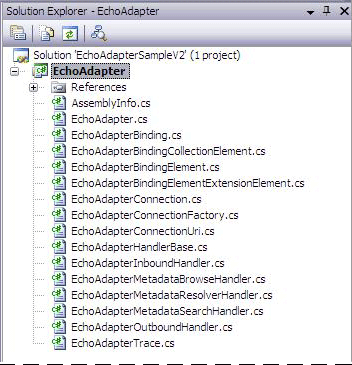
Your project should contain the same files. If it does not, exit Visual Studio, delete the EchoAdapterSampleV2 folder, and then restart this step of the tutorial.
In Visual Studio, on the File menu, click Save All.
Note
You saved your work. You can safely close Visual Studio at this time or go to the next step, Step 2: Categorize the Adapter and Connection Properties.
What Did I Just Do?
In this step, you created the echo adapter solution by using Visual Studio and the Adapter Development Wizard. The following table contains the set of files and what each file is for.
| File Name | Description |
|---|---|
| EchoAdapter.cs | This is the main adapter class which inherits from Microsoft.ServiceModel.Channels.Common.Adapter.No changes are necessary for the echo adapter. |
| EchoAdapterBinding.cs | This is the class used while creating a binding for an adapter. No changes are necessary for the echo adapter. |
| EchoAdapterBindingCollectionElement.cs | This is the Binding Collection Element class which implements the System.ServiceModel.Configuration.StandardBindingCollectionElement.No changes are necessary for the echo adapter. |
| EchoAdapterBindingElement.cs | This provides a base class for the configuration elements. To categorize the adapter and connection properties of the echo adapter, follow Step 2: Categorize the Adapter and Connection Properties. |
| EchoAdapterBindingElementExtensionElement.cs | This class is provided to represent the adapter as a binding element, so that it can be used within a user-defined WCF custom binding. To categorize the adapter and connection properties of the echo adapter, follow Step 2: Categorize the Adapter and Connection Properties. |
| EchoAdapterHandlerBase.cs | This is the base class for handlers used to store common properties/helper functions exposed by your base class. To categorize the adapter and connection properties of the echo adapter, follow Step 2: Categorize the Adapter and Connection Properties. |
| EchoAdapterConnection.cs | This defines the connection to the target system. To support the echo adapter's connection to the target system, follow Step 3: Implement the Connection for the Echo Adapter. |
| EchoAdapterConnectionFactory.cs | This defines the connection factory for the target system. To support the echo adapter's connection to the target system, follow Step 3: Implement the Connection for the Echo Adapter. |
| EchoAdapterConnectionUri.cs | This is the class for representing an adapter connection Uri. To support the echo adapter's connection to the target system, follow Step 3: Implement the Connection for the Echo Adapter). |
| EchoAdapterMetadataBrowseHandler.cs | This class is used while performing a connection-based browse for metadata from the target system. To support the metadata browsing capability for the echo adapter, follow Step 4: Implement the Metadata Browse Handler for the Echo Adapter. |
| EchoAdapterMetadataSearchHandler.cs | This class is used for performing a connection-based search for metadata from the target system. To support the metadata searching capability for the echo adapter, follow Step 5: Implement the Metadata Search Handler for the Echo Adapter. |
| EchoAdapterMetadataResolve.cs | This class is used for performing a connection-based retrieval of metadata from the target system. To support the metadata resolving capability for the echo adapter, follow Step 6: Implement the Metadata Resolve Handler for the Echo Adapter. |
| EchoAdapterOutboundHandler.cs | This class is used for sending data to the target system. To support the outbound message exchange for the echo adapter, follow Step 7: Implement the Synchronous Outbound Handler for the Echo Adapter. |
| EchoAdapterInboundHandler.cs | This class implements an interface for listening or polling for data. To support the inbound message exchange for the echo adapter, follow Step 8: Implement the Synchronous Inbound Handler for the Echo Adapter. |
| EchoAdapterTrace.cs | This class implements adapter tracing, for debugging and troubleshooting. |
Next Steps
You categorize adapter and connection properties for their UI logical grouping, and then implement connection, metadata browsing, searching, and resolving capabilities, and the outbound and inbound message exchanges. Lastly, you build and deploy the echo adapter.
See Also
Step 2: Categorize the Adapter and Connection Properties
Tutorial 1: Develop the Echo Adapter