Walkthrough Creating a Local Mobile Service in Visual Studio - .NET backend
This walkthrough creates a Mobile Service locally. It in no way is connected to your Azure subscription (yet) and will let you investigate and play with the APIs.
Video!
New Video on Developing Mobile Services Local!
Develop Azure Mobile Services Locally
Setup
You must be running Visual Studio 2013 and the latest Update
Download Visual Studio 2013 Update 3
Create a new Mobile Service
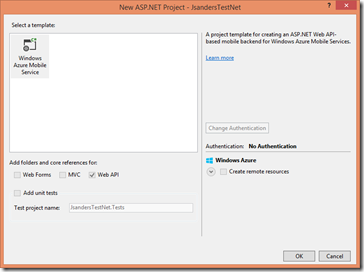
<File>,<New Project>
Accept the defaults, and hit OK:
(Note: if you don’t have source control set up yet, that is fine… just ignore the errors)
Now Build the solution <Ctrl+Shift+B>, it should build fine.
Not test it by hitting the run button or F5. This will open your localhost service on this box and you can test it using Internet Explorer.
To confirm this works, hit the ‘try it out’ button…
Then get the TodoItem table data by hitting this link:
Then the try this out button….
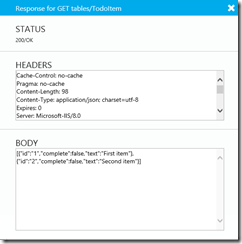
and finally hit send…
success!
Where did this data come from?!?
This is from the Seed function. It gets called if/when you modify data structures in your project in order to kickstart or seed the database.
Stop debugging and open this file (under the ‘App_Start’ folder in your solution): WebApiConfig.cs
You will see the seed function:
protected override void Seed(JsandersTestNetContext context) { List<TodoItem> todoItems = new List<TodoItem> { new TodoItem { Id = "1", Text = "First item", Complete = false }, new TodoItem { Id = "2", Text = "Second item", Complete = false }, }; foreach (TodoItem todoItem in todoItems) { context.Set<TodoItem>().Add(todoItem); } base.Seed(context); }
If you put a Breakpoint in there and debug, you will notice you do not hit it…
Modify the TodoItem class to include a new member:
public class TodoItem : EntityData { public string Text { get; set; } public bool Complete { get; set; } public string JeffData { get; set; } }
Put a breakpoint inside of Seed again and debug. When you go through the steps above to get the table data… You will see that indeed the ‘Seed’ function is called and we set the new data. The controller even returns the ‘jeffData’ field (even though I did not put data in it in the Seed function) but it is null.
[{"id":"1","jeffData":null,"complete":false,"text":"First item"},{"id":"2","jeffData":null,"complete":false,"text":"Second item"}]
TodoItem is very interesting and all… But what about creating some new tables and structures?
How to create new Tables, Models, Controllers in the .NET Mobile Service Backend
Easy peasey!
The overall concept is to
- add a new class that has your new data structure
- add a controller using the wizard
- seed the new table
Add new Model Class
Right click on the ‘Data_Objects’ folder in your solution and add a new class:
I’ll call it ‘CoolData’
Derive from ‘EntityData’ and copy the using statement from the TodoItem class:
using Microsoft.WindowsAzure.Mobile.Service; namespace JsandersTestNet.DataObjects { public class CoolData: EntityData { } }
Start adding data members!
using Microsoft.WindowsAzure.Mobile.Service; namespace JsandersTestNet.DataObjects { public class CoolData: EntityData { public string Description { get; set; } public string Name { get; set; } public int Quantity { get; set; } } }
Change the ‘Seed’ function to add some data to the context:
protected override void Seed(JsandersTestNetContext context) { /// Seed the CoolData! // build a list of coolStuff List<CoolData> coolStuff = new List<CoolData> { new CoolData{ Id="1", Name="Ice Cream", Description="Vanilla", Quantity=1 }, new CoolData{ Id="2", Name="Pepermint Patties", Description="York", Quantity=12 }, new CoolData{ Id="3", Name="Cats", Description="Definately NOT cool", Quantity=0 } }; // set each of these on the context foreach (CoolData coolItem in coolStuff) { context.Set<CoolData>().Add(coolItem); } /// end of new code List<TodoItem> todoItems = new List<TodoItem> { new TodoItem { Id = "1", Text = "First item", Complete = false }, new TodoItem { Id = "2", Text = "Second item", Complete = false }, }; foreach (TodoItem todoItem in todoItems) { context.Set<TodoItem>().Add(todoItem); } base.Seed(context); }
Add the new Controller
Right click on the ‘Controllers’ folder in your solution and add a new Scaffolded item:
Choose the Mobile Services Table Controller:
Pick the Model you just created and the default context, and hit the Add button:
Run and test:
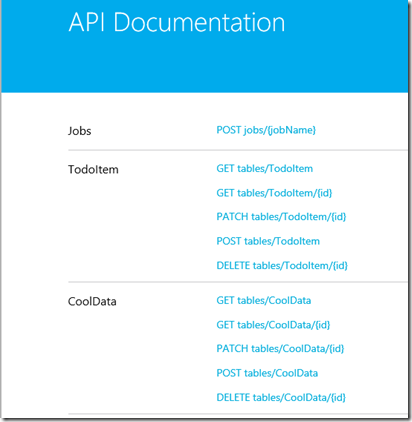
You will see the new Table provided by the controller:
And as before test to see if you can get the newly seeded data:
Conclusion
It is easy to develop locally with the new .NET backend and add tables. Your next steps will be to refine your development locally before pushing to the cloud. You can do this by using the Internet Explorer interface to Post and Get data and get your logic down. One you have that you can hook up an app and try it out. Finally you can publish your service to Azure and enjoy the benefits of our Azure scalability and service uptime!
Follow the Windows Store Developer Solutions team on Twitter @wsdevsol.
Links
New Video on Developing Mobile Services Local!


