Ever wonder how…
Cross posted from John Coyne's Embedded Blog.
I get asked all the time, about how to brand an embedded device so it doesn’t look like a PC. With Windows Embedded, we plan for custom branding experience right from the start.
we’ve included Embedded-specific packages with Windows Embedded Standard 7 like unbranded Startup Screens package, Custom Logon Desktop Background Images, Hide Boot Screens, Message Box Default Reply, Dialog Box Filter, and our Command Prompt Shell with Custom Shell Support.
Lots of different ways to highly customize the branding on a device, so that the end user never sees a “Microsoft brand” on the device…
But what about our BugCheck Screen? (for the noobs, the famed ‘Blue Screen of Death’)
while we can’t turn this off, as it’s a critical kernel piece for troubleshooting purposes, we can, in effect, “hide it”
Here’s what you do: (please note, this is not “officially” supported, but it does work!
- Open the SYSTEM.INI file found in the %systemroot% folder (i.e. C:'Windows or other). You can easily open the file by running SYSEDIT from the Run command, or by using Notepad.exe.
- Locate the [386enh] section in the file:
- If not already present, create the following new entries:
MessageBackColor=
MessageTextColor=
and give it a value according to the following list:
- 0 = black
- 1 = blue
- 2 = green
- 3 = cyan
- 4 = red
- 5 = magenta
- 6 = yellow/brown
- 7 = white
- 8 = gray
- 9 = bright blue
- A = bright green
- B = bright cyan
- C = bright red
- D = bright magenta
- E = bright yellow
- F = bright white
Once you’ve edited this, just save and reboot.
I’m also told that there are some “freeware” utilities out there to do this, but I’ve never tried them.
for example, what you’d do, is change the Background Color to Black, and Change the Text color to Black. Sneaky, eh?
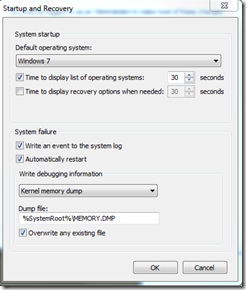
Also, in Windows, you’d want to change the options in the System Settings Dialogue (Start>Control Panel>System>Advanced System Settings) to use either a small memory dump or no memory dump (none), and automatically restart should be enabled.
To Test this, make the following entry change in the registry – note: there are 2 different keys, based on the type of keyboard you’re using:
USB Keyboard
HKEY_LOCAL_MACHINE\SYSTEM\CurrentControlSet\Services\kbdhid\Parameters
PS/2 Keyboard
HKEY_LOCAL_MACHINE\SYSTEM\CurrentControlSet\Services\i8042prt\Parameters
Now right-click on the right-hand pane and add a new DWORD key named CrashOnCtrlScroll, giving it a value of 1.
once you reboot – you can trigger a BSOD by holding the CTRL key and pressing the Scroll Lock key twice.
Here’s what the screen will say:
Just delete the key in the registry to remove this test “feature”
I had been meaning to post this for a while… Thanks to my friends at Crestron for jogging my memory!
Enjoy!
JC
