Office UI Fabric for VSTS Extensions – Typescript tools
In the series of blog on how to leverage Office UI Fabric in VSTS Extensions , we continue on from Office UI Fabric for VSTS Extensions - Getting Started and start to delve into how to setup our development environment.
TSLInt
To start off with, Lint is a set of tools to provide static code analysis. TSLint is simply a set tools and rules for Typescript. You can create an initial set by running the following command in your code directory: 'node_modules\.bin\tslint.cmd -i' This should create a 'tslint.json' file that has a basic layout and a few preset rules. You can customize and expand on that. Find examples such as the one that is bundled with these posts example.
Typescript
Typescript is the compiler that will "compile" your .ts or .tsx files to create actual javascript. Typescript uses tsconfig.js for configuration purposes. Create a "default" file by running 'tsc --init'. This file needs some customization to do what we want, when we want it. To simplify things, I have setup the parameters and removed all unused settings. It should look like this:
Webpack
Webpack is a "module bundler for modern JavaScript applications". This makes our lives easier in that we can manage fewer files and deliver less content to the browser when the app is loaded. You will need to create a webpack.conf.js file in the project directory and then add the contents:
Take note of the 'externals' section. If this is not added, you will end up with compile errors when referencing the VSS SDK.
Another reason for using webpack is for its "server" that was added as the webpack-dev-server dependency. This is a nifty way to host our application when we are developing and debugging. I am using a local TFS instance to debug and for that http is fine. If you are working on VSTS you will need a https endpoint which will require some more configuration, including a few custom certificates.
VSCode
Finally we can configure VSCode to give us a full "breakpoint" & "step through" debugging experience by using the chrome driver and by adding a .vscode folder with a launch.json file containing the following:
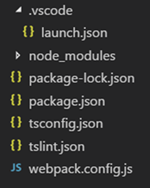
At this stage your directory structure should look something like this:
Configured Folder Structure
In the next post, we’ll move a few bits around with npm and polish our solution.
Also see
THANKS TO THE REVIEWERS: Steve St. Jean, Hamid Shahid
