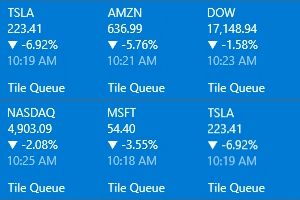
Quickstart: How to use the tile notification queue with local notifications
This topic shows how to enable the notification queue on your tile. It also shows how to tag your notification before sending it, to avoid duplicate or out-of-date content in the queue. With the tile notification queue enabled, Windows will cycle through up to five notifications.

Prerequisites
To understand this topic, you will need:
- A working knowledge of tile and notification terms and concepts. For more information, see Tiles, Badges, and Notifications.
- The ability to create a basic Windows Store app with C# or C++ Microsoft Visual Basic using Windows Runtime APIs. For more information, see Create your first app.
1. Add namespace declarations
Windows.UI.Notifications includes the tile APIs.
 using Windows.UI.Notifications;
using Windows.Data.Xml.Dom;
2. Enable the tile notification queue
This code enables the notification queue for your app. This call only needs to be made once while the app is running, though there is no harm in calling it again.
For primary Tiles, we recommend that you place this call in your app's initialization code. This ensures that the call is made before you update the tile locally, request a push notification channel, or start periodic updates for the tile.
For secondary Tiles, we recommend that you place this call immediately after creating the secondary tile.
TileUpdateManager.CreateTileUpdaterForApplication().EnableNotificationQueue(true);
 SecondaryTile tile = new SecondaryTile("MyTileId");

// TODO: Initialize tile properties

bool result = await tile.RequestCreateAsync();

if (result)
{
        TileUpdateManager.CreateTileUpdaterForSecondaryTile("MyTileId").EnableNotificationQueue(true);
}
3. Create a tile notification
This is the first step in all tile notifications and is no different here than in any other situation; it is included here only for completeness. For more information, see Send a local tile notification.
 // Generate the notification content (See the full code sample for this code)
XmlDocument content = GenerateContent("MSFT", 54.40, -3.55, DateTime.Now);

// Create the tile notification
TileNotification notification = new TileNotification(content);
4. Give your notification a tag
A tag is a string of no more than 16 alphanumeric characters, plus a terminating null character, that uniquely identifies the notification within your app.
When queuing is enabled, a maximum of five tile notifications can automatically cycle on the tile. By default, the replacement policy for notifications in the queue is first in, first out (FIFO); when the queue is full and a new notification arrives, the oldest notification is removed. Note that the notification display order does not follow a strict linear pattern. Users can see the notifications in a different order than they arrived in.
To override the FIFO queue behavior, a notification can be given a tag. If a new notification arrives with the same tag as an existing notification, the new notification replaces the old, regardless of the older notification's place in the queue. For instance, if your tile shows stock prices, you can use tags to replace an existing stock price in the queue with the updated price. The use of tags to replace notifications in the queue is optional.
For more information on using tags with the notification queue, see Using the notification queue. The example below shows how to set the tag for local notifications. For information on setting tags for periodic updates, see Tileupdater.StartPeriodicUpdateBatch. For information on setting tags for push notifications, see Push notification service request and response headers.
 // Set the tag so that we can update (replace) this notification later
notification.Tag = "MSFT";
5. Send notifications to the tile
Sending the notification is no different here than in any other situation; it is included here only for completeness. For more information, see Send a local tile notification.
However, since the queue is enabled, the last five notifications with unique (or null) tags will be displayed on the queue. Thus, to add a new notification to the queue (and push off the oldest if you already have five), you simply send a new notification with a unique (or null) tag.
 // Send the notification
TileUpdateManager.CreateTileUpdaterForApplication().Update(notification);
 // If the secondary tile is pinned
if (SecondaryTile.Exists("MySecondaryTile"))
{
    // Get its updater
    var updater = TileUpdateManager.CreateTileUpdaterForSecondaryTile("MySecondaryTile");

    // And send the notification
    updater.Update(notification);
}
Updating (replacing) notifications in the queue
To update (replace) a notification in the queue, simply send a new notification with the same tag. The previous notification with that tag (if it exists) will be removed and this new notification will be added to the top of the queue.
Clearing notifications from the queue
To clear all the notifications in the queue, simply use the Clear method. This will remove all notifications from the queue.
TileUpdateManager.CreateTileUpdaterForApplication().Clear();
TileUpdateManager.CreateTileUpdaterForSecondaryTile("MySecondaryTile").Clear();
You cannot remove individual notifications from the queue. You can only replace individual notifications by using the tag. If you need an individual notification removed, you will have to clear all the notifications and then re-send the remaining desired ones.