Creating and verifying licensing in a paid app for Office
I'm Krishnan Raghupathi, a Program Manager on the Office Store team. If you've read David's earlier post on choosing the right business model for your app for Office or SharePoint, and decided to charge users for your app, using our licensing service helps you enforce user licenses and prevent piracy. With the service, you can distinguish users on the trial mode from users who have paid for your apps, and direct each user to the appropriate experience.
One key principle to be aware of: The platform empowers your app to give the right experience based on the license, but does NOT directly enforce the user's license. Put differently, if you submit an app with a 30-day trial, users will be able to use that trial indefinitely unless your app implements logic to give a different experience (for example, encouraging users to buy the app on the 31st day).
This post outlines how you can add logic to enable licensing checks inside your code using the Office verification service. A follow-up post will cover the basics of enforcing licenses for apps for SharePoint.
We'll cover:
- The basics of licensing for apps.
- Verifying user licenses in your app for Office.
- A call to action.
How do app licenses work?
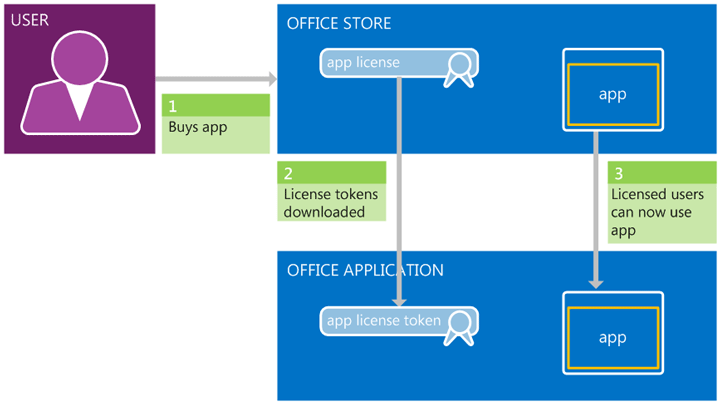
The article Licensing apps for Office and SharePoint goes into more detail about what app licenses are and how they work. In essence, when users download an app for Office from the Office Store , an app license token gets downloaded along with it. The token is for the user who bought the app and is passed along to the application itself when the user starts using the app (see Figure 1).
Figure 1: App licensing end-to-end
What does a license token look like?
The following is an example of the license token (check the App License XML schema for the latest license schema).
<r v="1"><t aid="WA103403563" pid="fdd5f373-c524-4123-b716-b583c532abe1" cid="8491CA951DB109E0" ts="1" et="Paid" ad="2012-09-05T09:07:40Z" sd="2012-09-05" te="2012-10-06T07:20:45Z" /><d>jFHyWsqnl4JFuFHBwX01ZiLGezvk7bt4JHk35wu7wtg=</d></r> |
For apps for Office, this token is passed as an encoded URL query parameter up to the web application supporting your app.
Licensing your app for Office
After you have the license token, you can pass it on the Office Verification service inside your web application to verify the token's validity. For best anti-piracy protection, you should use server-side code to take the token and pass it to the verification service, although you can choose to keep this logic in the (client-side) app itself if you want.
Implementing licensing in your app involves a simple four-step process (see Figure 2):

Figure 2. Four steps to implementing license checks in your app
1. Decode the token: Because the token is passed up in an encoded format as a URL query parameter, you should apply URL decoding and base64 decoding to get a decoded version of the user token. The following code retrieves the decoded token:
string token = Request.Params["et"].ToString(); // Obtains token URL.
// Applies base64 decoding of the token to get a decoded token.
byte[] decodedBytes = Convert.FromBase64String(token);
string decodedToken = Encoding.Unicode.GetString(decodedBytes);
2. Call the verification service: After you have your decoded token, the next step is to pass it up to the verification service. You can create a service reference to the verification service from inside Visual Studio using the Add Service Reference option. Assuming you're building an ASP.NET website, right-click the project in Visual Studio and choose Add Service Reference (see Figure 3).
Figure 3. Create a service reference inside Visual Studio
In the dialog box that pops up, enter the URL of the verification service—which is located at https://verificationservice.officeapps.live.com/ova/verificationagent.svc. Clicking Go downloads the service metadata. You can name the reference appropriately (in this sample, I'm calling it VerificationService), and then click OK (see Figure 4). This downloads the client contract to your project.
Figure 4. Create a client namespace for the Verification Service
Back in your code's logic, call the service with the decoded token:
//Create a client instance to call the service.
VerificationServiceClient client = new VerificationServiceClient();
//Create the interface request object and add your token to the request.
VerifyEntitlementTokenRequest request = new VerifyEntitlementTokenRequest();
request.EntitlementToken = decodedToken;
// Call the service.
VerifyEntitlementTokenResponse response = client.VerifyEntitlementToken(request);
3. Provide the right experience: You can parse the response returned by the service to decide what experience to return to the user. In this sample, we have four different HTML files, one for each of the possible response actions. You can redirect the user to one of these files and show customized experiences for each of these scenarios. You should also check whether the token is valid using the Validity property. Also check whether the returned Product ID matches the Product ID in your app (which is defined in your App Manifest in the <Id> tag).
if (response == NULL ||
response.ProductID != MY_PRODUCTID ||
response.IsValid == FALSE)
Response.Redirect("./Unlicensed.html");
if (response.EntitlementType == "Paid")
{
Response.Redirect("./Paid.html");
}
/* If you had a free app, but switched to paid, use this logic:
else if (response.EntitlementType == "Free")
{
Response.Redirect("./Paid.html");
}*/
else if (response.EntitlementType == "Trial")
{
if (response.EntitlementExpiryDate < DateTime.Now || response.IsExpired)
Response.Redirect("./ExpiredTrial.html");
Else
Response.Redirect("./Trial.html");
}
else
Response.Redirect("./Unlicensed.html");
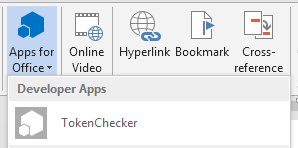
4. Testing and handling test tokens: To test your code, place the token file in a local folder along with the app manifest (.xml) file. You can then create a new registry key under [HKEY_CURRENT_USER\Software\Microsoft\Office\15.0\Wef\Developer] with a value of the folder name. This will let your app appear under the Developer category in your Word document (see Figure 5), where you can test that it works.
Figure 5. Test your app using the Developer apps category
For more information about creating and loading test tokens, see How to: Load a license token for testing purposes for task pane and content apps.
Handling test tokens also forms an important part of enforcing licenses. You can use this to perform special validation or to handle test tokens appropriately by giving a test experience. The verification service response lets you enable this using the IsTest property.
if (response.IsTest == true)
Response.Redirect("./InvalidToken")
The following is the full sample code:
using System; using System.Web; using System.Web.UI; using System.Web.UI.WebControls; using TokenChecker.VerificationService; using System.Text;
namespace TokenChecker { public partial class _Default : System.Web.UI.Page { protected void Page_Load(object sender, EventArgs e) { string token = Request.Params["et"].ToString(); VerifyToken(token); } public void VerifyToken(string token) { byte[] decodedBytes = Convert.FromBase64String(token); string decodedToken = Encoding.Unicode.GetString(decodedBytes);
/* Call the service. */ try { VerificationServiceClient client = new VerificationServiceClient(); VerifyEntitlementTokenRequest request = new VerifyEntitlementTokenRequest(); request.EntitlementToken = decodedToken; VerifyEntitlementTokenResponse response = null; response = client.VerifyEntitlementToken(request); } catch(SoapException ex) { // HANDLE EXCEPTION. } catch(Exception ex) { // HANDLE GENERAL EXCEPTION. } /* Handle the response. */ if (response == NULL || response.ProductID != MY_PRODUCTID || response.Validity == FALSE) Response.Redirect("./Unlicensed.html"); if (response.EntitlementType == "Paid") { Response.Redirect("./Paid.html"); } /* If you had a free app, but switched it to paid, use this logic: else if (response.EntitlementType == "Free") { Response.Redirect("./Paid.html"); }*/ else if (response.EntitlementType == "Trial") { if (response.EntitlementExpiryDate < DateTime.Now) Response.Redirect("./ExpiredTrial.html"); Else Response.Redirect("./Trial.html"); } /* Handle test license tokens. */ else if (response.IsTest == true) { //DO TEST LICENSE HANDLING } Response.Redirect("./Unlicensed.html"); } } } |
Call to action
To sum up, I'd like to invite you to do the following:
- Create your paid app with trials.
- Read the full MSDN aricle Add license checks to your apps for Office to learn more about testing licensing support in your app. Also look out for the follow-up post about licensing apps for SharePoint.
- Think about upsell during the trial period.
- Submit your app to the Office Store
Thanks for reading! Do let us know how you get on with license checks in your app.
Comments
Anonymous
November 01, 2012
Hi Krishnan, Thanks for the helpful code. I think something wrong with the handling verification response logic. According to the msdn documentation (see msdn.microsoft.com/.../jj164035%28v=office.15%29.aspx) test license tokens are always returned isvalid property false. I got also same result in my tests. That means ion your example the test licenses check is inaccesible.Anonymous
November 01, 2012
Hi, You performed the expiration check by comparing dates,but there is also a property in verification response called "IsExpired".What info does this fields provides?Anonymous
November 04, 2012
Hi Huseyin, Thanks so much for your comments! Great to see that this was helpful. You are right, the test license tokens that you test with will always have the IsValid property set to false. There are other test tokens specifically generated as part of pre-publish validation for your apps which can be checked for using the separate IsTest property. While you should always use the IsValid property as the most common case, I recommend using the IsTest property as well to handle these special tokens. The IsExpired property is a property of how stale the license token is (or, put another way, at what point the license token needs to be refreshed. It does not indicate, for now, the current status of the license itself - so I recommend using the date at the moment to carry out the licensing check. Looking forward to seeing your app on the Store! KrishannAnonymous
November 08, 2012
The comment has been removedAnonymous
November 08, 2012
Thanks so much for the information.Anonymous
November 13, 2012
Hi Daniel. It sounds like we'll need a little more information to best help you (what was the exact input set as the Base 64 string; which URL are you using as the end point for the verification service?) Start a post on social.msdn.microsoft.com/.../appsforoffice and we'll help you out there. Thanks, DavidAnonymous
February 15, 2014
Hi Krishnan, We should now use EntitlementExpiryDate property to determine weather the license entitlement expired or not. And even if we need to calculate the dates ourselves (for example: to display remaining days in UI), we need to compare to DateTime.UtcNow not DateTime.Now, as these dates stored as utc in office store.Anonymous
May 21, 2015
Hello, great post - I followed a modified version of this (keutmann.blogspot.com/.../sharepoint-2013-hosted-app-license-check.html) and it worked perfect for Office 365 - However when I test this with SharePoint 2013 on Premise - I am getting an error when installing from the App Store. I get this error right before it installs "Sorry, we can't seem to connect to the SharePoint Store. Try again in a bit." When I check the error log shows: "The remote server returned an error: (400) Bad Request" I am able to add other free apps but mine that uses this solution throws the above error. Do you have any thoughts on this - it would seem that it might be related to the end points.Anonymous
July 05, 2015
Getting some weirdness with a mail add-in licensing on the office store. Sometimes the add-in page shows per user price, sometimes - site license price... I can't quite figure out why, or how it's may be affecting potential customers. Perhaps I missed some documentation on that somewhere?


