Store PowerShell Profile on SkyDrive
Summary: Guest blogger, JD Platek, talks about storing the Windows PowerShell profile on SkyDrive.
Microsoft Scripting Guy, Ed Wilson, is here. Today I would like to introduce a new guest blogger. Please welcome JD Platek.
JD has been in IT since 2003, and he is an Exchange Server 2010 and Office 365 MCM. He has supported many industries, plus he has enjoyed having the opportunities to travel the world because of IT. Most of his career has been in the Exchange world, which lead him to learn and love Windows PowerShell. JD is a consultant for Microsoft in Singapore. He supports and regularly presents at the Singapore PowerShell User Group.
Take it away, JD…
There are seven steps for storing the Windows PowerShell profile on SkyDrive:
- Set up SkyDrive on ComputerA.
- Create a folder named PowerShell in SkyDrive and make it available offline.
- Create a new local profile, rename it, and copy it to SkyDrive.
- Create a local profile and edit it.
- Edit the SkyDrive profile.
- Set up SkyDrive on ComputerB.
- Create local profile and edit.
Let’s look at the steps individually…
1. Set up SkyDrive on ComputerA
You need to ensure that you log in to your computer with a Microsoft ID, or if your computer is domain joined, make sure that you have linked your Microsoft ID to your corporate account. If you’re not sure, press the Windows key + S, and type “Your Account Settings” in the Search charm.
The computer we’re using is running Windows 8.1. There are a few differences between Windows 8.1 and Windows 8:
- SkyDrive is included by default, so there is no need to install a separate package.
- The white cloud icon in the Task bar is no longer there.
- If you view SkyDrive from Windows Explorer, you’ll notice the pretty green checkmarks are gone from the folders, which indicated that the folder successfully synced.
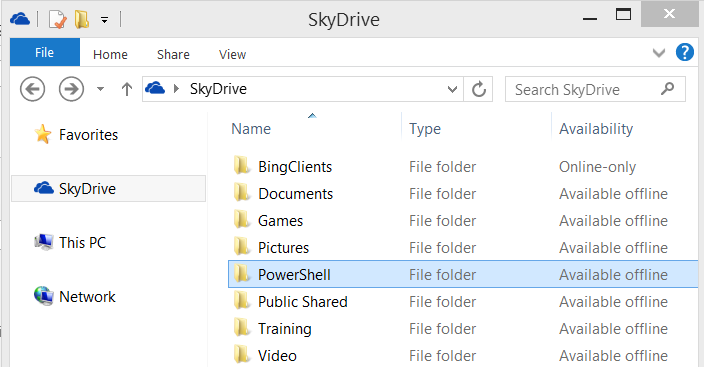
- There is a new column named Availability. In SkyDrive, you can now select all or some folders to save offline, and other folders can be online and not saved to your local disk. This is as easy as right-click, and then select Make available offline.
2. Create a folder and make it available offline
The following screenshot shows that I created a folder called PowerShell in SkyDrive, and I made it available offline.
3. Create a local profile, rename it, and copy it
If you already have a Windows PowerShell profile, you can simply copy that file to the directory SkyDrive\PowerShell\ and quickly rename it. Otherwise, you can start with a blank new profile, which is what I’ll be doing here.
To create a new local Profile:
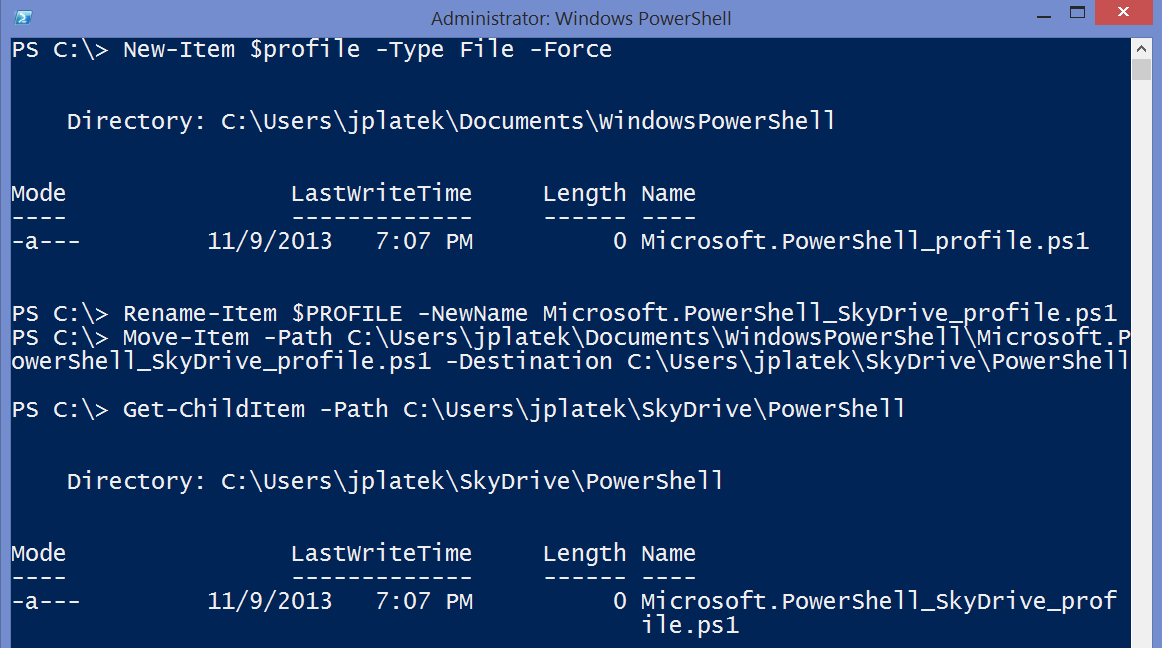
New-Item $profile -Type File –Force
To rename the profile:
Rename-Item $PROFILE -NewName Microsoft.PowerShell_SkyDrive_profile.ps1
To move the file:
Move-Item –Path $env:USERPROFILE\Documents\WindowsPowerShell\Microsoft.PowerShell_SkyDrive_profile.ps1 -Destination $env:USERPROFILE\SkyDrive\PowerShell\
To verify the move:
Get-ChildItem -Path $env:USERPROFILE\SkyDrive\PowerShell
4. Create a local profile and edit it
Now let’s create another new local profile, only this time we will be editing it.
To create a new local profile:
New-Item $profile –Type File –Force
To edit the profile:
Notepad $profile
To copy and paste the profile, then save and close Notepad:
#Variables for SkyDrive roaming profile
$PSSkyDriveProfile = 'Microsoft.PowerShell_SkyDrive_profile.ps1'
$PSSkyDriveProfilePath = $env:USERPROFILE + '\SkyDrive\PowerShell\' + $PSSkyDriveProfile
$PSLocalPath = $env:USERPROFILE + '\Documents\WindowsPowerShell\'
$PSLocalSkyDriveProfile = $PSLocalPath + $PSSkyDriveProfile
#Copy Skydrive Profile
Copy-Item -Path $PSSkyDriveProfilePath -Destination $PSLocalPath -Force
#Dot source load SkyDrive Local profile file
.$PSLocalSkyDriveProfile
#Creates a Function to edit SkyDrive profile quickly
Function Edit-PSSkyDriveProfile {notepad $PSSkyDriveProfilePath}
The first four lines are a variable to generate the file names and paths to the SkyDrive profile. Then you can see that we copy the SkyDrive file to your local system and force an overwrite if there is already an existing file. This way, the SkyDrive profile is your master image in the cloud. We dot source to have Windows PowerShell execute the SkyDrive profile script. Then I set up a function to quickly edit the master image that is located on SkyDrive in the cloud.
To quit and reopen Windows PowerShell:
Get-ChildItem –Path env:USERPROFILE\Documents\WindowsPowerShell\
Finally, verify that your SkyDrive profile file has been copied locally:
5. Edit the SkyDrive profile
Because we created that function, we should now be able to quickly edit the master image that is stored in SkyDrive. Let’s have Windows PowerShell create a script folder on drive C, and start in that path every time we launch Windows PowerShell.
Edit-PSSkyDriveProfile
To copy and paste, save, and close:
#test or create scripts directory
If (test-path c:\scripts) {} else {New-Item c:\scripts -Type directory}
#Changes to root of drive
cd C:\Scripts
This is a simple test to see if C:\Scripts exists. If it does not, create the folder and change to that directory. Then quit and reopen Windows PowerShell, and you should be at the C:\Scripts directory, as shown in the following image:
6. Set up SkyDrive on ComputerB
Follow the same steps as in Step 1 when we set up SkyDrive on ComputerA, but this time we set up SkyDrive on ComputerB.
7. Create local profile and edit
This is the same thing we did in Step 4, except we need to create a local profile on ComputerB, and then copy and paste again. However, you’ll notice this time when you quit and reopen Windows PowerShell, it should open at the C:\Scripts directory.
In the future, from either ComputerA or ComputerB, you can type Edit-PSSkyDriveProfile, and this will always edit the master image that is stored in SkyDrive. When launching Windows PowerShell on either computer, it will always copy this file locally and execute it as part of your session.
~JD
Thank you, JD, for writing this post and sharing. This is a cool trick.
I invite you to follow me on Twitter and Facebook. If you have any questions, send email to me at scripter@microsoft.com, or post your questions on the Official Scripting Guys Forum. See you tomorrow. Until then, peace.
Ed Wilson, Microsoft Scripting Guy


