An App-Time Story: Build an App before you go to bed and earn $100 in the morning! Continued
Chapter Four: Export to Visual Studio
If you are here, I assume you have customized the match template in the previous tutorial. Are you all done changing the imagines and text? It is time to go to Visual Studio 2012. (This section is from Jim O’Neil’s guide From Construct2 to Visual Studio)
This section might seem long but believe me it takes minutes, I promise.
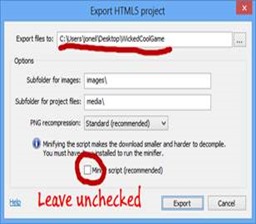
1. Export the project from Construct 2:
2. Select Windows 8 |
3. Pick a directory to export to. |
|
4. Wait while project is exported. |
5. Choose option to open destination folder. |
Note: you will need to have Visual Studio 2012 (or Visual Studio 2012 Express for Windows 8) running on a Windows 8 machine to proceed.
.
10. On the Packaging tab, click the Choose Certificate button. |
11. Then pick Create Test Certificate, and press OK. |
12. Press OK on the next dialog (you don’t need to enter anything in the text boxes) |
13. You can now run your game as a full-fledged Windows 8 application by clicking the arrow next to Local Machine (below) or just pressing the F5 key. |
14. At this point run your game just to make sure it works as you expected. You should check out snapped view (move mouse to top of screen until you see the hand cursor, then drag to middle of screen and then all the way left). Your app will now occupy about a third of the screen.
Depending on options you used while building your game, the snapped view may or may not be usable. If it is not, see https://bit.ly/Zu3KJl for some recommendations.
15. Before submitting to the store you need to provide a minimum of four graphics – three logos and a splash screen. These graphics have very specific size requirements (below) and should be .png or .jpg format. Use MS Paint or other free drawing tools to great these graphics.
Overwrite the existing file in the project directory (filenames below) with your custom graphics.
Asset |
Filename |
Size in Pixels |
Logo |
app-logo.png |
150 x 150 |
Small Logo |
app-smallogo.png |
30 x 30 |
Store Logo |
app-storelogo.png |
50 x 50 |
Splash Screen |
splashscreen.png |
620 x 300 |
At this point you will need to have your Windows Store Account active and be able to login with your Microsoft Account ID and password.
16. Right-click on the project in Solution Explorer to bring up the menu, then select Store, and Associate App with Store… On the dialog that results, press the Sign in button
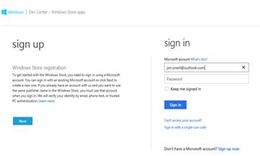
17. You will be prompted to enter your Microsoft account ID for your store account; enter your credentials and press the Sign in button. |
18. After you sign in, you’ll see the following dialog. Click the Reserve Name link.
|
19. You’ll be asked to sign in again. |
20. You’ll then see the steps to submit the app to the store. |
:
23. Continue with Selling details
Pick free, or charge if you like.
For the information on the rest of the page:
Markets: |
Pick the United States. You may pick any others except Korea, Brazil, South Africa, and Taiwan (as they have additional external certification requirements for games) |
Release date: |
Leave as Release my app as soon as it passes certification. |
Category |
Select a Category (it can be Games, but doesn’t have to be) |
Subcategory |
Select a Subcategory (not all Categories will have subcategories) |
Hardware Requirements |
Leave both Minimum DirectX feature level and Minimum system RAM set to Available to all systems. |
Accessibility |
Leave this unchecked |
Press the Save button.
24. Continue with Advanced features, do nothing except press the Save button |
25. Continue with Age rating and rating certificates Select an age rating for your application based on the theme and content. Then press the Save button. |
26. Continue with Cryptography
For Does this app call, support, contain or use cryptography or encryption? Select No.
Then check the checkbox that appears ( I confirm that this app is widely distributable to all jurisdictions without government review, approval, license or technology-based restriction.)
Finally, press the Save button.
At this point you have created most of the application profile in your Store developer account! Next you’ll go back to Visual Studio to create a package to upload your app to this new application profile.
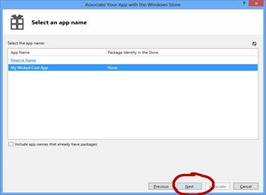
27. In Visual Studio you should now see the dialog updated to include your new application. Press the Next button. |
28. Now press the Associate button. |
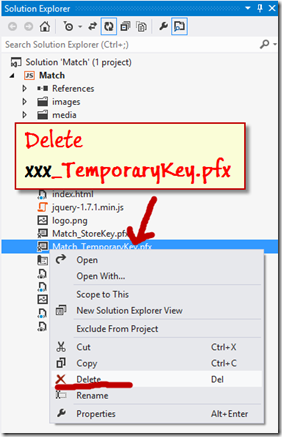
29. In Visual Studio Solution Explorer, delete the file ending in TemporaryKey.pfx, by selecting it and clicking the right mouse button to bring up the dialog, then clicking delete. DO NOT DELETE the one ending in StoreKey.pfx.
Press OK when prompted to confirm you want to delete permanently
30. Select the Store -> Capture Screenshots… option by clicking the right mouse button on the project in Solution Explorer.
Press OK at the prompt.
31. The Simulator should automatically start and begin running your application. Play the game to some interesting points you want to highlight, then click the Camera button on the right to take one or more screen shots. You will need these later when you finish the application profile in your Store developer account.
The screen shots will be stored by default in your My Pictures library, in a directory called Windows Simulator.
32. Back in Visual Studio, select the Store, Create App Packages… option
33. On the resulting dialog, leave Yes selected and press the Sign in button, to sign into your store account again.
 |
 |
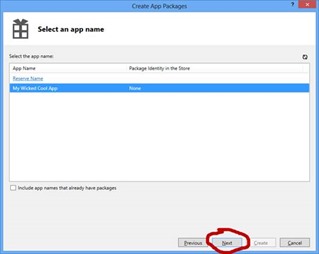
34. Select your app from the list, and press the Next button. |
35. On the screen that follows, press Create |
36. On the next screen, click the link labelled Output location; that will open a File Explorer window that you should leave open.
You can optionally run the Windows Application Certification Test Kit locally to make sure you’ve made all the correct changes to the template.
37. Continue editing your application profile on your Windows Store account Developer Dashboard. If you no longer have the site up, navigate to https://dev.windows.com, click the Dashboard menu, and then Edit your existing application profile.
38. Packages
Drag the appxupload file from the File Explorer windows over to the Packages field on the web page, and wait for the transfer to complete.
When it’s done, press the Save button.
39. Description
 |
 |
You’ll need to provide description information and graphics for your application listing on the Windows Store; see the table below for a description of these items as well as which of them are required.
Description (required) |
A plain text description of your applications |
App features |
|
Screenshots (at least one required) |
Click the Add image link and browse to the screenshots you took earlier (in the My Pictures/Windows Simulator) directory. You will also enter some short text for each screen shot. |
Description of update |
Leave blank |
Recommended hardware |
Leave blank |
Keywords |
Provide search terms to help users find your app |
Copyright and trademark info (required) |
Use text like “Copyright 2013, your-publisher-name” |
Promotional images |
Leave blank |
Website |
Leave blank |
Support contact info (required) |
Enter your e-mail address |
Privacy policy |
Leave blank (unless you have added other features that require one) |
Finally, press the Save button:
40. Notes to testers – optional, but you must at least visit the page and click the Save button.
41. You’re done!!! Press the Submit for Certification button.
You’ll get an e-mail confirming the certification, and you should hear within a couple of days (or even sooner) via another e-mail if your application has passed certification!
Don’t forget to submit your app to App Madness you have a chance to win $100.


