Git for Team Foundation Developers–Branches
This post will illustrate branching with Git. This is the second post in a series.
- Git for Team Foundation Developers
- Git for Team Foundation Developers – Branches (this post)
- Git for Team Foundation Developers - Merging
The series focuses on introducing Git for developers who are familiar with Team Foundation Version Control.
Background
One of the concepts that really threw me when I was first learning Git was branching. When using branching with Team Foundation Version Control (TFVC), you would typically use a pattern similar to the following:
In this model, you would build version 1 and release it. Upon release, you would create a new branch for version 2, but continue to support version 1 through bug fixes. At some point your team merges the fixes from v1 to the v2 branch, and v2 is released. When version 2 is released, a new branch for version 3 is created, but version 2 continues in maintenance mode until you merge changes from v2 to the v3 branch.
This could be an absolute nightmare. Not kidding, this is really easy to show on a diagram, but the reality was that the merge operation could often mean rewriting entire portions of a solution. Git, on the other hand, encourages branching even for small bug fixes because it doesn’t track files, it tracks content, making it easier to merge content later.
The Master Branch
There’s really nothing special about the Master branch. Git needs a single default branch to work with, and names the default “Master”. In reality, you may decide to create your own branching structure and never use the name “master”. For instance, you might use a branching structure like:
You may decide to instead create branches based on features.
One colleague on my team is working on a project where they create branches daily.
Creating a Branch
In my previous post, Git for Team Foundation Developers, I showed how to create a project in Visual Studio Online, clone the repository, commit changes to the local repository, and push changes to the remote repository. Everything we did used a default branch named “master”: the local repository uses “master”, and the remote repository uses “master”. Let’s create a local branch. I am going to use Visual Studio primarily to do work, but then use Git Bash and gitk to see what Git thinks is going on.
Click Branches.
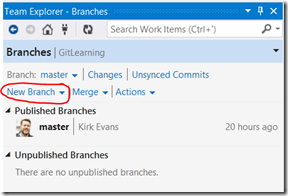
Click New Branch.
Give it a name and click “Create Branch”.
We just created a branch named “v2”. Once we are done, Visual Studio tells us that the branch is now v2 and that v2 is an unpublished branch.
Let’s see what Git thinks. Open Git Bash and change directory to your working directory (“cd /c/gitlearning”).
Notice that the command prompt now has (v2) appended to it, indicating that our current branch is v2. Want to see something cool? In Git Bash, switch to the master branch using “git checkout master”.
Notice the prompt now has (master) appended to it, indicating the current branch is the master branch. Now, go take a look at Visual Studio, and it knows the branch has changed to master.
Let’s switch branches back to our v2 branch using Visual Studio this time. Go to the Branch drop down and select the v2 branch.
In Git, we can use “git branch” to show all the branches, and the asterisk next to a branch indicates the current branch.
Git Bash also knows that we switched the branch using Visual Studio. There is a file in the .git directory named HEAD that contains this information, pointing to the current branch.
Creating Some History
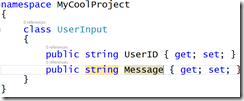
Now that we’re using the v2 branch, let’s make some changes. I am going to add a class named UserInput with two properties.
The solution explorer pane has that little green plus sign next to the UserInput.cs file that I talked about in my previous post in the series.
Right-click the file (not the project node) and choose Commit.
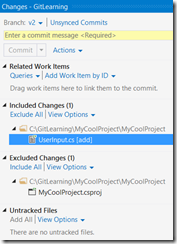
We can now see the included and excluded changes. The new class, UserInput.cs, is an included change. However, the .csproj is an excluded change, meaning it will not be committed.
That would be weird, to have the new class but the csproj not know anything about that. Simply drag the csproj to the Included Changes section, enter a check-in comment, and click Commit.
Now that we’ve checked in the code to our local repository, a colleague stops by your cube and points out that you should have used an interface for that class to improve testability. You right-click on the class, choose Refactor / Extract Interface.
Click OK, and the class now implements the new IUserInput interface. We go to Solution Explorer to see the changes.
Right-click on the project node (not the file this time) and choose Source Control / Commit.
The changes look good, we enter a check-in comment and choose Commit. When we are done, notice the link up top. We can click it to inspect details.
Before we do that, let’s go inspect what’s happened on the file system.
There are two files in the heads subdirectory, master and v2. There are also a bunch of subfolders in the objects subdirectory. Our latest commit shows an ID of “ffffb5c7” in Visual Studio. I go to the “ff” subfolder under objects, and see a file with a long weird name.
Let’s go look at Git Bash for a second. I use “git log” to show the log. It reads as newest at the top to oldest at the bottom.
Notice the full commit ID for the latest commit? The first two characters are the subfolder “ff”, the rest of it are the file name. Every commit is identified by a SHA-1 hash value of its author information and contents.
Now go back over to Visual Studio. We can now click the link for the commit to see the details, including changes as well as a pointer to its parent.
Click the link to its parent to see what that looks like.
Changes have parents.
Branches and the Working Directory
Here is the part that absolutely threw me for a loop. In TFVC, remember that you would have a different working directory for every single branch. In Git, there’s only one working directory and all changes are tracked within the repository. Here’s what my file system looks like right now:
OK, that’s expected, the IUserInput.cs and UserInput.cs files are there, I just coded those in Visual Studio. Now go to Visual Studio and switch branches back to master.
Now take a look at the Solution Explorer pane. UserInput.cs and IUserInput.cs are gone! Don’t worry, the'y’re not really gone, they’re just not in the master branch.
Let’s take a look at the file system. The files are gone from there, too.
The files are not deleted, they’re still there in the repository. Remember that what you’re looking at in File Explorer is the working directory. As we switch between branches, the working directory will reflect the latest commit. Switch back to the “v2” branch, and our files reappear in the working directory.
Get Those Changes to the Server
When I use TFVC, I would frequently check in source code to TFS to prevent against loss. This is a self-serving pattern. If I win the lottery, I am not going to care about those changes, and let’s face it, if I get hit by a bus I’m not going to care very much, either. I am only doing this to make sure that I don’t lose any changes should my hard drive crash or my laptop is stolen.
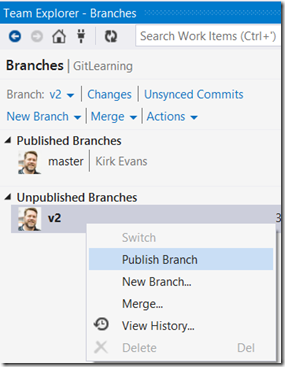
Let’s get the v2 branch to the server. I go back to the Branches section in the Team Explorer pane and choose “publish branch”.
Go to Visual Studio Online, under Code / Branches and we can see the new v2 branch is now in TFS.
I can also see a visual indication that the v2 branch is 2 commits ahead of the master branch.
I can compare branches.
When I compare, I can see the commit history that differs.
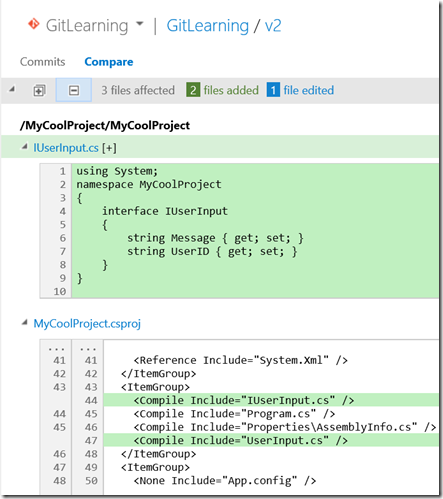
I can also see the difference in files.
This is the beauty of the Git model, I can create my own branch, such as “kirk_dev” where I do all of my own work. I publish that branch to the TFS server. I perform commits against my local repository offline, and when I am able to connect I can push the commits to the remote repository. Those changes can now be seen by the rest of my team and can be used for peer code reviews.
Merges
We now have two branches both on the server and in the local repository, master and v2. Let’s merge the changes from v2 back into master. Right-click the branch and choose Merge.
You are prompted to choose the source and target branches. In our scenario, v2 is the source and master is the target.
Click Merge, and an interesting thing happens. First, it looks like a new commit is created in the local repository. However, if we look closely, the commit is “ffffb5c7”, which is the same commit we saw previously. Git just takes the commits from the v2 branch and puts them in the master branch, effectively “replaying” all of our changes. Second, the branch is switched to master.
Remember, we have only done this in the local repository. No changes go to the remote repository until we decide they should. This was a mental block for me, as I am used to all operations being performed against the server. With Git, all changes are performed against the local repository and then pushed to the remote repository.
Note: there are other options than just pushing. We can also fetch and pull. For now, let’s just focus on push.
We can click that link “Unsynced commits” to commit the changes from the local repository to the remote repository. We can see the commits that will be added, and we can use the Sync button to synchronize our changes to the remote repository.
After it is complete, we see there are no additional outgoing commits.
Finally, we see a visual indication in Visual Studio Online that the master branch has the same commits as the v2 branch because it is 0 ahead and 0 behind.
For More Information
Collaborate in a Git team project (pull, push)
Use Git branches to switch contexts, suspend work, and isolate risk
Comments
Anonymous
March 30, 2014
Great series. One thing to note. "Git just takes the commits from the v2 branch and puts them in the master branch, effectively “replaying” all of our changes. " This isnt quite right. In TFS, branches are like big buckets that changesets are applied to, but git inverts this idea to make the commits unique and immutable and the branches just ephemeral pointers. So in fast-forward merges, such as this one, the commit doesn't move or get copied from V2 to master. The commit stays put and the master branch pointer is updated to reference it. That makes the push extremely tiny in that case since the only update needed on the server (assuming it had V2's changes already) is what commit the master branch should now be referencing.Anonymous
March 30, 2014
Ah! You're right, Stu! Even saw that in a diagram on the DAG showing the pointers. Thanks for the clarification.Anonymous
April 01, 2014
As a matter of fact, you should create a new branch for every new feature, bug, implementation you are creating.Anonymous
November 16, 2014
Hi Kirk, I'm enjoying reading your series of articles on using Git with Visual Studio Online. I do have a question on using Git with Visual Studio Online for CI. Is it possible to setup a Git branch using Azure portal using the Integrate source control feature for a website? I'm trying to workout the workflow for a developer or a team of developers to publish a Git branch to a Azure hosted website for integration testing or for customer feedback on development changes. I can see a situation where a dev team would be switch back and forth between website versions.


