Create the Best App for Office 2013 in 5 Minutes
While speaking in Kuala Lumpur for the Ignite developer training, Chris O’Connor (aka @grumpiewookie) jokingly said that the whole apps for Office thing needed something catchy, something nostalgic. We need some obscure JavaScript library to do something interesting, something entertaining yet educational.
Something like Clippy.
I searched for all of 30 seconds, and sure enough someone built a JavaScript library that lets you put Clippy in a web page! I love their tagline, “Our research shows that people love two things: failed Microsoft technologies and obscure Javascript libraries. Naturally, we decided to combine the two.”
During the lunch hour, I worked on a funny app (with the help of Keenan Newton) and moments later, demo’d an app that featured Clippy. This is not just an image, Clippy is actually animated, makes sounds, and prints whatever message you feed him to the screen!
There are a number of actions you can provide the agents, such as moveTo, animate, speak, congratulate, and a bunch of other tricks that you can use to amuse your fellow geeks.
Creating a Clippy app is ridiculously easy. There are a few steps, but only a handful of lines of code… the rest is just deployment goo. We’ll even go one step further by deploying our app for Office as part of a SharePoint document library so that when someone creates a new document we can be sure that Clippy will be there.
Create a Document in Excel
This demonstration requires Excel 2013 to support the new app model. Open Excel 2013 and create a document. This document will be the template used for our app (we could use a blank Excel document, but that doesn’t look as nice in screen shots now does it?) In Excel 2013 go to the File tab, click New, and choose the Expense Report template. Save the document somewhere on your hard drive.
Creating the Project
There are four steps that we need to perform to create the Clippy app. First, we create a SharePoint-hosted app. Next, we add an App for Office project item to the app. We then add a document library that uses the document as its template, and finally we add Clippy to the App for Office.
Creating the SharePoint Hosted App
This is the really easy part. In Visual Studio 2012, create a new App for SharePoint 2013 named “MyExpenseReportApp” and click OK. Give the project a name, URL for debugging, and changed the hosting model to “SharePoint-hosted”.
Done with that step.
Add an App for Office
Right-click the project node in Visual Studio 2012 and choose Add / New Item. Choose the “App for Office” project item type and name it “ExpenseReportApp”.
On the next page, uncheck Word and PowerPoint, leaving the option for creating a Task pane app in Excel.
On the next page, choose the option to insert the app into an existing document, and browse to your expense report document that you just created.
Click Finish.
Add a Document Library to the SharePoint App
We now need a document library that will use the App for Office as its template for new documents. Right-click the project node in Visual Studio 2012 and choose “Add / New Item”. Choose the “List” project item and name it “ExpenseReports”. Choose the option to create a customizable list template and a list instance using the Document Library content type.
Choose Next.
On the next screen in the wizard, choose the option to use the following document as the template for this library. Click the browse button, and you should be in the folder that contains your app. There is a child folder, “OfficeDocuments”, that contains the expense report Excel document that was bound to your app for Office.
Once you choose the file, click Finish in Visual Studio. You now have a document template that contains an app as the template for a document library. When someone creates a new document for that library, they will see your app.
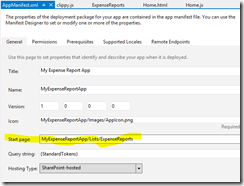
The document library will be created in the SharePoint app web, the only way that users will be able to access it is if you provide them the URL or add a UI element like a ribbon button. Another easy way to get to the document library is simply to update the app manifest to point to the document library.
When the app starts, it will be on the all items view for your document library.
Add Clippy
Now for a little developer ingenuity. Visit https://www.smore.com/clippy-js and download Clippy from GitHub. There are several folders in the ZIP file that you download, the only ones you need are the 3 files in the Build folder.
Extract those 3 files and add them to Visual Studio 2012 in the Home folder for your App for Office.
Once you have the files, the rest is easy. Open the Home.html file. Add the following CSS reference in the HEAD section.
<link rel="stylesheet" type="text/css" href="clippy.css" media="all">
You can see where I included it:
Finally, go to the bottom of the Home.html page and add the implementation details.
     <script src="clippy.min.js"></script>

    <script type="text/javascript">
    clippy.load('Clippy', function (agent) {
        agent.moveTo(0, 200);
        agent.show();
    });
</script>
Here is a screen shot that again shows where I placed it in my code.
Finally, hit F5 to debug your project. If you followed along, the app should open to your “ExpenseReports” document library in your app web. Go to the Files tab and choose New Document / ExpenseReportsContentType.
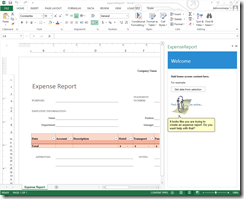
That will open Excel using the Expense Report template. The document contains a reference to our App for Office, so when the app opens we will see Clippy.
Can’t you just imagine their surprise when they open the new expense report app that you’ve been laboring over, and they are delighted that it comes with a built-in help system!
For More Information
https://www.smore.com/clippy-js – source and documentation for Clippy.js
https://dev.office.com – Learn to build apps for Office 2013


