Using URL Re-write in IIS to change Content-Disposition Headers
Browsers have several ways in which they can handle a file that is downloaded from a web-server and that does not contain HTML or is an HTML page associated resource. The way in which attachments are dealt with is quite neatly described in this blog post from the HttpWatch team: https://blog.httpwatch.com/2010/03/24/four-tips-for-setting-up-http-file-downloads/ .
The way to make a browser attempt to display a downloaded attachment inline, meaning inside the browser itself, or to pop-up a small window, asking if the end user wishes to save or open the file can be controlled by an http header called the 'Content-Disposition' header. Setting the value of this header to 'inline' will cause the browser to attempt to load the program that is associated with the document extension inside the browser window to display the file (think of a PDF file that is opened directly inside the browser window). Contrary, setting the value to 'attachment' will cause the browser to display a small dialogue asking the user if they wish to save or open the file instead (like the window shown below).

I have recently come across a situation, where a web-application was sending down Office files (Excel, PowerPoint or Word) and these were being dispatched to the client with a Content-Disposition header value of 'inline' as the one show below:
Content-Disposition: inline; filename=<file.ext>
There was an issue with displaying Office documents inline with some of the PCs that were accessing this application, and to work around this, I was requested to change the Content-Disposition header value from the one listed above to – note the fact that 'inline' would be replaced with 'attachement' but that the file name part would be kept as is:
Content-Disposition: attachment; filename=<file.ext>
In this walkthrough, I will describe the steps in which this can be implemented inside IIS using the Url Rewrite feature.
The first step, is to install Url Rewrite, if you do not already have this module present on your IIS server. It can be downloaded from the following location: https://www.iis.net/downloads/microsoft/url-rewrite. At the time of this writing, the version of the module is 2.0. The installation will not stop any of your IIS services or impact websites, but will require you to restart any open IIS Manager Consoles that you had open during the installation for the interface to be displayed.
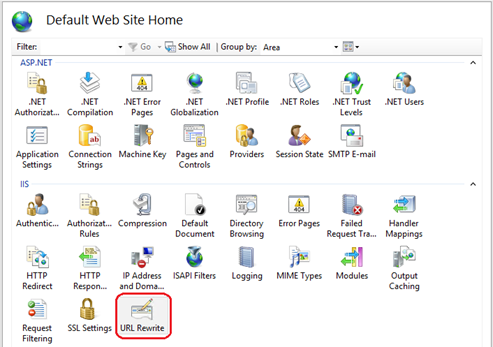
Launching the IIS Manager Console, you can now select the site / web-application that you wish to implement this change for, from the tree view on the left-hand side. Then double click the Url Rewrite Icon that is located inside the middle pane of the IIS Manager Console.

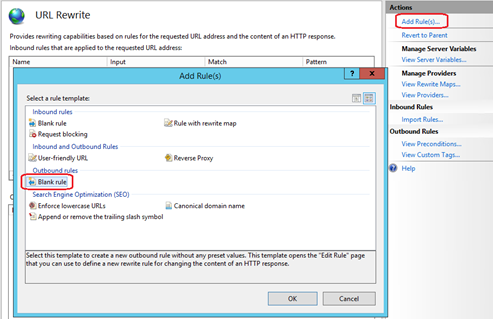
We can now create a new Outbound Rule from the rule templates. Click the 'Add Rules' action button on the right-hand side of the IIS Manager Console and select a 'Blank Rule' from the 'Outbound Rules' section. Outbound rules will affect the response generated by IIS to incoming requests. We can use this outbound rule to modify properties of the response object (such as an http header value) to obtain the desired result.

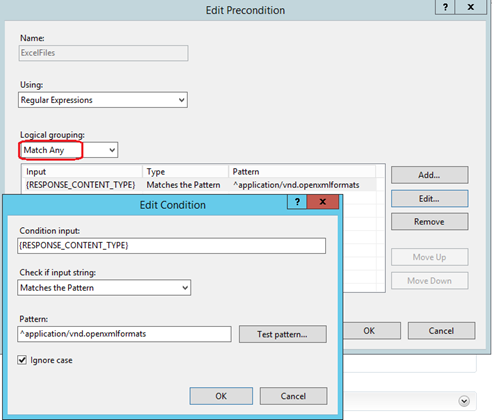
In order for the outbound rule to target specific responses, we need to create a pre-condition. Think of this as a filter that will only give back some responses that match certain conditions: in our case, responses that are dealing with files being sent down to the client as attachments. Select 'Create New Precondition' from the 'Precondition' dropdown to bring up the pre-condition creation Wizard

In the precondition wizard, we will use regular expressions to match the responses we wish to chance. Select 'Regular Expressions' from the 'Using' drop-down. Add a new input condition by pressing the 'Add' button on the right-hand side of the Window. In the input condition editor window, we will indicate that we want to match responses based on content type. Hence we will be examining the {RESPONSE_CONTENT_TYPE} variable for each response. We will chose to see if the value of this variable matches a pattern – hence chose 'Matches the Pattern' in the 'Check if Input String' dropdown. For this example, I will provide the patter to match for Excel documents, which is: ^application/vnd.openxmlformats . This translates to match anything that starts with the string 'application/vnd.openxmlformats'. You may add several patters if you also want to match Word or PowerPoint documents in the same pre-condition. If this is the case, do not forget to switch the 'Logical Grouping' dropdown to 'Match Any'.

Now that we have specified how we wish to find interesting responses, we need to specify what to modify inside the response. This is done in the 'Match' part of the rule definition. We want to try and match the 'Content-Disposition' which at this point will be present inside a server variable associated with the request. The name of the server variable is 'RESPONSE_Content_Disposition' and we need to look for values of interest inside the values of this variable using regular expressions. The pattern we are looking for in the values of this variable is the following: inline;(.*) – this is a regular expression that will match a string that contains the word 'inline;' and then proceed to match 0 or more characters after it. You way familiarize yourself more with regular expressions by reading this article I have bookmarked: https://linqto.me/Regex

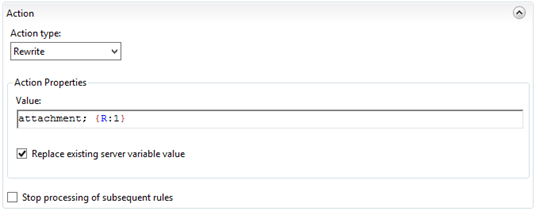
The next and final step is to specify how we wish the response to be changed by the url rewrite rule. We will do this in the 'Action' configuration settings of the rule. Specify an action of type 'Rewrite', while the value of the 'Action Properties' should be: attachment; {R:1} . This will replace the previous value with the word 'attachement;' followed by whatever the regular expression in the last step matched after the 'inline;' string. This is represented by the {R:1} place holder. Do not forget to check the 'Replace existing server variable value' checkbox so that the new value we have composed will overwrite the old.

Save the new url rewrite outbound rule and you have completed the changes.
This will allow you to intercept all responses that had a 'Content-Disposition' header that would display the contents of the response inline in the browser, by a content disposition directive that will make the browser prompt the end user to save the file to disk via a dialogue.
By Paul Cociuba
https://linqto.me/about/pcociuba
Comments
- Anonymous
April 04, 2017
The comment has been removed- Anonymous
May 04, 2017
The method show in the article above will only work when you detect a content disposition header. Url Rewrite will only allow you to change / modify content on the outbound response. That being said, there is nothing to stop you from:- creating a server variable called 'RESPONSE_Content_Disposition' in Url-Rewrite for the site you are changing the configuration (just go inside the IIS console, select the site, double click on Url rewrite, and then select 'Server variables' from the right hand side pane).- this will create a server variable called 'RESPONSE_Content_Disposition' even if no content disposition is set by the server itself.- depending on how you will do the matching for the 'Server Variable', you can change the pattern to *, you should be able to match anything even if the variable does not contain any data- the rewrite rule will then add the 'attachement' string into the variable name and this will be converted into a content-disposition header
- Anonymous