Establishing Trust between a WCF Web Service and the SharePoint 2010 Security Token Service
This article is the third in a series of MSDN articles on creating a claims-aware web service and consuming it from SharePoint Business Connectivity Services (BCS). In this article, you are going to enable federated HTTP binding for the web service and establish trust between the WCF Web service and the SharePoint 2010 Security Token Service (STS). The series consists of the following articles:
This blog is inactive.
New blog: EricWhite.com/blog
Shows how to create a very simple web service using WCF. Shows how to host this web service using IIS. |
|
Enhances the example so that the Web service can authoritatively report on the identity of its caller. |
|
Establishing Trust between a WCF Web Service and the SharePoint 2010 Security Token Service (This post) |
Configures the example developed in the previous article so that it uses a self-signed certificate to support a secure connection. |
Consuming a Claims-Enabled WCF Web Service as an SharePoint 2010 External Content Type |
Walks through the procedure for consuming a claims-enabled web service as a SharePoint 2010 External Content Type. |
These articles were written by Saji Varkey, and Bin Zhang, and me. They will be published on MSDN sometime in the near future. After they are published, I will update these posts to point to the MSDN articles. Juan Balmori Labra was the program manager behind these articles.
Every SharePoint server installation has a built-in security token service. While it is possible to establish trust relationships to security token services that are not part of a SharePoint installation, by far the most common scenario is where you establish a trust relationship with the SharePoint STS, so this article focuses on that scenario.
To follow the procedures in this article, you need to have two servers set up. One of the servers needs to be running the WCF Web service that you developed in the first two articles in this series. The other server needs to have an installed, running instance of SharePoint 2010 server. I tested these procedures on a freshly installed instance of SharePoint 2010 server.
The following diagram shows the various actors in this scenario. The user connects to the web front end (WFE), which talks to the BDC Runtime. The BDC runtime calls to the SharePoint Security Token Service (STS) and the web service.

First, you need to create a self-signed certificate. This is an activity that you’ll regularly do as a developer, but when you actually deploy live, you will use a certificate issued by a certificate authority.
Procedure: Create a Self-Signed Certificate
Note: If you already have a valid certificate issued by a certificate authority, then you can use that certificate instead of creating a self-signed certificate.
1. Start Internet Information Services (IIS) Manager. Click Start => Administrative Tools => Internet Information Services (IIS) Manager.
2. Select the machine in the Connections pane. Double-click Server Certificates.

3. Click Create Self-Signed Certificate.

4. The wizard will ask you to specify a friendly name. It is useful to give it a name that indicates the machine the certificate came from. In my case, I gave it the computer name for the computer that the Web service is hosted on.

Procedure: Bind the certificate to https
1. In Information Services (IIS) Manager, right-click on the site containing the Web service application, and click Edit Bindings…

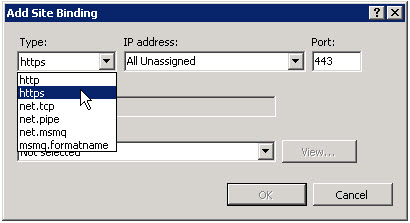
2. If you followed the procedures in this series, and started with a freshly installed operating system, you will see that there is no https binding. Click Add.
3. In the Add Site Binding dialog box, select https from the Type drop down.

4. Then select the SSL certificate that you just created.

5. Click the View… button to view details about the certificate. In particular, we are interested in the Subject property.

Note the value of the Subject field, as you will require that value when connecting to the service using Microsoft SharePoint Designer 2010. You will need this value in step 9 of the procedure in Consuming a Claims-Enabled WCF Web Service as a SharePoint 2010 External Content Type.
6. Click OK, and then click Close.
Next, we need to establish trust between the computer consuming the web service (the SharePoint 2010 server), and the computer hosting the WCF Web service. To do this, you export the certificate you just created, copy it to the consuming computer (the SharePoint 2010 server), and import the certificate using a PowerShell cmdlet.
Procedure: Export the Self-Signed Certificate
Start Microsoft Management Console. The easiest way is to enter mmc into the search box off of the start menu.

In the console, select File => Add/Remove Snap-in…
In the Add or Remove Snap-ins dialog box, click Certificates in the Available snap-ins list. Click the Add button.

When adding, Microsoft Management Console asks which account you will be managing certificates for. Click Computer Account, and then click Next.

Click Finish, and then click OK.
Now find the certificate that you just created. Expand Certificates, expand Personal, and click on Certificates. You will find one certificate that is issued to the machine you are on, and issued by the machine you are on.

Right-click on the certificate, click All Tasks, and click Export. This starts the Export Certificate wizard.

Click Next on the Welcome dialog.
In the next dialog, select, “No, do not export the private key”, and click Next.
In the next dialog, the default setting is DER encoded binary X.509 (.CER) . Do not change the setting, and click Next.
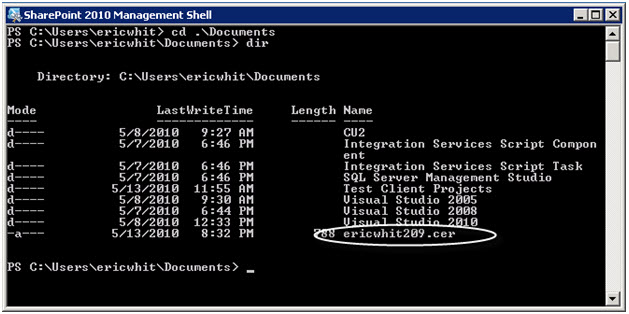
In the next dialog, specify the path and file name for the certificate file. In my case, because the machine name is ericwhit209, I named the certificate ericwhit209.cer. Click Next.
Click Finish. The wizard will tell you if the export was successful or not.
Now that you have exported the self-signed certificate, you need to copy this certificate to the computer running SharePoint 2010 server, and import it into SharePoint.
Procedure: Establish Trust between the Web Service and the SharePoint Server
Note: you need to perform this procedure only if you are using a self-signed certificate. If you are using a certificate that is issued by certificate authority, you don’t need to follow the steps in this procedure. This procedure enables certificate validation when BCS calls to the web service using Https.
1. Copy the certificate file from the computer that hosts the web service to the computer that contains SharePoint server 2010.
2. The following steps need to be performed on the SharePoint server computer.
Start a SharePoint 2010 Management Shell. Run as administrator.

3. Change directory to where you placed the certificate when you copied it from the Web service computer to the SharePoint server computer.

4. Read the certificate into a PowerShell variable, and then submit the certificate to the SharePoint trusted root authority. Enter the following into the PowerShell console, replacing ericwhit209.cer with the name that you gave the certificate when you exported it and copied it.
$cert = Get-PfxCertificate .\ericwhit209.cer
New-SPTrustedRootAuthority -Certificate $cert -Name ericwhit209

After the certificate is submitted, the cmdlet will output something along the lines of the following.

You can see the issuer, its range of validity, and more.
Now that https has been bound, you can update the Web.config for the WCF Web Service to use it. But before you can update the Web.config, you need to determine the thumbprint of the SharePoint Security Token Service certificate on the SharePoint Server computer.
Procedure: Determine thumbprint of the SharePoint Security Token Service certificate.
This procedure and the procedure following this procedure are what actually establishes trust between the SharePoint STS and the web service.
- On the server that is running SharePoint server 2010, start Microsoft Management Console, and add the certificate snap-in.
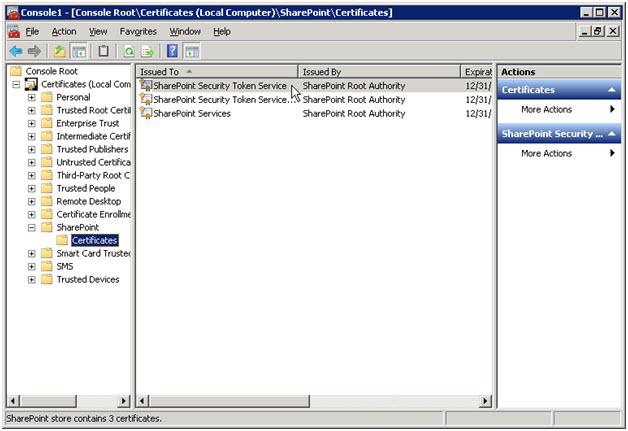
- Expand Certificates, and then expand SharePoint. Click on the Certificates node.

3. The certificate that we’re interested in is the top one that is issued to SharePoint Security Token Service. Double-click on it.
4. In the next step, you need to copy the thumbprint of the certificate to the clipboard. There is a tricky part to this step. If you copy the first apparent ‘space’ in the text box, you will be copying an invisible byte order mark (BOM) to the clipboard at that location in the string. You must be careful to select the string of hex digits without selecting that first character.

Copy the thumbprint from the Certificate dialog box to the clipboard.
Remove the spaces from the text of the thumbprint. The text as copied from the Certificate manager is as follows, with spaces separating the hex bytes:
dd be 98 f4 c2 db e6 d7 8c ec 14 d0 d0 0a b8 90 d1 53 08 f6
Open Notepad, paste the text into Notepad, and replace spaces with nothing, so that the string is as follows:
ddbe98f4c2dbe6d78cec14d0d00ab890d15308f6
This is one of the thumbprints that you will need in the following step.
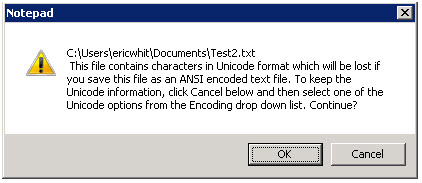
You can validate that you did not copy the byte order mark by attempting to save the file with the ANSI encoding. In notepad, on the menu, click File => Save As, specify a file name, and then click Save.

If you correctly did not select the character that contains the BOM, then the file will save properly. If you incorrectly selected the BOM, Notepad will inform you that the file contains characters in Unicode format which will be lost if you save the file as ANSI encoded text.

Copy and save this thumbprint so that you can paste it into the Web.config for the Web service.
Procedure: Replace Web.config for the Web service
Open the project for the Web service in Visual Studio. Replace Web.config with the contents of the following listing. There are four values that you will need to update values in this Web.config.
1. Update the endpoint URL for the SharePoint Security Token Service. You need to update only the machine name. Given the machine name, the endpoint URL for the SharePoint security service is well-known.
2. Update the metadata discovery URL for the SharePoint security service. As with the endpoint URL, you need to update only the machine name.
3. Update the thumbprint for the SharePoint security service with the value that you determined earlier in this article.
4. Update the name of the issuer token. This name needs to be unique among the trusted issuers in the issuer name registry. For the purposes of this article, use the machine name of the computer that is hosting the WCF web service.
Download a Clipboard Friendly Version of this Web.config
<?
xmlversion="1.0"?> <configuration>
<configSections>
<sectionname="microsoft.identityModel"
type="Microsoft.IdentityModel.Configuration.MicrosoftIdentityModelSection, Microsoft.IdentityModel, Version=3.5.0.0, Culture=neutral, PublicKeyToken=31bf3856ad364e35"/>
</configSections>
<system.serviceModel>
<diagnostics>
<messageLogginglogEntireMessage="true"
logMalformedMessages="true"
logMessagesAtTransportLevel="true" />
</diagnostics>
<services>
<servicebehaviorConfiguration="CustomersService.Service1Behavior"
name="CustomersService.Customers">
<endpointaddress=""
binding="ws2007FederationHttpBinding"
contract="CustomersService.ICustomers"
bindingConfiguration="Customers_ws2007FedHttpBinding">
<identity>
<dnsvalue="localhost" />
</identity>
</endpoint>
<endpointaddress="mex"
binding="mexHttpBinding"
contract="IMetadataExchange" />
</service>
</services>
<behaviors>
<serviceBehaviors>
<behaviorname="CustomersService.Service1Behavior">
<federatedServiceHostConfigurationname="CustomersService.Customers"/>
<!-- To avoid disclosing metadata information, set the value below to false and
remove the metadata endpoint above before deployment -->
<serviceMetadatahttpGetEnabled="true"/>
<!-- To receive exception details in faults for debugging purposes, set the value
below to true. Set to false before deployment to avoid disclosing exception
information -->
<serviceDebugincludeExceptionDetailInFaults="false"/>
</behavior>
</serviceBehaviors>
</behaviors>
<bindings>
<customBinding>
<bindingname="AsymmetricWindowsHttpBinding">
<securitydefaultAlgorithmSuite="Basic256Sha256"
authenticationMode="SspiNegotiated"
requireDerivedKeys="true"
securityHeaderLayout="Strict"
includeTimestamp="true"
keyEntropyMode="CombinedEntropy"
messageProtectionOrder="SignBeforeEncryptAndEncryptSignature"
messageSecurityVersion="WSSecurity11WSTrust13WSSecureConversation13WSSecurityPolicy12BasicSecurityProfile10"
requireSecurityContextCancellation="true"
requireSignatureConfirmation="false">
<localClientSettingscacheCookies="true"
detectReplays="true"
replayCacheSize="900000"
maxClockSkew="00:05:00"
maxCookieCachingTime="Infinite"
replayWindow="00:05:00"
sessionKeyRenewalInterval="10:00:00"
sessionKeyRolloverInterval="00:05:00"
reconnectTransportOnFailure="true"
timestampValidityDuration="00:05:00"
cookieRenewalThresholdPercentage="60" />
<localServiceSettingsdetectReplays="true"
issuedCookieLifetime="10:00:00"
maxStatefulNegotiations="128"
replayCacheSize="900000"
maxClockSkew="00:05:00"
negotiationTimeout="00:01:00"
replayWindow="00:05:00"
inactivityTimeout="00:02:00"
sessionKeyRenewalInterval="15:00:00"
sessionKeyRolloverInterval="00:05:00"
reconnectTransportOnFailure="true"
maxPendingSessions="128"
maxCachedCookies="1000"
timestampValidityDuration="00:05:00" />
<secureConversationBootstrap />
</security>
<binaryMessageEncodingmaxReadPoolSize="64"
maxWritePoolSize="16"
maxSessionSize="2048">
<readerQuotasmaxDepth="32"
maxStringContentLength="8192"
maxArrayLength="16384"
maxBytesPerRead="4096"
maxNameTableCharCount="16384" />
</binaryMessageEncoding>
<httpTransportmanualAddressing="false"
maxBufferPoolSize="524288"
maxReceivedMessageSize="65536"
allowCookies="false"
authenticationScheme="Anonymous"
bypassProxyOnLocal="false"
decompressionEnabled="true"
hostNameComparisonMode="StrongWildcard"
keepAliveEnabled="true"
maxBufferSize="65536"
proxyAuthenticationScheme="Anonymous"
realm=""
transferMode="Buffered"
unsafeConnectionNtlmAuthentication="false"
useDefaultWebProxy="true" />
</binding>
<bindingname="AsymmetricCookieHttpsBinding">
<securityauthenticationMode="IssuedTokenOverTransport"
defaultAlgorithmSuite="Basic256Sha256"
messageSecurityVersion="WSSecurity11WSTrust13WSSecureConversation13WSSecurityPolicy12"/>
<binaryMessageEncoding>
<readerQuotasmaxStringContentLength="1048576"
maxArrayLength="2097152"/>
</binaryMessageEncoding>
<httpsTransportmaxReceivedMessageSize="2162688"
authenticationScheme="Anonymous"
useDefaultWebProxy="false"/>
</binding>
</customBinding>
<ws2007FederationHttpBinding>
<bindingname="Customers_ws2007FedHttpBinding">
<securitymode="TransportWithMessageCredential">
<messageissuedKeyType="AsymmetricKey">
<!-- UPDATE: the URL for the SharePoint security service -->
<issueraddress="https://ericwhit210/_vti_bin/sts/spsecuritytokenservice.svc/windows"
binding="customBinding"
bindingConfiguration="AsymmetricWindowsHttpBinding"/>
<!-- UPDATE: the metadata URL for the SharePoint security service -->
<issuerMetadataaddress="https://ericwhit210/_vti_bin/sts/spsecuritytokenservice.svc?wsdl"/>
</message>
</security>
</binding>
</ws2007FederationHttpBinding>
</bindings>
<extensions>
<behaviorExtensions>
<addname="federatedServiceHostConfiguration"
type="Microsoft.IdentityModel.Configuration.ConfigureServiceHostBehaviorExtensionElement, Microsoft.IdentityModel, Version=3.5.0.0, Culture=neutral, PublicKeyToken=31bf3856ad364e35"/>
</behaviorExtensions>
</extensions>
</system.serviceModel>
<microsoft.identityModel>
<servicename="CustomersService.Customers">
<certificateValidationcertificateValidationMode="None"/>
<audienceUrismode="Never"/>
<issuerNameRegistrytype="Microsoft.IdentityModel.Tokens.ConfigurationBasedIssuerNameRegistry, Microsoft.IdentityModel, Version=3.5.0.0, Culture=neutral, PublicKeyToken=31bf3856ad364e35">
<trustedIssuers>
<!-- UPDATE: the thumbprint that was issued by SharePoint Security Token Service -->
<!-- UPDATE: the name of the issuer token -->
<addthumbprint="ddbe98f4c2dbe6d78cec14d0d00ab890d15308f6"
name="ericwhit210 "/>
</trustedIssuers>
</issuerNameRegistry>
</service>
</microsoft.identityModel>
</configuration>
Download a Clipboard Friendly Version of this Web.config
At this point, the Web service is configured properly. In the next article, you will use SharePoint Designer 2010 to consume the Web service as an External Content Type.
Comments
Anonymous
July 08, 2010
The comment has been removedAnonymous
October 07, 2010
Hello , I have successfully completed first two articles but i m stuck in third one . Let me know in Which web.config file ,the above code has to be replaced. I have replaced the web.config file of the WCF project created in first two articles. Also I am getting an error Could not find a base address that matches scheme https for the endpoint with binding WS2007FederationHttpBinding. Registered base address schemes are [http]. Kindly reply urgentlyAnonymous
October 28, 2010
Harsha - did you ever solve the problem with the error Could not find a base address that matches scheme https for the endpoint with binding WS2007FederationHttpBinding. Registered base address schemes are [http]? I'm having a simlar problem..... did find out how to make it work? Please let me know, ThanksAnonymous
July 20, 2011
Olivia/Harsha, You have to configure SSL certificate for your service Application. If hosted on local server add https binding and it will work.Anonymous
May 05, 2012
If I create a domain certificate I will get the credentials for every user in the domain?Anonymous
May 14, 2012
The comment has been removedAnonymous
September 03, 2012
I am also getting the same error -Could not find a base address that matches scheme https for the endpoint with binding WS2007FederationHttpBinding. Registered base address schemes are [http] Did any of you solve it? Hi Ovais, Can you bit elaborate your solution? Should I create a self signed certificate for Security Store Service Application?Anonymous
February 19, 2013
hello, i've a question. are those steps also necessary for word automation serviceAnonymous
September 24, 2013
I have successfully completed first two articles but i m stuck in third one . Let me know in Which web.config file ,the above code has to be replaced. I have replaced the web.config file of the WCF project created in first two articles. Kindly reply urgently