Creating Custom Workflow Task Approval Forms with SharePoint Designer 2010
I was recently creating a SharePoint Designer workflow for use in SharePoint 2010 and Office 365. The workflow was pretty straight forward. The end goal of the workflow was to automate an approval process for creating a sub site within an existing site collection. This is something I have written a lot about previously, so this post will not focus on the custom workflow action to create the site. Instead I was much more focused on the approval form. You see, my workflow was attached to an InfoPath form that captured the initial data requests from the user. Once it was submitted, the workflow auto-started. The first significant part of the workflow used the Start Approval Process action in SharePoint Designer. If you have used this before – you know that it is very similar to the OOB approval process. You can designate how many approvers will participate, construct the email you’ll send them, designate it as serial or parallel, etc. However, when you execute this action as part of your workflow, all your users get is the simple, straight-forward task form. I was wondering…. would it be possible without having to resort to Visual Studio or something that would require full trust to customize the task’s form. Ideally I wanted to display some of the data from the initial form so the user would have an idea of what they were approving without having to open up the original InfoPath file and I wanted to add some branding. The answer is of course – SharePoint Designer can do that. This post documents my discovery as you will have a hard time I think finding any reference. My initial Bing searches came up with lots of people asking, but not a lot of answers.
Let’s focus first on getting some additional fields of information on the form. The trick is to click on the word Approval in the approval process action.
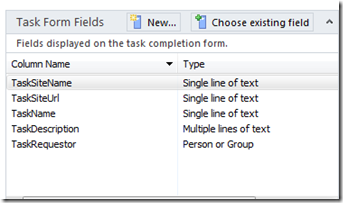
This takes you to the normal editor where you customize the approval process. In particular, the top-right hand corner of this dialog allows you to specify new fields that you will later be able to place on the form. In case you are curious as to what is going on behind the scenes. These fields will become site columns connected to a content type that represents the schema of your approval. Here is a screen shot of a few fields I added.
Now that the fields have been created, lets focus on where you can initialize their data so that when the task is created they display your data. To the left of the Task Form Fields, there is a section named Customization. There you will want to click on “Change the behavior of a single task”. This will pull up an editor that allows you to see the different stages a task goes through “is Assigned”, “is Pending”, “Expires”, “Completes”, etc. Since we want to initialize our task fields with new data, we will place new actions in the “Before a Task is Assigned” section. Use the SharePoint Designer action named “Set Task Field”. You can use this action to give these fields data. As to the values, you can reference the current workflow item if you wish. In my screenshot, I am using variables.
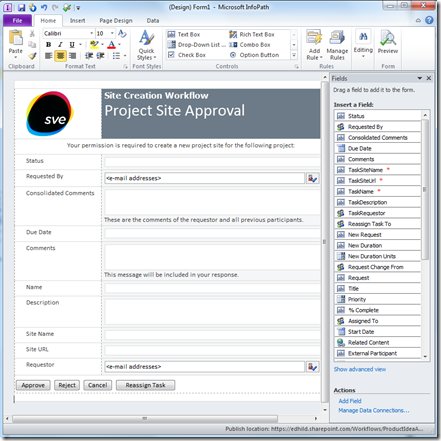
Save and work your way out of the editors until you get back to the initial Workflow screen in SharePoint Designer. We will not focus our attention to the display of the form. As it turns out with both SharePoint Server 2010 as well as Office 365, when you publish your workflow SharePoint Designer will build an approval InfoPath form for you. So Save and Publish the workflow. On the workflow property screen, there is a Forms area should have an InfoPath form named Approval.xsn. You can click the link to open the form in InfoPath. This will pull the schema information of the task form including the OOB fields and your custom ones. Now you can rearrange and add branding to the form. A Quick Publish will push out your changes. Here is what my InfoPath form looked like:
After the quick publish, run the workflow. When the task gets created, you should be able to see your custom design as well as the custom fields. Here is the final screenshot of the form being used in the SharePoint using the browser.
Comments
- Anonymous
June 01, 2011
Hi Ed - Great post! Did you have any issues when trying to show promoted fields (2007 terminology) in a list view? Example - Create a view in the task list that showed the "Name" and "site Name" columns with the values captured in the IP forms? @Ediaz009


