Application Partitioning with MEF, Silverlight and Windows Azure – Part II
Welcome back to the partitioned blog post about application partitioning with Silverlight MEF and Windows Azure. In this second and last post I will talk about how you can retrieve the information about the deployed parts of the application and retrieve the actual XAP files from the Azure Blob Storage.
Still we only have one Silverlight project where we added just one interface as the contract for the import and lazy initialization and an attribute class to flag our parts in the Silverlight projects to come as user controls to be exported as parts of the application meeting the specified contract.
Now we can extend the class corresponding to our shell to handle the imports of those attributed parts. This is also straight forward and follows the standard MEF procedures.
First thing to do would be to define a property attributed with the ImportMany attribute to tell MEF that it should populate this property with all (not just one) exports meeting the requirements of the importing application. This requirement is actually the contract I were talking about before.
 [ImportMany(AllowRecomposition = true)]
 public IEnumerable<Lazy<UserControl, IPartAttributes>> Parts { get; set; }
Important to note is the AllowRecomposition property for the ImportMany attribute which tells CompositionContainer to repopulate (recompose) when exports change. Now that we have this we still need to tell MEF to actually populate this property and this is as easy as calling the SatisfyImports method on the of CompositionInitializer class. For real world projects you should however be aware of the limitations of CompositionInitializer.
 public partial class MainPage : UserControl, IPartImportsSatisfiedNotification
 {
     public MainPage()
     {
         InitializeComponent();
         CompositionInitializer.SatisfyImports(this);
     }
     .
     .
     .
 }
In order to recognize when all imports have been finished (or satisfied) the class also implements an interface which lets MEF automatically call the OnImportsSatisfied method when recomposition occurs. As a side note it would make sense to follow implement the Model View ViewModel pattern for this application as well then you would factor out this code into a ViewModel class and mark that exportable and then again import it as a part into the main applications shell class printed above. How this can be done is described in a blog post by Glen Block. Continuing with this sample however there is one last thing to do which is to filter and add the UserControls imported by MEF to the items collections of the respective ItemsControl. That involves two steps actually:
- Clear the items collections of the ItemsControls
- Filter and add the new imports
Here’s the simplistic implementation for the shell areas in this sample application.
 public void OnImportsSatisfied()
 {
     ClearShellItemControls();
     PopulateShellAreas();
 }

 private void PopulateShellAreas()
 {
     var headerParts = Parts.Where(p => p.Metadata.IsHeaderPart == true).Select(p => p.Value);
     foreach (var hPart in headerParts)
     {
         header.Items.Add(hPart);
     }

     var leftnavParts = Parts.Where(p => p.Metadata.IsLeftNavPart == true).Select(p => p.Value);
     foreach (var lnPart in leftnavParts)
     {
         leftnav.Items.Add(lnPart);
     }

     var workbenchParts = Parts.Where(p => p.Metadata.IsWorkbenchPart == true).Select(p => p.Value);
     foreach (var wbPart in workbenchParts)
     {
         workbench.Items.Add(wbPart);
     }

     var footerParts = Parts.Where(p => p.Metadata.IsFooterPart == true).Select(p => p.Value);
     foreach (var fPart in footerParts)
     {
         footer.Items.Add(fPart);
     }
 }

 private void ClearShellItemControls()
 {
     header.Items.Clear();
     leftnav.Items.Clear();
     workbench.Items.Clear();
     footer.Items.Clear();
 }
Next thing to do now is the handle the means on how the application gets to know which XAPs to retrieve in order to import the parts into the container. As already pointed out we need to keep the information about which XAP files belong to the application and their storing location outside of the original Windows Azure deployment package (.cspkg). Because if we would keep it internally we would need to redeploy the package whenever the list of XAP files changes which is something what we don’t want to do.
It would of course be possible to put this information into the configuration file of the cloud service which is exposed through the Windows Azure management portal or the Management API. However this is does only really help for the task of changing the information about the application parts easily. It does however introduce some difficulties in retrieving those values from the Silverlight client which does not have any direct means to get to the configuration settings of the service. So we would need this information through some mechanics embedded into the hosting ASP.Net page or surface it through an respective web service. For simplicity I tool another approach and put a simple XML file also into the blob storage which I then can retrieve easily from my Silverlight application and I can also easily change and redeploy it by simply downloading, changing and uploading it again using my preferred tools. The file itself was already shown in the previous post of this series so now I will focus on how to retrieve it which is absolutely straight forward by using a standard Silverlight WebClient class in the Application_Startup method of the main application to get the file.
 private void Application_Startup(object sender, StartupEventArgs e)
 {
     WebClient wClient = new WebClient();
     wClient.DownloadStringCompleted += new DownloadStringCompletedEventHandler(wClient_DownloadStringCompleted);
     wClient.DownloadStringAsync(new Uri("https://<storageaccount>.blob.core.windows.net/mefparts/DeploymentCatalog.xml"));
     CompositionHost.Initialize(new DeploymentCatalog(), catalogs);
     this.RootVisual = new MainPage();
 }
Then we can parse the file and for each part start an asynchronous download of the XAP files into an AggregateCatalog which is the type of the catalogs object in the code below.
 void wClient_DownloadStringCompleted(object sender, DownloadStringCompletedEventArgs e)
 {
     if (e.Error == null)
     {
         string deploymentCatalogDefinition = e.Result;
         XDocument doc = XDocument.Parse(deploymentCatalogDefinition);
         var v = doc.Descendants("PartFile");
         foreach (XElement xe in v)
         {
             catalogs.Catalogs.Add(CreateCatalog(xe.Attribute("name").Value));
         }
     }
 }

 private DeploymentCatalog CreateCatalog(string partName)
 {
     Uri uri = new Uri("https://<storageaccount>.blob.core.windows.net/" + partName);
     var catalog = new DeploymentCatalog(uri);
     catalog.DownloadCompleted += new EventHandler<System.ComponentModel.AsyncCompletedEventArgs>(catalog_DownloadCompleted);
     catalog.DownloadAsync();
     return catalog;
 }
For this to work however there is one prerequisite to be met on the blob storage side and this is to allow public access for retrieving blobs from the container holding the XAP files and the DeploymentCatalog.xml file. This can of course be done with one of the various tools for managing the Azure Storage Service or if you created the container using the StorageClient class library you can create the container and set the permissions respectively. This also gives you two other advantages which are:
- The Silverlight application does not need to carry the shared key of your storage account to retrieve blobs which would impose a security risk
- You do not need to create REST calls to the storage service including the authorization and other headers as there is no StorageClient library available for Silverlight
This completes main application and it’s now time to create the parts that comprise the meat of the current applications. For this sample there is actually not much more to do than:
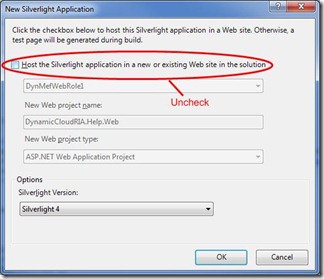
To add another Silverlight project to the solution. It is recommended to make sure that you uncheck the option to host the Silverlight application in the existing web project. It actually does no harm if it is added however it bloats the cloud service package with the XAPs which are not needed there.
Create the UI for the part
 <Border x:Name="LayoutRoot" Background="LightBlue" Height="50" VerticalAlignment="Top">
     <TextBlock HorizontalAlignment="Center" VerticalAlignment="Center" Text="Footer" FontSize="16" FontWeight="Bold" />
 </Border>
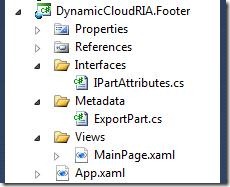
And then add the MetadataAttribute and the contract interface to the project like it was done in the main application
Mark the UserControl exportable using the MetadataAttribute just added to the project
 [ExportPart(IsFooterPart=true)]
 public partial class MainPage : UserControl
 {
     public MainPage()
     {
         InitializeComponent();
     }
 }
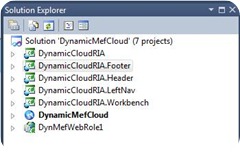
This is then usually repeated for all other parts of the application until all areas have a populating part located in an external XAP. For this sample the complete Solution structure looks lie this.
The main project (here “DynamicCloudRIA”) is deployed via the WebRole project (here “DynMefWebRole1”) as a standard cloud solution project and the XAPs of the other Silverlight projects can be uploaded to the respective container in the Windows Azure Blob Storage. For this sample the container contents look like shown below.
After this has been done the application should already run and show the shell and the dynamically loaded application parts. Hopefully this helps to understand how MEF can help to create partitioned applications with loosely coupled application parts even when the application and its parts is deployed on a cloud platform such as Windows Azure. The source code for the sample is attached for download below.


