Virtual Machine Scale Sets - It is really about protecting your application's performance
Azure Virtual Machines Scale Sets serve as the foundation for your auto scaling capabilities. The architecture of virtual machine scale sets greatly simplifies the ability to run a cluster that can adjust either by scaling out or by scaling up.
With all VMs configured the same, VM scale sets are designed to support true autoscale – no pre-provisioning of VMs is required – and as such makes it easier to build large-scale services targeting big compute, big data, and containerized workloads.
The Azure Container Service leverages scale sets so it might be useful to better understand how they work.
The real beauty comes in because you can set up thresholds for such things as CPU utilization across the cluster, paving the way For Azure to automatically monitor and respond to thresholds for a variety of performance metrics, not the least of which is percent CPU utilization.
In this post we will demonstrate automatically scaling up when the overall cluster percent CPU utilization stays above 60% more than five minutes.
The purpose of this walk-through is to illustrate the following:
How to provision Azure scale sets using the Azure Resource Manager Template mechanism.
How to work with the json-formatted template file, the place that we set up our VM types. The operating system. The number of cores. The amount of memory. Load balancer rules, public IP addresses, storage accounts, and more.
How to use Azure commandline utilities as well as an Azure resource manager template to provision virtual machines that can leverage Azure scale sets.
A deep dive on instance count, storage account, virtual networks, public IP addressing, load balancers, and Azure scale sets, as well as the relationship among these different components.
A demonstration of how auto scaling kicks in to provision additional virtual machines in the deployment.
Getting the source code for the templates
A set of example templates for VM scale sets can be found in the Azure Quickstart templates GitHub repository here.
Provisioning Infrastructure in Azure
Before diving into the mechanics of Azure scale sets and how they work, let's quickly review how infrastructure gets provisioned in Azure. There are a variety of ways that you can provision infrastructure and Azure. We will focus on using the Azure command line utilities.
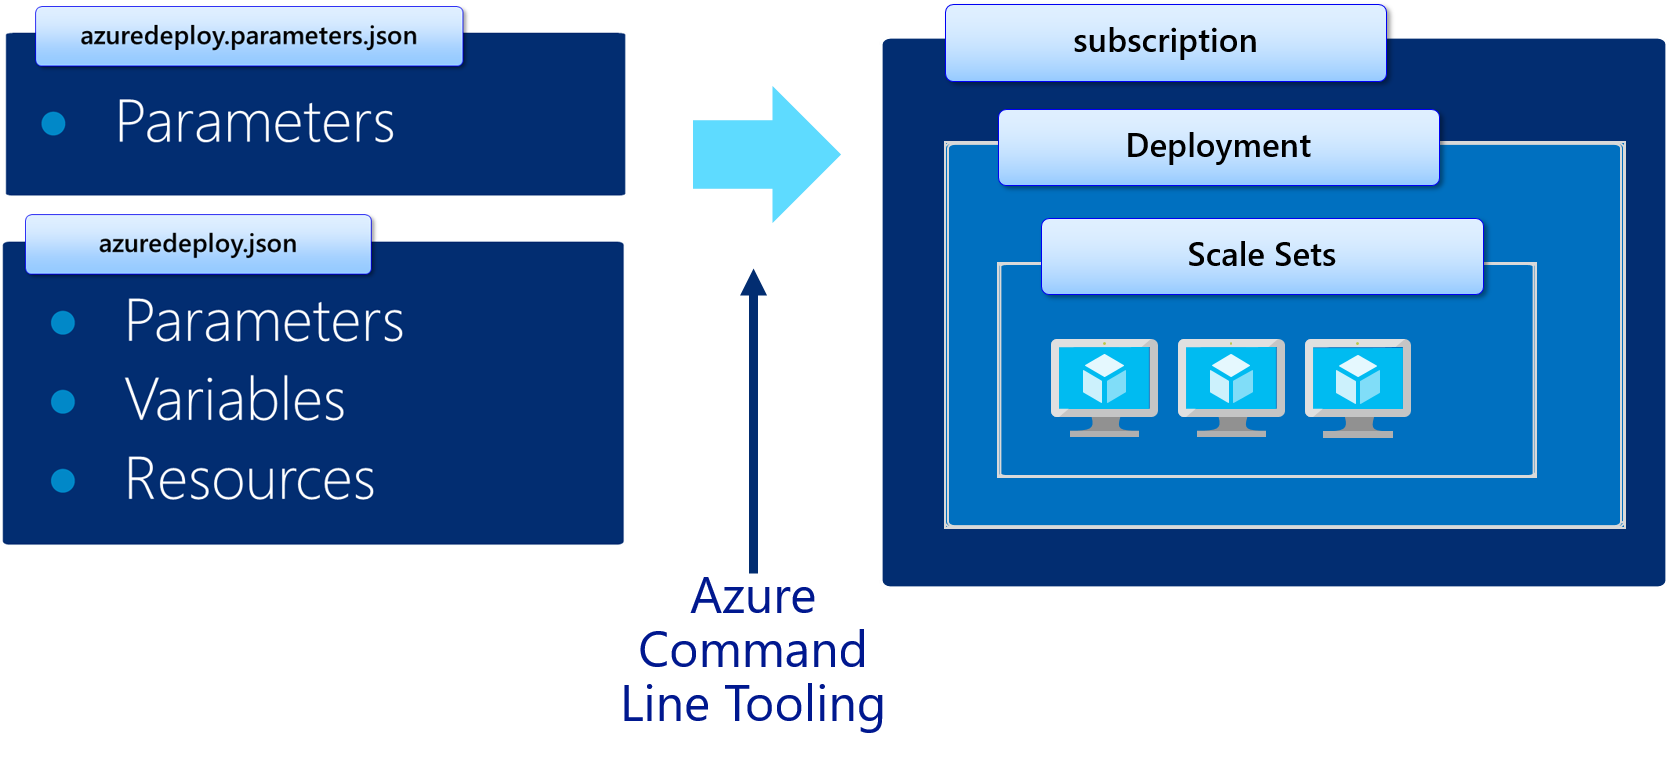
Notice in the diagram below that there are two json files that represent the infrastructure would like to provision. Using the Azure command line utilities, the infrastructure definition contained in those json files can be transformed into actual compute, storage, and networking infrastructure within a user's Azure subscription.
Figure 1: Using the cross-platform tooling to deploy infrastructure
Azure Group Create
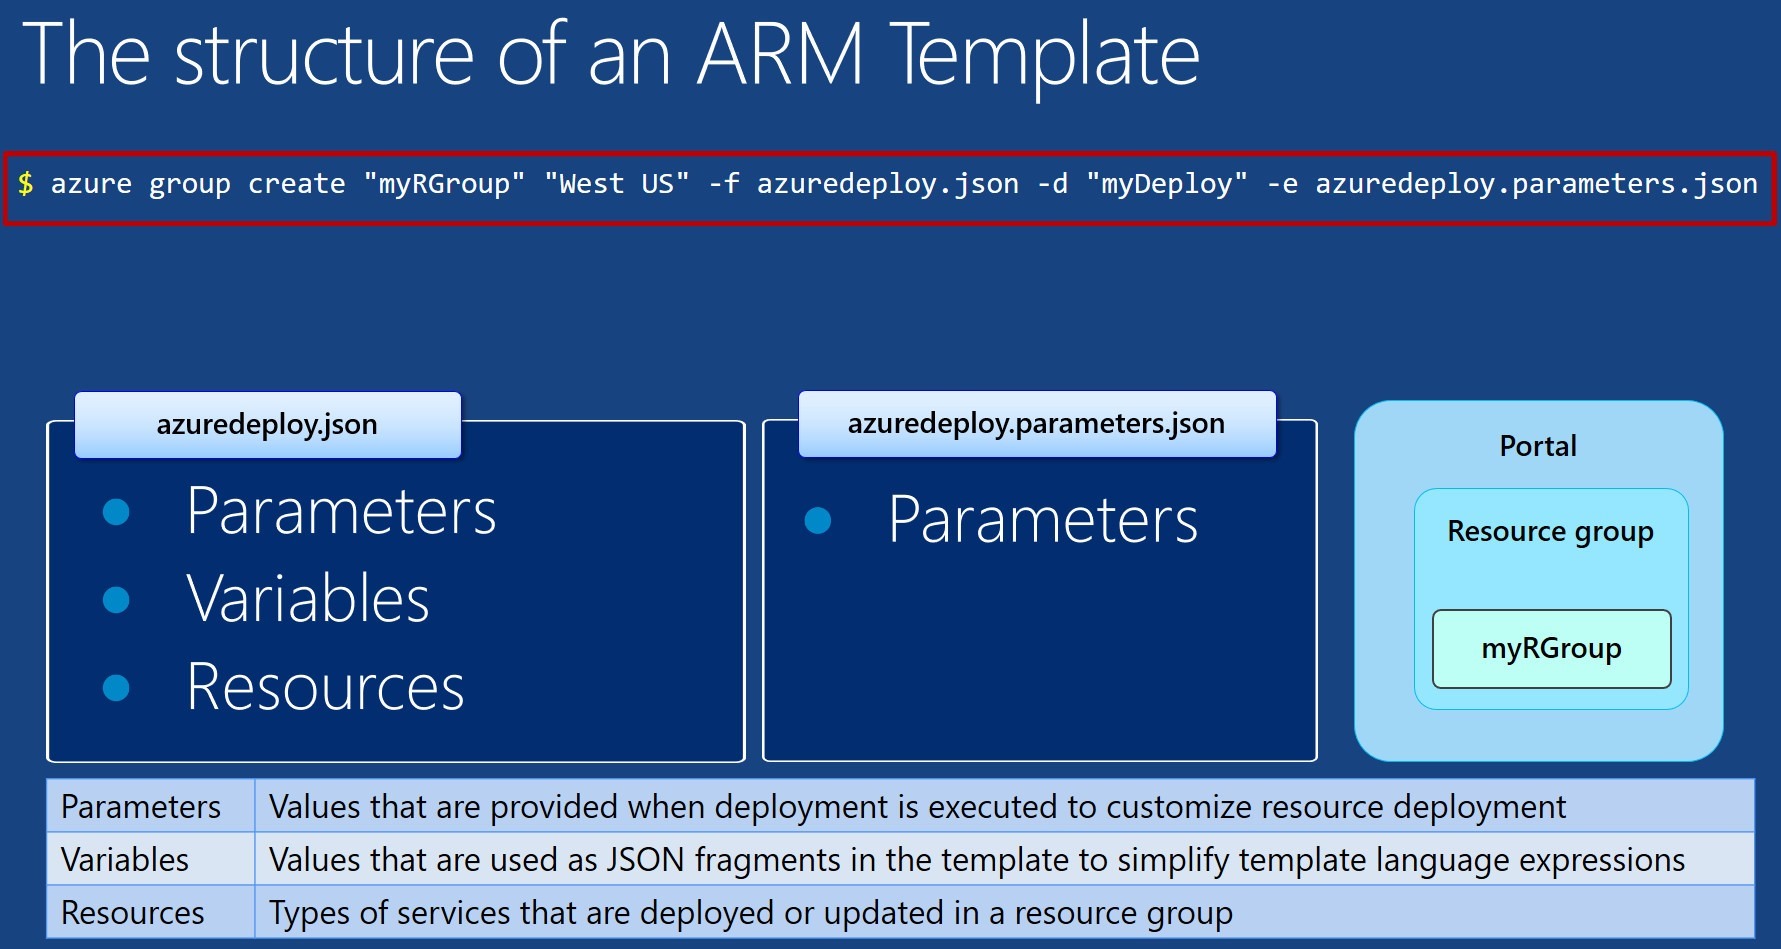
Notice in the figure below there is a red box around what appears to be a command. This command ("azure") is the Azure command line tool. It accepts a number of parameters.
Here are some things to realize about the command you see there:
$ azure group create "vmss-rg" "West US" -f azuredeploy.json -d "vmss-deploy" -e azuredeploy.parameters.json
- azure group create
- Is the fundamental command that builds out your infrastructure
- vmss-rg
- Is the name of your resource group, which is a conceptual container for all the infrastructure you deploy (VMs, Storage, Networking). If you delete a resource group, you delete all the resources inside of it
- WestUS
- Is a data center where your deployment will take place
- vmss-deploy
- Is the name of the deployment (so you can refer back to it later)
- azuredeploy.json
- Is where you define the infrastructure you want to deploy
- azuredeploy.parameters.json
- Allows you to specify which values you can input when deploying the resources. These parameter values enable you to customize the deployment by providing values that are tailored for a particular scenario, like the number of VMs you want in your scale set
The Azure Cross Platform tooling can be downloaded here:
https://azure.microsoft.com/en-us/documentation/articles/xplat-cli-install/
My final point for the diagram below is that the most important section is the Resources section.
Figure 2: Understanding how the Azure group create command works
Choosing a data center
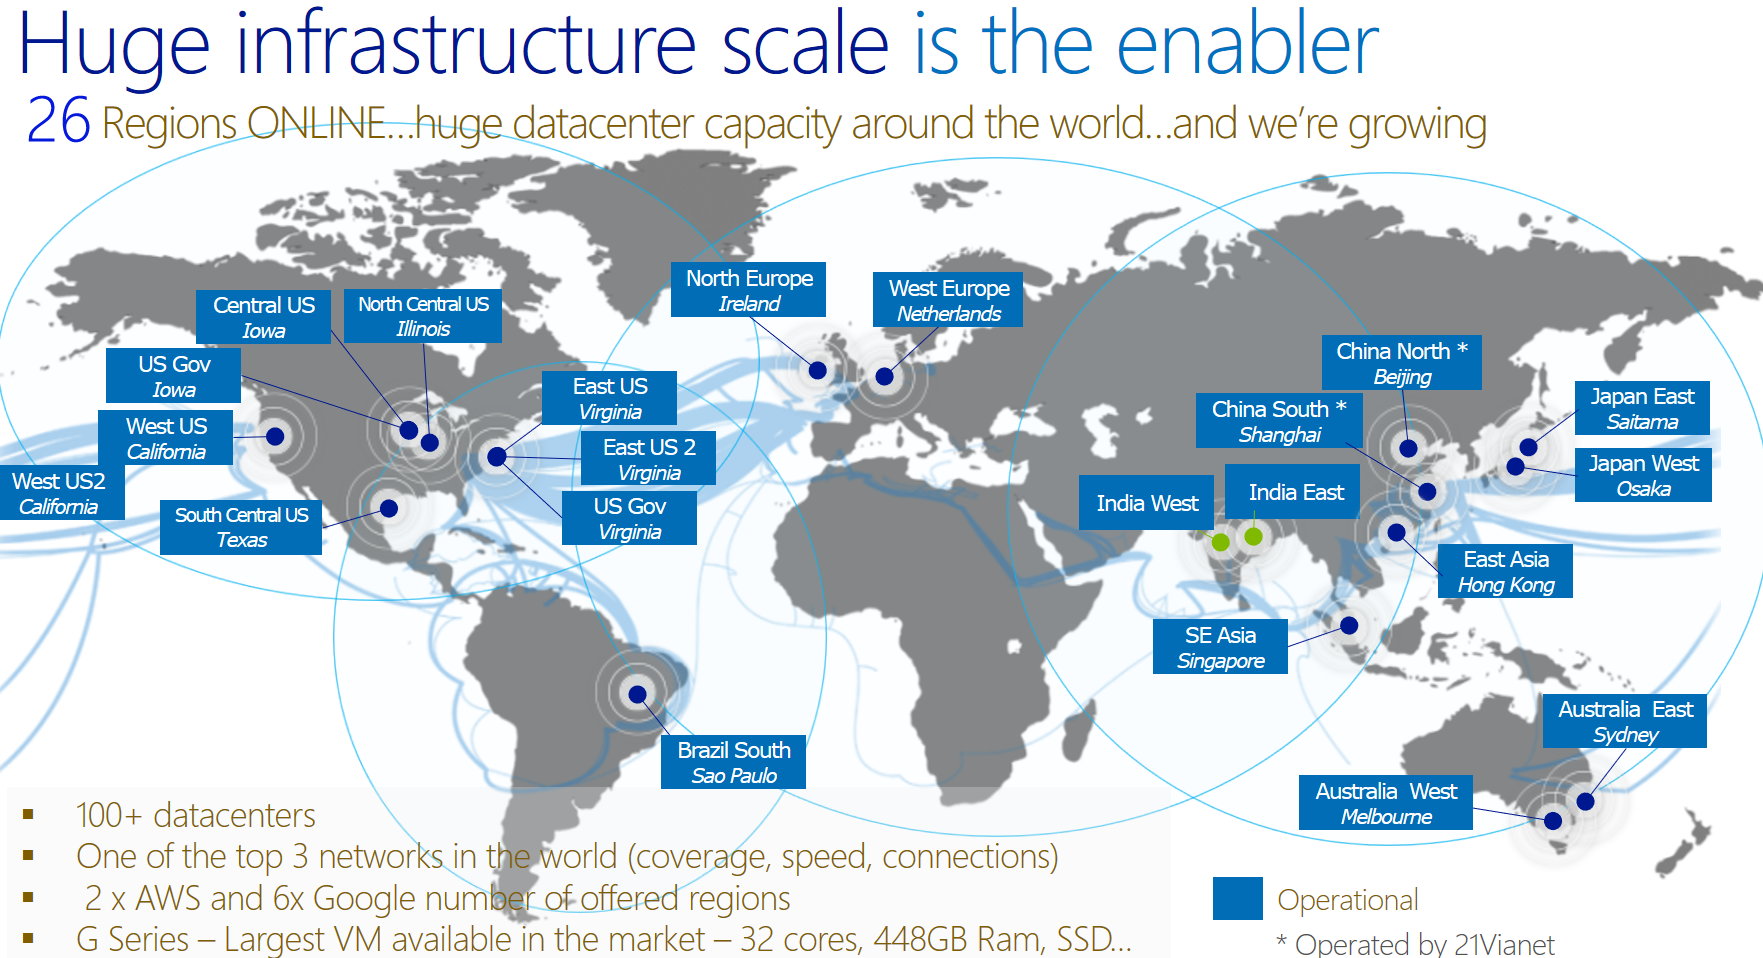
Azure's global footprint is always increasing. While we might've chosen the west US for our destination, there are many other options.
Figure 3: Choosing a data center
Building a template so you can provision VMs in a VM Scale Set
The discussion above assumes that you already had define your json-formatted templates. So what we want to do now in this next section is actually walk through one of these templates. Luckily for us, there are some samples we can work from..
The repository on github contains many templates.
https://github.com/Azure/azure-quickstart-templates
Figure 4: Downloading sample ARM templates
git clone https://github.com/Azure/azure-quickstart-templates.git
A simple clone command will download the templates locally.
Figure 5: Cloning the QuickStart templates locally
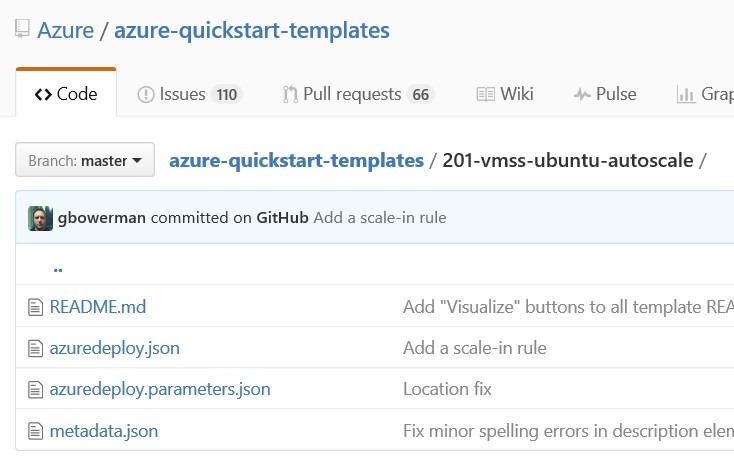
We are interested in 201-vmss-ubuntu-autoscale. This example demonstrates some of the core features.
Figure 6: Viewing the auto scale set example
Viewing the Sample Template
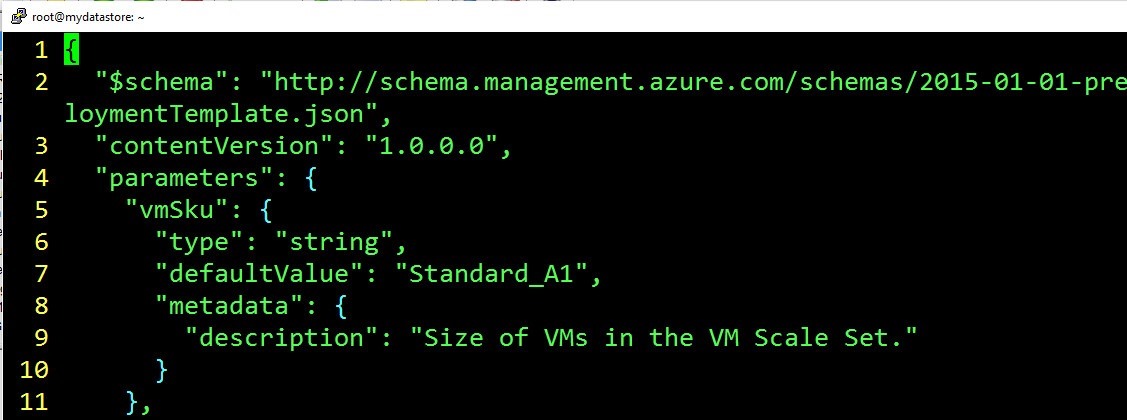
So we will start exploring azuredeploy.json. In the first section, the parameter section, which was explained earlier, allows us to pass values to customize a deployment.
We may want to pass in different numbers of VMs per Scale Set.
In the figure below you will note that the first parameter is vmSku, and that simply represent the type of hardware we want to use. We are choosing Standard_A1, because that's a simple single core VM.
See this link: https://azure.microsoft.com/en-us/documentation/articles/virtual-machines-windows-sizes/
- A-series
- A-series - compute-intensive instances
- D-series
- Dv2-series
- DS-series*
- DSv2-series*
- F-series
- Fs-series*
- G-series
- GS-series
Figure 7: Choosing the VM size
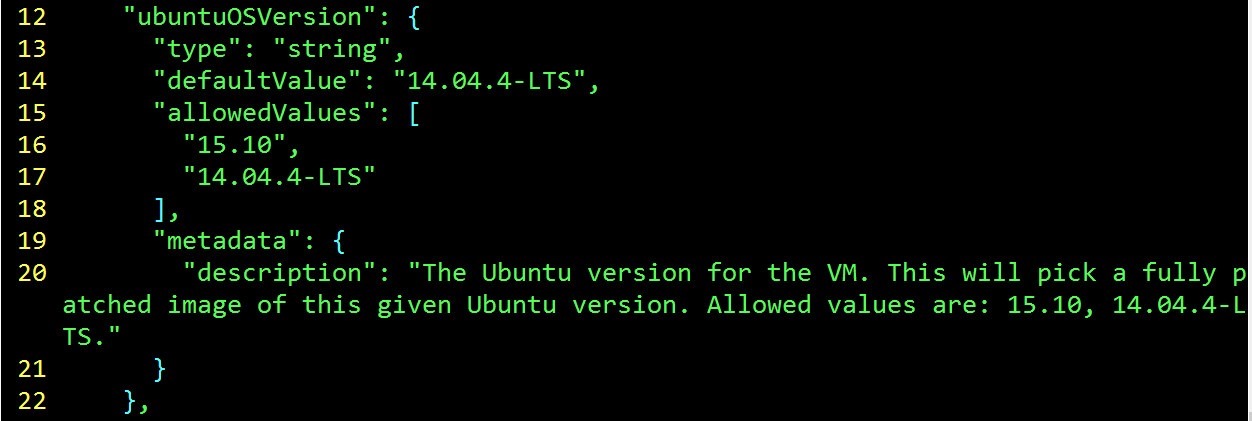
This next section simply indicates the operating system type (Ubuntu in this case).
Figure 8: Indicating the operating system
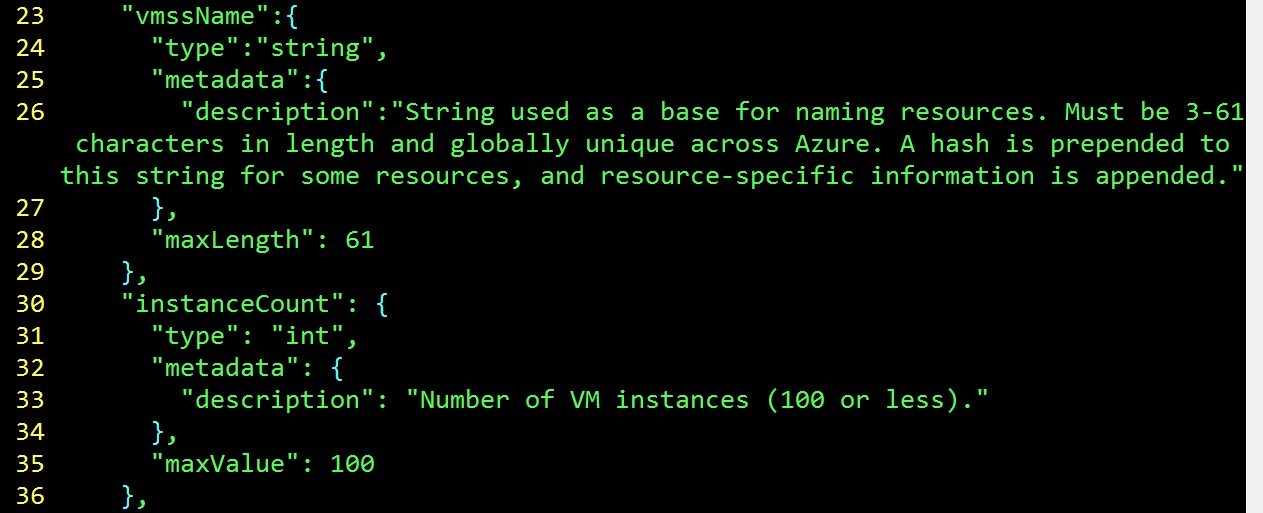
vmSSName represents the name that we will get to the VM scale set. This is the higher level of abstraction above naming individual VMs.
Figure 9: Naming the scale set
Resources Section
We are going to skip over the variables section for now. instead, we will focus on the resources section, which is where we define the actual infrastructure we want to deploy it:
- The VM scale set itself
- Storage
- Networking
- Load balancers
- and more
virtualNetworks
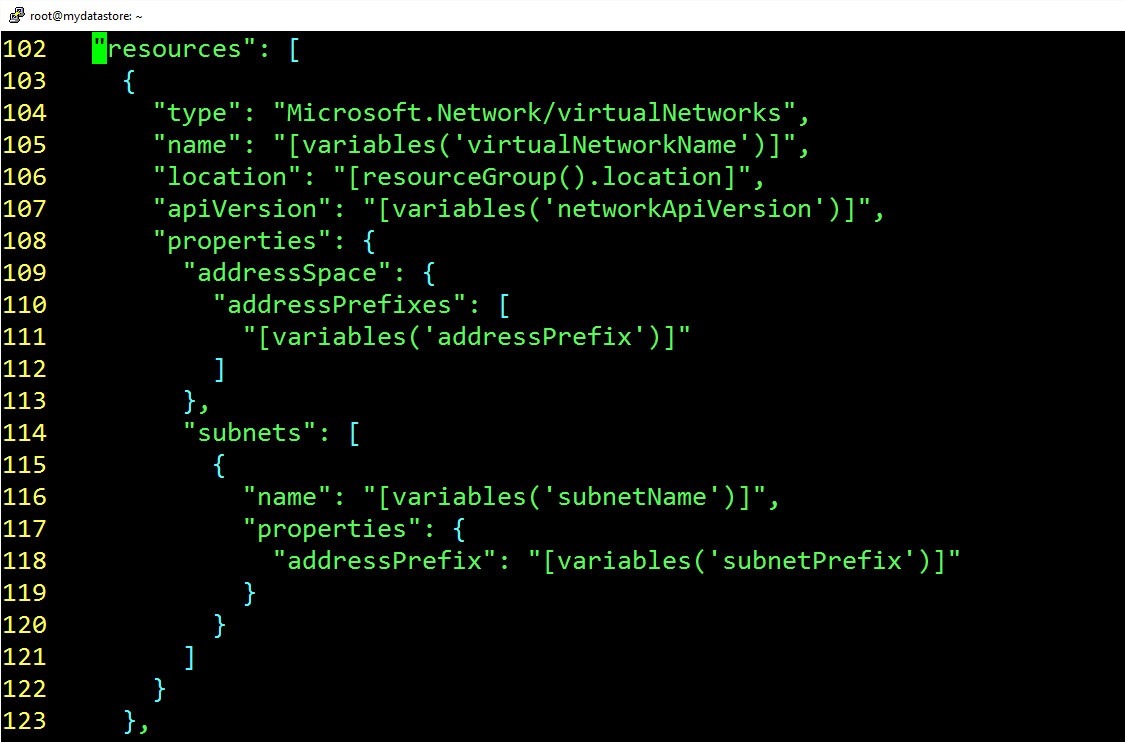
The VMs inside of the scale set will need to have a networking address space.
Learn more here: https://azure.microsoft.com/en-us/documentation/articles/resource-groups-networking/
Figure 10: Specifying network information
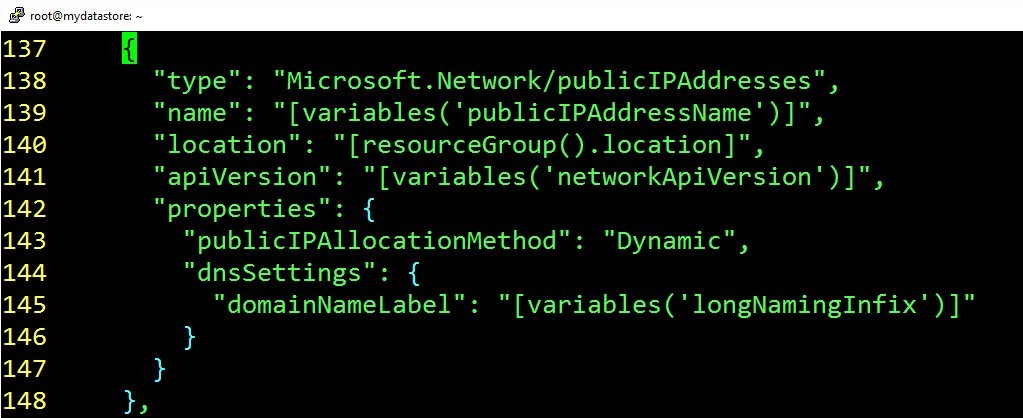
Storage accounts are needed because the underlying disk image that is hosting the operating system will need to be tied to a storage account. You will see this referenced later by the VM scale set itself.
Figure 11: Defining the storage accounts
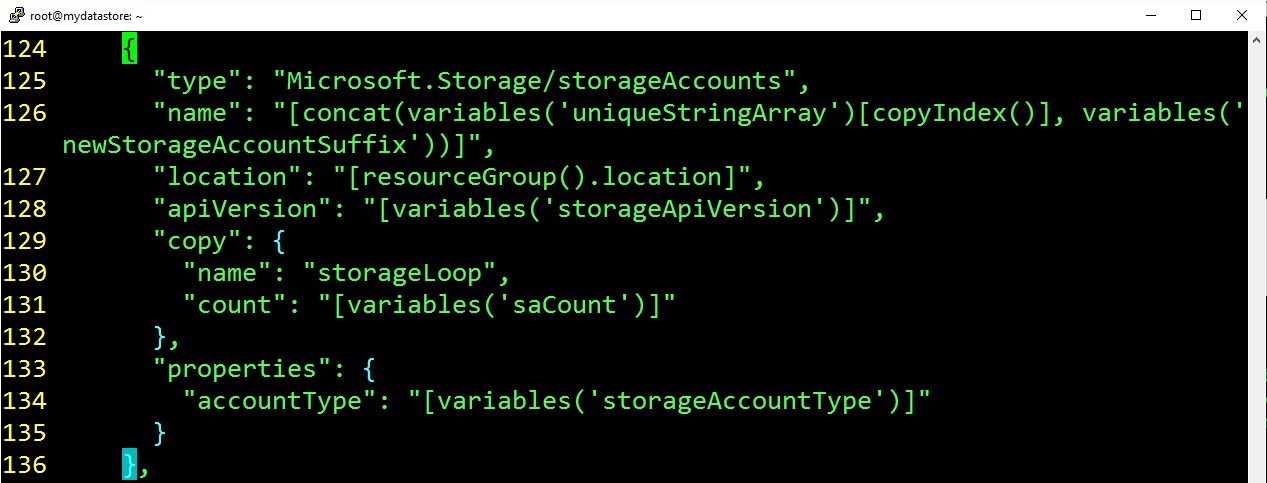
Public IP addresses are necessary because they provide the load balanced entry point for the virtual machines in the scale set. The public IP address will route traffic to the appropriate virtual machines in the scale set.
Figure 12: Public IP Address
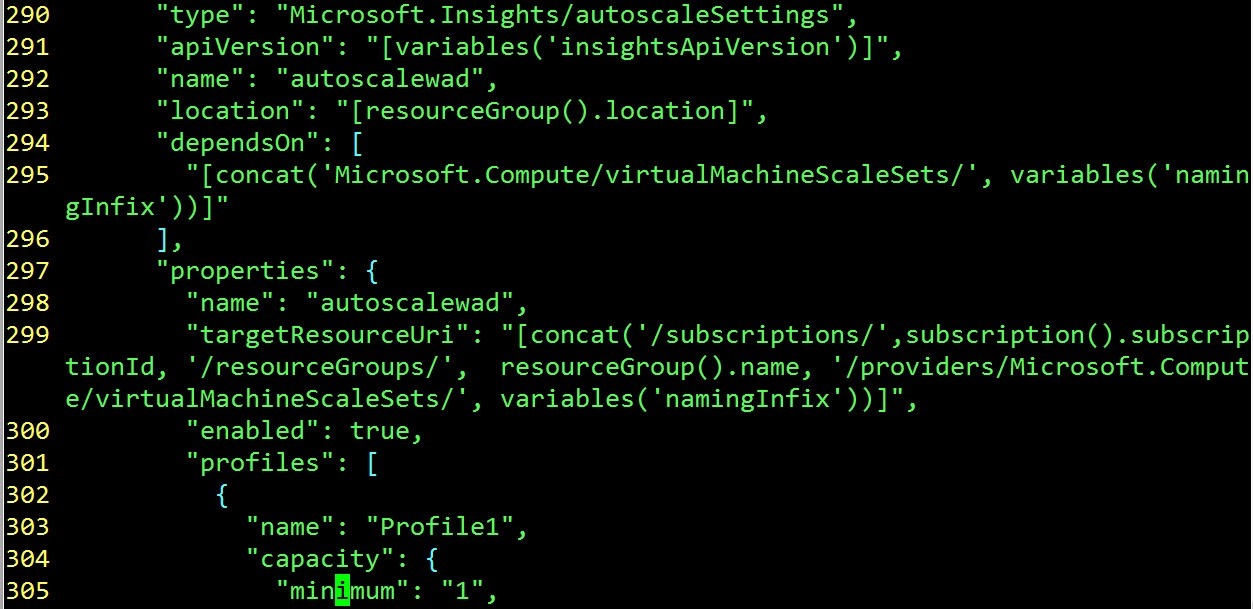
This is where you define the metrics that determine when you're scale set will scale up or scale down. There are a variety of metrics that you can use to do this. In the next section, rules defines which metrics will be used for scaling up scaling down.
Figure 13: Autoscale Settings
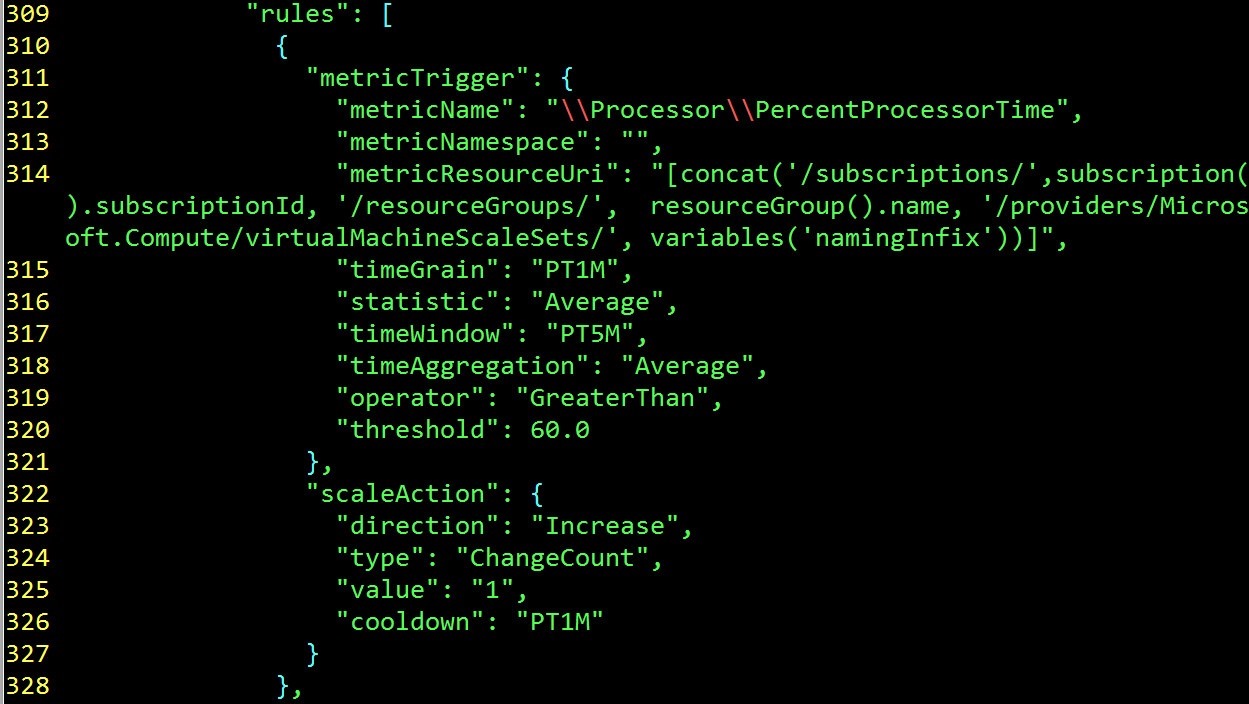
Here between lines 311 and 320 you can see that the percent processor time is being used to scale up or scale down. Most of the time window indicates for five minutes if more than 60% of the processor capability is used, a scale up of that will be triggered. On lines 323 two 326, you can notice that we will scale up one VM if the percent processor time threshold is reached. An on line 322 through 326, you will note that we scale up for just one VM
Figure 14: Percent processor time as a scaling metric
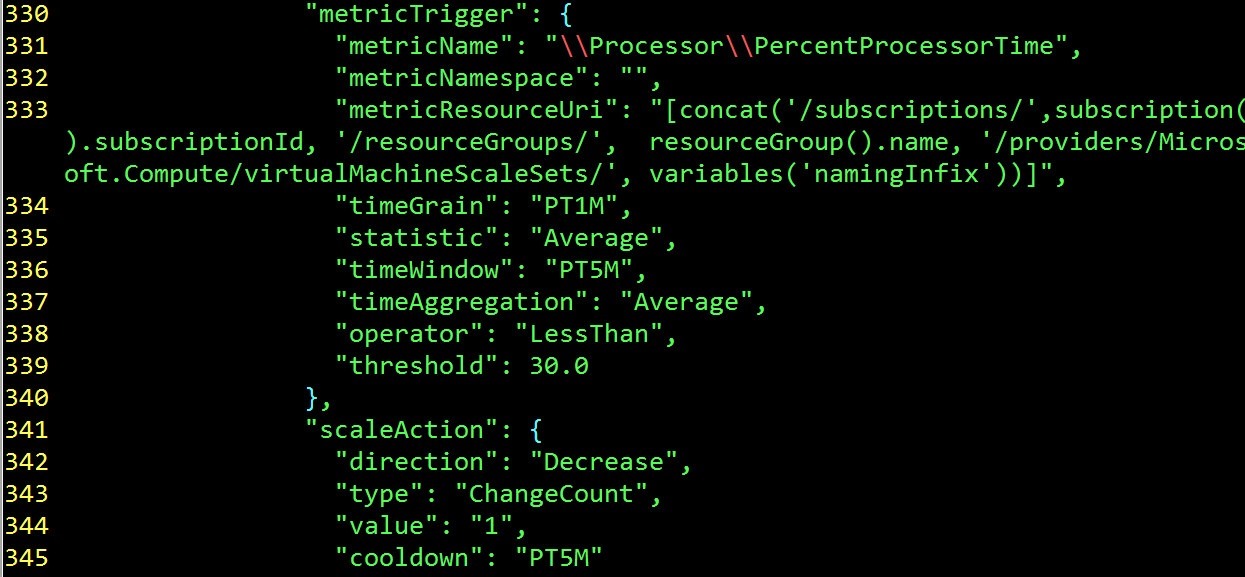
We also need to define how we scale back down. Notice that if the percent processor time dips below 30% for five minutes or more, we will scale down.
Figure 15: Scaling the cluster down
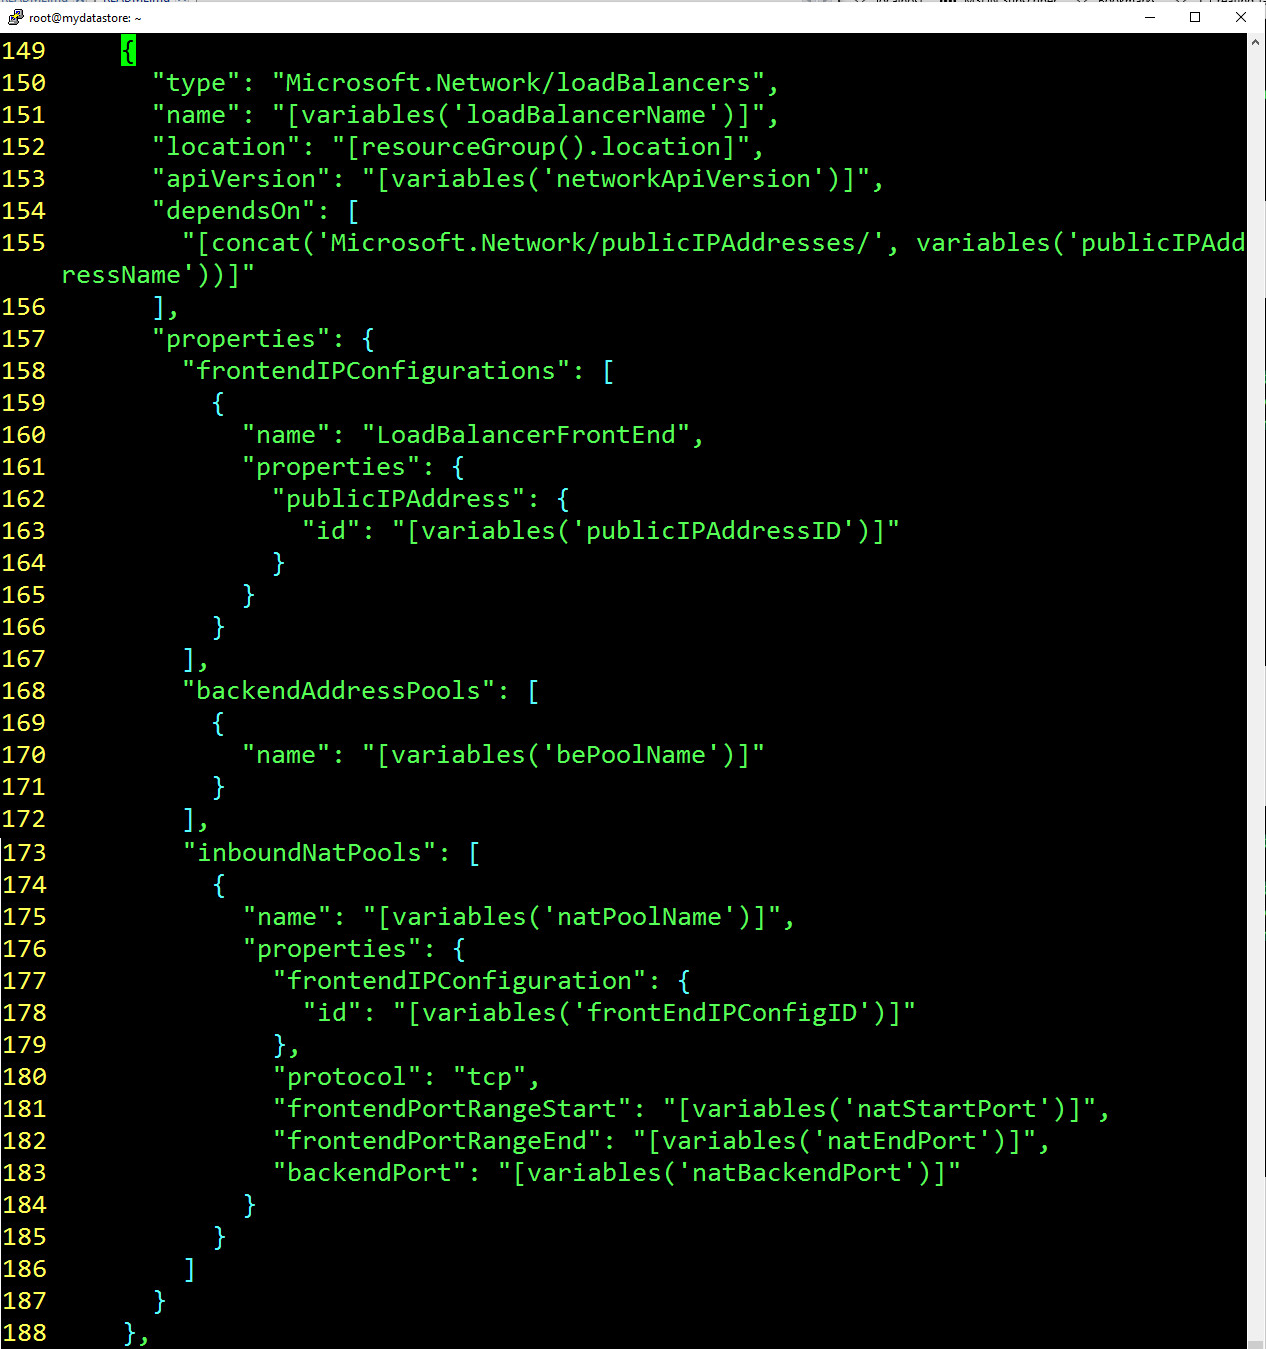
Load balancing is used to route traffic from the public Internet to the load balanced set of virtual machines.
If you look closely on lines 181 and 182, you will notice that we define a front-end port range through which we can map to specific VMs. You will need to refer back to the resource file to really understand which specific numbers are being used. I have included an excerpt below.
So what this means is that if you SSH into port 50,000, you will reach the first VM in the scale set. If you SSH into 50,001, you will reach the second VM scale set. And so on.
 "natStartPort": 50000,
"natEndPort": 50119,
"natBackendPort": 22,
Consecutive ports on the load balancer map to consecutive VMs in the scale set.
Figure 16: Understanding the load balancer and the routing into scale sets
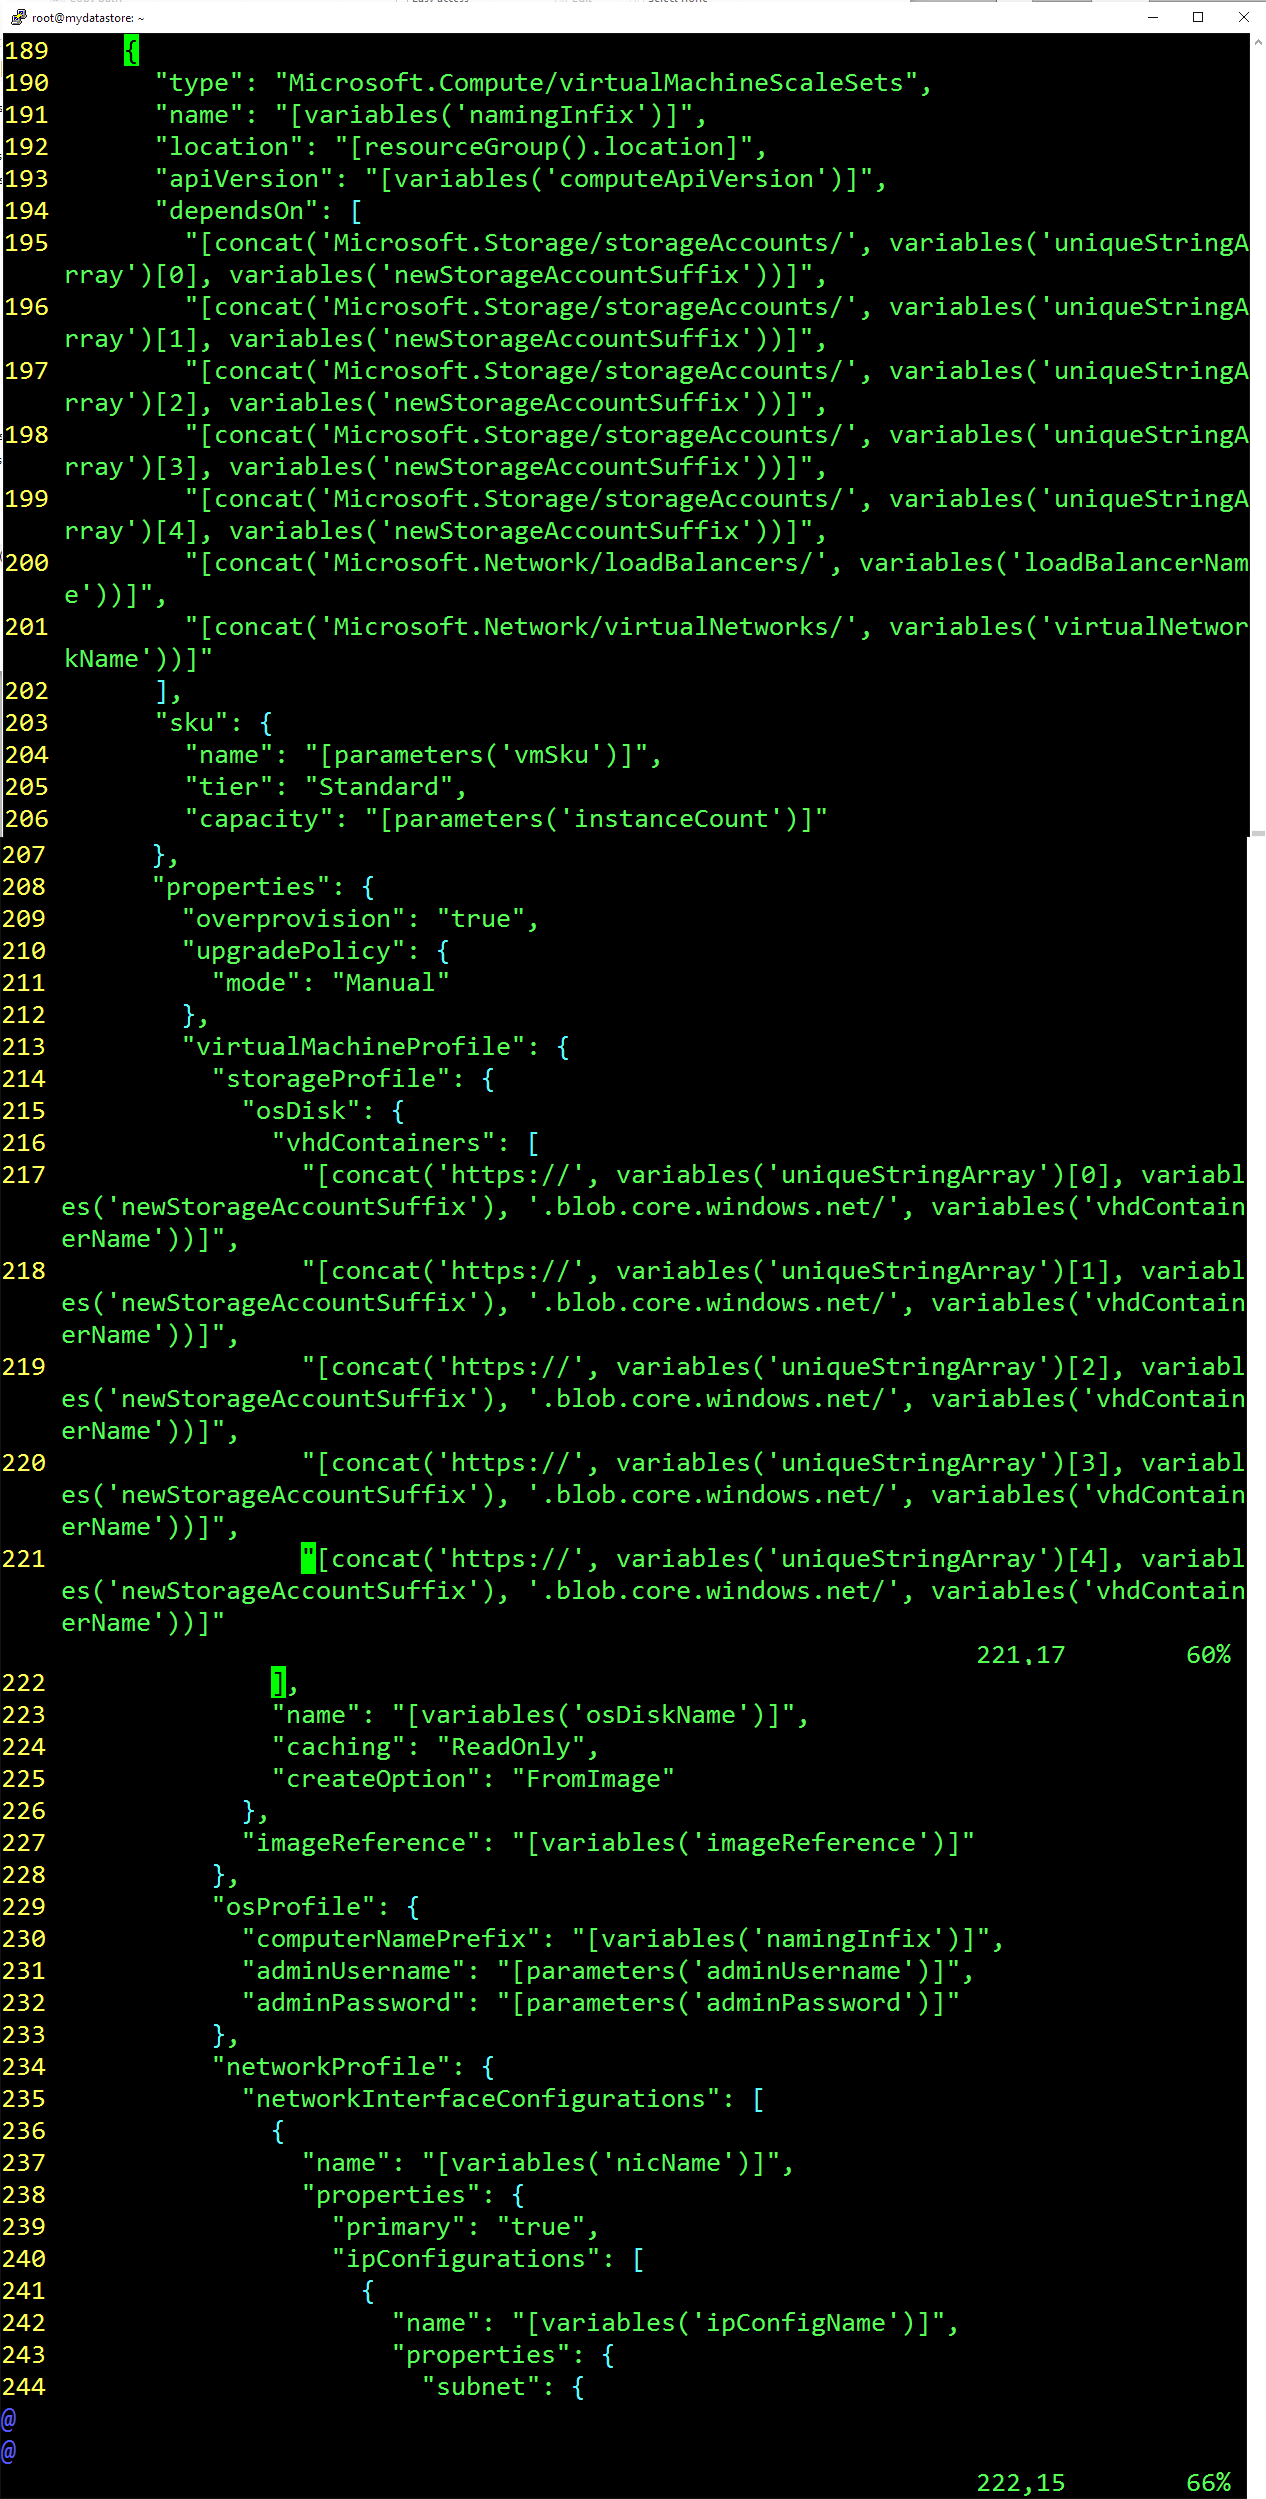
Finally, we get to the core section where we specify that we want to use the VM scale sets.
On line 194 you will notice that there is a dependency on the underlying storage accounts, because the underlying VHD file for each of the VMs needs a storage account.
If you read the detailed sections of this particular resource, you will note that it leverages some of the previously defined resources, such as the operating system, the networking profile, the load balancer, etc.
Finally, towards the end, as you can see in the json below, we are defining some diagnostic resources so we can track the performance of our virtual machine scale sets.
 "extensionProfile": {
"extensions": [
  {
    "name": "LinuxDiagnostic",
    "properties": {
      "publisher": "Microsoft.OSTCExtensions",
      "type": "LinuxDiagnostic",
      "typeHandlerVersion": "2.3",
      "autoUpgradeMinorVersion": true,
      "settings": {
        "xmlCfg": "[base64(concat(variables('wadcfgxstart'),variables('wadmetricsresourceid'),variables('wadcfgxend')))]",
        "storageAccount": "[variables('diagnosticsStorageAccountName')]"
      },
      "protectedSettings": {
        "storageAccountName": "[variables('diagnosticsStorageAccountName')]",
        "storageAccountKey": "[listkeys(variables('accountid'), variables('storageApiVersion')).key1]",
        "storageAccountEndPoint": "https://core.windows.net"
      }
    }
  }
]
}
Figure 17: Defining the virtual machine scale sets
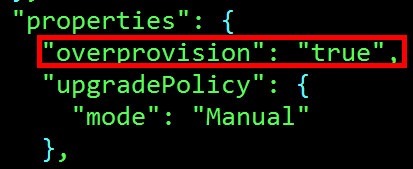
Overprovisioning
- Starting with the 2016-03-30 API version, VM Scale Sets will default to "overprovisioning" VMs.
- This means that the scale set will actually spin up more VMs than you asked for, then delete unnecessary VMs.
- This improves provisioning success rates because if even one VM does not provision successfully, the entire deployment is considered "Failed" by Azure Resource Manager.
- While this does improve provisioning success rates, it can cause confusing behavior for an application that is not designed to handle VMs disappearing unannounced.
- You are not billed for these extra VMs, and they do not count toward your quota limits scale set built on a custom image (one built by you) must create all OS disk VHDs within one storage account.
- As a result, the maximum recommended number of VMs in a scale set built on a custom image is 20. If you turn off overprovisioning, you can go up to 40.
- A scale set built on a platform image is currently limited to 100 VMs (we recommend 5 storage accounts for this scale).
Figure 18: The overprovision property
Using the command line to provision our virtual machine scale set
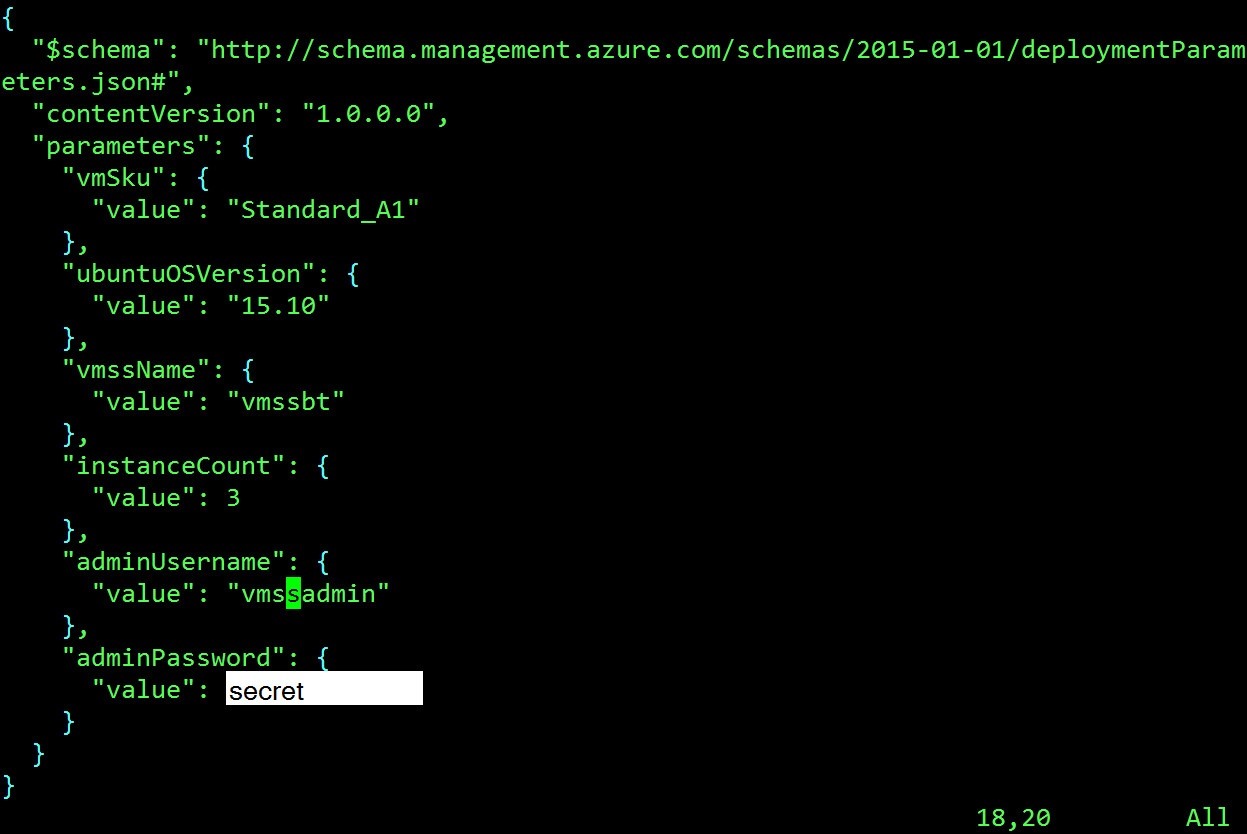
Before diving into the command line. Let's finish off working with the azuredeploy.parameters.json file, which is where we customize or parameterize the deployment.
This is the file that is used to pass in parameters, such as the:
- vmSku
- ubuntuOSVersion
- vmssName
- instanceCount (how many VMs to include in the scale set initially)
- etc
Figure 19: Customizing the deployment
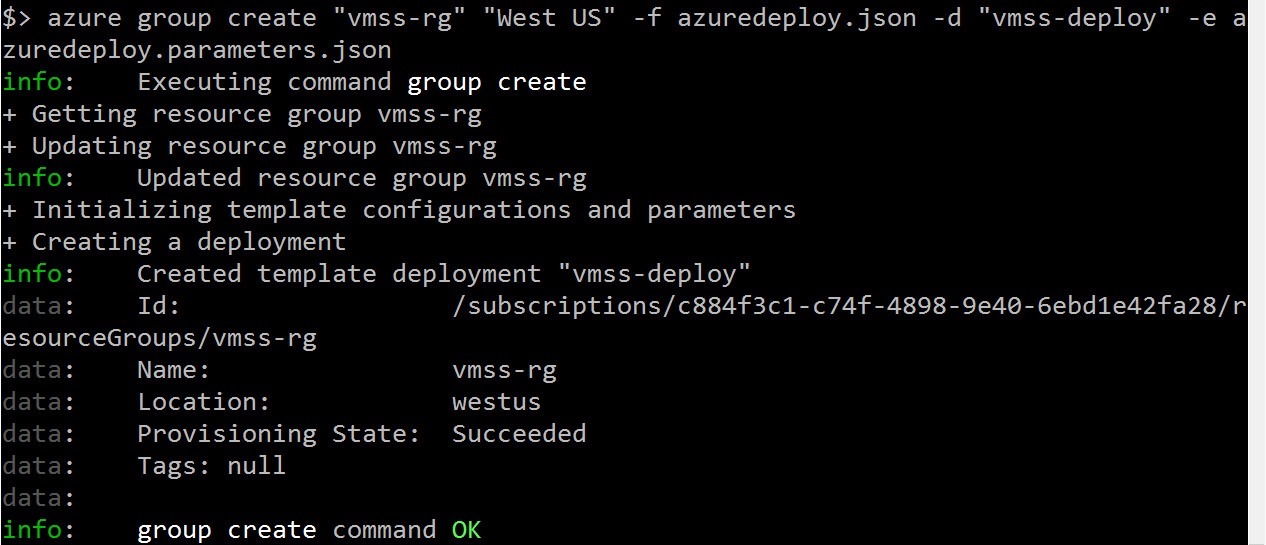
Now we are ready to issue the command to provision that virtual machine scale sets using the Azure cross-platform tooling.
azure group create "vmss-rg" "West US" -f azuredeploy.json -d "vmss-deploy" -e azuredeploy.parameters.json
Note below that we are executing the azure group create command. It passed the preflight validation because we don't see any failure yet.
Figure 20: Executing the deployment
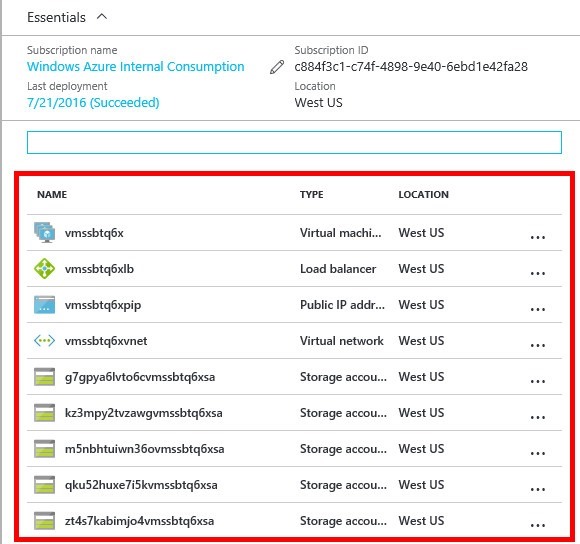
Notice the things that we walk through previously within the template have now been made reality:
- Virtual machine scale set
- Load balancer
- Public IP address
- Various storage accounts
Figure 21: The infrastructure that was deployed
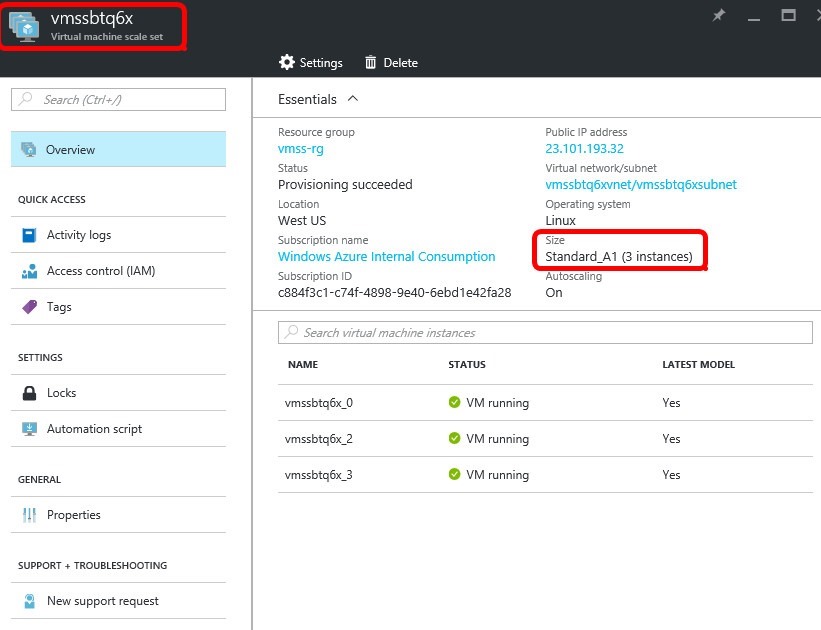
If we drill down to the details of the scale set, you will notice that currently it plumbs to the instance count *that was passed in. As you recall, the * instance count was 3 in the parameters file.
Figure 22: Details of the VM scale set
Verifying that auto scaling is functioning
What we want to do now is stres the system and force CPU utilization to rise above 60% for more than five minutes, so that we can see the scaling up of our VMs.
Note that the stress needs to happen across the whole scale set, not just an individual VM.
Stress
There is a utility called stress that makes this easy.
So we will use the command below to remote and so that we can install this utility.
Because we will need to stress the tool on each individual VM, we will remote into each of our three VMs that are in the scale set.
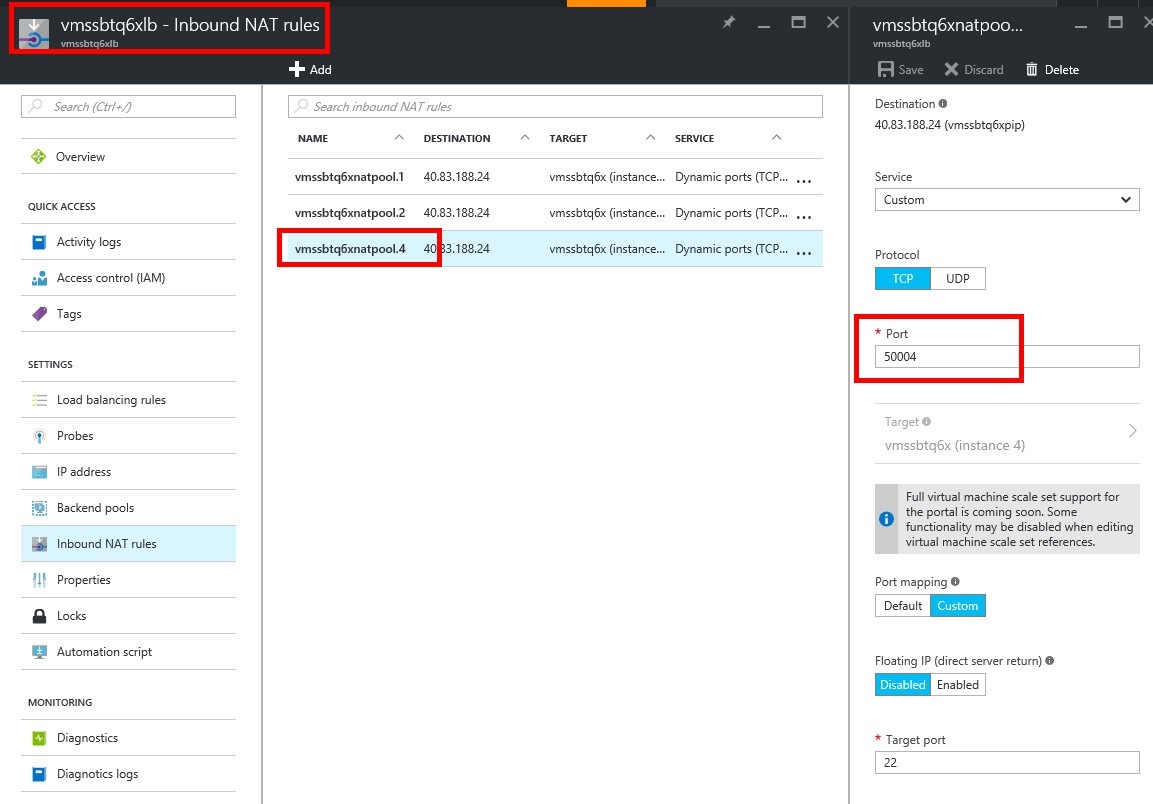
Which ports work can be determined from listing the VMs or querying the LB NAT rules. On my second deployment note that 50004 ended up being the port to remote into.
Notice I am clicking on a NAT pool resource in the portal.
Figure 23: Looking at NAT rules to determine available ports
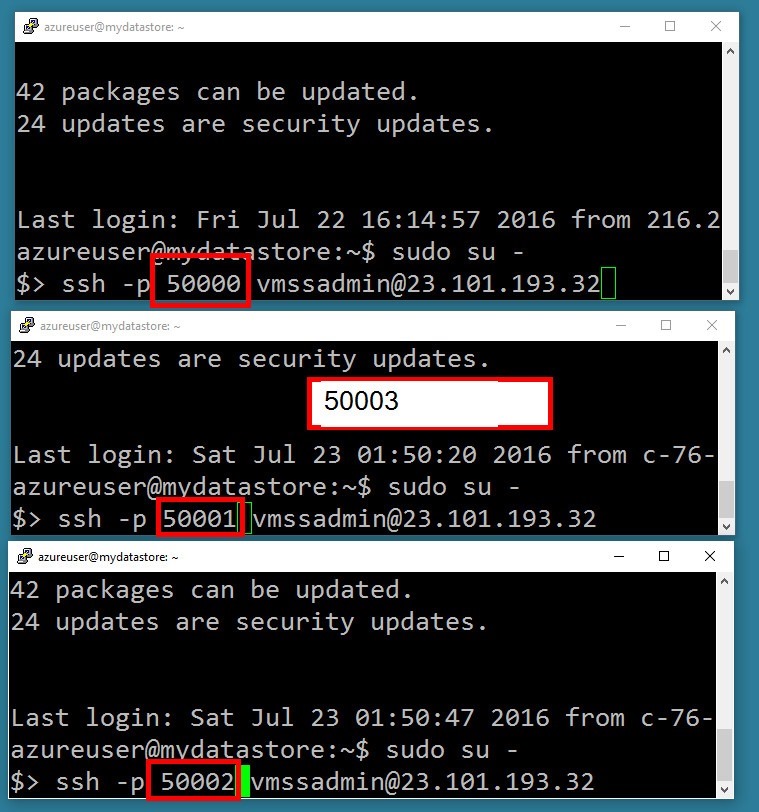
You will need to remote in with the SSH command. From there you can run the stress tool. Remember when you talk about percent CPU utilization you are talking about the average of all the nodes in your cluster, not any one/single machine. This makes sense, of course.
Make sure you plug in the appropriate ports in the diagram below. Yours may be different!
Figure 24: Remoting in and using the appropriate number
Well, it turns out that stress is not available by default in Ubuntu.
So let's install the stress utility.
Stressing the VMs in the scale set
- Step 1 - SSH into each of the three VMs and the scale set
- Step 2 - Install stress
- Step 3 - Run stress
- Step 4 - Run top
This next section will discuss or explain the upcoming images that follow this narrative.
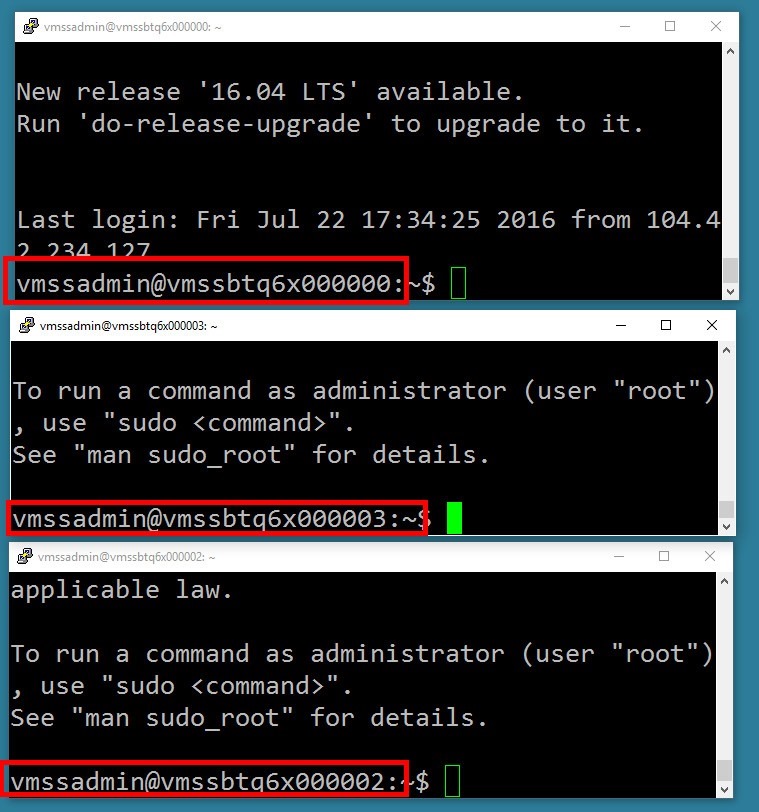
Step 1 of 4 - SSH into each of the three VMs and the scale set
We will need to be logged into each of the VMs and the scale set so that we could install stress and run it.
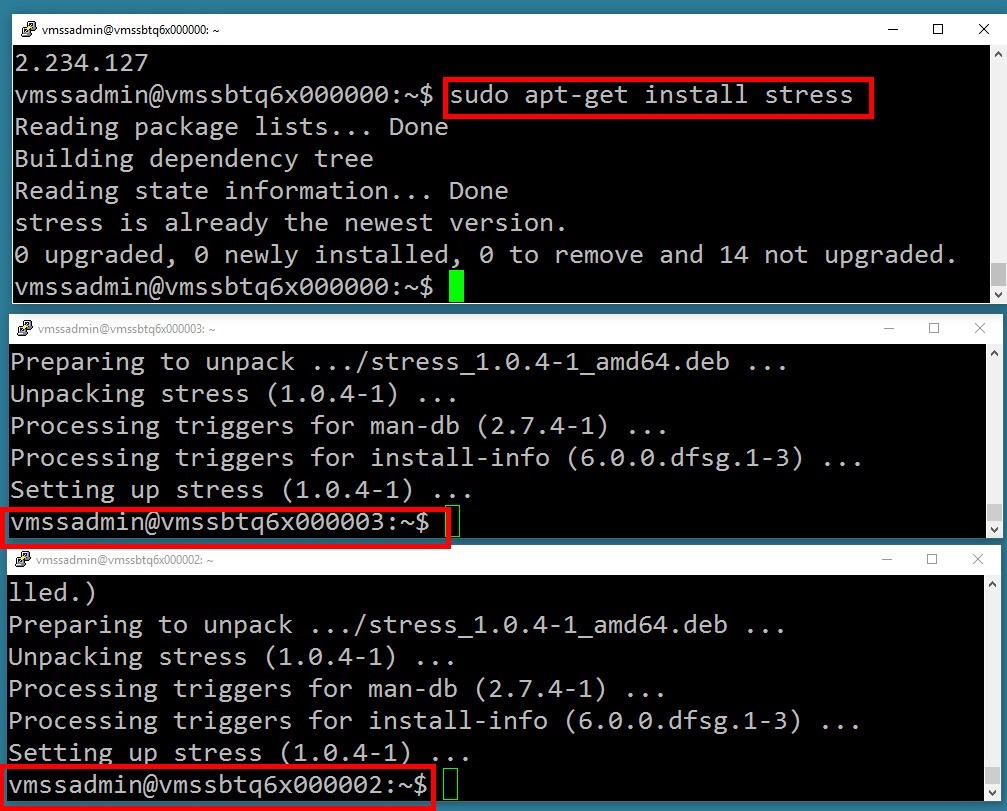
Step 2 of 4 - Install stress
Stress is the utility that will max out your CPU so that you can trigger a scale event.
sudo apt-get install stress
Step 3 of 4 - Run stress
We will run it as follows with the following parameters:
stress --cpu 8 --io 4 -c 12 --vm 2 --vm-bytes 128M --timeout 800s &
Step 4 of 4 - Run top
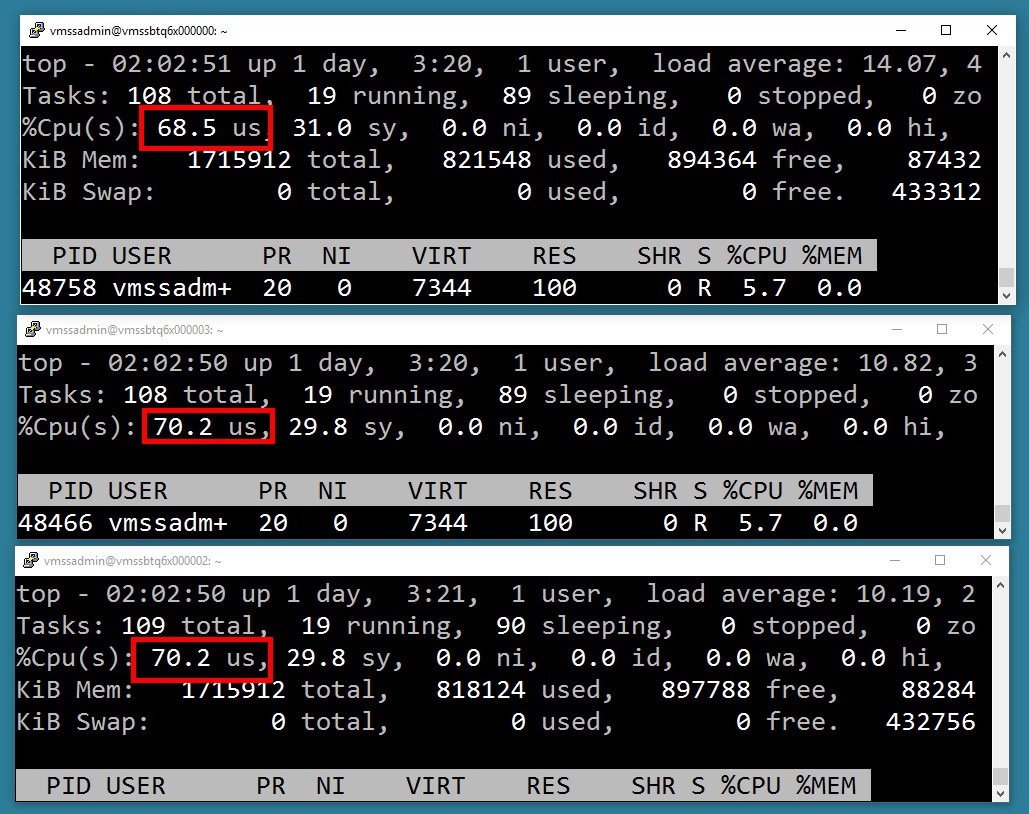
Top gives us a nice depiction of CPU utilization so we can verify that it is high enough to trigger a scale event.
top
Figure 25: We are SSH'd into each of the VMs and the scale set
Figure 26: Installing Stress (sounds funny)
Figure 27: Remember to install it on all of the VMs and the scale set
Figure 28: Verifying %CPU Utilization
Some key points.
- Scale out is based on average CPU across the scale set.
- You can scale up too (More CPU, Memory, Storage).
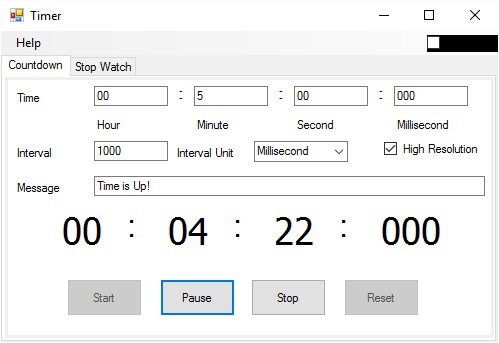
- The whole cycle can take 20 minutes for all the magic to happen (VMs provisioned, de-provisioned, etc).
- Insights pipeline needs to be initiated (e.g. create storage account, start sending data, initialize Insights engine etc.).
- After the first scale event, you can expect scale events to take 5-10 minutes depending on timing (5 minute sampling plus time to start VM etc).
Figure 29: Make sure you wait
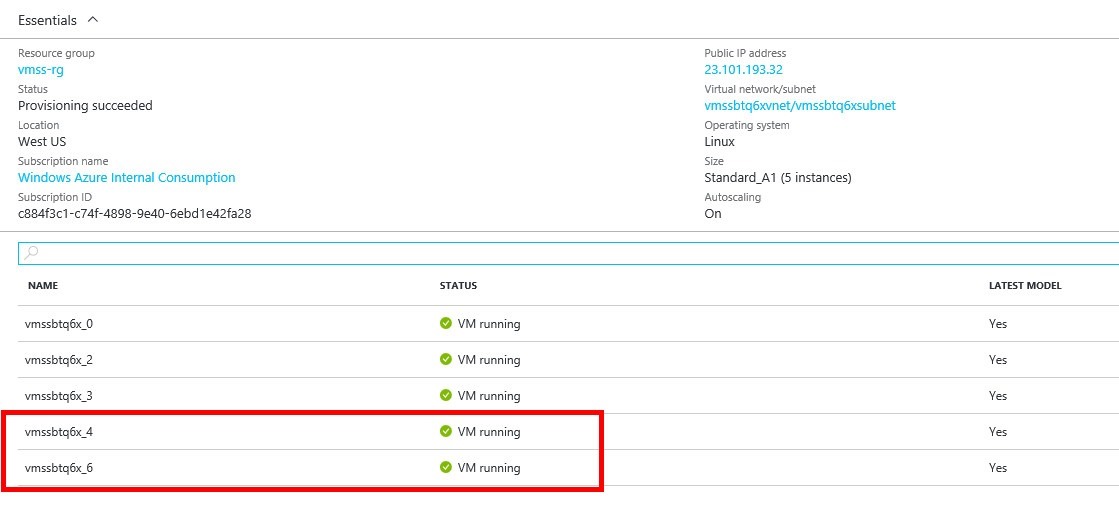
Success - VMs in scale set provisioned
This is actually exactly what we were looking for. Notice that two additional VMs got brought online to accommodate to compensate for the massive spike in CPU utilization. If you think about it, three virtual machines running at 80% utilization need to be at 40% minimum (as specified by our pre-defined threshold), given the sudden and massive spike. So the question becomes what number of additional VMs are needed to bring down the CPU to a reasonable level. I like that Azure brought 2 VMs online, not just 1. Feels like a safer but prudent reaction to CPU spikes. I will conclude this post right here but there is more to talk about. I encourage everybody to go simply do some searching around the web for guidance around Azure scale sets.
Figure 30: the moment we have been waiting for
Conclusion
This brief walk-through has taken you from beginning to end, allowing you to see how a scale set is constructed, how to set up some metrics to trigger scale up and scale-down events. This post took you through a detailed walk-through all the way to the point of validating that scale sets work and that additional VMs can be brought online in the event of high CPU utilization across the cluster.
