Debug XAML in Blend
Applies to: ![]() Visual Studio
Visual Studio ![]() Visual Studio for Mac
Visual Studio for Mac
Note
This article applies to Visual Studio 2017. If you're looking for the latest Visual Studio documentation, see Visual Studio documentation. We recommend upgrading to the latest version of Visual Studio. Download it here
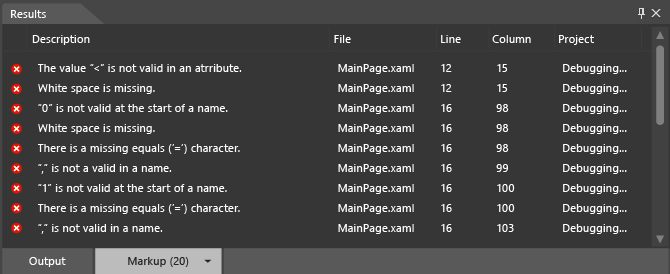
You can use the tools in Blend for Visual Studio to debug the XAML in your app. When you build a project, any errors are displayed in the Results panel. Double-click an error to locate the markup related to the error. If you need more room to work, you can hide the Results panel by pressing F12.
Syntax errors
Syntax errors occur if the XAML or the code-behind files do not follow the formatting rules of the language. The description of the error can help you understand how to fix it. The list also specifies the name of the file and the line number where the error occurs. XAML errors are listed on the Markup tab in the Results panel.
Tip
XAML is an XML-based markup language and follows XML syntax rules.
Some common causes of XAML syntax errors are:
A keyword has been misspelled or the capitalization is wrong.
Quotation marks are missing around attributes or text strings.
A XAML element is missing a closing tag.
A XAML element exists in a location where it is not allowed.
For more information on common XAML syntax, see Basic XAML syntax guide.
You can also identify and resolve simple code-behind syntax errors, compilation errors, and run-time errors in Blend. However, code-behind errors may be easier to identify and resolve in Visual Studio.
Debugging sample XAML code
The following example will walk you through a simple XAML debugging session in Blend.
To create a project
In Blend, open the File menu, and then click New Project.
In the New Project dialog box, a list of project types appears on the left side. When you click a project type, the project templates that are associated with it appear on the right side.
In the list of project types, click Windows Universal.
In the list of project templates, click Blank App (Universal Windows).
In the Name text box, type
DebuggingSample.In the Location text box, verify the location of the project.
In the Language list, click Visual C#, and then click OK to create the project.
Right-click on the design surface and then click View Source to switch to Split view.
Copy the following code by clicking the Copy link in the upper-right corner of the code.
<Grid HorizontalAlignment="Left" Height="222" VerticalAlignment="Top>
     <Button content="Button" x:Mame="Home" HorizontalAlignment="Left" VerticalAlignment="Top"/>
     <Button Content="Button" HorizontalAlignment="Left" VerticalAlignment="Top" Margin="0,38,0,0">
     <Button Content="Button" HorizontalAlignment="Left" VerticalAlignment="Top" Margin="0,75,0,0"/>
     <Button Content="Button" HorizontalAlignment="Left" VerticalAlignment="Top" Margin="0,112,0,0"/>
     <Button Content="Button" HorizontalAlignment="Left" VerticalAlignment="Top Margin="0,149,0,0"/>
</Grid>
Locate the default Grid, and paste the code between the opening and closing Grid tags. When you're finished, your code should look like the following:
<Grid Background="{ThemeResource ApplicationPageBackgroundThemeBrush}">
     <Grid HorizontalAlignment="Left" Height="222" VerticalAlignment="Top>
          <Button content="Button" x:Mame="Home" HorizontalAlignment="Left" VerticalAlignment="Top"/>
          <Button Content="Button" HorizontalAlignment="Left" VerticalAlignment="Top" Margin="0,38,0,0">
          <Button Content="Button" HorizontalAlignment="Left" VerticalAlignment="Top" Margin="0,75,0,0"/>
          <Button Content="Button" HorizontalAlignment="Left" VerticalAlignment="Top" Margin="0,112,0,0"/>
          <Button Content="Button" HorizontalAlignment="Left" VerticalAlignment="Top Margin="0,149,0,0"/>
     </Grid>
</Grid>
Press Ctrl+Shift+B to build the project.
An error message appears alerting you that the project cannot be built, and the Results panel listing the errors appears at the bottom of the app.

Resolve XAML errors
When XAML errors are detected, the design surface displays an alert that your project contains invalid markup. As you resolve the errors, the error list in the Results panel is updated. When you have resolved all the errors, the design surface is enabled, and your app is displayed on the design surface.
To resolve the XAML errors
Double-click the first error in the list. The description is "The value '<' is not valid in an attribute." When you double-click the error, the pointer finds the corresponding location in the code. The
<precedingButtonis valid, and not an attribute as suggested in the error message. If you look at the preceding line of code, you'll notice that the closing quotation marks for the attributeTopare missing. Type the closing quotation marks. Notice that the error list in the Results panel updates to reflect your changes.Double-click the description "'0' is not valid at the start of a name."
Margin="0,149,0,0"appears to be well formed. However, notice that the color coding ofMargindoes not match the other instances ofMarginin the code. Because the closing quotation marks are missing from the preceding name/value pair (VerticalAlignment="Top),Margin="is read as part of the value of the preceding attribute, and 0 is read as the beginning of a name/value pair. Type the closing quotation marks forTop. The error list in the Results panel updates to reflect your changes.Double-click the remaining error, "The closing XML tag 'Button' is mismatched." The pointer is located at the closing Grid tag (
</Grid>), suggesting that the error is inside theGridobject. Notice that the secondButtonobject is missing the closing tag. After you add the closing/, the Results panel list is updated. Now that these initial errors have been resolved, two additional errors have been identified.Double-click "The member 'content' is not recognized or is not accessible." The
cincontentshould be upper-case. Replace the lower-case "c" with an upper-case "c."Double-click "The property 'Mame' does not exist in the
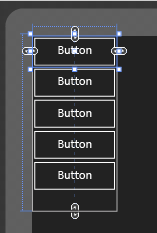
http://schemas.microsoft.com/winfx/2006/xamlnamespace." The "M" in "Mame" should be an "N." Replace the "M" with an "N." Now that the XAML can be parsed, the app appears on the design surface.
Press Ctrl+Shift+B to build your project and confirm that there are no remaining errors.
Debug in Visual Studio
You can open Blend projects in Visual Studio to more easily debug the code in your app. To open a Blend project in Visual Studio, right-click the project in the Projects panel, and then click Edit in Visual Studio. After you have finished your debugging session in Visual Studio, press Ctrl+Shift+S to save all your changes, and then switch back to Blend. You will be prompted to reload the project. Click Yes to All to continue working in Blend.
For more information about debugging your app, see Debug UWP apps in Visual Studio.
Get help
If you need more help debugging your Blend app, you can search the UWP app community forums for posts related your issue or post a question.