Encodings and line endings
Applies to: ![]() Visual Studio
Visual Studio ![]() Visual Studio for Mac
Visual Studio for Mac
Note
This article applies to Visual Studio 2017. If you're looking for the latest Visual Studio documentation, see Visual Studio documentation. We recommend upgrading to the latest version of Visual Studio. Download it here
The following characters are interpreted as line breaks in Visual Studio:
CR LF: Carriage return + line feed, Unicode characters 000D + 000A
LF: Line feed, Unicode character 000A
NEL: Next line, Unicode character 0085
LS: Line separator, Unicode character 2028
PS: Paragraph separator, Unicode character 2029
Text that is copied from other applications keeps the original encoding and line break characters. For example, when you copy text from Notepad and paste it into a text file in Visual Studio, the text has the same settings that it had in Notepad.
When you open a file that has different line break characters, you may see a dialog box that asks whether the inconsistent line break characters should be normalized, and which type of line breaks to choose.
Advanced save options
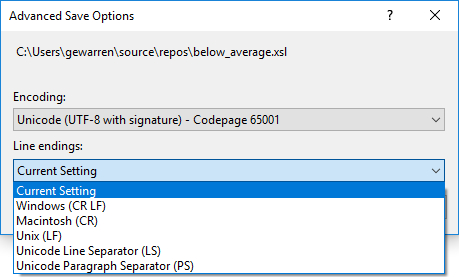
You can use the File > Advanced Save Options dialog box to determine the type of line break characters you want. You can also change the encoding of a file with the same settings.

Note
If you don't see Advanced Save Options on the File menu, you can add it.
- Choose Tools, Customize,
- Choose the Commands tab, select the Menu bar radio button and from the corresponding drop-down list choose File. Choose the Add Command button.
- In the Add Command dialog box, under Categories, choose File, and then in the Commands list, choose Advanced Save Options. Choose OK button.
- Use the Move Up and Move Down buttons to move the command to any place in the menu. Choose Close to close the Customize dialog box. For more information, see Customize menus and toolbars.
Alternatively, you can access the Advanced Save Options dialog box by choosing File > Save <file> As. In the Save File As dialog box, choose the drop-down triangle next to the Save button and then choose Save with encoding.