Sample: Custom virtual table provider with CRUD operations
This sample shows how to implement a custom data provider to create a virtual table that supports create, retrieve, update, and delete operations. For each of these operations, you implement a generic plug-in, register them using the Plugin Registration Tool, and enable virtual table data sources to create the virtual table.
To learn more about data providers and plug-in development, see Custom data providers
Data source details
In this walkthrough, you will set up a simple table in an external SQL Server to create a virtual table. The table name used in this example is VETicket.
Note
Update your plug-in code, if you wish to change the name of the table or column(s).
| Column Name | Data Type | Purpose |
|---|---|---|
| TicketID | Unique Identified, Primary Key | Primary key for the table. |
| Severity | Integer | Severity value for the ticket. |
| Name | String | Description of the ticket. |
There are four steps to enable a custom data provider to create a virtual table.
Step 1: Implementing CRUD plug-ins and registering the assembly
Step 2: Creating data provider and adding plug-ins to the provider
Step 3: Creating a virtual table in Dataverse environment
Step 4: Create, update, view, and delete records using a virtual table
Step 1: Implementing CRUD plug-ins and registering the assembly
Create your plug-in project and install the following NuGet packages. The solution in this example is named StubProvider.
Assembly URL Microsoft.CrmSdk.CoreAssemblies https://www.nuget.org/packages/Microsoft.CrmSdk.CoreAssemblies Microsoft.CrmSdk.Data https://www.nuget.org/packages/Microsoft.CrmSdk.Data Microsoft.CrmSdk.Deployment https://www.nuget.org/packages/Microsoft.CrmSdk.Deployment Microsoft.CrmSdk.Workflow https://www.nuget.org/packages/Microsoft.CrmSdk.Workflow Microsoft.CrmSdk.XrmTooling.CoreAssembly https://www.nuget.org/packages/Microsoft.CrmSdk.XrmTooling.CoreAssembly Microsoft.IdentityModel.Clients.ActiveDirectory https://www.nuget.org/packages/Microsoft.IdentityModel.Clients.ActiveDirectory Microsoft.Rest.ClientRuntime https://www.nuget.org/packages/Microsoft.Rest.ClientRuntime Newtonsoft.Json https://www.nuget.org/packages/Newtonsoft.Json/13.0.1-beta2 Add the following six class files to your solution. In each of the class files, add the following using statements
using System;
using System.Collections.Generic;
using System.Data.SqlClient;
using System.Linq; using System.Text;
using System.Threading.Tasks;
using Microsoft.Xrm.Sdk;
using Microsoft.Xrm.Sdk.Extensions;
using Microsoft.Xrm.Sdk.Data.Exceptions;
using Newtonsoft.Json;
Note
In each of these class files, update the table name to match the source table name you have setup. The example uses VETicket as the source table name.
Class file name Purpose Connection.cs This class contains code for creating and managing connection to the external SQL data source. It includes connection string parameters specific to the external database and SQL-based authentication information required to establish the connection. Replace the values respective to your: Database server, UserID, Password, and table name that you will be creating a virtual table in Dataverse. CreatePlugin.cs This class contains code that handles the create operation for the virtual table. UpdatePlugin.cs This class contains code that handles updating records in the virtual table. RetrievePlugin.cs This class contains code that retrieves a specific record from the virtual table. RetrieveMultiplePlugin.cs This class contains code for fetching multiple records from the virtual table. DeletePlugin.cs This class contains code that allows you to delete a record in the virtual table.
Read the following important information about using a connection string or username/password authentication in application code.
Important
Microsoft recommends that you use the most secure authentication flow available. The authentication flow described in this article requires a very high degree of trust in the application, and carries risks that are not present in other flows. You should only use this flow when other more secure flows, such as managed identities, aren't viable.
Code for Connection.cs
 public static class Connection
{
   public static SqlConnection GetConnection()
   {
       try
       {
           //sample database to connect to
           SqlConnectionStringBuilder builder = new SqlConnectionStringBuilder();
           builder.DataSource = "Enter name or network address of the SQL Server";
           builder.UserID = "Enter User Name";
           builder.Password = "Enter password";
           builder.InitialCatalog = "Enter database details";
           SqlConnection connection = new SqlConnection(builder.ConnectionString);
           return connection;
       }
       catch (SqlException e)
       {
           Console.WriteLine(e.ToString());
           throw;
       }
   }
}
Code for CreatePlugin.cs
public class CreatePlugin : IPlugin
{
    public void Execute(IServiceProvider serviceProvider)
    {
        var context = serviceProvider.Get<IPluginExecutionContext>();
        if (context.InputParameters.Contains("Target") && context.InputParameters["Target"] is Entity)
        {
            Entity entity = (Entity)context.InputParameters["Target"];
            Guid id = Guid.NewGuid();
            //change the table name below to the source table name you have created
            string cmdString = "INSERT INTO VETicket (TicketID,Name,Severity) VALUES (@TicketID, @Name, @Severity)";
            SqlConnection connection = Connection.GetConnection();
            using (SqlCommand command = connection.CreateCommand())
            {
                command.CommandText = cmdString;
                command.Parameters.AddWithValue("@TicketID", id);
                command.Parameters.AddWithValue("@Name", entity["new_name"]);
                command.Parameters.AddWithValue("@Severity", entity["new_severity"]);
                connection.Open();
                try
                {
                    var numRecords = command.ExecuteNonQuery();
                    Console.WriteLine("inserted {0} records", numRecords);
                }
                finally
                {
                    connection.Close();
                }
                // other codes.
            }
            context.OutputParameters["id"] = id;
        }
    }
}
Code for UpdatePlugin.cs
public class UpdatePlugin: IPlugin {
    public void Execute(IServiceProvider serviceProvider)
    {
        var context = serviceProvider.Get<IPluginExecutionContext>();
        Guid id = Guid.Empty;
        if (context.InputParameters.Contains("Target") && context.InputParameters["Target"] is Entity)
        {
            Entity entity = (Entity)context.InputParameters["Target"];
            //change the table name below to the source table name you have created
            string cmdString = "UPDATE VETicket SET {0} WHERE TicketID=@TicketID";
            SqlConnection connection = Connection.GetConnection();
            using (SqlCommand command = connection.CreateCommand())
            {
                command.Parameters.AddWithValue("@TicketID", entity["new_ticketid"]);
                List<string> setList = new List<string>();
                if (entity.Attributes.Contains("new_name"))
                {
                    command.Parameters.AddWithValue("@Name", entity["new_name"]);
                    setList.Add("Name=@Name");
                }
                if (entity.Attributes.Contains("new_severity"))
                {
                    command.Parameters.AddWithValue("@Severity", entity["new_severity"]);
                    setList.Add("Severity=@Severity");
                }
                command.CommandText = string.Format(cmdString, string.Join(",", setList)); connection.Open();
                try
                {
                    var numRecords = command.ExecuteNonQuery();
                    Console.WriteLine("updated {0} records", numRecords);
                }
                finally
                {
                    connection.Close();
                }
                // other codes.
            }
        }
    }
}
Code for RetrievePlugin.cs
public class RetrievePlugin : IPlugin
{
    public void Execute(IServiceProvider serviceProvider)
    {
        var context = serviceProvider.Get<IPluginExecutionContext>();
        Guid id = Guid.Empty;
        if (context.InputParameters.Contains("Target") && context.InputParameters["Target"] is EntityReference)
        {
            EntityReference entityRef = (EntityReference)context.InputParameters["Target"];
            Entity e = new Entity("new_ticket");
            //change the table name below to the source table name you have created
            string cmdString = "SELECT TicketID, Severity, Name FROM VETicket WHERE TicketID=@TicketID";
            SqlConnection connection = Connection.GetConnection();
            using (SqlCommand command = connection.CreateCommand())
            {
                command.CommandText = cmdString;
                command.Parameters.AddWithValue("@TicketID", entityRef.Id);
                connection.Open();
                try
                {
                    using (SqlDataReader reader = command.ExecuteReader())
                    {
                        if (reader.Read())
                        {
                            e.Attributes.Add("new_ticketid", reader.GetGuid(0));
                            e.Attributes.Add("new_severity", reader.GetInt32(1));
                            e.Attributes.Add("new_name", reader.GetString(2));
                        }
                    }
                }
                finally
                {
                    connection.Close();
                }
                // other codes.
            }
            context.OutputParameters["BusinessEntity"] = e;
        }
    }
}
Code for RetrieveMultiplePlugin.cs
public class RetrieveMultiplePlugin : IPlugin
{
    public void Execute(IServiceProvider serviceProvider)
    {
        var context = serviceProvider.Get<IPluginExecutionContext>();
        EntityCollection collection = new EntityCollection();
        //change the table name below to the source table name you have created
        string cmdString = "SELECT TicketID, Severity, Name FROM VETicket";
        SqlConnection connection = Connection.GetConnection();
        using (SqlCommand command = connection.CreateCommand())
        {
            command.CommandText = cmdString;
            connection.Open();
            try
            {
                using (SqlDataReader reader = command.ExecuteReader())
                {
                    while (reader.Read())
                    {
                        Entity e = new Entity("new_ticket");
                        e.Attributes.Add("new_ticketid", reader.GetGuid(0));
                        e.Attributes.Add("new_severity", reader.GetInt32(1));
                        e.Attributes.Add("new_name", reader.GetString(2));
                        collection.Entities.Add(e);
                    }
                }
            }
            finally
            {
                connection.Close();
            }
            context.OutputParameters["BusinessEntityCollection"] = collection;
        }
    }
}
Code for DeletePlugin.cs
public class DeletePlugin : IPlugin
{
    public void Execute(IServiceProvider serviceProvider)
    {
        var context = serviceProvider.Get<IPluginExecutionContext>();
        //comment
        Guid id = Guid.Empty;
        if (context.InputParameters.Contains("Target") && context.InputParameters["Target"] is EntityReference)
        {
            EntityReference entityRef = (EntityReference)context.InputParameters["Target"];
            id = entityRef.Id;
            //change the table name below to the source table name you have created
            string cmdString = "DELETE VETicket WHERE TicketID=@TicketID";
            SqlConnection connection = Connection.GetConnection();
            using (SqlCommand command = connection.CreateCommand())
            {
                command.CommandText = cmdString; command.Parameters.AddWithValue("@TicketID", id);
                connection.Open();
                try
                {
                    var numRecords = command.ExecuteNonQuery();
                    Console.WriteLine("deleted {0} records", numRecords);
                }
                finally
                {
                    connection.Close();
                }
                // other codes.
            }
        }
    }
}
Compile and build the solution. You will now have an assembly file (.dll) that you can use to register in your Dataverse environment. You will find this file in the solution folder/bin/Debug directory.

Register the assembly using the Plugin Registration Tool. You can get the latest Plugin Registration Tool package from NuGet.
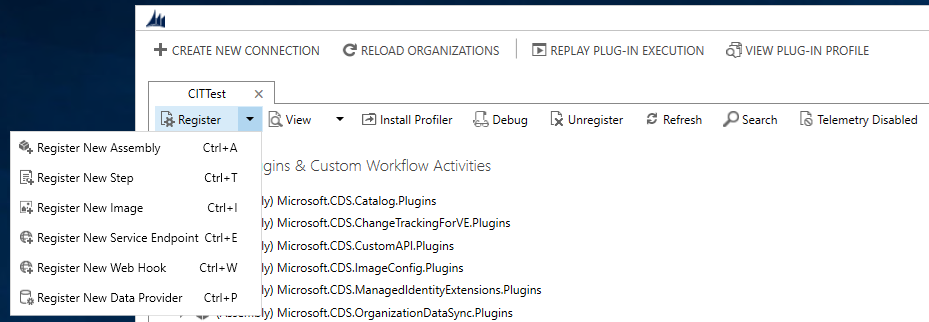
Open the Plugin Registration Tool. You need to have system administration privileges to register the assembly.Select CREATE NEW CONNECTION to connect to your Dataverse environment. Select the Register drop-down and then select Register New Assembly.
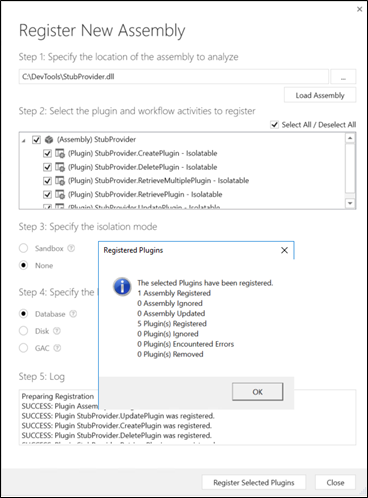
Select the assembly file and register the plug-ins. Make sure that you have selected all the plug-ins (Create, Update, Delete, Retrieve, and RetrieveMultiple plug-ins).
Step 2: Creating data provider and adding plug-ins to the provider
Select the Register drop-down and then select Register New Data Provider.
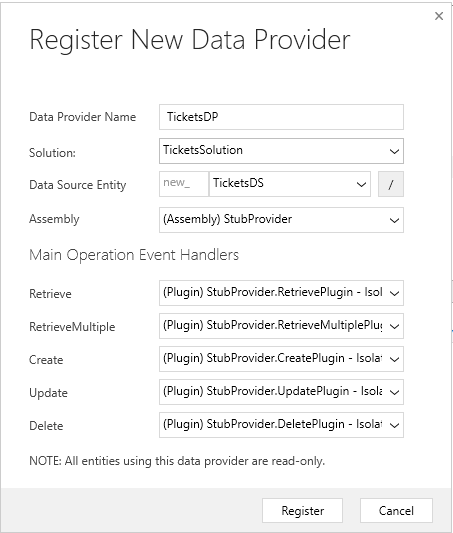
In the Register New Data Provider dialog, enter the following details:
Enter Data Provider Name.
In the Solutions option, select an existing solution or create a new solution in the drop-down. If you want to create a new solution, select the NewSolution option from the drop-down. In the Create New Solution dialog, enter the required details and select Save.
In the Data Source Table (Entity) option, select Create New Data Source. Enter the details. Make sure that the data source is part of the solution you created or selected.
Note
The data source table in Dataverse holds the configuration data for a data source record to be passed to the provider plug-ins.
Map each of the registered plug-in to its respective operations.
Register the new data provider.
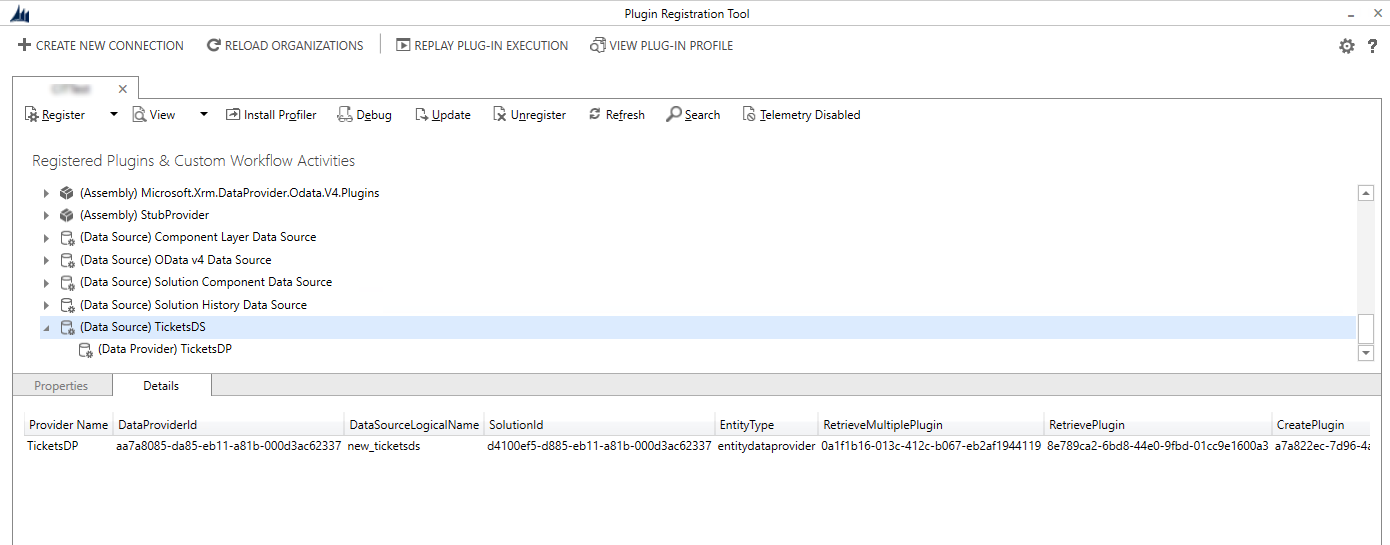
In the Plugin Registration Tool, you'll see the new data source record and the associated data provider. Selecting the data source will display the details which include the plug-ins and their registered GUID.
Step 3: Creating a virtual table in Dataverse environment
Create a new virtual table data source by navigating to Setting > Administration > Virtual Table (Entity) Data Sources.
Select New and then select the data provider you created in the previous step from the drop-down.
Enter a name for the data source and select Save and Close.
You are now ready to create the virtual table that represents the external data source. To do this, go to Settings > Customize the System.
In the left navigation pane of solution explorer, Select Tables (Entities), and then select New.
Enter the following details:
Column Description Data Source Select the data source you created in the previous step. Display Name Virtual table name. Plural Name The value will be automatically populated based on the display name. Name This will also be created automatically based on the value you enter for the display name. External Name The name of the source table. External Collections Name You can use the same value from the plural name column. Select Save and Close.
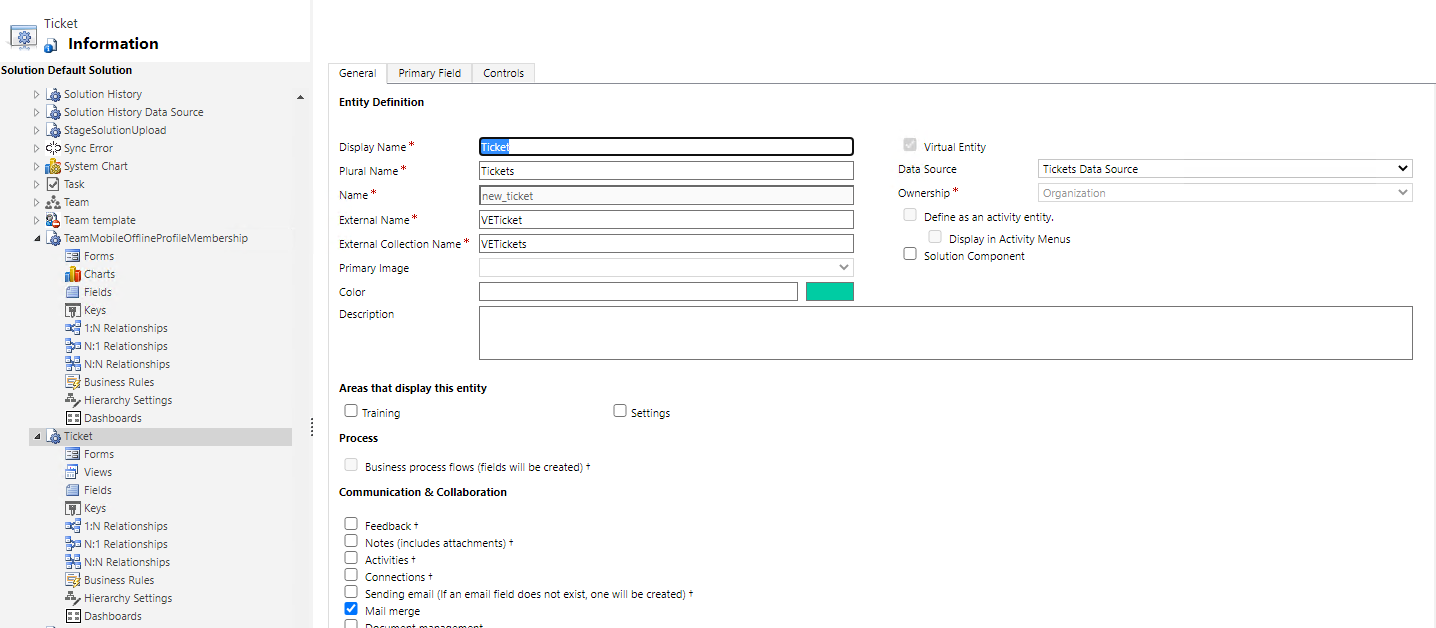
In the left navigation pane, select and expand on the virtual table you created.
Select Fields to update and create new columns representing the external source.
Select the Primary Key column for the virtual table and select Edit.
Update the External Name column to match the column name in your external data source. In this example, the external column name is TicketID.
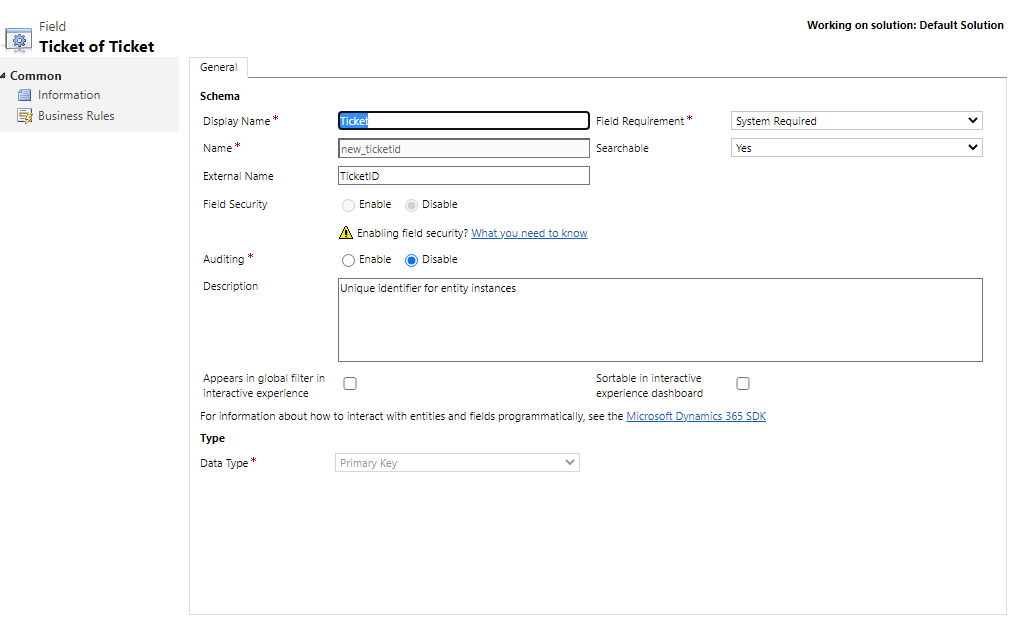
Select Save and Close.
Select the Name field for the virtual table and select Edit.
Update the External Name field to match the field name in your external data source. In this example, the external column name is Name.
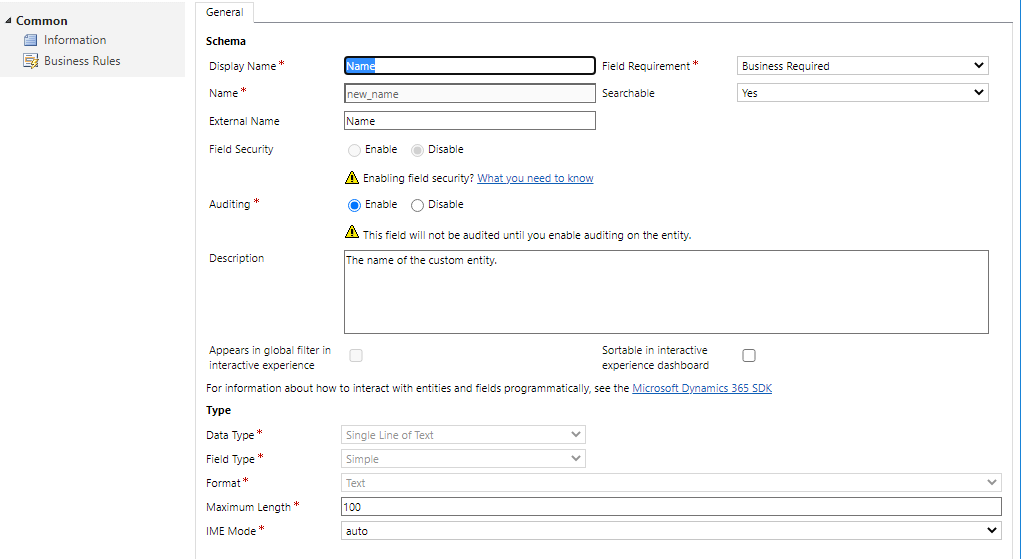
Select Save and Close.
Select New to create a new column in the virtual table. This column will represent the severity column in the external data source.
Enter the following information for the new columns:
Column Name Value Display Name Severity Name new_severity External Name Severity Field Requirement Business Required Data Type Whole Number 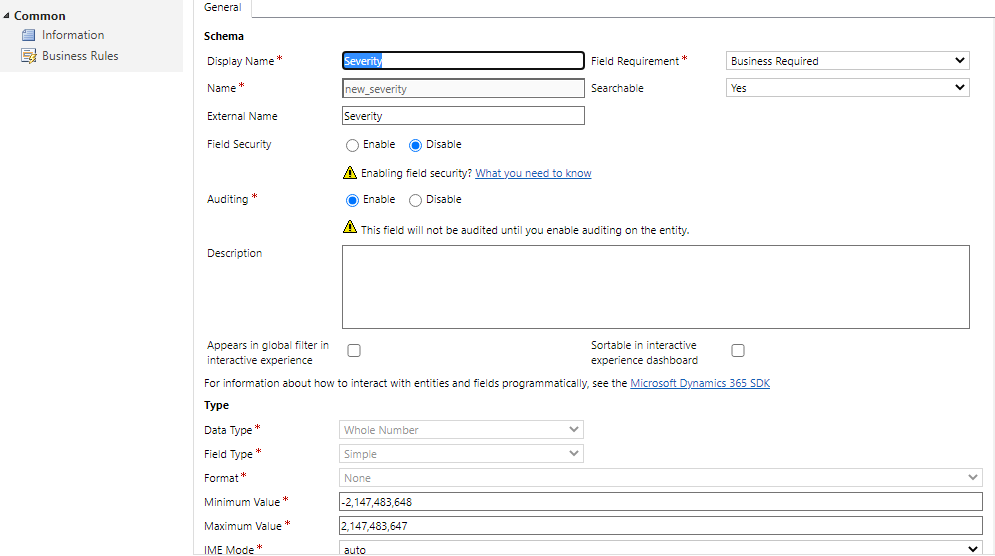
Select Save and Close.
Step 4: Create, update, view, and delete records using a virtual table
Create a model-driven app and add the virtual table to the site map. Then select the virtual table main form and the Advanced field view. Publish the app. More information: Build your first model-driven app from scratch
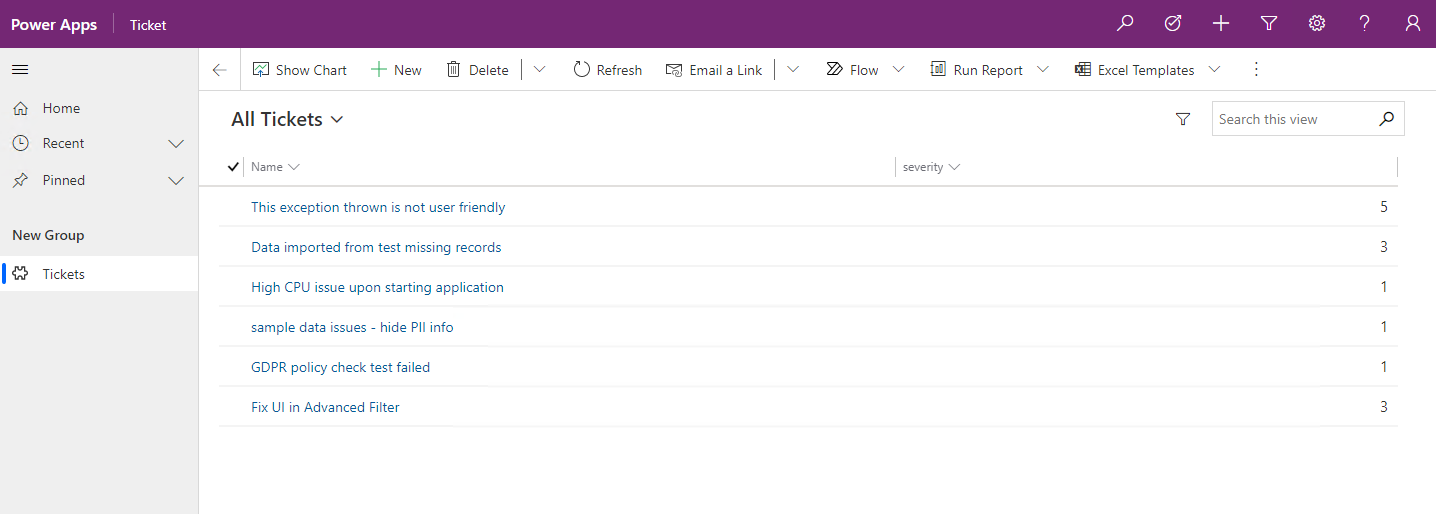
Application users can perform read, create, update, delete operations using the virtual table just like any other table in Microsoft Dataverse.
See also
Getting started with virtual tables
API considerations for virtual tables
Custom virtual table data providers
Virtual table walkthrough using OData v4 Data Provider