Traceability app quick start (preview)
[This article is prerelease documentation and is subject to change.]
This article describes how to verify, import, and remove demo data. It also explains how to use demo data to explore the capabilities of the Traceability app in Power Apps.
Verify demo data
Usually, demo data is installed automatically when you first install the Traceability Add-in for Dynamics 365 Supply Chain Management.
To check whether demo data is installed on your system, follow these steps.
Open the Traceability app in Power Apps.
On the left navigation pane, select Settings > Activity.
Verify that configuration settings shown in the following table are shown on the Activity page.
Company Activity Code Activity Type Source Activity Code Source Activity Type Track or not USMF Goods Receipt Production Goods Receipt Production TRUE USMF Consumption Production Consumption Production TRUE If the configuration settings aren't shown, then you can import the demo data as described in the next section.
Import demo data
If you'd like to explore Traceability using demo data, but the data isn't available, follow these steps to import it.
- Open the Traceability app in Power Apps.
- On the left navigation pane, select Home > Get started.
- In the Manage environment data section, on the Import demo data tile, select Import demo data.
- Wait until the import process is complete. The process might take several minutes.
Delete all data
When you're done exploring the demo data, you can remove it from your system, together with all other data that's been collected since you started using Traceability.
Warning
This procedure removes all data from the Traceability Add-in for Supply Chain Management, not just the demo data. Be sure you want to delete all data before you proceed.
To delete all data from the Traceability Add-in, follow these steps.
- Open the Traceability app in Power Apps.
- On the left navigation pane, select Home > Get started.
- In the Manage environment data section, on the Delete all data tile, select Delete all data.
- Wait until the import process is complete. This process might take several minutes.
Demo data model
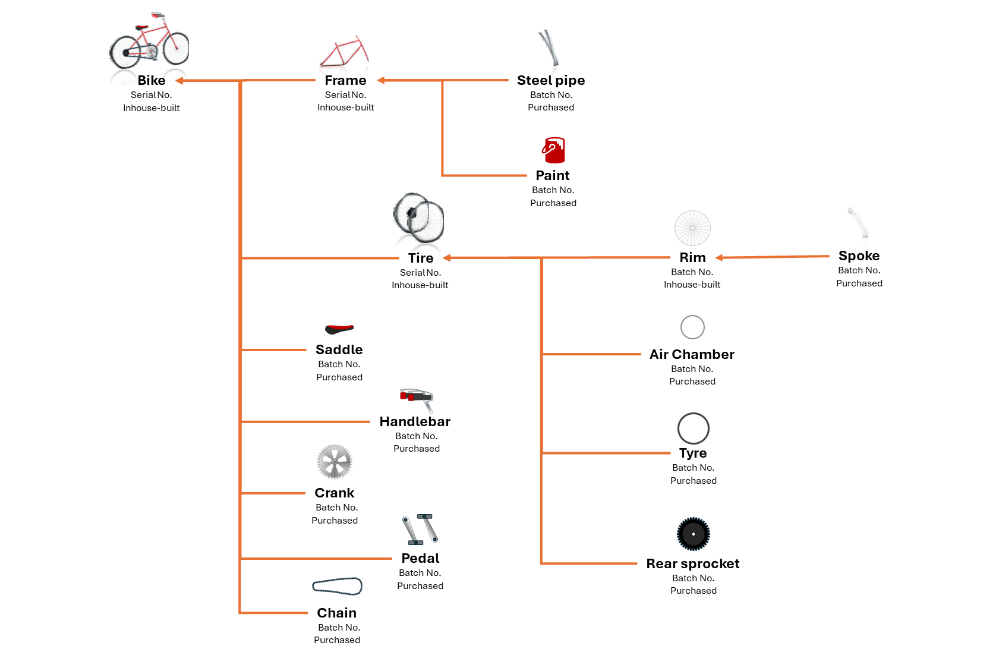
The demo data describes the components of a manufactured bicycle. The following illustration shows the bill of materials (BOM) structure of the bicycle.
Explore the demo data
This section shows how to explore the capabilities of the Traceability app using the demo data. Several common scenarios are described.
Open the Traceability app in Power Apps.
On the left navigation pane, select Trace > Genealogy trace.
Make a backwards search, which lets you enter a unique identifier of a finished good to retrieve its genealogy, activity, and data collection.
Use the search field to look for a specific serial number of a finished good. For example, you can use the serial number bike-s0001 or bike-s0002 to find the genealogy tree of a bike from the demo data.
Traceability shows a genealogy tree for the serial number you entered. Now you can do an activity verification by following these steps:
- Select the node for the bike in the genealogy tree.
- Select the View detail button for your selected node to open a dialog.
- Open the Activities tab in the dialog. Activity events are displayed in reverse chronological order. For example, you might see five activities for Consumption and one activity for Goods receipt.
Do a forward search to see the higher-level assembly related to a selected genealogy tree node. Follow these steps:
- Select the paint-demo node in the genealogy tree.
- Select the Trace button for your selected node. The app now shows a high-level genealogy list.
Try out the table views. Until now, you've been working on the Graphic view tab. The table views provide another way to view and explore your data. Try the following options:
- Select Table view - composition to do a backward search.
- Select Table view – where used to do a forward search.
