Filters for Mobile Apps
Clarity offers a wide range of powerful filters to help you sort and customize Recordings, Heatmaps, and Dashboard. By choosing the right filter for your needs, you can find interesting patterns in your data and make better-informed decisions.
Use filters to drill deep into user behavior at screen or a session-level. For example, you can use screen filters to focus on data related only to a specific screen on your app. You can also use session filters to understand how diverse types of users interact with your app.
Tip
Save your favorite filter combinations as a segment so you can easily find them later.
Where do I find the filters?
With any of your projects open, you can find the filters from Dashboard, Recordings, or Heatmaps pages.
On the Dashboard, select Filters to show the filters.

On Session Recordings, select Filters to show the filters.

On Heatmaps, select Filters to show the filters.

Note
Filters set in one of these three areas usually remain in effect when you switch your view from one to another. For example, you can set a session filter in Heatmaps and use it again on your Dashboard or Recordings.
Filter groups
There are 30+ filters available, so Clarity grouped them into relevant categories.
Navigate through the filters by using the left bar. You can choose from the following groups on the navigation bar:
Go to a filter group by selecting it from the navigation bar or scroll down the page until you see it.
Filtering by User info
The User info filter group helps you to screen results by information about your visitors:

Time frame: Select a date range for your results. You can choose options between today and the last 30 days or enter a custom date range.
Device class: Select one or more devices from the list that contains Tablet, and Mobile.
Device brand: Select data that includes the product brand. This filter helps you to view more from the specific brand.
Model: Select one or more device model name/number from the dropdown list.
Operating system: Select one or more OSs from a list. You can exclude the filter by selecting Exclude selection checkbox.
Country/Region: Select one or more countries/regions from the list. You can exclude the filter by selecting Exclude selection checkbox.
Clarity user ID: Enter a specific Clarity user ID to include only results from that Clarity user. You can get the user ID from the Session details view.
Filtering by User actions
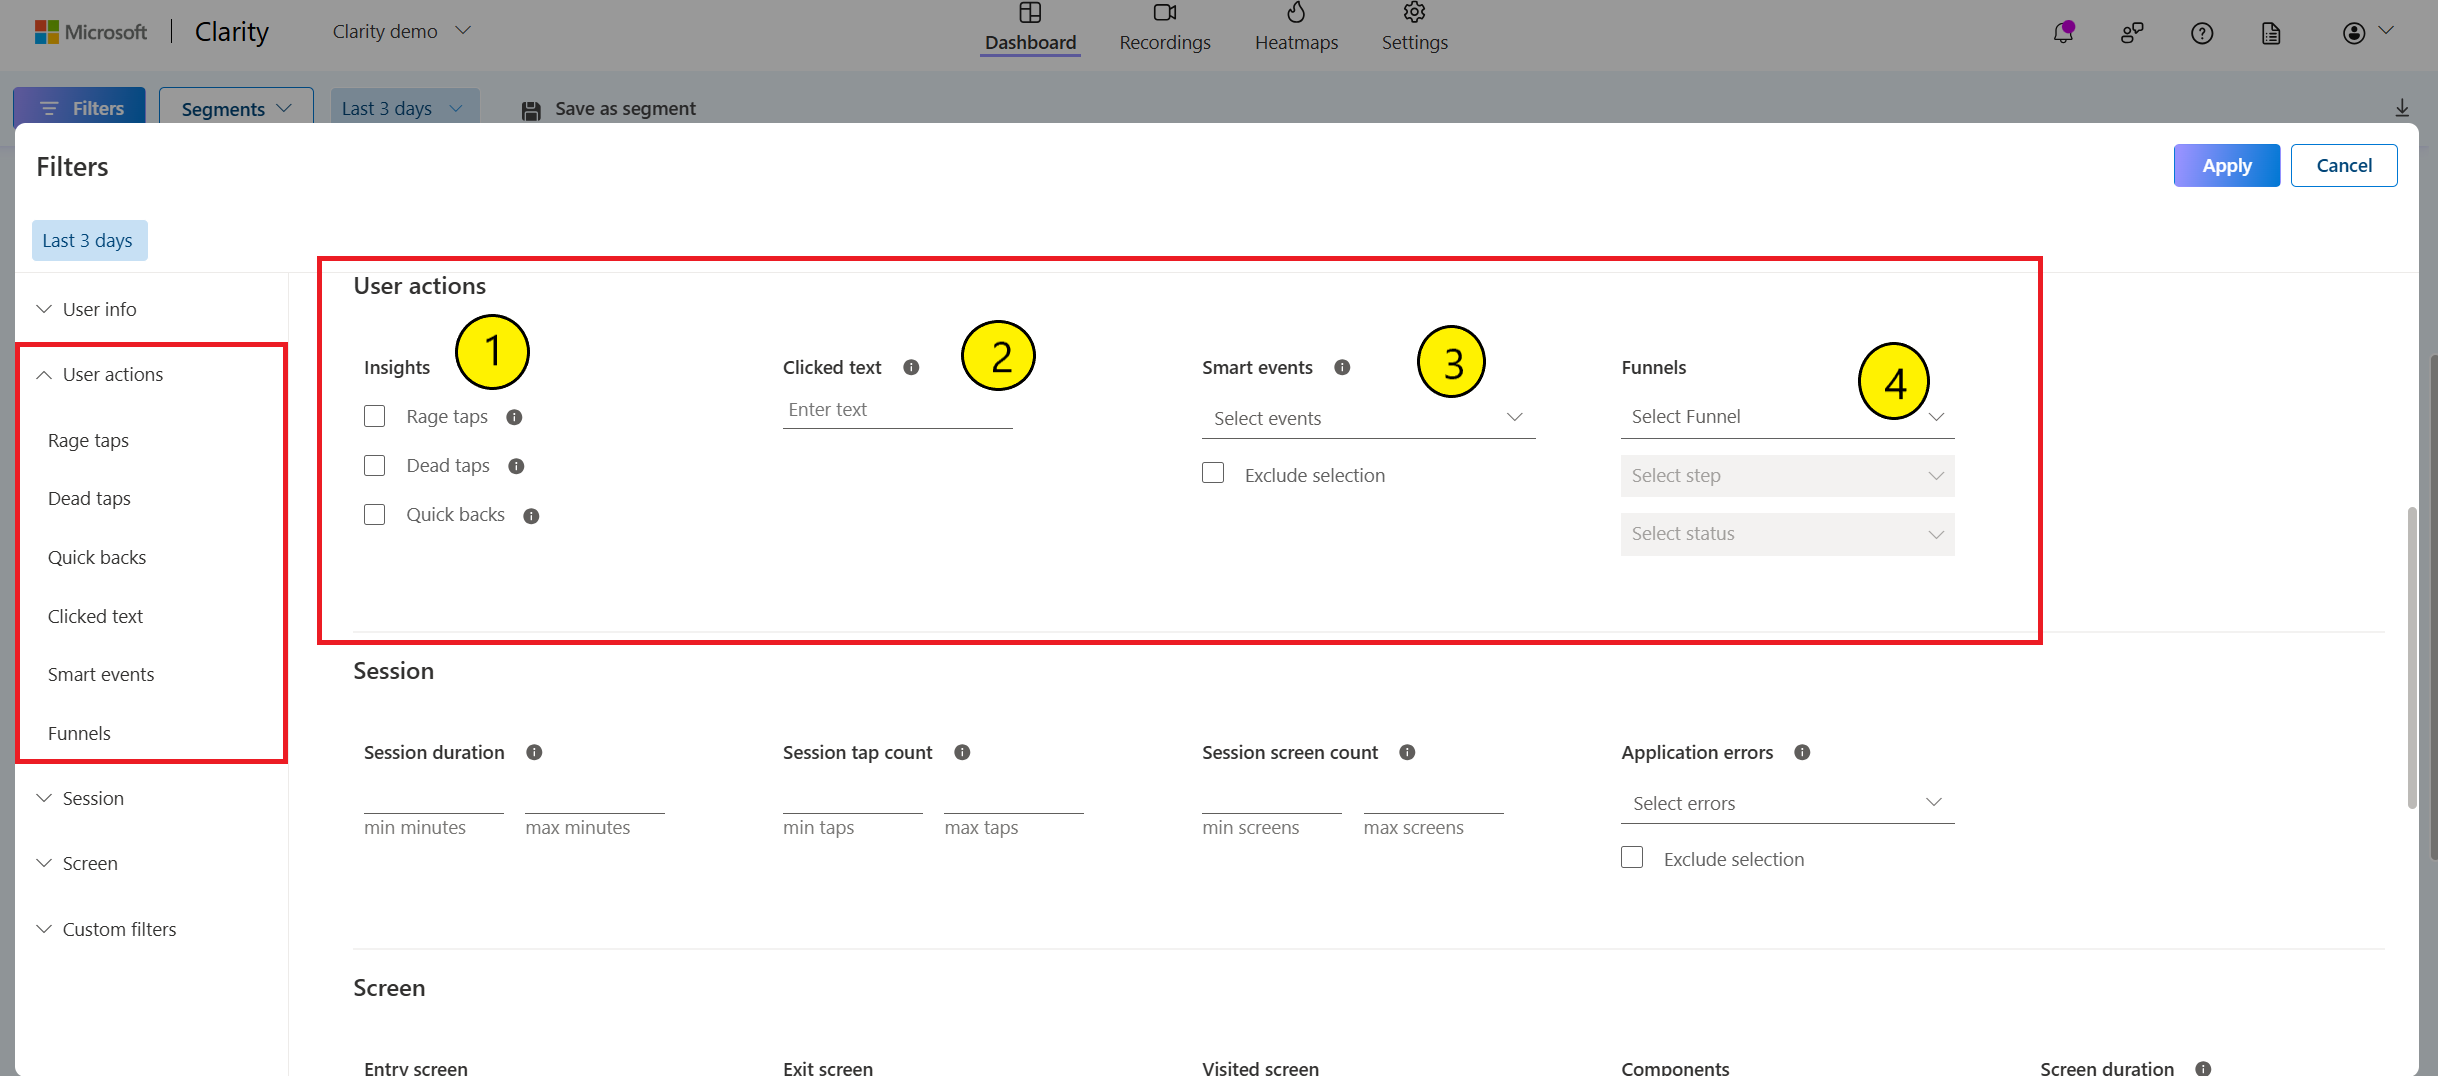
The User actions filter group allows you to screen results by user activity on your app:

Insights filter group helps you to screen results by insights generated from Clarity Insights:
Rage taps: Select data where a user repeatedly tapped in a clustered area within a brief period. This filter helps identify frustration points in your design.
Dead taps: Select data where a user tapped somewhere, but there was no response. This filter helps find UX bugs.
Clicked text: Select data where a user tapped on a specific element with this text in it.
Smart events: Select data that capture key user actions. Clarity automatically defines smart events, and you can customize them or define new events. Learn more about Smart events.
Funnels: Select data that capture ordered group of user actions. You can customize or define funnels. Learn more about Funnels.
Filtering by Session
The Session filter group helps you to screen results by criteria you choose:

Session duration: Select the duration of user sessions in minutes. For "one minute 30 seconds," enter "1.5". Choose to view sessions based on the minimum and maximum values you input.
Session tap count: Select the sessions where users tapped a specific number of times. Choose to view sessions based on the minimum and maximum values you input.
Session screen count: Select the sessions where users visited a specific number of screens. Choose to view sessions based on the minimum and maximum values you input.
Example: Find out why users didn't interact with your app using Session tap count. Enter few taps to see user sessions with lower interactivity. And for a balancing perspective, enter a higher number of taps to view sessions with many interactions. Dig into the details to better understand what makes your app engaging and what doesn't.
Application errors: Select data where an error is detected while executing JavaScript on the webview part of your app or an uncaught exception that might lead to a crash. You can view multiple errors on a screen using logical OR or logical AND functions. You can view top 500 JavaScript errors in the drop-down. You can exclude the filter by selecting Exclude selection checkbox.
Filtering by Screen
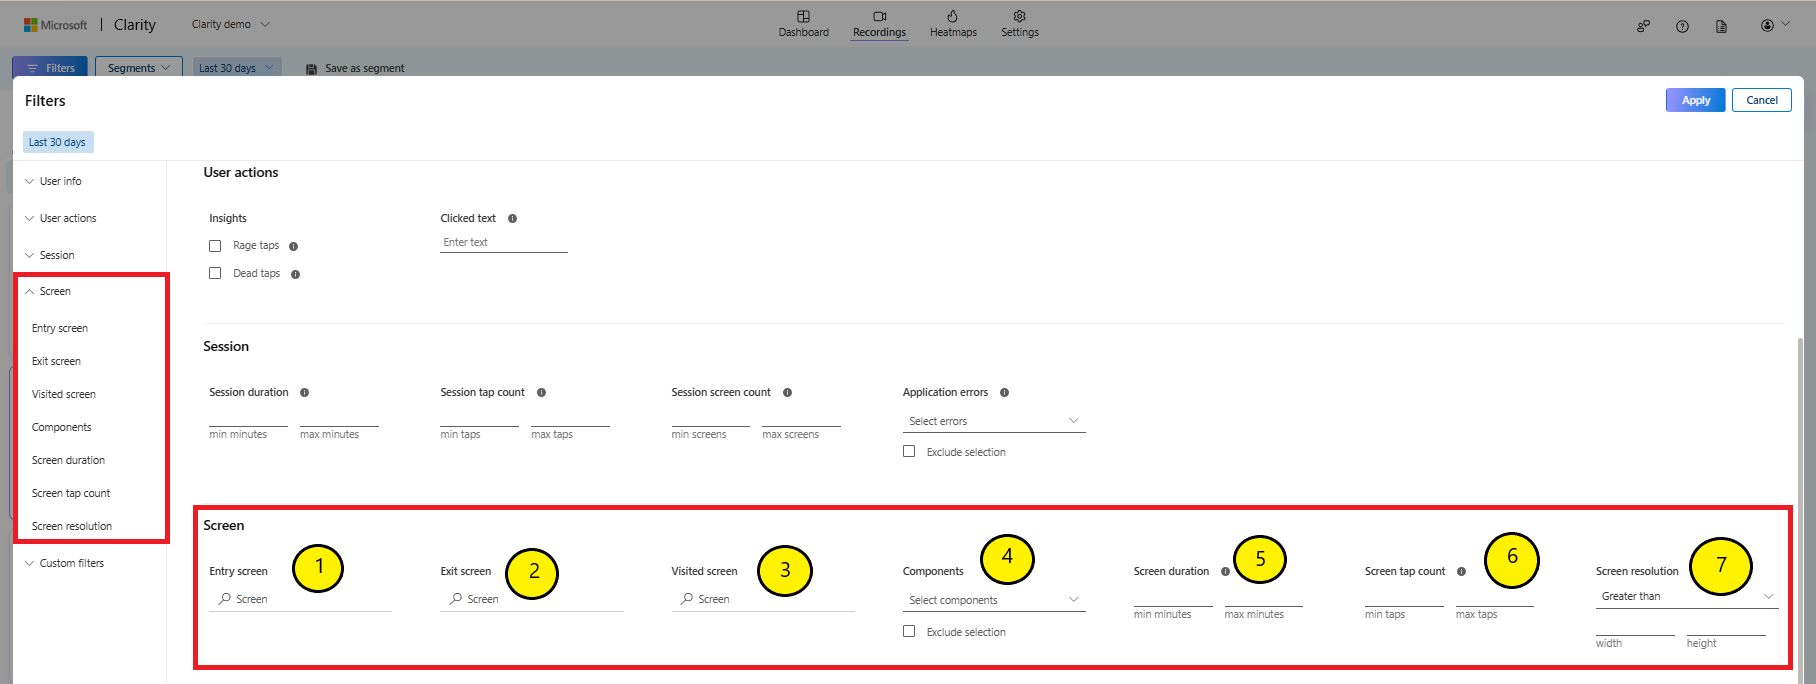
The Screen filters group helps you to screen results by criteria related to the screens viewed:

Entry screen: Select data where a user entered the app on a specific screen. This filter helps to watch and analyze user behavior on screens.
Exit screen: Select data where a user left the app on a specific screen. This filter helps evaluate why users left a particular screen.
Visited screen: Select data that includes a specific screen. This filter helps analyze how users navigate away from a particular screen during a more extensive journey on your app.
Components: Select data where that includes a specific component that fragments within your Android Activities.
Screen duration: Select the amount of time the user spent on a screen. Enter the duration in minutes. For "one minute 30 seconds," enter "1.5". Choose to view sessions based on the minimum and maximum values you input.
Screen tap count: Select the number of taps on a screen. Enter the number of taps per screen. Choose to view sessions based on the minimum and maximum values you input.
Screen resolution: Select the screen resolution of the app in pixels. Choose to view data greater than, less than, or equal to the selected screen resolution.
Filtering with Custom filters
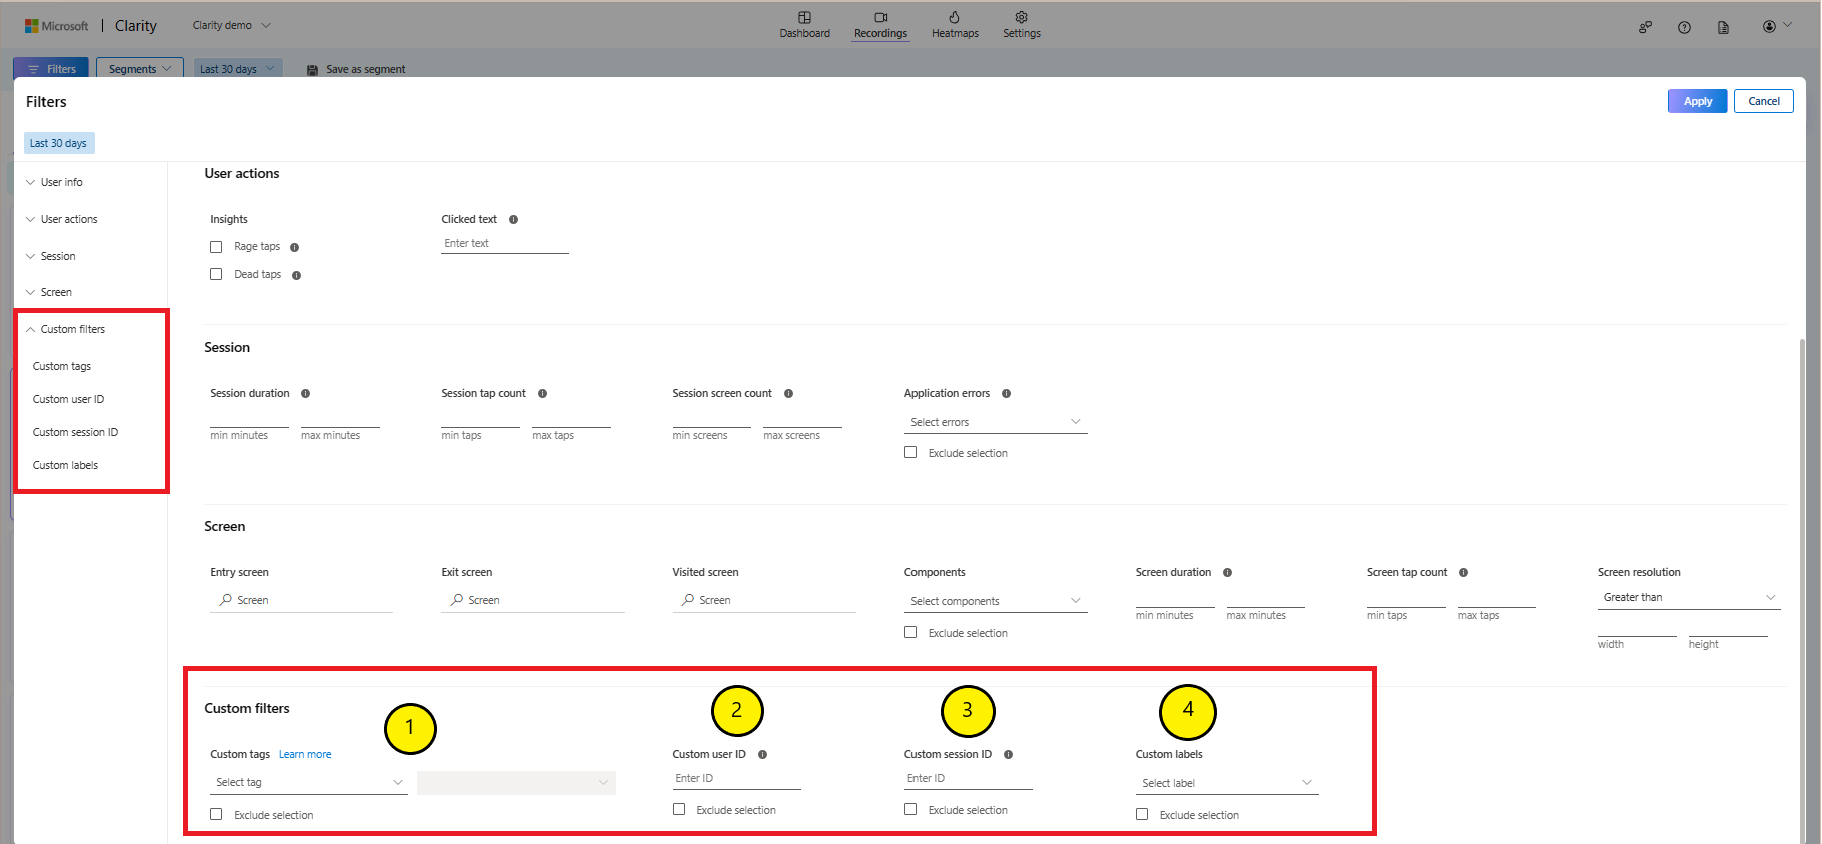
Clarity's custom tags are customizable filters that allow you to analyze recordings and heat maps in different directions. Learn more about:

Custom tags
In the custom tags section, you can filter by:
Device Memory: Use in combination with device cores filter to understand interaction across low end and high end devices. These filters are useful when you're viewing application crashes.
Package Name: Select the package name in case you have multiple packages connected to the same project in Clarity.
Application Version: Use to filter out data for a specific build of the mobile app.
Clarity Version: The version of the Clarity SDK used in the Client's app.
Custom IDs
Custom IDs allow you to filter using user ID. These properties are set similar to custom tags.
- Custom user ID: The app owner creates and retrieves the text type using Clarity API custom identifiers. You can exclude this filter by selecting Exclude selection checkbox.
- Custom session ID: The app owner creates and retrieves the text type using Clarity API custom identifiers. You can exclude this filter by selecting Exclude selection checkbox.
Badge labels
| Image | Description |
|---|---|

|
|

|
|

|
|
FAQ
For more answers, refer to FAQ.