Step 4: Create a Sharepoint Application to Access the Adapter

Time to complete: 15 minutes
In this step you take the application definition file that you created using the Business Data Catalog Definition Editor tool, and import it into Microsoft Office SharePoint Server.
Prerequisites
You should have created an application file as described in Step 3: Create an Application Definition File.
The Microsoft Single Sign-On service must be running.
How to Create a SharePoint Application
Creating a SharePoint application involves the following steps:
Create a Single Sign-On (SSO) application in SharePoint.
Create a Shared Services Provider, and import the application definition file.
Create a Web Part page, and add Web Parts.
This topic demonstrates how to perform these steps.
Creating an SSO Application in SharePoint
To pass user credentials to the Echo adapter from a SharePoint application, you must set up an SSO application that maps to a user account or group.
Manage server settings for Single Sign-On
Start SharePoint 3.0 Central Administration. On the Start menu, point to All Programs, point to Microsoft Office Server, and then click SharePoint 3.0 Central Administration.
On the top navigation bar, click Operations.
On the Operations page, in the Security Configuration section, click Manage settings for single sign-on.
On the Manage Settings for Single Sign-On page, in the Server Settings section, click Manage Server Settings.
Ensure that the information on this page is correct for your Single Sign-On installation. For more information about these operations, see “Configure single sign-on (Office SharePoint Server)” at https://go.microsoft.com/fwlink/?LinkId=105291.
Manage settings for enterprise application definitions
In SharePoint Central Administration, on the top navigation bar, click Operations.
On the Operations page, in the Security Configuration section, click Manage Settings for single sign-on.
On the Manage Settings for Single Sign-On page, in the Enterprise Application Definition Settings section, click Manage Settings for enterprise application definitions.
On the Manage Enterprise Application Definitions page, click New Item.
On the Create Enterprise Application Definitions Page, set the Display name field to EchoSSO, and then set the Application name field to EchoSSO. This value should match the SecondarySsoApplicationId you specified in Step 3: Create an Application Definition File.
In the Contact e-mail address field, enter your e-mail address, and then click OK.
Manage account information for enterprise application definitions
In SharePoint Central Administration, on the top navigation bar, click Operations.
On the Operations page, in the Security Configuration Section, click Manage settings for single sign-on.
On the Manage Settings for Single Sign-On page, in the Enterprise Application Definition Settings section, click Manage account information for enterprise application definitions.
On the Manage Account Information for an Enterprise Application Definition, select EchoSSO from the Enterprise application definition list.
In the Group account name field, type the Windows group that will be used to secure this application definition. For example, DOMAIN\Domain Users.
Click Set.
On the Provide EchoSSO Account Information page, in the Username field type testuser, and then in the Password field type testpassword.
Click OK, and then click Done.
Creating a Shared Services Provider and importing the application definition file
A Shared Services Provider (SSP) is a logical grouping of shared services and their supporting resources. You can create an SSP by using the SharePoint Central Administration Console. This example will work in any SSP. For more information about creating an SSP, see “Chapter overview: Create and Configure Shared Services Providers” at https://go.microsoft.com/fwlink/?LinkId=105119.
To import the application definition file
Start SharePoint 3.0 Central Administration. On the Start menu, point to All Programs, point to Microsoft Office Server, and then click SharePoint 3.0 Central Administration.
In the left navigation pane, click the name of the SSP to which you want to import the application definition.
In the Business Data Catalog section, click Import application definition.
On the Import Application Definition page, click Browse, and then select the EchoWS.xml file.
Click Import, and then click OK.
Creating Web Parts
You must now create Web Parts in your SharePoint site to use the method instance created in the Business Data Catalog Definition Editor. Web Parts are reusable components that can contain any kind of Web-based information, including analytical, collaborative, and database information.
To create a Web Part page
Start SharePoint 3.0 Central Administration. On the Start menu, point to All Programs, point to Microsoft Office Server, and then click SharePoint 3.0 Central Administration.
In the left navigation pane, click the name of the SSP in which you imported the application definition file.
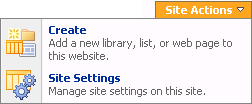
On the Shared Services Administration page, in the upper-right corner, click Site Actions, and then click Create.

On the Create page, in the Web Pages section, click Web Part Page.
On the New Web Part page, in the Name field, type EchoPart, and then select Full Page, Vertical from the Chose a Layout Template list.
Click Create.
To add a Business Data Web Part
Click Add a Web Part.
In the Add Web Parts dialog box, select Business Data List, and then click Add.

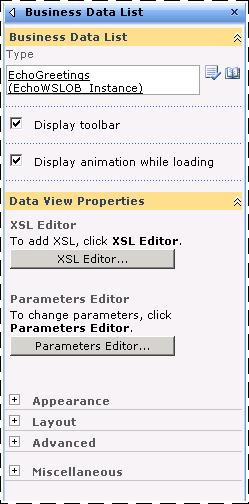
Click Open the tool pane.
The Business Data List tool pane opens in the right pane. In the Business Data List section, for the Type field, click the Browse button.

In the Business Data Type Picker dialog box, select the EchoWSLob_Instance application, and then click OK.
On the Business Data List tool pane, click OK.
You are presented with a field that allows you to enter a greeting value to pass to the EchoGreetings method. Enter data in the greeting field and click Retrieve Data. This invokes the EchoGreetings method of the Echo adapter hosted in IIS and returns a response.

Note
The name column does not contain the user information, but only displays BDC.Name. This occurs because the BDC expects only a simple record structure, and does not display the complex structure represented by the name field.
Click Exit Edit Mode from the upper corner of the page.
What did I just do?
You have used the SharePoint 3.0 Central Administration to import an application definition, and create Web Parts that use this definition to invoke the EchoGreetings operation of the Echo adapter.
Next Steps
This tutorial is complete. For more information using the Business Data Catalog, see “Business Data Catalog” at https://go.microsoft.com/fwlink/?LinkId=119921.