Step 1: Use the Oracle E-Business Adapter to create and publish a WCF service

Time to complete: 15 minutes
Objective: You can use the WCF LOB Adapter Service Development Wizard to generate a WCF service from the Oracle E-Business Suite artifacts that can be hosted in a hosting environment such as Internet Information Services (IIS) or Windows Process Activation Service (WAS). This topic demonstrates how to use the wizard to generate a WCF service file.
Prerequisites
Before running the wizard, install the following:
Microsoft Windows Communication Foundation (WCF) Line of Business (LOB) Adapter SDK either with the Complete option or the Custom option (and choosing Tools within this option). This installs the Visual Studio template for the Adapter Service Development Wizard.
Microsoft BizTalk Adapter for Oracle E-Business Suite from the BizTalk Adapter Pack.
For more information about these prerequisites, see the BizTalk Adapter Pack installation guide. The installation guide is typically installed at <installation drive>:\Program Files\Microsoft BizTalk Adapter Pack\Documents.
Note
You must also run the create_apps_artifacts.sql script provided with the Microsoft Office SharePoint Server sample to create the MS_SAMPLE_EMPLOYEE interface table in the Application Object Library application. This interface table is used in this tutorial.
Create a WCF Service for the Operation on Oracle E-Business Artifact
This section provides the steps to create a WCF service for the Select operation on the MS_SAMPLE EMPLOYEE Interface Table.
To Create a WCF Service for the Select Operation on the MS_SAMPLE EMPLOYEE Interface Table
Start Visual Studio, and then create a project.
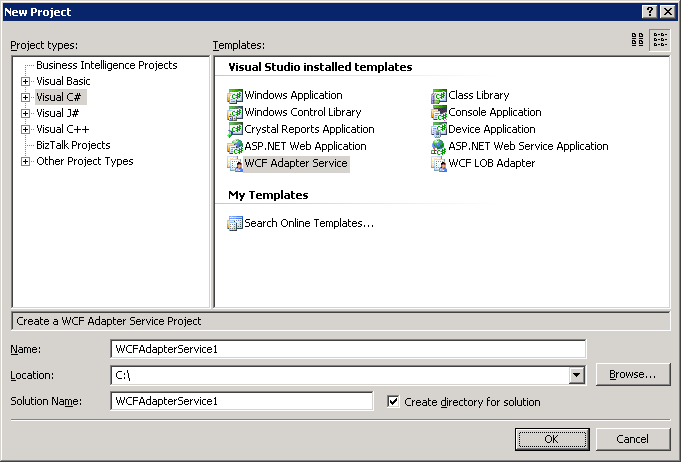
In the New Project dialog box, from the Project types pane, select Visual C#. From the Templates pane, select WCF Adapter Service.
Alternatively, from the Project types pane, expand Visual C#, and then select Web. From the Templates pane, select WCF Adapter Service.

Note
If you installed Visual Studio 2013 with the Web Development component, the WCF Adapter Service template is also available from the New Web Site option (File > New > Web Site).
However, the Oracle E-Business adapter only supports Web sites that are created on the file system. Therefore, while creating a Web site in the New Web Site dialog box, you must click File System in the Location list.
Specify a name and location for the solution, and then click OK. The WCF Adapter Service Development Wizard starts.
On the Welcome page, click Next.
On the Choose Operations page, specify a connection string to connect to Oracle E-Business Suite. To do so:
In the Select a binding list, click oracleEBSBinding, and then click Configure.
In the Configure Adapter dialog box, click the Binding Properties tab.
Under the General category, for the ClientCredentialType binding property, select EBusiness.
Under the OracleEBS category, specify appropriate values for the OracleUserName, OraclePassword, and OracleEBSResponsibilityName binding properties. In this case, you need to provide database credentials for the OracleUserName and OraclePassword binding properties.
Under the Metadata category, for the EnableSafeTyping binding property, select True. If you are retrieving values for the date column, we recommend that you set the EnableSafeTyping binding property to True when generating the metadata.
Click the URI Properties tab, and then specify values for the connection parameters. For more information about the connection URI for the Oracle E-Business adapter, see Create the Oracle E-Business Suite Connection URI.
Click the Security tab, and in the Client credential type list, select Username. Specify a valid Oracle E-Business Suite user name and password to connect to Oracle E-Business Suite.
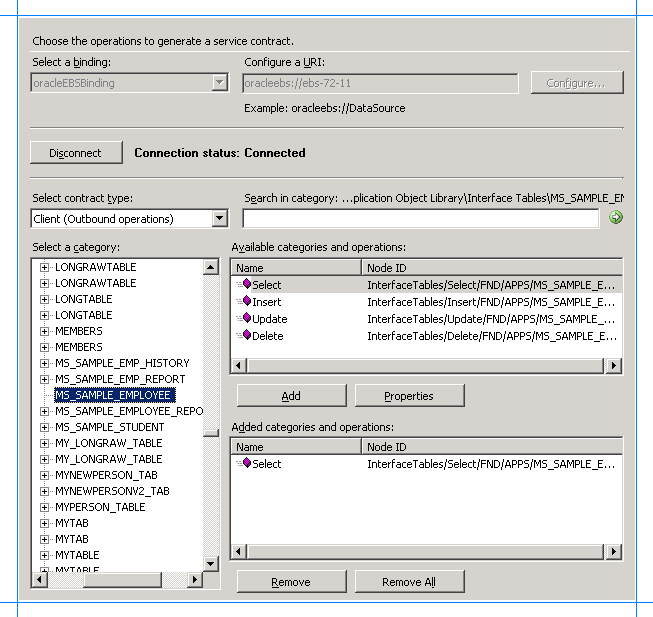
Click OK to close the Configure Adapter dialog box, and then click Connect. After Visual Studio successfully establishes a connection with Oracle E-Business Suite, the connection status is shown as Connected. You can also see the Oracle E-Business Suite metadata being displayed on the Choose Operations page.
On the Choose Operations page, in the Select contract type list, click Client (Outbound operations).
In the Select a category box, browse to the MS_SAMPLE_EMPLOYEE interface table in Application Object library application. For information about browsing to an artifact in the adapter, see Browse, Search, and Retrieve Metadata for Oracle E-Business Operations.
In the Available categories and operations box, select the Select operation, and then click Add. The Select operation is added to the Added categories and operations box.

Note
You can add more than one operation for each artifact. You can also add operations for different Oracle E-Business Suite artifacts. For example, you can add one operation for an interface table and another for a concurrent program. In addition, you can search for specific operations by specifying wildcard characters in search expressions. For more information about the supported special characters and the node levels at which you can search for the operations, see Search for Oracle E-Business Suite operations.
On the Choose Operations page, click Next.
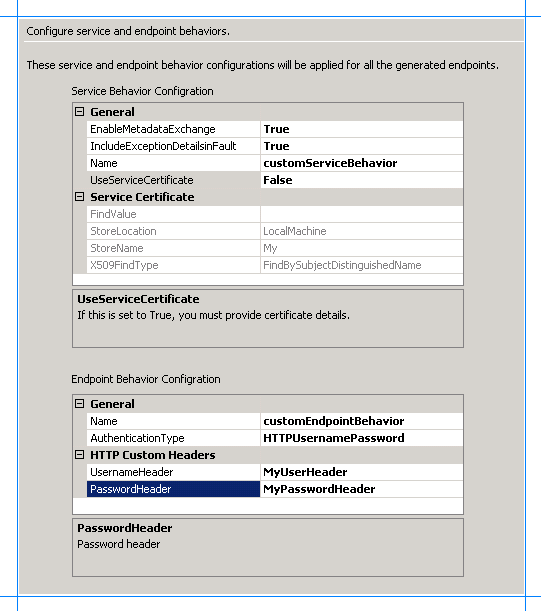
On the Configure Service and Endpoint Behaviors page, specify values to configure the service and endpoint behavior.
In the Service Behavior Configuration box, specify values for the following:
For the property Specify the value EnableMetadataExchange Set this to True to create a metadata exchange endpoint. By setting this to True, you make the service metadata available using standardized protocols, such as WS-Metadata Exchange (MEX) and HTTP/GET requests. Default is False. IncludeExceptionDetailsinFault Set this to True to include managed exception information in detail of SOAP faults returned to the client for debugging purposes. Default is False. Name Name for the service behavior configuration. For this tutorial, type customServiceBehavior. UseServiceCertificate Specifies whether you want to use the message level security mode of WCF. Default is True. For this tutorial, you must set this to False. Note
Because we are not using service certificates for this tutorial, you do not need to provide values for the FindValue, StoreLocation, StoreName, and X509FindType properties. For more information about the certificates and the associated properties, see "X509ClientCertificateCredentialsElement Properties" at https://go.microsoft.com/fwlink/?LinkId=103771.
In the Endpoint Behavior Configuration box, specify values for the following:
For the property Specify the value Authentication Type For Microsoft Office SharePoint Server to consume the WCF service, you should set this as HTTPUserNamePassword. This enables clients to specify user name and password as part of the HTTP header. Name Specify a name for the endpoint behavior configuration. For this tutorial, type customEndpointBehavior. UsernameHeader Name for the user name header. For this example, specify MyUserHeader. For more information about HTTP headers, see "Support for Custom HTTP and SOAP Headers" at https://go.microsoft.com/fwlink/?LinkId=106692. Note: You must specify a value for this property if the Authentication Type is set to HTTPUserNamePassword. If Authentication Type is set to Auto, this property is optional. PasswordHeader Name for the password header. For this example, specify MyPassHeader. For more information about HTTP headers, see "Support for Custom HTTP and SOAP Headers" at https://go.microsoft.com/fwlink/?LinkId=106692. Note: You must specify a value for this property if the Authentication Type is set to HTTPUserNamePassword. If Authentication Type is set to Auto, this property is optional. The following figure shows the Configure Service and Endpoint Behaviors page with the specified values.

On the Configure Service and Endpoint Behaviors page, click Next.
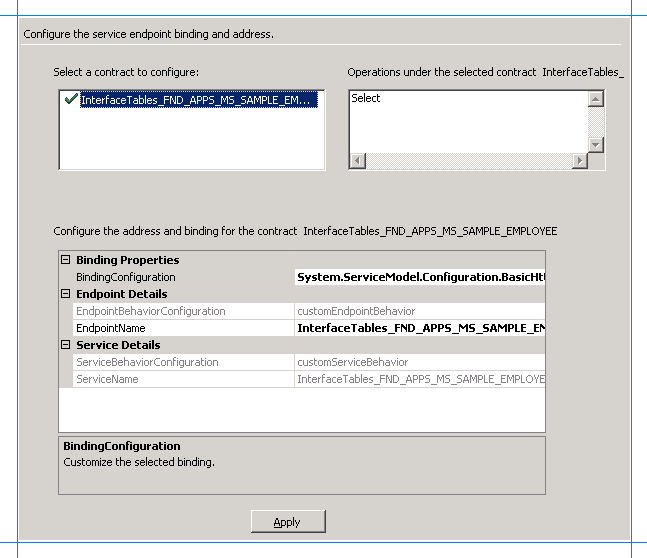
On the Configure Service Endpoint Binding and Address page, the Select a contract to configure displays the artifact (MS_SAMPLE_EMPLOYEE) that you configured. The Operations under the selected contract box displays the Select operation you selected for the artifact on the Choose Operations page.
In the Configure the address and binding for the contract box, specify values for the following:
For the property Specify the value Binding Configuration The wizard only supports basic HTTP binding. So, the binding configuration field is automatically populated to System.ServiceModel.Configuration.BasicHttpBindingElement.
Click the ellipsis button (…) to change the properties for HTTP binding. To use a secure communication channel, you must always set the Mode property to Transport. The wizard sets the default value for the Mode property as Transport.
For more information about the other bindings exposed, see "BasicHttpBindingElement Members" at https://go.microsoft.com/fwlink/?LinkId=103773.Endpoint Name Specify an endpoint name for the contract. The other fields on this page are automatically populated based on the values you specified in the earlier pages.
Click Apply.
Note
If you do not specify any values on this page, the default values are accepted for all the contracts.
The following figure shows the Configure Service Endpoint Binding and Address page with the specified values.

On the Configure Service Endpoint Binding and Address page, click Next. The Summary page lists a tree structure of the Oracle E-Business Suite artifact and the operation selected for the artifact.
Review the summary, and then click Finish.
The wizard creates a WCF service and adds the following files to the Visual Studio project:
.svc file. This is the WCF service file. The wizard generates one file for each contract.
Web.config file.
Service code (.cs file)
Modify the .cs file
When you create a service out of an Oracle E-Business Suite artifact using the Oracle E-Business adapter and want to use it from the Business Data List Web Part in Microsoft Office SharePoint Server, you are expected to provide the full filter clause starting with the WHERE clause. For example, if you want to search for an employee who name is “John”, you need to provide the following filter clause in the Business Data List Web Part:
where NAME like ‘JOHN’
However, if you want the user to only provide the name as an input for the filter clause without actually mentioning the whole filter clause, you can add a code in the .cs file that modifies the filter clause coming in from the Business Data List Web Part in Microsoft Office SharePoint Server to pass it to Oracle E-Business in the WHERE clause format.
For example, in the case of this tutorial, if you want the user to enter an employee name in Business Data List Web Part in Microsoft Office SharePoint Server and retrieve record for that employee, you can add the following code in the .cs file:
SelectResponse InterfaceTables_FND_APPS_MS_SAMPLE_EMPLOYEE.Select(SelectRequest request)
{
     request.FILTER = "where NAME like '" + request.FILTER + "'"; // The code to avoid the users from specifying the WHERE clause in the filter from Business Data List Web Part.
     return base.Channel.Select(request);
}
Publish the WCF Service
Make sure that SSL is enabled for IIS. For instructions on how to enable SSL for IIS, see https://go.microsoft.com/fwlink/?LinkId=197170.
To publish the WCF service:
Right-click the project in Solution Explorer, and then click Publish.
In the Publish Web dialog box, specify a URL for the WCF service. For example:
https://<COMPUTER_NAME>:<PORT_NUMBER>/MS_SAMPLE_EMPLOYEE/Note
You must publish the WCF service to a SSL-enabled location. In other words, the value in the Target Location box must start with “https://”. Because the user credentials are passed in the HTTP header, the wizard automatically configured the adapter’s binding behavior to use “Transport” as the security mode, which implies SSL encryption. You can of course go back, and edit the web.config file to change the value of the <security mode> parameter, but using SSL is always a better option when you have sensitive information transported in clear text in the HTTP header.
From the Copy box, click All project files.
Click Publish.
Verify that the WCF service is published successfully.
Start the IIS Microsoft Management Console. Click Start, point to Administrative Tools, and then click Internet Information Services (IIS) Manager.
Navigate to the node where you published the service. For the MS_SAMPLE_EMPLOYEE service, navigate to Internet Information Services > <Computer Name> > Web Sites > Default Web Site > MS_SAMPLE_EMPLOYEE.
On the right pane, right-click the InterfaceTables_FND_APPS_MS_SAMPLE_EMPLOYEE.svc file, and then click Browse.
The Web page shows up with the URL for retrieving the WSDL. You may want to test metadata retrieval using the svcutil command. For example, the command to retrieve metadata for the MS_SAMPLE_EMPLOYEE service is:
svcutil.exe https://<COMPUTER_NAME>:<PORT_NUMBER>/MS_SAMPLE_EMPLOYEE/InterfaceTables_FND_APPS_MS_SAMPLE_EMPLOYEE.svc?wsdl
Next Step
To create an application definition file for the Oracle E-Business Suite artifact, use the Business Data Catalog Definition Editor. For instructions, see Step 2: Create an Application Definition File for the Oracle E-Business Suite Artifacts. The application definition file identifies where the LOB data is stored and the format in which it is stored.
See Also
Tutorial: Present Data from Oracle E-Business Suite on a SharePoint Site