Planejar a implantação do Controlador de Rede
Aplica-se a: Azure Stack HCI, versões 22H2 e 21H2; Windows Server 2022, Windows Server 2019, Windows Server 2016
Importante
O Azure Stack HCI agora faz parte do Azure Local. A renomeação da documentação do produto está em andamento. No entanto, as versões mais antigas do Azure Stack HCI, por exemplo, 22H2, continuarão a fazer referência ao Azure Stack HCI e não refletirão a alteração de nome. Saiba mais.
O planejamento da implantação do Controlador de Rede por meio do Windows Admin Center requer um conjunto de VMs (máquinas virtuais) que executam o sistema operacional Azure Stack HCI ou Windows Server. O Controlador de Rede é uma função de servidor altamente disponível e escalonável que requer um mínimo de três VMs para fornecer alta disponibilidade em sua rede.
Observação
É recomendável implantar o Controlador de Rede em suas próprias VMs dedicadas.
Requisitos do controlador de rede
O seguinte é necessário para implantar o Controlador de Rede:
Um VHD (disco rígido virtual) para o sistema operacional Azure Stack HCI criar VMs do Controlador de Rede.
Um nome de domínio e credenciais para ingressar VMs do Controlador de Rede em um domínio.
Pelo menos um comutador virtual que você configura usando o assistente de Criação de Cluster no Windows Admin Center.
Uma configuração de rede física que corresponde a uma das opções de topologia nesta seção.
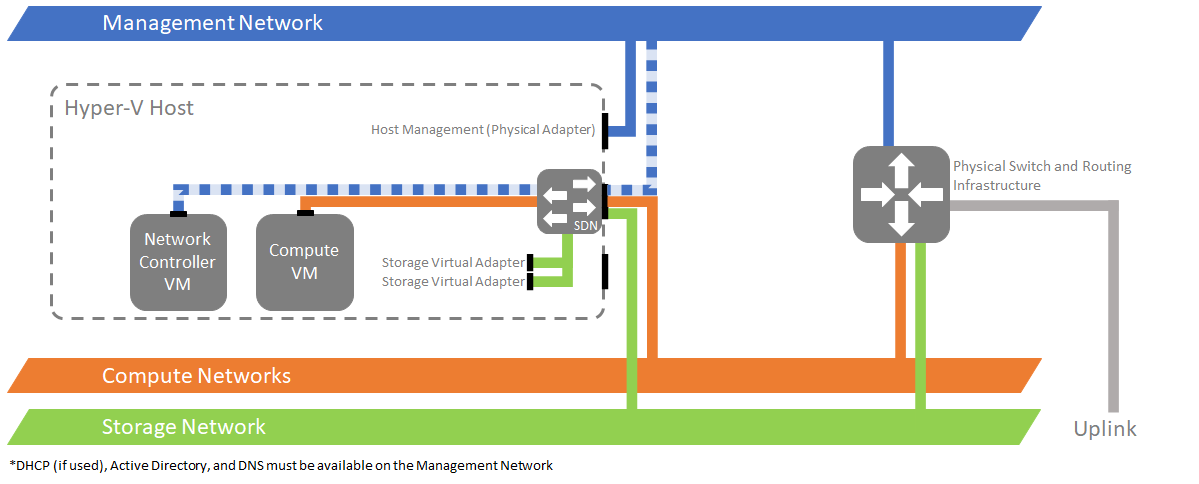
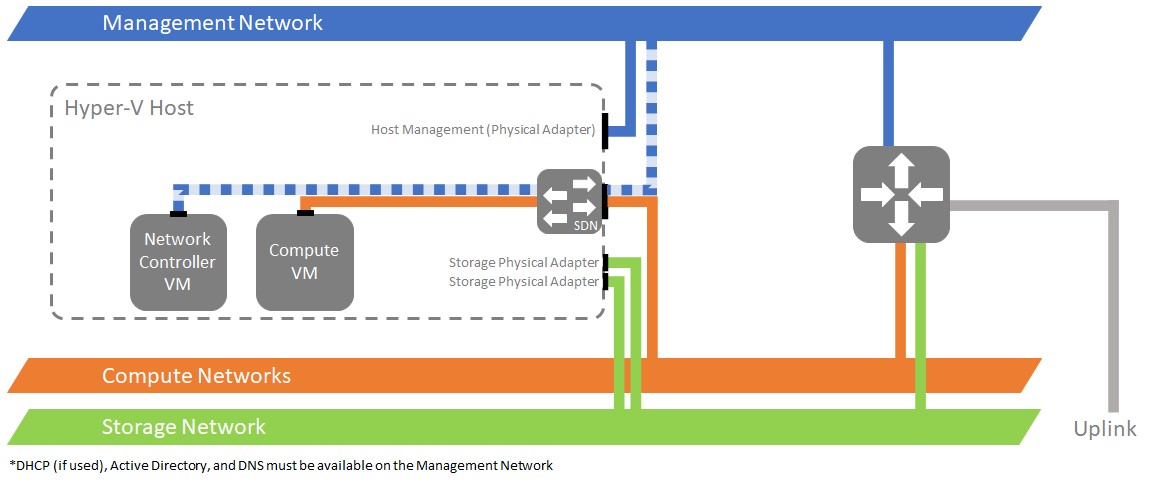
Windows Admin Center cria a configuração no host Hyper-V. No entanto, a rede de gerenciamento deve se conectar aos adaptadores físicos do host de acordo com uma das três opções a seguir:
Opção 1: A rede de gerenciamento é fisicamente separada das redes de carga de trabalho. Essa opção usa um único comutador virtual para computação e armazenamento:
Opção 2: A rede de gerenciamento é fisicamente separada das redes de carga de trabalho. Essa opção usa um único comutador virtual somente para computação:
Opção 3: A rede de gerenciamento é fisicamente separada das redes de carga de trabalho. Essa opção usa dois comutadores virtuais, um para computação e outro para armazenamento:
Você também pode agrupar os adaptadores físicos de gerenciamento para usar o mesmo comutador de gerenciamento. Nesse caso, ainda recomendamos usar uma das opções nesta seção.
Informações de rede de gerenciamento que o Controlador de Rede usa para se comunicar com Windows Admin Center e os hosts Hyper-V.
Endereçamento baseado em DHCP ou estático baseado em rede para VMs do Controlador de Rede.
O FQDN (nome de domínio totalmente qualificado) REST (Transferência de Estado Representacional) para o Controlador de Rede que os clientes de gerenciamento usam para se comunicar com o Controlador de Rede.
Observação
Windows Admin Center atualmente não dá suporte à autenticação do Controlador de Rede, seja para comunicação com clientes REST ou comunicação entre VMs do Controlador de Rede. Você pode usar a autenticação baseada em Kerberos se usar o PowerShell para implantá-la e gerenciá-la.
Atualizações dinâmicas de DNS
Você pode implantar nós de cluster do Controlador de Rede na mesma sub-rede ou em sub-redes diferentes. Se você planeja implantar nós de cluster do Controlador de Rede em sub-redes diferentes, deverá fornecer o nome DNS REST do Controlador de Rede durante o processo de implantação.
Observação
Se você implantou seus Controladores de Rede com endereços IP estáticos para seus serviços de API REST, não há necessidade de habilitar o DNS dinâmico.
Habilitar atualizações dinâmicas de DNS para uma zona
Para habilitar atualizações dinâmicas de DNS para uma zona, siga estas etapas:
- No servidor DNS, abra o console do Gerenciador DNS.
- No painel esquerdo, selecione Zonas de Pesquisa Direta.
- Clique com o botão direito do mouse na zona que hospeda o registro de nome do Controlador de Rede e clique em Propriedades.
- Na guia Geral, ao lado de Atualizações dinâmicas, selecione Somente seguro.
Restringir atualizações dinâmicas a nós do Controlador de Rede
Para restringir as atualizações dinâmicas do registro de nome do Controlador de Rede apenas aos nós do Controlador de Rede, siga estas etapas:
- No servidor DNS, abra o console do Gerenciador DNS.
- No painel esquerdo, selecione Zonas de Pesquisa Direta.
- Clique com o botão direito do mouse na zona que hospeda o registro de nome do Controlador de Rede e clique em Propriedades.
- Na guia Segurança, selecione Avançado.
- Selecione Adicionar.
- Escolha Selecionar uma entidade principal.
- Na caixa de diálogo Selecionar Usuário, Computador, Conta de Serviço ou Grupo , selecione Tipos de Objeto. Marque Computadores e clique em OK.
- Na caixa de diálogo Selecionar Usuário, Computador, Conta de Serviço ou Grupo, insira o nome do computador de um dos nós do Controlador de Rede e clique em OK.
- Em Tipo, selecione Permitir.
- Em Permissões, marque Controle Total.
- Clique em OK.
- Repita as etapas 5 a 11 para todos os computadores no cluster do Controlador de Rede.
Próximas etapas
Agora você está pronto para implantar o Controlador de Rede em VMs.


