Layout Techniques for Windows Forms Developers
 This article has a corresponding video that can be viewed here.
In a typical Windows Forms application control placement is set using the Location property, setting the X and Y sub property values. The Windows Forms designer provides a complete set of tools for aligning and sizing controls.
The WPF and Silverlight platforms are different in both available tooling and layout options.
This article will demonstrate some form layout techniques to help Windows Forms developer's make the transition to WPF or Silverlight.
We'll first lay the form out using the same familiar techniques you're used to in Windows Forms; then we'll create the form using a typical WPF & Silverlight workflow.
Table of Contents
Requirements
Please read the WPF & Silverlight Layout Controls topic.
Application
This simple Windows Forms dialog took about 90 seconds to layout. The Windows Forms designer provided excellent layout adorners to assist in aligning the controls. The Properties Window was utilized to set control anchoring and enter the Label and Button text.

This simple WPF dialog took about 90 seconds to layout. The designer provided excellent layout adorners to assist in aligning and set anchoring on the controls. The Properties Window was utilized to enter the Label and Button text.

Let's Build This Dialog in WPF
- Add a new WPF Window to the project and name it Customer.xaml
- Click the design surface outside the boundary of the Window to select the Window object
- Using the lower left resize adorner, resize the Window to 350 x 300. Notice the resize adorner labels indicate the size as you resize the Window.

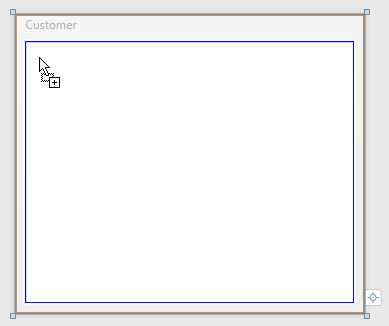
- Drag and drop a Label control from the ToolBox to the design surface inside the Window
- Notice the blue box adorner that gets displayed along with the inner area changing color to white when you drag the Label from the ToolBox. This is the Drop Target feature of the WPF and Silverlight Designer, providing you feedback where the object you are dragging can be dropped.
- After dropping the Label, move it to the upper left corner. Notice edge snap line adorners providing assistance as you get near the top and left edges.
- The number in the top left corner indicates the distance to each edge. The top right and bottom left adorners indicate how far the control is from those edges.

- With the new Label selected on the design surface, use the Properties Window to set the Label text to, First Name. In WPF and Silverlight this is accomplished by changing the Content property.

- Add a TextBox to the form
- To easily position the TextBox to line up with the Label, the text baseline adorner displays helping you line up the controls

- After moving the TextBox, the selected adorners will now display as pictured below
- The small square adorners at each corner are used to resize the TextBox
- The below TextBox is anchored left and top. This is indicated by the left and top triangles the red arrows point to. Since the left edge of the TextBox is great than a few pixels from the edge, the anchoring adorner line is displayed.
- To now anchor this TextBox to the right also, we just need to click the right circle the right red arrow points to
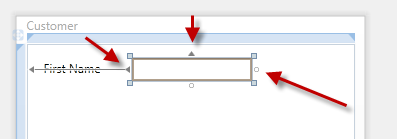
- After clicking the right circle, the right edge anchoring adorner is displayed
- Windows Forms terminology
- TextBox is anchored left, top and right
- WPF and Silverlight terminology
- TextBox has HorizontalAlignment set to Stretch and VerticalAlignment set to Top

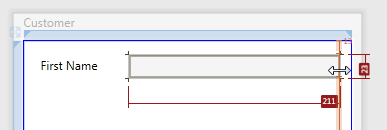
- Now resize the TextBox. When resizing, notice the right edge snap line that appears down the length of the right edge. This indicates that the control is 12px from the edge.
- Marquee select the Label and TextBox control
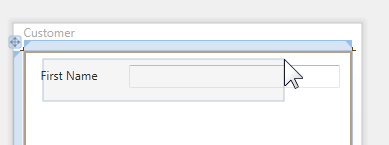
- Release the mouse and right click the selected TextBox, select Copy

- Click the inner area of the Window, right click and select Paste
- The newly pasted controls will appear on top of the existing controls
- Notice the newly pasted controls are selected

- Click and drag the TextBox down; the Label will move with the TextBox
- As you are dragging down, notice that the designer snaps at two increments, 6px and 14px. For this application, we are using 14px.
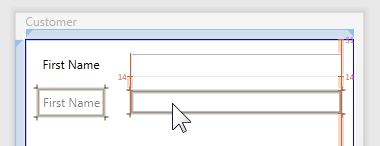
- Repeat the select, copy, paste and align action two more times
- Change the Label Content property as indicated below

- Drag and drop a RadioButton below the bottom TextBox
- Move it into the position shown below
- Notice the left control edge snap line and the control distance adorner value of 14

- Drag and drop a new Label control below the Phone Label. Move it below the Phone Label as pictured below.
- Notice the left edge snap line provides an easy guide for the left edge
- As you drag the new Label control down use the text baseline snap line of the RadioButton to align the control

- Change the new Label to read Gender and set the Content property on the RadioButton to Male
- Drag and drop a new RadioButton control to the design surface and move it into place as pictured below
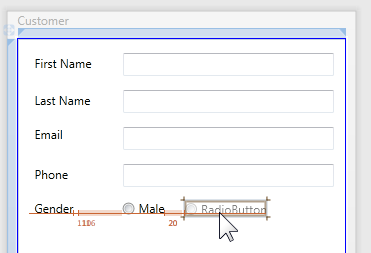
- Change the text of the new RadioButton to Female
- Add a new Button to the design surface and move it into position as shown below
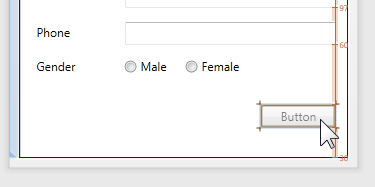
- After releasing the mouse the selection adorners will appear as pictured below
- Now anchor this button right and bottom:
- Click the left adorner, this will toggle anchor left to anchor right
- Click the top adorner, this will toggle anchor top to anchor bottom
- In WPF and Silverlight terminology the Button now has HorizontalAlignment set to Right, VerticalAlignment set to Bottom

- Copy and paste the Button, then move into the position below.
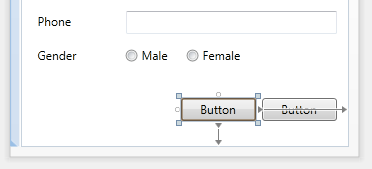
- Change the Button's text as pictured below by using the Properties Window to change the Content property of each Button.
- You can test the layout by resizing the Window control. Notice that the Buttons stay anchored to the bottom right and the TextBoxes resize with the Window.

Easily Change to a Resizable Two Column Form
Now that we see creating a form in WPF or Silverlight is very similar to the Windows Forms experience, let's look at how WPF or Silverlight easily enables making the above form a two column form. The two column form we will create will resize when the Window is resized.
Before proceeding, think about the steps you would follow using the Windows Forms platform to accomplish the task.
Under the Covers
The Windows Forms Designer persists changes to a hidden code-behind file. The WPF and Silverlight Designer persists changes to XAML. To view the created XAML you can click on the XAML View Button. The XAML View and Design View buttons are located at the bottom of the Visual Studio tab you have been working with.
If your XAML is not currently visible, click the XAML View button.

Your XAML should look similar to the below image.
What I want to point out is the second element in the XAML, the Grid.
The entire time we have been adding controls to the form, we have actually been adding them as a child of the Grid control. The Grid is one of the available layout panels.
When the Grid has no rows or columns defined, it's effectively a single cell grid, positioning its child controls using Margin, HorizontalAlignment and VerticalAlignment properties. In similar fashion, Windows Forms uses Location and Anchor properties.
I've show the Grid control here because in the next step we will being working with it.

In WPF or Silverlight the simple steps to create a two column form are:
- Click on the Design View button to bring the designer back into view
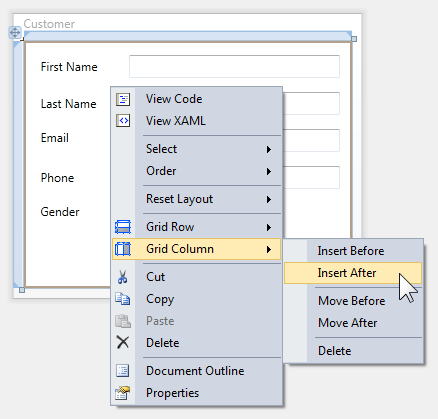
- Right click on the Grid (the area inside the Window, not occupied by a child control), select Grid Column, Insert After
- The form should now look like the below image
- The Grid Column, Insert After function adds a new column after the current column and sets its width to 126px. Notice the 126 in the right column rail adorner.
- The left column size is displayed also; 1*. Star sizing is proportional sizing and is fully explained in this article WPF & Silverlight Layout Controls.

- With the Grid selected, locate the ColumnDefinitions property in the Properties Window, and click the Collection Editor elipsis button as indicated below
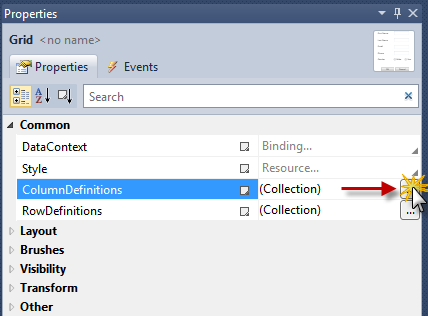
- When the Collection Editor opens:
- Select the second ColumnDefinition in the ListBox on the left
- Click the Width property Property Marker
- From the Context Menu, select Reset Value
- This will change the second column to its default value which is 1*
- Click the OK button to commit the changes
- This will effectively split the form into two proportionally spaced columns that are of equal width
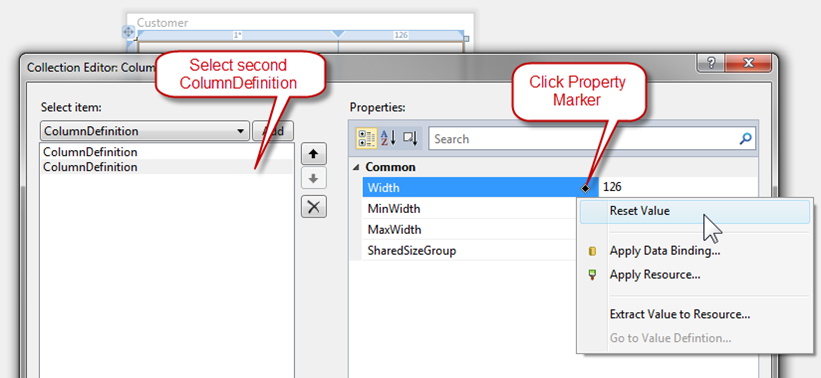
- The form now has two equal sized Star sized columns.

- Click the design surface outside the Window to select the Window. Notice the Grid's rail adorners are no longer visible and the Window resize adorners are now visible.
- Resize the Window to 600 x 300 as pictured below.

- Marquee select the first four Labels and TextBoxes and release the mouse button

- Right click the selected controls and select Copy from the Context Menu
- Right click the selected controls and select Paste from the Content Menu
- The eight controls will remain selected; now drag them into position to the right colomn
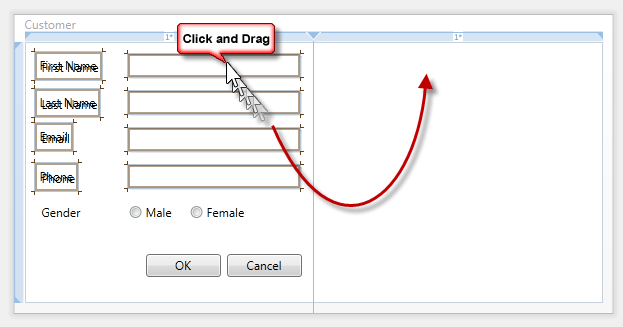
- Use the text baseline snap line to vertically align the controls as pictured below

- Change the Content property on the Label controls on the right to the values below
- Marquee select the two Buttons, drag and drop them to the below location
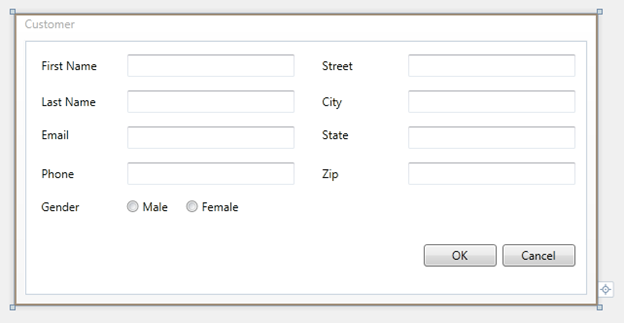
- Select the Window by clicking the design surface outside the Window boundary. Using the lower left corner resize adorner, resize the Window smaller and larger. Notice that the two columns stay the same size and the controls size to the column.
Content Based Layout
The purpose of the article is to help Windows Forms developer's make the transition to WPF or Silverlight. In the above walk-through we guided you through creating a WPF or Silverlight form using familiar form design techniques you used in Windows Forms.
Now that you have an understanding of control placement and some Grid concepts, let's walk-through building a content based layout form. This type of form is still very easy to build, it leverages more features of the Grid control and providing a layout that conforms to content as the size of that content changes at design or run-time; for example a globalized application when a different language is being used.
Again, in this next section we'll demonstrate how to easily create a form that uses content base layout instead of absolute positioning while at the same time leveraging layout techniques that are familiar to you.
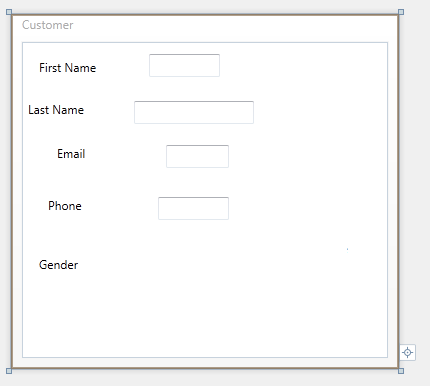
The strategy of this technique is to quickly layout, name and set the text values for your controls. When dragging a control from the ToolBox we are only concerned with positioning the control near where you want it. From the below image you can see I've paid very little attention to size or positioning.
Step One – Quick Layout
- Increase the size of the Window; this will give you more room to drag and drop controls with less precision
- Drag and drop controls onto the design surface then set their Content property for Labels
- Remember, you don't need to worry about exact positioning or sizing, now. Just lay the controls out very quickly
- We will add the two RadioButtons and two Buttons later on
Step Two – Create Rows
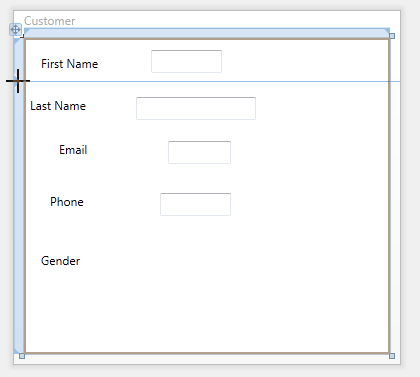
- Select the root Grid control by clicking inside its boundary

- Create your first Grid row by clicking the left Grid Rail Adorner as pictured below
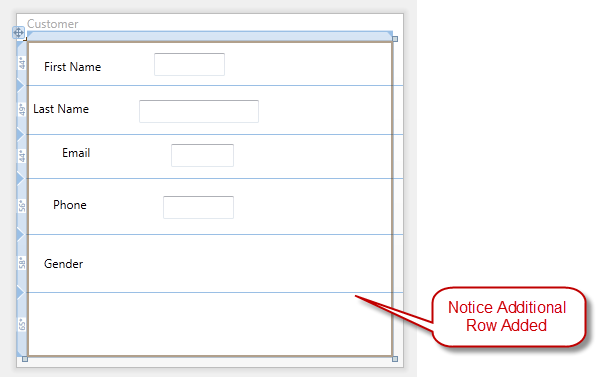
- Repeat creating the Grid rows so that your form looks like the below image
Step Three – Create Columns
- Create the columns by clicking the top Grid Rail Adorner as pictured below

Step Four – Auto Size Controls
- With the root Grid selected, press CTRL+A to select all child controls of the Grid. Optionally, you can also marquee select controls.

- Right click on one of the selected controls, from the Context Menu select, Reset Layout, All

- Your form should look similar to the below image
- What has happened to each control is:
- Margin reset to default value, 0
- VerticalAlignment reset to default, Stretch
- HorizontalAlignment reset to default, Stretch
- Size reset to default, Auto
- Notice how each control consumes the full space allocated to it by its container cell.

Step Five – Auto Size Rows
- Hover the mouse over the left Grid Rail Adorner near the numbers, a Grid Row size selector will appear
- Click Auto
- Repeat for each row except the last row
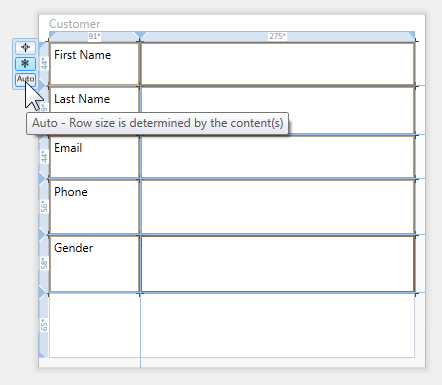
Your form should now look like the below image. You can now see why we didn't spend much time during the initial layout.
- The bottom row is Star sized. In this form it will consume all the remaining vertical space.
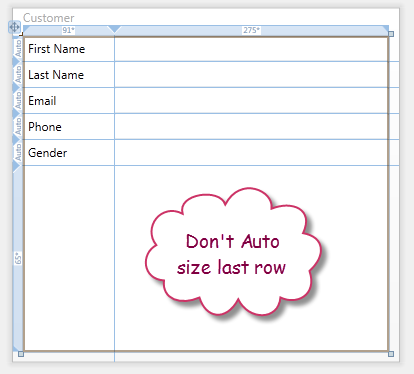
Step Six – Auto Size the First Column
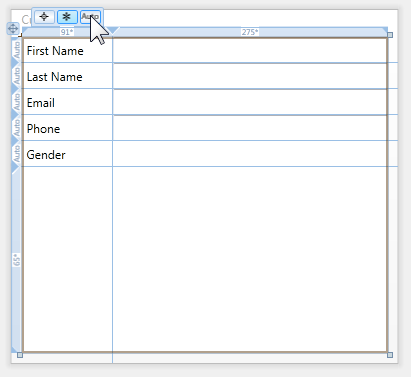
Hover the mouse over the top Grid Rail Adorner near the numbers, a Grid Column size selector will appear
Click Auto
By auto sizing the first column we are allowing the text of the Label controls to grow at run-time or design-time based on a font, font size or language change.
- Another option is to provide a fixed width of reasonable value, replace the Label controls with TextBlocks and enable text wrapping. Since the rows are auto sized, if the text does wrap the row size will automatically be increased to accommodate the increase is height.
Step Seven – Margins
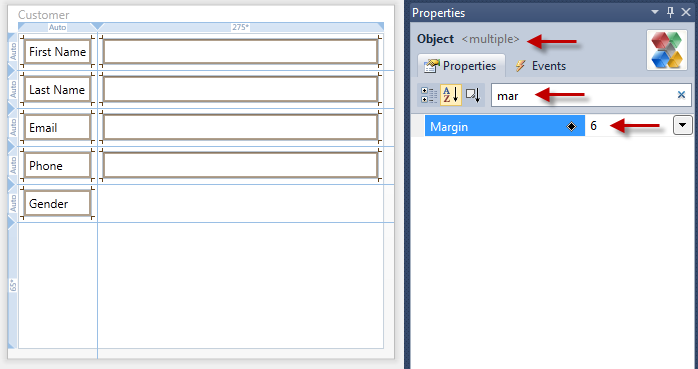
- Select all child Grid controls using CTRL+A
- Notice the Properties Window
- Top red arrow – multiple objects are now selected
- Middle red arrow – enter "mar" in the Search Box
- Bottom red arrow – enter "6" for the Margin
- On the design surface, all of the controls all have a Margin of 6.
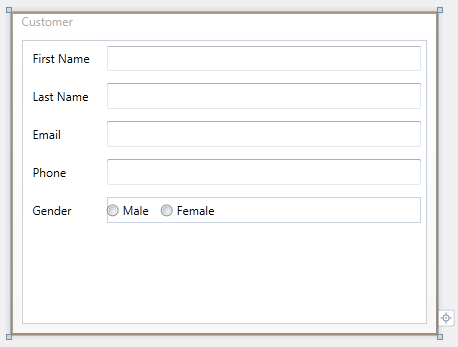
Step Eight – RadioButtons
- Click the StackPanel icon in the ToolBox, and then draw the StackPanel in the column next to the Gender Label.

- Use the Reset Layout feature for the StackPanel

- Using the Properties Window, set the following properties:
- Orientation to Horizontal
- Margin to 6

With the StackPanel selected double click on the RadioButton icon in the ToolBox to create the first RadioButton
Repeat the double click action to create the second RadioButton.
Using the Properties Window set the following RadioButton properties :
- Content property for each RadioButton to the appropriate text (Male, Female)
- Reset Height property as pictured below

- VerticalAlignment to Center
- Female RadioButton, set the Margin property to 12,0,0,0
Your form should now look like the below image
Step Nine – Add the Buttons
We will now use the Grid SharedSizeScope feature you learned about in the WPF & Silverlight Layout Controls article.
This feature enables us to ensure that the Button controls will be the same size, even if the text of one button is shorter/longer than the other Button.
- Draw a new Grid in the row below the RadioButtons
- Add a column to that Grid near the middle of the Grid
- Add a Button control to each Grid cell as in the below picture
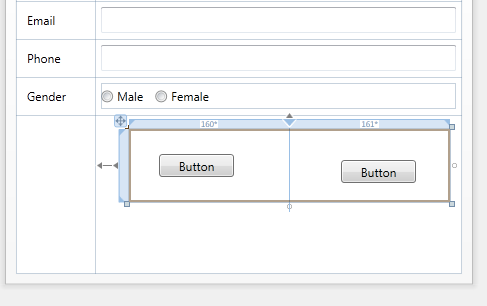
- With the new Grid selected on the design surface, switch to XAML view. Notice that the same Grid is selected in the XAML Editor for you.
- Add the attached property, Grid.IsSharedSizedScope and set its value to True.
- This attached property is currently not available in the Properties Window so we need to use the XAML Editor.

- Switch back to Design view and select the new Grid again.
- Using the Properties Window, locate the ColumnDefinitions property and click the ellipsis button to open the Collection Editor.

- For both columns, set the Width to Auto and the SharedSizeGroup to buttons
- Click OK to close the dialog and commit the changes

- On the design surface, select both Button controls in the new Grid
- Using the Properties Window, set the six properties indicated by the red arrows
- Setting the Button Padding property provides nice internal spacing between the Button's text and border.
- Your form will now look like the below image

Information |
What is the above degenerate area? The degenerate area (or degenerate zone) is an area of the Grid that remains after the last column or row. The above Grid is 300px wide, but its two columns are Auto sized only taking up about 110px total; the remaining 190px area is the degenerate area. Notice the top Grid Rail Adorner for the degenerate area does not have a number on it. This is because there really is no column there. The missing number on a Grid Rail Adorner for a row or column is a visual indicator that that row or column does not exists. |
- On the design surface, select the new Grid
- Using the Properties Window, set the five properties indicated by the red arrows
- Your form will now look like the below image

Information |
The reason we right aligned the above Grid is to anchor the Grid (and the child buttons) to the right edge of the form. If the form is resized, the Grid will stay anchored to the right edge. |
- Using the Properties Window, selected each Button and set the Content property adoringly
- Notice the buttons have the same width. This provides a nice clean look.
- Resize form to desired size.

Tip |
This is an auto sized form. Notice when you resize the forms width, the TextBoxes resize with the form. At your option, you could set a fixed width for the TextBoxes. At your option you could also set the MinWidth property on the Window or TextBoxes to prevent the user from resizing the dialog too small. |
Review
In this short article we have learned that:
- Form layout skills learned in Windows Forms transfer to WPF and Silverlight
- Absolute positioning can be used in WPF or Silverlight applications
- Adopting content based layout in WPF or Silverlight can easily be achieved by following a simple workflow:
- Roughly layout the form
- Add Grid rows and columns
- Resize Grid child controls
- Set appropriate Margins for child controls
- Add additional controls, etc.
Comments
Microsoft values your opinion about our products and documentation. In addition to your general feedback it is very helpful to understand:
- How the above features enable your workflow
- What is missing from the above features that would be helpful to you
Thank you for your feedback and have a great day,
Karl Shifflett
Expression Team
Comments
Anonymous
August 02, 2010
Very nice post!Anonymous
August 02, 2010
I don't think that the layout issues scares the Windows developers. It's the data binding which terrifies them.Anonymous
August 04, 2010
Thank you for your feedback on data binding. Do you have any specifics you can relay or is it just data binding in general? Thank you and have a super day, KarlAnonymous
August 15, 2010
Excellent video post. Thanks for this.Anonymous
August 16, 2010
Girish, Thank you for leaving a comment and glad you liked the post and video. Cheers, Karl