Publishing Virtual Applications in Windows Virtual PC
Windows® Virtual PC (WVPC) provides a feature called virtual applications, using which you can access applications running in a Virtual Machine (VM) seamlessly from Windows® 7 host Start menu. These applications get added to the host start menu automatically upon installing inside the VM using a feature called Auto Publish.
Preparing a VM for Auto Publish
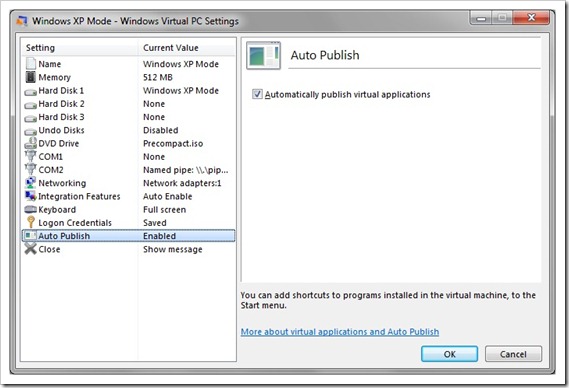
For a Windows based VM (XP SP3 and higher versions), you need to install “Update for Windows® XP SP3 or above to enable RemoteApp™” or “Update for Windows® Vista SP1 or above to enable RemoteApp™” inside the VM. Windows® XP mode VHD has this package preinstalled. Also, you need to ensure auto-publishing is enabled in the virtual machine settings. Open ‘Virtual Machines’ folder and select the VM à right click à settings à Auto Publish.
Fig. 1. Enabling Auto Publish using WVPC settings dialog
Publishing an application
By default, applications installed under ‘All users’ profile are auto-published to the Windows 7 host. So, if an application has created its shortcuts in ‘All users’ profile, no action is required from user. There are applications which don’t install for “All users” and get installed for current user only. Follow the steps as below to publish such applications
- Click on the Start Menu button
- Right Click on Programs
- Click open. You'll see the start menu open up as a folder. This is the start menu folder in the user's profile
- You will see the application folder/shortcut appearing here. Copy that folder/shortcut (Ctrl+C)
- Right Click on programs again and then Click on "Open All Users"
- Now paste the above folder/ application shortcut to this folder (“All users” start menu)
- In a few moments the application will get published to the host start menu
Let’s take an example for publishing command prompt. To publish it simply create a new shortcut to cmd.exe at "C:\Documents and Settings\All Users\Start Menu\Programs" inside the VM. That is all you need to do for publishing the command prompt (Fig 2).
Fig. 2. Adding a virtual application (cmd.exe) to All User programs folder to Auto Publish it
Using this shortcut, now you can launch any application inside VM as remote app or install new applications.
Controlling publishing
Though auto-publishing works totally automatically, with virtually no user intervention required; there are ways in which publishing can be controlled.
Exclude List
You may want some applications that you install in the guest to not get published to the host Start menu. For this we maintain a list inside the guest registry called the “Exclude List” . This list contains full paths of applications that we do not want to publish to the host start menu. The Exclude List is present in the guest registry at HLKM\Software\Microsoft\Windows NT\CurrentVersion\Virtual Machine\VPCVAppExcludeList.
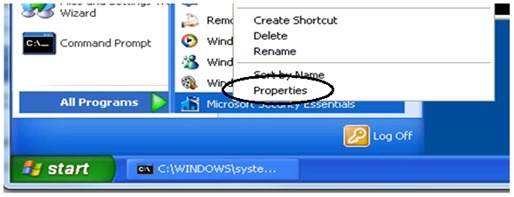
This is illustrated by an example below (Fig 3). For example you install Microsoft Security Essentials (https://www.microsoft.com/security_essentials/ ) to secure your VM. This would publish the anti-virus’s UI to the host start menu which you might not want. You need to add this application to the exclude list. This is illustrated below.
1. Right-click on the Microsoft Security Essentials® shortcut on the Start menu and click on properties
Fig. 3. Microsoft Security Essentials dialog
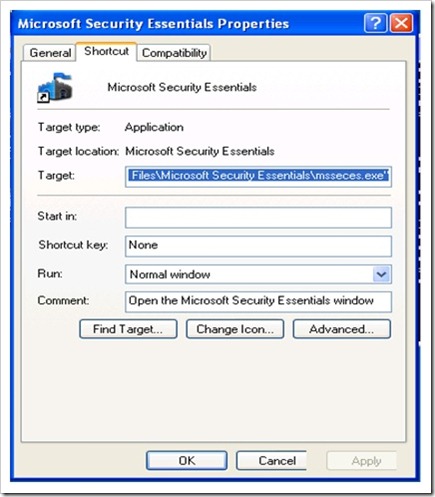
2. Retrieve the full path of the application.
Fig 4. Retrieving the application path for adding it to the Exclude list
3. Add this path to the exclude list (remember to get rid of the quotes) and restart the guest.
Fig 5. Using Exclude list to prevent a virtual application from getting Auto published
4. Consequently you may want some application which is present in the All-User’s start menu but did not get published. These are windows default application which we have excluded by default. For that just delete the entry of that application from the exclude list and restart the guest. For example for publishing the XP MSPaint.exe to Windows 7 start menu, just delete the mspaint.exe entry from the exclude list.
5. Restart the Virtual Machine.
Manual publishing
Another way you can control the applications that get published to the host Start menu is through manual publishing. Here, the user disables auto-publishing and takes total control of what gets published to the host start menu. This is very useful for IT-Administrators who want to restrict applications that get published, irrespective of the number of applications that the user installs inside the guest.
Steps to manually publish the applications
Applications that get published to the host Start menu have an entry in the guest registry which is managed by the WMI class Win32_TSPublishedApplication. Scripting can be used to manipulate this WMI class to manually publish and unpublish application. This is illustrated below.
- Shutdown the VM. Disable the Auto Publishing setting and then restart the VM.
- Log in to the virtual machine as an administrator.
- Install the application
- Save the following VBScript to a .vbs file and execute it.
- Do remember to replace the “App Name” with the name of the application and “App Path” with the full application path.
- If you run it on a Vista on Windows 7 Virtual Machine, then run in on an elevated command prompt.
    1: '******************************************************
    2: 'Declare the variables to be used in the script
    3: '******************************************************
    4: strComputer = "."
    5: strNamespace = "\root\cimv2\TerminalServices"
    6: 'Replace "App Name" with the application Name.
    7: appName = "App Name"
    8: 'Replace "App Path" with the full application path.
    9: appPath = " App Path"
   10: '*******************************************************
   11: 'Create a unique ID for the app entry in the allow list.
   12: '*******************************************************
   13:
   14: set x = createobject("Scriptlet.TypeLib")
   15: strNewGuid=Mid(x.GUID,2,8)
   16:
   17: Set objSWbemServices = GetObject("winmgmts:\\" & strComputer & strNamespace)
   18: Set objSWbemObject = objSWbemServices.Get("Win32_TSPublishedApplication")
   19: Set objNewSWbemObject = objSWbemObject.SpawnInstance_()
   20:
   21: '***************************************************************************************
   22: 'Set the various properties for the application to be added
   23: '***************************************************************************************
   24:
   25: objNewSWbemObject.Properties_.Item("Name") = appName
   26: objNewSWbemObject.Properties_.Item("Alias") = strNewGuid
   27: objNewSWbemObject.Properties_.Item("Path") = appPath
   28: objNewSWbemObject.Properties_.Item("PathExists") = "true"
   29: objNewSWbemObject.Properties_.Item("CommandLineSetting") = "1"
   30: objNewSWbemObject.Properties_.Item("RequiredCommandLine") = ""
   31: objNewSWbemObject.Properties_.Item("IconIndex") = "0"
   32: objNewSWbemObject.Properties_.Item("IconPath") = appPath
   33: objNewSWbemObject.Properties_.Item("VPath") = appPath
   34: objNewSWbemObject.Properties_.Item("ShowInPortal") = "0"
   35:
   36: '*******************************************
   37: 'Add the application entry
   38: '*******************************************
   39: objNewSWbemObject.Put_
7. Restart the guest.
Note: - This is an indicative script and you might have to customize it according to your requirements. E.g., if the icon is not present in the executable file itself but is part of some other file, then that file path needs to be provided for the value of “IconPath”. Details of the various fields can be found at https://msdn.microsoft.com/en-us/library/bb736365(VS.85).aspx .
Steps to manually unpublish the applications
Similarly, you can manually unpublish an application using the following script.
    1: '******************************************************
    2: 'Declare the variables to be used in the script
    3: '******************************************************
    4: strComputer = "."
    5: strNamespace = "\root\cimv2\TerminalServices"
    6: 'Replace "App Name" with the application Name.
    7: appName = "App Name"
    8:
    9: strQuery = "Select * From Win32_TSPublishedApplication  WHERE Name='" & appName & "'"
   10: Set objSWbemServices = GetObject("winmgmts:\\" & strComputer & strNamespace)
   11:
   12: Set colItems = objSWbemServices.ExecQuery _
   13:     (strQuery)
   14: For Each objItem in ColItems
   15:         objItem.Delete_
   16: Next
To remove all the virtual applications, use the modified script below:
    1: '******************************************************
    2: 'Declare the variables to be used in the script
    3: '******************************************************
    4: strComputer = "."
    5: strNamespace = "\root\cimv2\TerminalServices"
    6:
    7: strQuery = "Select * From Win32_TSPublishedApplication"
    8: Set objSWbemServices = GetObject("winmgmts:\\" & strComputer & strNamespace)
    9:
   10: Set colItems = objSWbemServices.ExecQuery _
   11:     (strQuery)
   12: For Each objItem in ColItems
   13:         objItem.Delete_
   14: Next
Another way to do the same is through WMI management tools like wbemtest.exe or WMI Administrator tools (https://www.microsoft.com/downloads/details.aspx?familyid=6430F853-1120-48DB-8CC5-F2ABDC3ED314&displaylang=en ).
Using these tools, you can list the instances of the class Win32_TSPublishedApplication in the namespace root\cimv2\TerminalServices and then delete one or more of the instances to manually unpublish those applications. This is illustrated here https://technet.microsoft.com/en-us/library/cc738926(WS.10).aspx
Check out Windows XP Mode RTM Build today, and let us know what you think, either via the comments section here, or sharing your feedback on the WVPC and Windows XP Mode Forum on Technet here.
Technorati Tags: Windows 7,Windows Virtual PC,Windows XP Mode,Application Compatibility,Windows Upgrade,VPC,VHD,VM,Virtual Machine,Virtualization,Virtual applications
Palash Kar
SDE
Microsoft Virtualization Team
Comments
Anonymous
November 04, 2009
Please update Virtual PC to not require processor virtualization.Anonymous
November 27, 2009
Excellent Tutorial. Many thanks for the input.Anonymous
January 28, 2010
Window Virtual PC and Window Virtual xp modeAnonymous
March 01, 2011
Is there a way to "script it" so that you can control/customize how the published app starts...? I.e ...start app with terminal services disabled.... wait 10 seconds...then start terminal services? Such a script would be awesome for apps that complain about legacy apps that complain about terminal services at startup but don't otherwise have an issue with having them running post startup.... (P.s. I need this :) )Anonymous
March 16, 2011
Or failing this even simply opening a Virtual App with integration features off would be nice. i.E as even if you set integration features to be disabled at start-up on your VM. Running any virtual application from the Win7 start menu automatically ignores this and proceeds to enable integration features any way! Bad news if you disabled them because the application will not run other wise :)......:(Anonymous
August 03, 2011
While is says in many places that virtual apps with a Windows 7 guest, the auto publish is disabled and it says it isn't supported if the guest is Windows 7 Pro.Anonymous
November 19, 2011
how do you publish it from a windows 7 utlimate guest? the shortcuts never appear on the host even if pucblishing is enabled and the host is windows 7 ultimate...Anonymous
September 16, 2014
This worked.
Thanks a lot.


