Using database in Windows Store apps (I)
Author: Aaron Xue
Introduction
There are lots of discussions about using database in Windows Store apps in MSDN forum. These discussions mainly focus on the usage of SQL database. Based on this scenario, we developed a series of articles along with sample code and demos used to demonstrate how to access both local database and remote database.
This topic consists of four categories as below.
- Overview of main approaches to access database in Windows Store apps.
- How to access local database:
- How to use SQLite for Windows Runtime and how to use sqlite-net library to manipulate SQLite database.
- How to use Extensible Storage Engine (ESE) or known as JET APIs.
- How to use WCF to access database in Windows Store apps.
- How to access remote database.
First, we talk about how to access local database in Windows Store apps. SQLite would be a good choice.
What is SQLite?
SQLite is a relational database management system contained in a small Cprogramming library. In contrast to other database management systems, SQLite is not a separate process that is accessed from the client application, but an integral part of it. SQLite's functionality through simple function calls, which reduce latency in database access. SQLite stores the entire database as a single cross-platform file on a host machine.[1] These features make SQLite to be efficient and easy to backup.
Please note: SQLite doesn’t support all the SQL features. The following features are not supported in SQLite.[2]
- RIGHT JOIN and FULL JOIN
- Complete ALTER TABLE support
- Complete trigger support
- Writing to VIEWs
- GRANT and REVOKE
[1].SQLite Wikipedia:https://en.wikipedia.org/wiki/Sqlite
[2].SQL features that SQLite do not implement:https://www.sqlite.org/omitted.html
Including SQLite in the app
SQLite team has made a VS extension called SQLite for Windows Runtime.
Please refer to:
https://www.sqlite.org/download.html
Then we will get a VSIX file which is a extension of Visual Studio. After installing the VSIX file, right click on our application and select Add reference:
We will see SQLite for Windows Runtime. Please select both C++ runtime package and SQLite package. SQLite need a runtime environment so that it can pass WACK.
After finishing the step, the SQLite will exist in a sqlite3.dll file. If we want to use it in C# we have to use P/Invoke to get the methods in dll. That’s a lot of works. We recommend using sqlite-net. This is a open source, light-weighted library which makes .Net platform to manipulate SQLite database. We can get sqlite-net via Nuget.
In Tools menu, select as follows:
Then, input in the console:
We will get these two files:
The files call dll methods using P/Invoke and package them into asynchronous methods. We will give some samples to show how to use the async methods.
Usage of SQLite-net
Create table:
I prepare to create 2 tables as the following charts show:
Persons table:
Orders table:
XAML:
<common:LayoutAwarePage
x:Name="pageRoot"
x:Class="App1.BasicPage1"
DataContext="{Binding DefaultViewModel, RelativeSource={RelativeSource Self}}"
xmlns="https://schemas.microsoft.com/winfx/2006/xaml/presentation"
xmlns:x="https://schemas.microsoft.com/winfx/2006/xaml"
xmlns:local="using:App1"
xmlns:common="using:App1.Common"
xmlns:d="https://schemas.microsoft.com/expression/blend/2008"
xmlns:mc="https://schemas.openxmlformats.org/markup-compatibility/2006"
mc:Ignorable="d"
>
<Grid Background="{StaticResource ApplicationPageBackgroundThemeBrush}">
<Grid.ColumnDefinitions>
<ColumnDefinition Width="*" />
<ColumnDefinition Width="*" />
</Grid.ColumnDefinitions>
<Grid.RowDefinitions>
<RowDefinition Height="*" />
<RowDefinition Height="100" />
<RowDefinition Height="200" />
</Grid.RowDefinitions>
<ListView Name="lv1" Grid.Row="0" Grid.Column="0">
<ListView.ItemTemplate>
<DataTemplate>
<StackPanel Orientation="Horizontal">
<StackPanel.Resources>
<Style TargetType="TextBlock">
<Setter Property="Width" Value="150" />
<Setter Property="TextAlignment" Value="Left" />
</Style>
</StackPanel.Resources>
<TextBlock Width="50" Text="{Binding ID_P}" />
<TextBlock Text="{Binding FirstName}" />
<TextBlock Text="{Binding LastName}" />
<TextBlock Text="{Binding Address}" />
<TextBlock Text="{Binding City}" />
</StackPanel>
</DataTemplate>
</ListView.ItemTemplate>
</ListView>
<ListView Name="lv2" Grid.Row="0" Grid.Column="1">
<ListView.ItemTemplate>
<DataTemplate>
<StackPanel Orientation="Horizontal">
<StackPanel.Resources>
<Style TargetType="TextBlock">
<Setter Property="Width" Value="150" />
<Setter Property="TextAlignment" Value="Left" />
</Style>
</StackPanel.Resources>
<TextBlock Width="50" Text="{Binding ID_O}" />
<TextBlock Text="{Binding OrderNo}" />
<TextBlock Text="{Binding ID_P}" />
</StackPanel>
</DataTemplate>
</ListView.ItemTemplate>
</ListView>
<StackPanel Grid.Row="1" Grid.Column="0" Grid.ColumnSpan="2" Orientation="Horizontal" HorizontalAlignment="Left">
<Button Content="Add 1 line" Click="Button_Click_1" />
<Button Content="Update" Click="Button_Click_2" />
<Button Content="SQL query" Click="Button_Click_3" />
</StackPanel>
<ListView Grid.Row="2" Grid.Column="0" Name="lv3">
<ListView.ItemTemplate>
<DataTemplate>
<StackPanel Orientation="Horizontal">
<StackPanel.Resources>
<Style TargetType="TextBlock">
<Setter Property="Width" Value="150" />
<Setter Property="TextAlignment" Value="Left" />
</Style>
</StackPanel.Resources>
<TextBlock Width="50" Text="{Binding ID_P}" />
<TextBlock Text="{Binding FirstName}" />
<TextBlock Text="{Binding LastName}" />
<TextBlock Text="{Binding Address}" />
<TextBlock Text="{Binding City}" />
</StackPanel>
</DataTemplate>
</ListView.ItemTemplate>
</ListView>
<ListView Grid.Row="2" Grid.Column="1" Name="lv4">
<ListView.ItemTemplate>
<DataTemplate>
<StackPanel Orientation="Horizontal">
<StackPanel.Resources>
<Style TargetType="TextBlock">
<Setter Property="Width" Value="150" />
<Setter Property="TextAlignment" Value="Left" />
</Style>
</StackPanel.Resources>
<TextBlock Text="{Binding FirstName}" />
<TextBlock Text="{Binding LastName}" />
<TextBlock Text="{Binding OrderNo}" />
</StackPanel>
</DataTemplate>
</ListView.ItemTemplate>
</ListView>
</Grid>
</common:LayoutAwarePage>
Here are 4 ListView controls, lv1 is used for showing Persons table, lv2 is used for showing Orders table, lv3 is used for showing result1, lv4 is used for showing result2.
C#:
SQLiteAsyncConnection conn;
List<Persons> re1;
List<Orders> re2;
public BasicPage1()
{
this.InitializeComponent();
ConnData();
InitData();
}
private void ConnData()
{
var dbPath = Path.Combine(Windows.Storage.ApplicationData.Current.LocalFolder.Path, "db.sqlite");
conn = new SQLite.SQLiteAsyncConnection(dbPath);
}
private async void InitData()
{
var result = await conn.CreateTablesAsync<Persons, Orders>();
List<Persons> persons = new List<Persons>()
{
new Persons(){FirstName="Adams",LastName="John",Address="Oxford Street",City="London"},
new Persons(){FirstName="Bush",LastName="George",Address="Fifth Avenue",City="New York"},
new Persons(){FirstName="Carter",LastName="Thomas",Address="Changan Street",City="Beijing"}
};
List<Orders> orders = new List<Orders>()
{
new Orders(){OrderNo="77895",ID_P=3},
new Orders(){OrderNo="44678",ID_P=3},
new Orders(){OrderNo="22456",ID_P=1},
new Orders(){OrderNo="24562",ID_P=1},
new Orders(){OrderNo="34764",ID_P=65}
};
await conn.InsertAllAsync(persons);
await conn.InsertAllAsync(orders);
var qu1 = conn.Table<Persons>();
re1 = await qu1.ToListAsync();
this.lv1.ItemsSource = re1;
var qu2 = conn.Table<Orders>();
re2 = await qu2.ToListAsync();
this.lv2.ItemsSource = re2;
}
If the database does not exist, SQLite will create a new one.
Please note:
Why should the database be located in the Application data locations?
Windows Store app is running in a sandbox, there are restrict of reading and writing files. If you’re going through the Task Manager, you will find a process named RuntimeBroker. This process is responsible for checking if Windows Store app behaves as it declares. We can access files from Application data locations directly. So, if you want to create a database, it should be located in AppData folder.
We are using the method SQLiteAsyncConnection. InsertAllAsync(). The method can insert a collection which contains some customized class into related table. It will check the class of the object and decide which table should be inserted into.
We use SQLiteAsyncConnection.Table<T>() to get the whole table and the data in table. T is the class of table. Then using AsyncQueryTable.ToListAsync() to convert the result into List<T> to display the data.
Result:
Insert one record:
We call InsertAsync() method:
private async void Button_Click_1(object sender, RoutedEventArgs e)
{
await conn.InsertAsync(new Persons() { FirstName = "Aaron", LastName = "Xue", Address = "MinHang", City = "Shanghai" });
var qu = conn.Table<Persons>();
var re = await qu.ToListAsync();
this.lv3.ItemsSource = re;
}
Result:
Update data in table:
We use ExcuteAsync() method. The method will return a integer which means the rows affected by the SQL statement.
private async void Button_Click_2(object sender, RoutedEventArgs e)
{
string city="Shanghai";
int i = await conn.ExecuteAsync("UPDATE Persons SET City=? WHERE FirstName='Bush'", city);
var qu = conn.Table<Persons>();
var re = await qu.ToListAsync();
this.lv3.ItemsSource = re;
}
Result:
Now, let’s try to use a little complex SQL statement.
For example:
SELECT Persons.FirstName,Persons.LastName,Orders.OrderNo FROM Persons LEFT JOIN Orders ON Persons.ID_P=Orders.ID_P ORDER BY Persons.FirstName
Code:
private async void Button_Click_3(object sender, RoutedEventArgs e)
{
List<Result> re = await conn.QueryAsync<Result>("SELECT Persons.FirstName,Persons.LastName,Orders.OrderNo FROM Persons LEFT JOIN Orders ON Persons.ID_P=Orders.ID_P ORDER BY Persons.FirstName");
this.lv4.ItemsSource = re;
}
Please note:
Here we are using QueryAsync instead ExcuteAsync() or ExcuteScalarAsync(). Because ExcuteAsync() do not return result and ExcuteScalarAsync() can only return scalar result such as “int”,”string” etc.
QueryAsync<T> will pass a class using T and the return is List<T>. That’s a great help for us to use or to display the result.
Result:
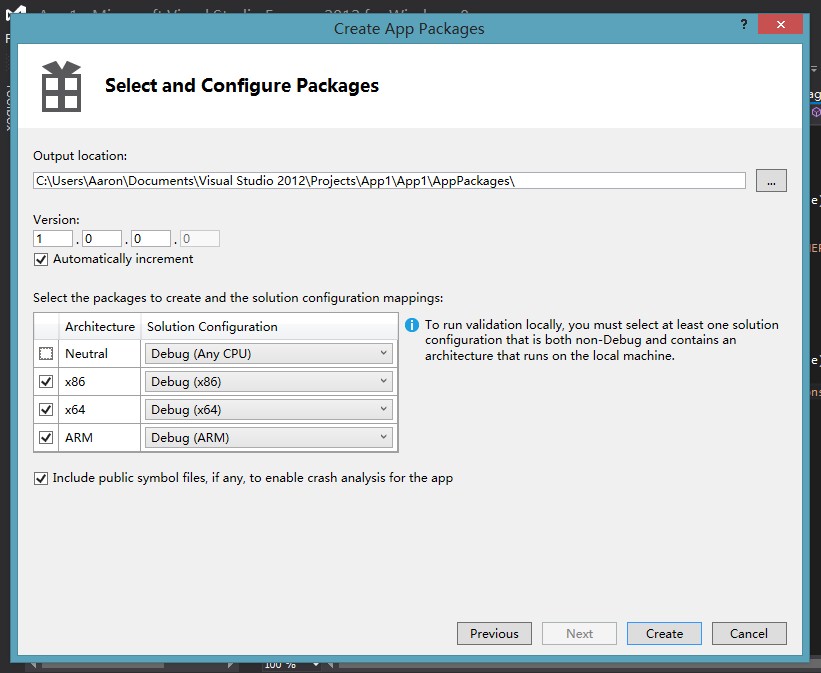
Package application
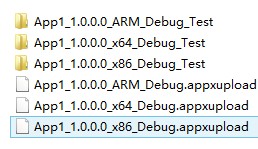
We have already added SQLite for Windows Runtime and C++ Runtime. So the application can’t be architecture neutral(We can’t select Any CPU). We have to create 3 version of application (x86,x64,ARM), VS will help us to finish the job.
Just select 3 version, then we will get:
WACK(Windows App Cert Kit) result
The result is Pass.
You could download the sourcode via SkyDrive
https://skydrive.live.com/redir?resid=AF599C8D7F814B07!272&authkey=!AIR_ivlJjBHGCW8
Finally, thanks for the great help of Tim Heuer’s blog.
Comments
Anonymous
January 09, 2013
This was way too helpful. I was just searching for DB related stuff in <a href="http://thedroidcity.com">Android</a>. This was out of context, but still solved my issue.Anonymous
January 12, 2013
Hi,I download your sourcode,but it can't run.There is a exception:Could not open database file.Please help me,Thank you !Anonymous
January 13, 2013
The possibile reason is that the database path contains Chinese characters which can’t be recognized by SQLite. You can try to convert it into Unicode manually and then rebuild the project.Anonymous
January 14, 2013
how convert it into Unicode manually?Anonymous
January 14, 2013
The same question ,the database path contains Chinese characters,then can't be recognized by SQLite .How to solve? Thank you!Anonymous
January 14, 2013
Hi All, Sorry, I can't find a good solution to translate the characters programmatically, so we have to translate it manually. Please find the AppData folder path via Windows.Storage.ApplicationData.Current.LocalFolder.Path For example, my path is: string path = @"C:Usersv-axueAppDataLocalPackages411dc642-5c9d-4e96-a33e-6cc73caffbd6_jq6xpzdywz9kjLocalState"; If there is any Chinese characters in the path, please replace it with unicode manually. For example: If there is "用户" in it, replace it with "用户" You could get Unicode using the following code: var pathTemp =Encoding.Unicode.GetBytes("用户"); char[] pathUniChars = new char[Encoding.Unicode.GetCharCount(pathTemp)]; pathUniChars=Encoding.Unicode.GetChars(pathTemp); string str = new string(pathUniChars); The issue seems to be a by-design issue of SQLite for WinRT. It only occurs when we are preparing to send the path to sqlite.dll. If so, that would be a big possibility that the SQLite for WinRT can't support Chinese in manipulating the data via SQL statements. If there is anything wrong, or you have a better idea, please feel free to tell me. That would be a great help. AaronAnonymous
January 28, 2013
The comment has been removedAnonymous
April 05, 2013
Where do I unzip the SQLite to? When I go to "add Reference" the "SQLite for windows runtime" doesn't show up. If I do a browse, none of the files are of the correct file type.Anonymous
April 22, 2013
SQLite is useless since it crashes when account name contains non-ASCII characters. Is this serious bug already fixed?Anonymous
May 16, 2013
So, is there anywhere a tutorial like this for Visual Basic developers? I only find C# samples and tutorials. Just the thought of the language gives me a headache. Sorry C# developers. But I'm pretty sure that there are many VB developers out there that would love a great tutorial in VB.Anonymous
February 12, 2014
I already installed and added references for Sqlite with my windows phone 8 project, when i tried to build the project a got this build error "The type or namespace name 'Community' could not be found (are you missing a using directive or an assembly reference?)". any help?Anonymous
February 17, 2014
“ a series of articles ” ? where can I find the topic on 1,2b,3,4 as you suggested ?(while current post only focus on 2a sqlite)Anonymous
February 22, 2014
SQLLite does not work for SQL Server! Connecting to a webservice to run your database queries does not work for a Windows Store app if you plan to deploy it to whom ever decides to download the app. Using a webservice means that the person who buys your app would also need to go find your webservice somewhere and then install it too. It is absolutely ridiculous that you can't access SQL Server directly from a Windows Store app and the person who left System.Data (or an alternative) out should be canned.Anonymous
April 08, 2014
I dont know why Microsoft has created everything soo different and hard for windows store apps . it is not easy to use !! not at all .. this is the reason why all the developers run from windows app development..Anonymous
October 08, 2014
You said in the first part of your aticle, "How to use WCF to access database in Windows Store apps" where are the follow up articles that discuss about that?Anonymous
March 21, 2015
The comment has been removed


