Migrating your Windows Azure SQL Database Using Data-Tier Application Framework (DacFX) Technology
This blog post will cover how to migrate your Windows Azure SQL Database (formerly “SQL Azure”) from Windows Azure onto a local SQL Server (box product) using Data-Tier Application Framework (DACFx) Technology and SQL Server Management Studio 2012. Since DACFx is shipped with SQL Server Management Studio 2012 you can download both at no cost. This blog will show you how to use the Windows Azure Portal to export a Data-Tier Application logical backup file (BACPAC ) and how to use SQL Server Management Studio 2012 to import that backup file into a local SQL Server instance.
The reasons for moving from Azure to a local SQL Server instance vary greatly, the most common reason is for testing or development, where you want to test changes locally on SQL Express without affecting your live database. You can also move an Azure SQL Database to a SQL Server instance running in a Windows Azure virtual machine.
About Data-Tier Application Framework Packages
DACFx technology can be used to create two different types of packages:
- DACPAC Packages with the .dacpac extension currently contain only the database schema, including tables, stored procedures, logins, functions, etc.
- BACPAC Packages with the .bacpac extension contain both the database schema and data.
Picking the Right Tools
To migrate your database with data & schema, you need have a tool to import a BACPAC package. SQL Server Management Studio 2012 can import BACPAC files and it contains other features for Azure that you will want to take advantage of. SQL Server Management Studio 2008 R2 (the older version of SQL Server Management Studio) cannot import a BACPAC. If you are running SQL Server 2008 R2 you can download SQL Server Management Studio 2012 at no charge, install it side by side with SQL Server 2008 R2, and it will work with your SQL Server 2008 R2 instance. For these reasons, this blog post shows how to use SQL Server Management Studio 2012, the newest version of SQL Server Management Studio.
Creating a Copy of a Your Windows Azure Database
A BACPAC is a logical backup and does not guarantee transactional consistency. That means if users are writing to your database while the export is taking place, the resulting BACPAC will contain inconsistent data--for example broken foreign key references. Therefore, you need to first create a copy of your database then run the export from the copy.
Here is how to create a copy of your database:
Connect to your Windows Azure SQL Database server using SQL Server Management Studio.
Select the database you want to export in the Object Explorer, right click and choose from the drop down New Query.
In the query window type:
CREATE DATABASE <destination_database_name> AS COPY OF <source_database_name>
When you execute this command it will return immediately, however Windows Azure Data will still be executing the copy in the background. You can monitor the copy process by using the sys.dm_database_copies and sys.databases views. Issue the following T-SQL:
SELECT * FROM sys.dm_database_copies;
SELECT state_desc, * FROM sys.databases
Once the copy completes you can use the destination database as the source for the creation of the BACPAC. While the BACPAC is generating don’t execute any INSERTS, UPDATES, or DELETES against it.
For more information see Copying Databases in Windows Azure SQL Database
Create a BACPAC backup file sing the Windows Azure Portal
The Windows Azure Portal allows you to create a BACPAC; however, it will not output the package to your local hard drive, instead it writes it to Windows Azure Blob Storage. From Windows Azure Blob Storage, that package can be downloaded on to your local drive and then imported to an on-premise SQL Server.
Steps for creating a BACPAC from the Windows Azure Portal
Login To Windows Azure Portal
Click on the Hosted Services, Storage Accounts & CDN Button on the lower right.
Once loaded, click on Storage Accounts in the left top navigation.
In the main view, choose a subscription and either use an existing Windows Azure storage account or create a new Windows Azure storage account. For better performance, make sure that the Windows Azure storage account is in the same region as your Azure database. Copy the access key where you can get at them later (use notepad) and also the Blob Url to your storage account.
You must also create a container inside the selected Blob storage for your BACPAC files by using a tool such as Azure Storage Explorer. So install this (or another Blob storage tool) and create a container, for this example we are using a container named: dac.
Now click on the Database button on the lower right.
In the database main view of the Windows Azure Portal, navigate to the subscription that hosts your database, then to the server and finally click on the copied version of the database from the steps above.
In the top toolbar click the Export button.
Fill out the Export Database to Storage Account dialog.
The Login for the Database Export Settings should be your admin login for your database.
The Password for the Database Export Settings should be your admin password for your Azure SQL Database.
The New Blob URL for Table Storage Account should be the Blob Url that you noted down in step 4. Prefix with https://, concatenated with a container name and a file name for the location of the BACPAC. There must be a container, you can’t put the file in the root. There must be a file name, something like this:
https://myblobstorage.blob.core.windows.net/dac/exportedfile.bacpac
Double check your blob url and make sure you do not have any spaces, uppercase letters, or special characters in the blob url. Take a minute to get it right and it will save you a lot of frustration.
The Access key for Table Storage Account should be the access key that you saved in step 4.
The process of creating the BACPAC is submitting asynchronously. You will get an immediate message that your job has been submitted to the queue. Then it can take a few minutes to several hours for the export to complete.
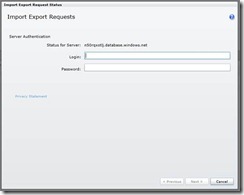
To check the status, click on the server name in the right hand window and then the status button in the top toolbar. Now fill out the dialog with your Windows Azure SQL Database admin login and password.
If you have done everything correctly, you should see a success message when the BACPAC is finished. You can follow the status of the BACPAC being generated; note that the last update column in the status dialog is UTC.
Importing a BACPAC into SQL Server
Now that you have your BACPAC generated via the Windows Azure Portal, you can deploy (or import) it into your on-premise SQL Server using SQL Server Management Studio 2012
Here are the steps:
Download and install SQL Server Management Studio 2012, you can side-by-side install this with SQL Server 2008 R2 if you want.
Open SQL Server Management Studio 2012 and connect to the SQL Server where you want your data to be imported.
In the object explorer right click on Databases and choose Import Data-Tier Application.
Click next to get to the second step in the wizard screen. There you have two choices: use a BACPAC from the disk, or download one directly from Windows Azure Blob storage. Since our package is on Blob Storage, let’s download from there. On the Import Settings page of the wizard, select the Import from Windows Azure radio button.
Another dialog will appear to collect your connection information. Enter in your storage account name on Windows Azure Storage where the BACPAC was placed and the Windows Azure Storage Account Key (Primary Access Key). Then click Connect.
SQL Server Management Studio 2012 will traverse and find your BACPAC, if it doesn’t find the right one, use the Container and File name drop downs to choose the Data-Tier application package you want to install. Click the Next button on the Import Setting page.
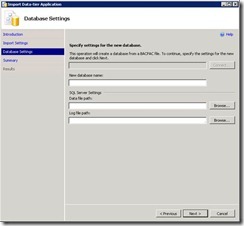
The next page of the wizard is the Database Settings. Here you can enter your database name, the location of the database data file and transaction log files. Then click the Next button.
Review the summary page and click the Finish button.
In the Results page, the BACPAC will download from Windows Azure, a database will be created, and your schema, data, stored procedures, etc will be imported into the new database.
More Fun…
Your BACPAC from Windows Azure blob storage was downloaded into the Temporary location specified in the Import Settings page. You can save that package off for a backup of your database. Another fun thing to do is rename the extension from .bacpac to .zip, then open it up and look at the Xml files inside. But note that editing the XML files directly is not supported and your package may be rejected by the tools if you make any changes to the XML.
Summary
With the Window Azure Portal, you can easily create a Data-Tier Application logical backup package (BACPAC), store it to your Windows Azure Blog Storage; and then, using SQL Server Management Studio 2012, you can import that package to your local database server.
{6230289B-5BEE-409e-932A-2F01FA407A92}
Comments
Anonymous
September 12, 2012
Thanks for thisAnonymous
April 30, 2014
I have the tools installed everyone says to install, I am running SQL Server 2012. I am still getting the error when following the same steps listed here trying to import a .bacpac file. Odd part is everyone I work with has no issues running the same versions of the same software. Ideas??Anonymous
August 27, 2014
The comment has been removed
![clip_image001[4] clip_image001[4]](https://msdntnarchive.z22.web.core.windows.net/media/MSDNBlogsFS/prod.evol.blogs.msdn.com/CommunityServer.Blogs.Components.WeblogFiles/00/00/01/55/35/metablogapi/1768.clip_image0014_thumb_65F4C22A.png)
![clip_image002[4] clip_image002[4]](https://msdntnarchive.z22.web.core.windows.net/media/MSDNBlogsFS/prod.evol.blogs.msdn.com/CommunityServer.Blogs.Components.WeblogFiles/00/00/01/55/35/metablogapi/3581.clip_image0024_thumb_6DEC648C.png)
![clip_image003[4] clip_image003[4]](https://msdntnarchive.z22.web.core.windows.net/media/MSDNBlogsFS/prod.evol.blogs.msdn.com/CommunityServer.Blogs.Components.WeblogFiles/00/00/01/55/35/metablogapi/1351.clip_image0034_thumb_3DA58FD6.png)
![clip_image005[4] clip_image005[4]](https://msdntnarchive.z22.web.core.windows.net/media/MSDNBlogsFS/prod.evol.blogs.msdn.com/CommunityServer.Blogs.Components.WeblogFiles/00/00/01/55/35/metablogapi/1348.clip_image0054_thumb_3F565BAA.jpg)
![clip_image001[6] clip_image001[6]](https://msdntnarchive.z22.web.core.windows.net/media/MSDNBlogsFS/prod.evol.blogs.msdn.com/CommunityServer.Blogs.Components.WeblogFiles/00/00/01/55/35/metablogapi/3021.clip_image0016_thumb_6122343B.png)

![clip_image005[6] clip_image005[6]](https://msdntnarchive.z22.web.core.windows.net/media/MSDNBlogsFS/prod.evol.blogs.msdn.com/CommunityServer.Blogs.Components.WeblogFiles/00/00/01/55/35/metablogapi/8371.clip_image0056_thumb_0432A5AC.jpg)
![clip_image001[8] clip_image001[8]](https://msdntnarchive.z22.web.core.windows.net/media/MSDNBlogsFS/prod.evol.blogs.msdn.com/CommunityServer.Blogs.Components.WeblogFiles/00/00/01/55/35/metablogapi/8863.clip_image0018_thumb_49B7A5D7.png)
![clip_image003[4] clip_image003[4]](https://msdntnarchive.z22.web.core.windows.net/media/MSDNBlogsFS/prod.evol.blogs.msdn.com/CommunityServer.Blogs.Components.WeblogFiles/00/00/01/55/35/metablogapi/7282.clip_image0034_thumb_2240D96D.jpg)

