Customize DLP – Built-In, Export, Import and create a new rule
Some customers have asked me how to customize built-in DLP rules and if it’s possible to export all the rules from their Office 365 tenants. Yes! That’s possible. You have some rules for the most-common sensitive information types, but sometimes you want to adjust something or even create a new one to meet your organization’s specific needs.
I am going to show you here how to Export, import built-in rules and how to create a new custom rule using your own XML files.
Export the XML
You can export your rules from your tenant. If you don’t have a customized rule, you are going to see only the “Microsoft Rule Package”.
First, connect to the Exchange Online PowerShell:
$Cred = Get-Credential
$Session = New-PSSession -ConfigurationName Microsoft.Exchange -ConnectionUri https://ps.outlook.com/powershell/ -Credential $Cred -Authentication Basic –AllowRedirection
Import-PSSession $SessionJust to check, you can list existing rules by typing:
Get-ClassificationRuleCollection

In my example, I have the default one and a Fingerprint rule that I uploaded before.
Store the rules in a variable:
$ruleCollections = Get-ClassificationRuleCollection
Writes all the content to the XML file:
Set-Content -path "C:\custompath\exportedRules.xml" -Encoding Byte -Value $ruleCollections.SerializedClassificationRuleCollection
You can check the exported content to understand the structure. I recommend you to use an XML editor:

Edit the XML file
Now you have the entire rule collection exported. It contains all default and customized rules (if you have one). You can check what you want to modify, if needed. This file can be used as a sample file to build your next DLP rules for your company.
The most important part in this file is the biggest one, the <Rules> part. For example, the Credit Card example below.

You might want to modify some parts, for example that requires corroborative evidence with different or additional keyword, adjust values such as proximity, add your own keywords etc.
Note: You will need to generate two GUIDs for your new rule (one for the rule package and one to replace the GUID used in the exported rule). You can create a new GUID in several ways, but you can use the PowerShell to simplify this task just typing [guid]::NewGuid() or if you want to create more than one you can use 1..4 | % {new-guid} , where 4 is the max number of GUIDs you want to create.
PowerShell References:
PowerTip: Create a New GUID by Using PowerShell
https://blogs.technet.microsoft.com/heyscriptingguy/2013/07/25/powertip-create-a-new-guid-by-using-powershell/
PowerTip: Use PowerShell to Create New GUID
https://blogs.technet.microsoft.com/heyscriptingguy/2015/09/10/powertip-use-powershell-to-create-new-guid/
Upload your new Rule
After the modifications you will need to upload your new rule. You can do this using PowerShell connected to Exchange Online.
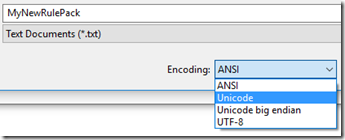
First, save the file as XML ( use Unicode encoding – you need to use this encode to works)

Connect to Exchange Online Shell (explained earlier)
In the Exchange Shell Online, type:
New-ClassificationRuleCollection -FileData (Get-Content -Path "C:\custompath\MyNewRulePack.xml" -Encoding Byte)

Run Get-DataClassification to retrieve the rule created
Remove Classification Rule Collection
If you want to remove this Classification Rule Collection you have created, you must type:
Remove-ClassificationRuleCollection -Identity "My New RulePack"
Creating a DLP policy and add the Rule created
Let’s now add the Classification Rule Collection we have created to a new policy.
First, you need to create a new DLP policy, for example:
New-DlpPolicy -Name "My New RulePack" -State Enabled -Description "My New Rule Pack - Contoso" -Mode Enforce
You can check your DLP policy by typing:
Get-DlpPolicy -Identity "My New RulePack"

Or go to Exchange admin center > data loss prevention:

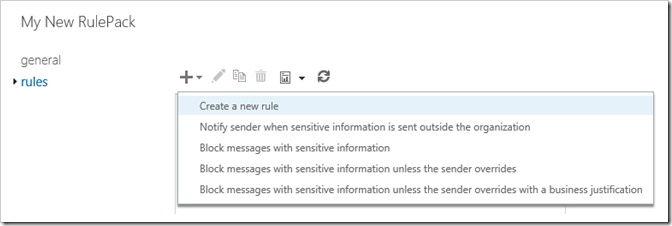
Click to edit and go to rules. Select Create a new rule:

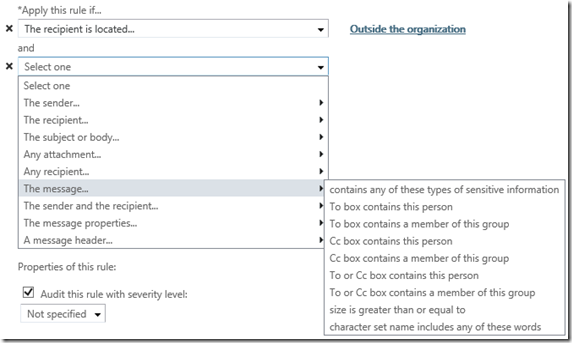
Let’s use an example here if the recipient is located Outside the organization and the message contains any of these types of sensitive information.

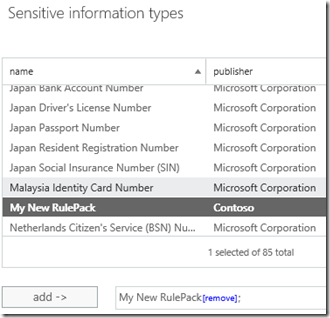
Now, select your rule pack created earlier and click to add.

Conclusion
You could read in this article how to export, import your custom rule and how to associate this to a new DLP Policy. You can edit your XML to add keywords and regular expressions to meet your organization’s specific needs. At the end you can test this rule sending an email to a recipient located outside your organization.
Reference:
Customize the built-in DLP sensitive information types
https://technet.microsoft.com/en-us/library/dn781122%28v=exchg.150%29.aspx?f=255&MSPPError=-2147217396
Comments
- Anonymous
November 23, 2016
Great article Tiago, it is very important tip about DLP Rules. You Rock.- Anonymous
November 24, 2016
Thank you for your comment Flavio!! :)
- Anonymous
- Anonymous
November 24, 2016
The article is very useful. Thanks a lot!- Anonymous
November 24, 2016
Hi Braz! Thank you so much! :)
- Anonymous
- Anonymous
November 24, 2016
Great Job Tiago, thanks for sharing this import subject!!!- Anonymous
November 24, 2016
Thank you Vanderson!!!
- Anonymous