Video Blogging with Javascript and the Media Web Part
 Hi there, Mihai Coman here. I’m a new Program Manager on the SharePoint Designer team.
Over the last couple of weeks you’ve gotten a better idea of some of the new capabilities of SharePoint Designer. There’s a ton of new features and UI components to play with, from Content Type workflows to XLV to summary pages . But if you’re like me, you’re probably itching to get your hands dirty and see how everything fits together. What better way to scratch that itch than with a practical project?
We’re not going to work on just any old project here. In this entry I’m going to teach you how to use the new Media Web Part, Asset Library, and a few lines of Javascript to add video functionality to SharePoint’s built-in Blog template. I won’t be going in depth on anything but the SPD aspect of all this – expect to see a full treatment of SharePoint’s new video functionality soon on the SharePoint Blog.
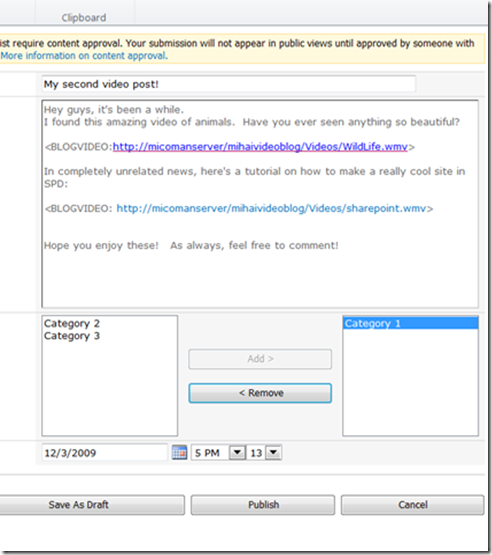
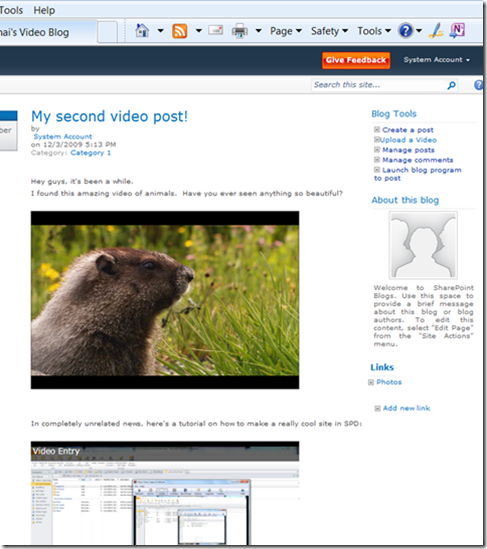
So why would you want to be able to include videos in your blog posts? Perhaps you found a great music video online that you want to share with your readers. Or perhaps you want your readers to see you playing an acoustic version of that same song. Better yet, perhaps you want your readers to play the two videos side by side so they can see that you’ve hit the notes dead on. You’ll obviously need a place to upload videos and a way to specify what video(s) you want and where you want them to play in each blog entry. Here’s how it might work:
It’s very simple. First, you click the new “Upload a Video” button in the Blog Tools pane on the upper right side of the main page (see above screenshot). After uploading your videos, you click “Manage Videos,” copy the addresses of the newly uploaded videos and include them anywhere in your blog post using the tag <BLOGVIDEO: video URL> . When you publish your entry, the videos show up in the right places throughout your entry.
So how much work would it be to implement this? Surprisingly little. You’ll need a MOSS server with the “Publishing” feature activated. Starting with SharePoint’s blog template, you’ll simply add an Asset Library, import a Javascript file, and add less than 10 lines of code to your Master Page. Most of the work is done by the new Media Web Part and its createMediaPlayer method. The following will be split into four sections – the first three outline library setup, page setup, and introduce the createMediaPlayer method. The fourth section explains some of the provided code that ties it all together – you’re free to skip it if you’re not the curious type.
Let’s get started!
Setting up the Asset Library
First things first. Our solution builds on top of SharePoint’s built-in Blog template so we’ll need to start with that. Create a new sub-site using the Blog template and name it whatever you want. I named mine “Mihai’s Video Blog.” I assume you won’t need instructions for this part – if you do, use the experience as a chance to get acquainted with SharePoint’s new browser interface.
Now we’re going to need a place to store the videos that we use. A new kind of document library called an Asset Library is going to provide that storage. Open up your site in SPD, click on Lists and Libraries in the Navigation pane, and from the Document Library button in the Ribbon, choose Asset Library (Figure 1). Name your new library “Videos.”
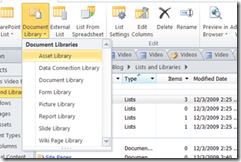
Figure 1

Figure 2
In the summary window for the Videos library, remove the Audio, Image, and Folder content types by highlighting each and pressing the “Delete” key (Figure 2). Now, in the same window, click “Edit List Columns.” Delete most of the fields listed so that you’re left with a listing similar to that of Figure 3.
The All-Important createMediaPlayer Method
Now for an aside. If you learn anything from today’s blog entry, I hope it’s this. This method of the Media Web Part does the bulk of the heavy lifting in the remainder of our project.
mediaPlayer.createMediaPlayer( videoHolder, videoHolder.id, '400px', '266px', { displayMode: 'Inline', mediaTitle: 'Video Entry', mediaSource: videoURL, previewImageSource:'', autoPlay: false, loop: true, mediaFileExtensions:'wmv;wma;avi;mpg;mp3;', silverlightMediaExtensions:'wmv;wma;mp3;' } ); |
If ever you want to insert a Media Player into any section of a SharePoint page, you simply include this script anywhere on the page with the appropriate videoHolder and videoURL parameters. VideoHolder should be a reference to the page element that will hold the player (any div, for instance), and videoURL should be an absolute or relative URL to a video.
Why would you need to type code to use the Media Web Part when you can just insert it into a page through the browser? The answer involves added functionality. Although you can set up the Media Web Part in the browser and specify a file to play, without Javascript and the createMediaPlayer function you won’t be able to:
- Dynamically set what file the Media Player loads (based perhaps on page parameters and content)
- Automatically create additional media player web parts like, say, one for every place where you want to include a video in your blog post.
We’ll need to have both of these abilities for our video blog. Keep reading to see how we do it.
Inserting Javascript into the Page
Back to work. Our storage solution is set but we’ll need some way of displaying uploaded videos in our blog entries. We’ll also need a quick way of uploading videos so that we’re not forced to navigate to SharePoint’s “All Site Content” section every time.
This is where Javascript comes in handy.
We’re going to split the Javascript code into two pieces: a major one that’s going to live in a standalone .js file in the Site Assets folder, and a minor one that’s going to go in our Mater Page. The former does all of the heavy lifting – it’ll be thoroughly explained, while the latter simply calls functions in the other.
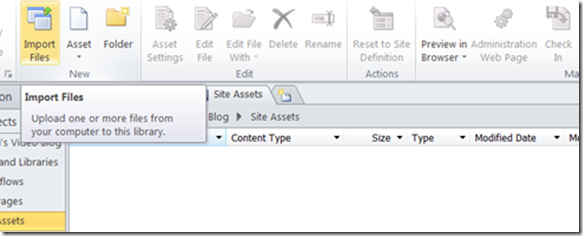
First let’s get the major file onto our site. Start by downloading this to your computer. Click on Site Assets in the Navigation pane, then click on Import Files in the ribbon (Figure 4). In the dialog box that opens, click “Add” and choose videoBlog.js from your computer. Click “OK.” Done! In case you’re curious: there is no standard for where Javascript files go. You could very well have placed this file under “Site Pages” instead.
Now we’re going to stick the “minor” snippet of Javascript into the Blog site’s Master Page. Since all pages on the site use the same Master Page, the Javascript will be run upon loading any page. If for some reason you decided not to edit the Master Page, you would have to insert this script into the site’s “default.aspx” file and into several views of the Posts list. Click on “Master Pages” in the Navigation pane, right click on v4.master, and choose “Edit File in Advanced Mode.” V4.master is the Master Page that implements SharePoint’s fancy new web interface, including the top page ribbon, new color scheme, sidebar, and so on.
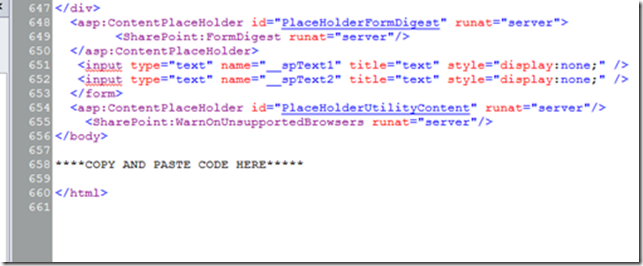
In Code View, scroll to the very bottom of the page and insert the following lines of code right above the final </html> statement. Figure 5 shows you exactly where. Then hit Save and click “yes” when you are prompted whether you want to modify the page from the site definition. All this means is that SharePoint will store the Master Page somewhere else under the hood.
That wasn’t too bad, was it? The first four lines simply link to Javascript resources. The first allows us to use the JQuery library (which we need later for selecting elements by class name), the second and third are simply the file we imported earlier (but with different relative paths so that both default.aspx and other pages can reach it), and the fourth is the Javascript file that the Media Web Part needs to run. You’ll always need to include that last one if you’re going to use the createMediaPlayer method. The code ends with two simple function calls. The first calls a function in our imported Javascript file that creates links to upload and manage videos in the “Blog Tools” sidebar section (since that sidebar is a non-customizable Web Part), and the second calls a function that inserts videos wherever you specify in your blog entries.
That’s it! You’re actually done. When you browse to your blog now, you should be able to click the new “Upload Video” link in the Blog Tools pane to upload each video you want. After they’re uploaded, you’ll click “Manage Videos,” copy the appropriate URLs and paste them anywhere in your blog entries by using the <BLOGVIDEO: Video URL Here> tag. Your new blog entries will show up with the appropriate videos in place of these tags.
How Does It Work?
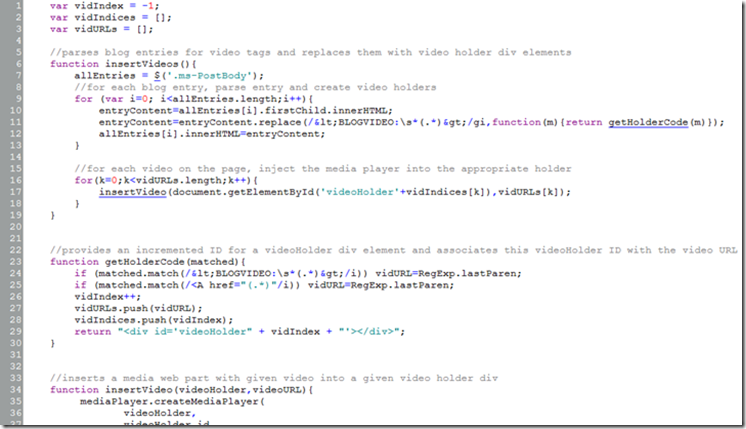
You didn’t think I would just leave you wondering how it all worked, did you? Of course not. Before wrapping up, I’ll explain how the insertVideos function inside videoBlog.js does its magic. Below is some code from videoBlog.js and an explanation.
I admit, it’s a little more intimidating. But don’t worry, it’s easy to understand. I’ve split the code into three sections in the screenshot above, each of which is explained below.
1. The insertVideos function starts by using JQuery selector syntax to get a list of all the blog entries on the page – all of these have the class name “ms-PostBody.” We use JQuery because Javascript has no built-in functionality for finding elements solely by class. For each of those blog entries, it then uses a Javascript regular expression to find any text of the form <BLOGVIDEO: some URL> and replaces it with an HTML div element of the form “<div id=’videoHolderX’>”, where X is some number. Remember how the createMediaPlayer method took arguments for videoURL and video holder? In the end, by associating the replaced video URL with a uniquely IDed div, we’ll be able to insert each media player in the correct location within the blog entry. This is all implemented by the replace method on line 11 which takes as its first argument the string to search for and as its second argument the replacing string. In our case, we don’t have an exact string to search for - we only know that we need something of the form <BLOGVIDEO: some URL> – thus we use a regular expression. I won’t go into how the regular expression works, but you can find a great tutorial at https://javascriptkit.com/jsref/regexp.shtml. As I suggested above, we also don’t know the exact string we want to replace our matches with since we need a different number at the end of each div ID of the form videoHolderX. That’s why, for each match, the function getHolderCode gets called.
2. getHolderCode’s job in this process is to increment the vidIndex global variable (thus setting X in “videoHolderX” to a unique value) and to associate this index value with the parsed URL of the video by storing the two in the global variables vidIndices and vidURLs. You’ll notice on line 23 that the argument “matched” is passed in. Each time getHolderCode is called, this argument holds a match of the form <BLOGVIDEO: some URL>. The next two lines parse the match again to get the URL within, accounting for the fact that SharePoint saves working URLs as links, making it necessary for us to also find strings of the form <BLOGVIDEO:<A href=”someURL”… >…>. Each line makes use of the RegExp object’s lastParen property, which extracts the last sub-expression in parentheses from the match (in our case, the URL we need). The next few lines save the extracted videoURL and the associated ID, and return the “incremented” replacing text.
3. Once every <BLOGVIDEO> tag on the page has been replaced with a <div id=’videoHolderX’> element and the changes have been saved to the page (line 12), the function loops through every video, passing its URL and a reference to the matching video holder div to a function that further passes them to the createMediaPlayer method (which I covered at the beginning of this entry).
And that’s how you convert your regular old blog into a video blog. I won’t get into how I modified the Blog Tool links, tweaks for non-IE browsers, or more efficient (but messier) parsing methods. Feel free to discuss these or ask specific questions. For the time being, enjoy your video blog and, until next time, have fun playing with SharePoint Designer!
Comments
Anonymous
December 11, 2009
Thanks Mihai, Very informative. I'm gonna go vlog now!Anonymous
December 14, 2009
Excellent, This post comes very handy. thank you.Anonymous
December 15, 2009
Will there be any further development/bug fixes for SharePoint Designer 2007? While 2010 looks great, in the real world, I doubt if more than 50% of 2007 farms will be upgraded by mid-2011.Anonymous
December 16, 2009
is this possible in the previous version on Sharepoint?Anonymous
December 16, 2009
Hi, this sounds too interesting! a must try... but i hav some other issue at this moment... We have used MOSS 2007, and used Sharepoint designer to design the workflows. The workflow worked fine for around 7 months, but suddenly when the approvers click on the link which is provided in the default mailer for approving a request, they face an error page which gives the following error: 'No item exists at http://xxsomeurlxxx.aspx. It may have been deleted or renamed by another user. ' Where as the record can still be found in the list. Please help ! our support team says that Sharepoint designer silently reformats the code ! is this true?? Please help !!..thnxAnonymous
January 06, 2010
Hi Orchid, I would suggest asking your question on the SP Workflow forum here: http://social.msdn.microsoft.com/Forums/en-US/sharepointworkflow/threads Best, KolbyAnonymous
January 07, 2010
The comment has been removedAnonymous
January 17, 2010
The comment has been removedAnonymous
March 04, 2010
Hi Mihai Great post do you think it could works if i don't have a Moss version I tried to do it i followed your doc but the link doesn't appear Do youhave any idee Thanks for your help.Anonymous
August 06, 2010
I am trying to pull the following file to complete my Video Blogging, this is very cool stuff, but the attachment cannot be found: Start by downloading this to your computer, with the following reference: blogs.msdn.com/.../9935950.ashx Does anyone have this handy? Please and thank you! ...RyanphAnonymous
September 19, 2011
Also, the download reference not working. Too bad, looks promising!Anonymous
September 26, 2011
This worked just as you said. Thanks for the great post. I have it working for videos, but it doesn't work for sound files (Media Failed to Load). Do you expect that it would work for mp3 files as well?Anonymous
November 07, 2011
Does this work with 2010? (and with MP3's?)Anonymous
November 11, 2011
Awesome, thanks a ton. This is great stuff!Anonymous
November 14, 2011
This is a great article thanks. It appears for me this is limited to only working in IE9. Is there any way to make this work for other browsers, like FireFox, IE8, Chrome, Safari etc?Anonymous
February 03, 2012
Thanks for the post, this is great. I have one issue where users with read only access don't see the video player. I've made sure to checkin and approve the master page so I'm not sure what's causing it. ThanksAnonymous
March 01, 2012
I can't get to the javascript: "First let’s get the major file onto our site. Start by downloading this to your computer." It send me to an error page? Where can I get this file? Thanks.Anonymous
March 02, 2012
Found it.... var vidIndex = -1; var vidIndices = []; var vidURLs = []; //parses blog entries for video tags and replaces them with video holder div elements function insertVideos(){ allEntries = $('.ms-PostBody'); //for each blog entry, parse entry and create video holders for (var i=0; i<allEntries.length;i++){ entryContent=allEntries[i].firstChild.innerHTML; entryContent=entryContent.replace(/<BLOGVIDEO:s*(.)>/gi,function(m){return getHolderCode(m)}); allEntries[i].innerHTML=entryContent; } //for each video on the page, inject the media player into the appropriate holder for(k=0;k<vidURLs.length;k++){ insertVideo(document.getElementById('videoHolder'+vidIndices[k]),vidURLs[k]); } } //provides an incremented ID for a videoHolder div element and associates this videoHolder ID with the video URL function getHolderCode(matched){ if (matched.match(/<BLOGVIDEO:s(.)>/i)) vidURL=RegExp.lastParen; if (matched.match(/<A href="(.)"/i)) vidURL=RegExp.lastParen; vidIndex++; vidURLs.push(vidURL); vidIndices.push(vidIndex); return "<div id='videoHolder" + vidIndex + "'></div>"; } //inserts a media web part with given video into a given video holder div function insertVideo(videoHolder,videoURL){ mediaPlayer.createMediaPlayer( videoHolder, videoHolder.id, '400px', '266px', { displayMode:'Inline', mediaTitle:'Video Entry', mediaSource:videoURL, previewImageSource:'', autoPlay:false, loop:true, mediaFileExtensions:'wmv;wma;avi;mpg;mp3;', silverlightMediaExtensions:'wmv;wma;mp3;' } ); } //inserts links to upload video and manage videos into the Blog Tools web part function createUploadVideoLink(){ blogTools = $('.ms-blogAdminLinks')[0]; newItem = blogTools.childNodes[0].cloneNode(true); newItem2=blogTools.childNodes[1].cloneNode(true); newItem.childNodes[0].childNodes[0].onclick = function(){ShowPopupDialog('Videos/Forms/Upload.aspx?Source=Videos/Forms/Thumbnails.aspx/')}; newItem.childNodes[1].href="javascript: ShowPopupDialog('Videos/Forms/Upload.aspx?Source=Videos/Forms/Thumbnails.aspx/')"; newItem.childNodes[1].innerHTML="Upload a Video"; blogTools.insertBefore(newItem,blogTools.childNodes[1]); newItem2.childNodes[1].href="Videos/Forms/Thumbnails.aspx?Source=Videos/Forms/Thumbnails.aspx"; newItem2.childNodes[0].childNodes[0].href="Videos/Forms/Thumbnails.aspx?Source=Videos/Forms/Thumbnails.aspx"; newItem2.childNodes[1].innerHTML="Manage Videos"; blogTools.insertBefore(newItem2,blogTools.childNodes[2]); }Anonymous
March 02, 2012
Got it working, but it's al ittle quirky with SPD 2010... Also, when the 'upload video' pop-up runs, it sometimes stays all greyed out. It's easier to go to the video library and upload the video there directly. Thanks for the post!Anonymous
April 08, 2012
Nice post I got it working but sometimes the Upload Video button opens a grayed out pop up. Is there a resolution for this? Thanks for sharing!!!!!Anonymous
April 18, 2012
The comment has been removedAnonymous
June 27, 2012
Great work..... It worked for me but only i e 7/8 but is there a way that we can make it work for safari/chrome/firefox. Thanks kamsAnonymous
July 25, 2012
Yes, Users with Vistors permission cannot view this video. What permission do they needed? Do I have to give Contribute permission? But this is not what I want to. Please advice. Thanks.Anonymous
August 02, 2012
Did this work on SharePoint Foundation ?Anonymous
October 09, 2012
This works great on SharePoint Server. I have only one question. How do you add Preview Image to the Video? Thanks
