Project 2010: Introducing Web Based Project Editing
Have you ever wanted to make edits to a project plan far away from your desktop installation of Project? Perhaps you were in a meeting and pulled up Project Web Access to show project status but hoped to capture updates directly in PWA as the meeting progressed. Maybe you have multiple stakeholders on a plan who want the ability to add tasks even if they aren’t responsible for the entire project schedule and don’t have Project on their desktop.
Hi, I’m Pat Malatack and today I’ll be introducing you to a new feature in Project Server 2010, web based project editing in Project Web Access (PWA). With this feature, these requests and many others will become a distant memory. Project Server 2010 enables the ability to create projects, edit the plan, assign resources to tasks, and publish the plan, all from the comfort and convenience of your browser. In Project Server 2010 you can expect to edit projects large and small on the server. Additionally, you can move effortlessly back and forth between editing projects in the browser and in the desktop client. This allows users to have the convenience of a browser based project editing solution together with the power of the desktop client.
Now I know what you’re thinking “Do I need some fancy plugin for this? ”, “How does it work? ”, “How well does it scale? ”, and “How does it differ from Project Professional? ” Let’s answer each one of these questions and hopefully many more today.
-------
Do I need some sort of fancy plugin for this? Not at all! Web based project editing has been implemented in JavaScript and HTML so all you need is a browser, no ActiveX controls or any other plugin required. Yep you read correctly NO ACTIVEX!!!!!!!
How does it work? Performing edits to projects in your browser is simple and easy to use. In PWA you can expect to find many of the same great features you are familiar with in the Project desktop. Although we don’t have time in this blog post to walk through each and every feature, I will walk you through a few by starting off with a brand new project plan that I have just created in the web as shown below.
The first thing to take note of here is the user interface. There are 4 core interface elements that should capture your eye. First, you will see the Fluent User Interface at the top of the page (expanded in the screenshot below). Here you can manipulate the project plan. You are able to perform actions like linking, indenting and marking tasks as complete.
Second, you will see a blue information bar. This “status bar” displays information about the current project plan you are working on. In the example below you will see the project was checked out on 10/28 and that I am viewing a “Draft” of the current project plan.
Next you will see a grid. The grid is composed of two panes (our final two core UI elements). The left-most pane we will refer to as the “grid pane”. The grid pane is where the end users will complete actions on task level information. Users will be able to edit task names, assign resources and enter various project fields like start date & end date from this pane. As task information is entered we will begin to see a Gantt chart taking shape in the right half of the grid, we will refer to this as the “Gantt pane”. The grid, complete with both panes, is pictured below.
For this particular example I will build a project plan for the launch of a new product. I will begin by defining some high level phases. In order to create each task I will start by typing a task name in the empty row on screen with the  indicator.
When I press ENTER on the keyboard or move to another cell the “new row”, as indicated with the ![clip_image008[1] clip_image008[1]](https://msdntnarchive.z22.web.core.windows.net/media/TNBlogsFS/BlogFileStorage/blogs_msdn/project/WindowsLiveWriter/Project2010IntroducingWebBasedProjectEdi_9A32/clip_image008%5B1%5D_thumb.png) icon, will move down one row, giving me another location with which to enter a new task.
icon, will move down one row, giving me another location with which to enter a new task.
After a few more edits I begin to see the high-level structure of the plan taking shape. Unfortunately, I have made a mistake while entering the start date of one of my phases. Thankfully PWA has detected this typo and informed me of this error while continuing to allow me to make edits.
Once I get a free moment I can click on the error. PWA will do its best to inform me of the problem and allow me to resolve the issue. In this particular case I have entered a value that is not a date for a date field.
After resolving the typo I hope to insert some sub tasks in Phase 1. At this stage in the project, Phase 1 is the only phase I have sufficient information for which to plan. All this takes is a simple press on the “Insert” Button in the ribbon or the “Insert” key on my keyboard.
After inserting each of my tasks I have a plan that looks something like this.
Next I want to indent the newly inserted tasks under Phase 1. To do this I will click in the “row header” region on the far left of the grid pane. I will select each of the rows and press indent in the ribbon (or Alt+Shift+Right on my keyboard if I prefer to use the Keyboard Shortcut Support). This demonstrates the use of full Task Hierarchy and Indent/Outdent support in the browser.
Now that I have created a summary task I want to establish dependencies on each of the subtasks. To do this I will select all of the subtasks and link them. In the screen shot below you will note that the tasks have been linked (which can be seen visually in the Gantt chart) but they have not been scheduled. The behavior is similar to that of Project Desktop if “calculate project after each edit” is turned off.
Finally we will press calculate which is located in the ribbon and the tasks dates will be updated. You should also note in this picture that the items that were changed as a result of the calculate operation are highlighted in blue. This demonstrates the use of Change Highlighting in the browser.
Some other notable features to call out here are support for Multi-Level Undo as well as Cut/Copy & Paste right in your browser (both are shown in the ribbon screen shot earlier in this post). If I had made a mistake in anyone of these edits and wanted to undo it or I wanted add a list of work items copied somewhere like Excel, I would effortlessly be able to do this in PWA.
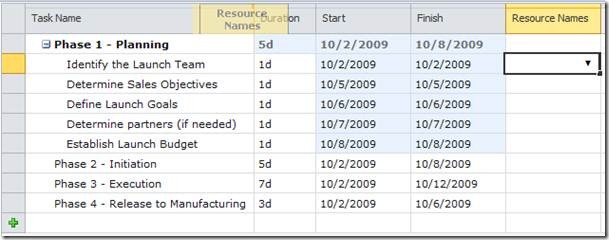
Now that I have some tasks created and scheduled I want to go ahead and make some resource assignments, before I do this though I want the resource column to be placed right next to the task name to make assignments easier to see visually. To do this in PWA I simply drag the resource column by clicking down on the column header and dragging with my mouse. A “ghost image” will appear so that a user can see where my column will be positioned, demonstrating the intuitiveness of Flexible View Manipulation in PWA.
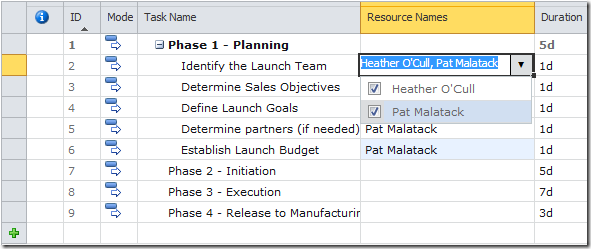
Together with my colleague Heather I will be “Identifying the Launch Team” as well as “Defining Launch Goals”. This demonstrates browser based support for Multi-Resource Assignment. Heather will be responsible for “Determining Sales Objectives” and I will be handling the other tasks defined. Making the assignments is depicted below.
A few more items of interest to mention in PWA are high-fidelity (and colorful) Gantt charts, support for Grouping (as you would expect from Project’s desktop client), and support for User Controlled Schedulingin the browser.
How well does is scale? Editing projects from small to the very large is supported in Project Server 2010. There are no explicit size limits for browser based editing. Coming soon – a video with a 6,000+ line project.
How does it differ from Project Professional?
Project Professional will continue to be your one stop shop for great project planning/tracking features like baselining, leveling and task warnings and suggestions as well as some of the new 2010 features like Timeline View and Team Planner. Features like defining work breakdown structures will only be available in the desktop client, which will continue to be the premium project editing experience. For basic project plan editing and manipulation though PWA will serve as a great compliment to Project Professional for traditional Project Managers and help to expand the use of Project to people within your organization whom traditionally did not use Project Professional.
To recap here are just some of the features you can expect with web based editing in Project Server 2010.
Rapid entry |
Multi-Resource Assignment |
| Asynchronous editing, validation & error handling | Fluent User Interface |
| Multi-Level Undo | User Controlled Scheduling |
| Change Highlighting | Keyboard Shortcut Support |
| Cut/Copy/Paste | Flexible View Manipulation |
| Task Hierarchy | High Fidelity Gantt Charts |
| Grouping | Support for Large Projects |
| Indenting/Outdenting | And many more… |
Remember everything demonstrated in today’s post was done in a browser and is included as part of Project Server 2010. We hope you are as excited for web based project editing as we are and be sure to download the beta when it is made available in November.
Comments
Anonymous
November 02, 2009
The comment has been removedAnonymous
November 08, 2009
This look like a great step forward. It looks like resource are assigned fulltime to a task. Is it a way to estimate task resource effort (to adjust units or work)?Anonymous
November 09, 2009
You have to use the Project client to assign resources at anything besides their max units (by default this is 100%).Anonymous
December 02, 2009
back in project server 2007, you can already edit a proposal via the browser, however, you can't do that for a project. The usual task editing, completion rates, dates can all be keyed in. this sounds to me more like an intended technical delay so as to sell more copies of project server 2010 later.Anonymous
March 21, 2010
I agree with Keng. This does look like an intentional delay.Anonymous
August 05, 2011
I am working with Project Server 2010on a Project professional 2007 compatibility. Why are the percentage completed controls are gray? is there a way to make them active? I am able to type in the percentage completed in the grid and can't see a reason not to be able to use the controls too. ThanksAnonymous
November 08, 2011
Really a nice tutorial Keep it up the good work Pat ;)Anonymous
November 15, 2011
It's almost useless without the ability to assign units. How in the world could they have left that out???Anonymous
May 31, 2012
Good, very informative post, thanks!


