Customizing SharePoint List New/Edit/Display Forms individually in InfoPath 2010
Summary: Customizing list forms is very easy with infopath 2010. A “Customize Form” option is provided along with the list properties as shown below. Now the problem is the editing performed on the form is reflected same in the entire three list forms (new/edit/display). Sometime the requirement can be to have different kinds of forms for new/edit/display fields. The steps described below provides a solution to this problem.
Applies to: Microsoft InfoPath 2010, Microsoft SharePoint Server 2010, SharePoint Designer 2010
Published: Jan 2011
Contents
- Introduction
- Customize list forms
- Create views in InfoPath
- Associate views with list forms using SP Designer
Introduction
The basic knowledge of following things are required to perform this activity:
- InfoPath 2010
- SharePoint Server 2010
- SharePoint designer 2010
Before you start, set up a list with required number of columns on SharePoint site. The list will be having the OOB new/edit/display pages. These pages are to be individually modified using InfoPath 2010. Open the list as shown below.
Customize the list form
- On the List tools, click List. You will see a Customize Form option on the right(highlighted in red)
- Click on it, the edit form page will be opened in InfoPath
- You can modify the form here, but the change will be reflected in all the 3 forms of the list
- But here we need to individually modify each form. To achieve this we need to create separate views for each form
Create views in InfoPath
- On InfoPath, click on Page Design tab on the top ribbon
- You would see option to create New View as shown above.
- You already will be having an edit view (default). You need to create two more views for new and display options.
- Click on New View, You will get an option to specify the name as shown below. Specify the name of the view (ex:- New View) and click ok to create the view for new page.
- Similarly we need to create one more view for display page. (Name :- Display View)
- The three views will be available on the Views drop down list (Highlighted in green)
- These three views can be individually modified. You can change page layouts, hide fields or add rules or validations. But still views are not associated with the list views. To do that, we need help of SharePoint designer.
- Click on the publish icon to publish the changes made so far.(highlighted below)
Associate views with the list forms
Open the list in SharePoint designer. The list forms would be displayed as shown below.(Highlighted in Green)
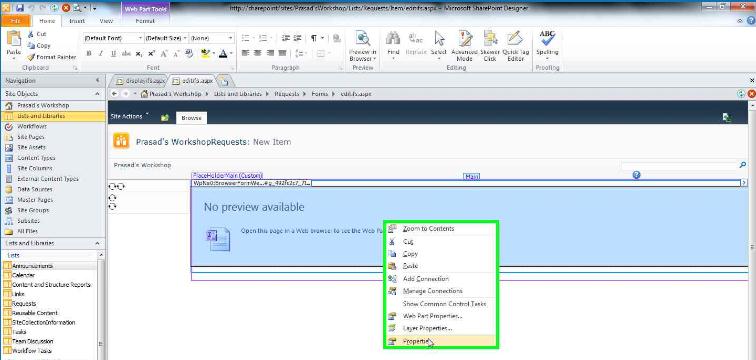
Click and open each list item. Right click as shown below and select Properties.
- In Properties list, you will see an option “Default View”. Type the View names which you have created in this space. Associate forms with views properly as shown below.
- NewForm – NewView
- EditForm – EditView
- DisplayForm – DisplayView
This way, you can edit the forms independently. On publishing, the changes will be reflected on the SharePoint.
Comments
Anonymous
October 18, 2013
Thank you sooooo much, this completely helped and cured a major headache all in one. Thank you!!!Anonymous
February 04, 2014
Just what I was looking for! I appreciate this very much.Anonymous
February 05, 2014
Awesome! Step one towards different views for different people. Nice and concise.Anonymous
April 03, 2014
There is one mistake in your description: You have to take: •newifs,aspx– NewView •editfs.aspx– EditView •displayifs.aspx– DisplayViewAnonymous
April 18, 2014
I’ve created my New and Display views in InfoPath 2010. However, when I open the forms, in SP Designer 2010, I cannot get any properties to display. Also, when I set a default value on one view it applies the default value to all views. What am I doing wrong?Anonymous
April 18, 2014
For whatever reason, I had to add a new InfoPath form webpart to the form pages. However, when I set a default value on one view it applies the default value to all views.Anonymous
May 01, 2014
Another option if you don't have SP Designer access to your site, just create a rule on Form Load. So when the default view is opened, it checks if ID is populated (ID = not blank) and switches to secondary view. In summary, when ID is blank, open default view. When ID is not blank, switch to secondary edit view.Anonymous
July 17, 2014
Thanks Prasad for this post. I was not sure how to associate a view to a list form before this post but this nailed it. Thanks again!Anonymous
November 24, 2014
Can you add a close button to displayifs.aspx? I have tried it but the button does not show.Anonymous
February 28, 2015
Can I update my sharepoint list using this?


.jpg)


