Deploying PerformancePoint 2010 Soup to Nuts
The PerformancePoint team receives a lot of questions about how to deploy (or activate) the product now that it lives within the confines of SharePoint. This is definitely a valid question because the “up and running” process is quite different compared to the experience from 2007. To help illustrate the process, I’m going to take you through the steps necessary to get PerformancePoint up and running, from beginning to end. This post may get a bit lengthy, so skip over the parts that you already know or, for whatever reason, don’t apply to your environment.
Current Server Topology
How does the current layout look? How many front end servers (servers that host sites but which don't run the service applications) exist in relation to application servers? Are the SQL servers clustered (or mirrored)? Is the farm distributed across multiple boxes, or is everything located on one physical server? Most farm topologies include at least 2-3 WFEs, an app server, and a database server, as represented in the diagram below:
 |
| Typical Farm Topology |
To deploy PPS in this type of environment, SharePoint Enterprise Edition must be installed on the farm. If you are upgrading from PerformancePoint 2007, you must use the import option on the PPS settings page to import 2007 data to V2. This tool neither facilitates upgrading your actual SharePoint environment nor your PPS V1 environment. It only moves data (e.g. existing dashboards, scorecards, data sources, grids, and charts) from V1 to V2. Before this tool can be run, we recommend that you set up a clean SharePoint 2010 environment. But if you have data from your 2007 environment that you need in your 2010 environment, there are upgrade options. You can read about those, and the upgrade steps, in this blog post: https://blogs.msdn.com/performancepoint/archive/2009/11/16/upgrading-performancepoint-server-2007-to-performancepoint-2010.aspx. In each upgrade case, the PerformancePoint import utility must be used to move content from the 2007 environment to the 2010 environment.
For the sake of simplicity, and because this is such a common deployment scenario, a three-machine farm is the topology that I will use to explain the deployment process. This also assumes a Beta 2 or later install scenario.
Hardware/Software Recommendations
The following are the server and client recommendations for running PerformancePoint.
Server Recommendations (WFE or Application Server)
| Hardware | Software |
|
|
Database Recommendations
| Hardware | Software |
|
|
Client Recommendations (for Dashboard Designer)
| Hardware | Software |
|
|
So much of a successful deployment depends on the installation of SharePoint itself. But since this blog is about PerformancePoint, in particular, I’m not going to cover the actual SharePoint installation except for where it makes sense to discuss the overlap between PerformancePoint and SharePoint. I’m going to assume that SharePoint has been installed and that each web front end and application server (as well as any other server attached to the farm) has undergone the setup process. That will allow me to quickly get to the heart of this blog – PerformancePoint configuration and deployment.
Installation Crossroad
Here is a case where I need to point out one of the nuances of the SharePoint installation that will affect the ease of configuring PerformancePoint in a farm environment. Once you finish installing SharePoint, you are asked to configure the SharePoint farm (this won't apply in a stand-alone configuration). There are two options. The first is a wizard that takes users through the process of creating a default site collection with a number of different service applications enabled. This would be the site that appears when users navigate to the server root. The second option takes users directly to the Central Administration default page and requires that the administrator create the default web application, the default site collection, and activate any service applications. For the sake of this deployment guide, we will choose the latter option and create these elements without the wizard. You will then have a better idea of what the wizard does for you when you select that option. Plus, these are the steps that you will need to follow if your SharePoint farm is already running but not quite deployed.
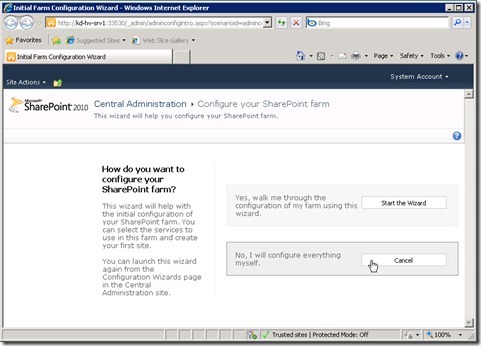 |
| SharePoint Configuration Wizard |
Creating a SharePoint Web Application
After the SharePoint install has been run, but before you can really do anything with the product, you must create a default web application.
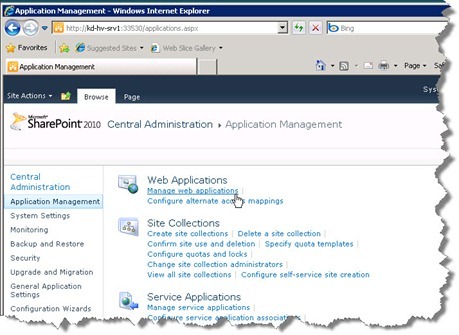 |
| Manage Web Applications in SharePoint |
This is the equivalent of creating a new IIS site. The first web application that you create on the farm will likely be the default web site on the farm, and SharePoint will default to port 80, although you can specify any port that you choose. If a site already exists on that port, it will be stopped, and SharePoint will begin using it. As you proceed through the wizard, you will notice that new web applications can be configured with classic authentication (NTLM) or with claims-based authentication. Claims-based authentication uses a secure claims ticket (instantiated by the secure claims service) and passed between the client, the WFE, and the application server, in order to authenticate the user. In this example, I will use classic mode authentication, which uses Windows authentication to validate users. For Beta 2, Claims Based Authentication was not fully tested, so stick with Classic Mode Authentication when creating new web applications. If you deploy an RTM version of the product, claims is the right option for extranet or internet-zoned sites.
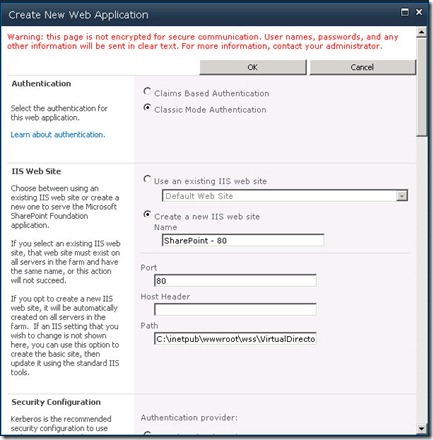 |
| Creating a Web Application in Classic Mode |
When creating a new web application, it is most secure to create a new application pool identity or to use an existing one that has been set up for this purpose. Administrators can also register a new managed domain account from the Create New Web Application page. The Register Managed Account link allows you to specify a domain account to use with the associated application pool for that web application. When you use a managed account, you let SharePoint keep knowledge of the name/password relationship. Thus, when it comes time to assign an account to a new web application or other service, you can simply assign the account without having to know the password. Note, however, that if you use a new or existing managed account, you will need to grant that user db_owner privileges on the content database associated with that web application. That can be done either manually (using the UI) or via PowerShell.
Here are the PowerShell commands:
| PS> $w = Get-SPWebApplication(“web application name”) |
| PS> $w.GrantAccessToProcessIdentity("<domain\user>") |
If you have more than one web app, you need to specify its identity on the first command. Because each web application uses its own content database, you need to run these commands for any web application that uses PerformancePoint.
This PowerShell command does three things:
- It creates a new user for the WSS_Content DB.
- It makes the user a member of the db_owner role.
- It creates a new schema for the user.
You can also manually create a new DB user for your process identity and add that user to the db_owner role of the content database for the web application. In order to make quicker use of managed accounts, you may want to inform SharePoint about them (or create them in SharePoint) before you get to web application or service application pages. You can define as many as you need by going to Security --> Configure managed accounts in Central Administration. That way, they will be available when it becomes necessary to assign one to a service or to an application.
By default, SharePoint uses the app pool account of the person who installed the product. Most deployments will use a specific domain account with limited permissions. This helps to ensure that functions in SharePoint and PerformancePoint don’t use an account with too many privileges, allowing access to resources that should be reserved for administrators or other higher-privileged accounts.
 |
| Creating a New App Pool |
Creating a Site Collection
Once you have a web application in place, you will need to create a site collection. The first site collection that you create will be the top-level (default) SharePoint site for all of the objects that you create within this collection.
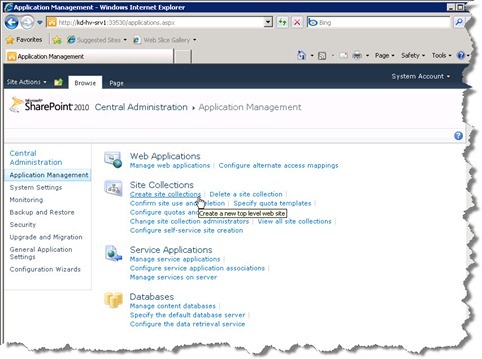 |
| Creating a New Site Collection |
From the Site Collection dialog, name your site. If this is the first site collection on this site, you have the option of creating the site under the managed path “/sites”. Generally speaking, if this is the first site collection for a particular web application, you create the site at the root level (e.g. https://contoso.com/PerformancePointSite1/). This allows users who visit the root to see content without having to navigate to a managed URL. If this is a subsequent site collection, you will only have the option to create the site collection under a managed path (the default managed path is /sites). You can create additional managed paths in SharePoint Central Administration, under the Define Managed Paths page.
For a PerformancePoint default site, create a default site collection using the Business Intelligence Center template. This is the standard site collection template for PerformancePoint objects. It already contains all of the necessary SharePoint content types used to create BI dashboards. You can certainly add PerformancePoint content types to standard web part pages, lists, and libraries in order to create deployment targets, but it's much easier to use the Business Intelligence Center.
 |
| BI Template Selection |
If the Business Intelligence Center template isn't visible, it's likely that you aren't using a SharePoint Enterprise license. PerformancePoint isn't included with Standard licenses.
Starting the Service
Before you go much further, I recommend starting the actual services that you plan to run on your application servers. These services, like the PerformancePoint Service, the Excel Calculation Service, the User Profile Service, the Search service, etc., are the actual binaries for each of these services. Instances of these services are called by the service application every time work on the server needs to be done. The beauty of being able to start these services one-by-one is that you only need to start the services that you plan to use, saving server resources. This is the primary advantage of the service model architecture in SharePoint 2010. In SharePoint 2007, the shared service provider ran all the services, all of the time, regardless of which of them actually needed using. In this case, in order to use PerformancePoint Services, you need to start at least it and the Secure Store Service. I talk more about this in the section, Setting Up Secure Store below.
 |
| Starting SharePoint Services |
Creating a PerformancePoint Service Application
Once the Business Intelligence Center has been created, the administrator must create a PerformancePoint service application. This creates the service application proxy that facilitates web service calls between the WFE and the app server, along the Windows Communication Framework. New service applications can be created from either the UI or from cmdlets. If cmdlets are used, from the SharePoint 2010 Management Console window, the administrator runs the following (run with elevated privileges):
New-SPPerformancePointServiceApplication
If the UI is used, the administrator selects Manage service applications (pictured below)
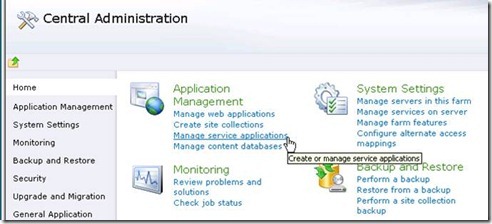 |
| Manage Service Applications |
and then from the New menu, selects PerformancePoint Service Application and fills in the requested values.
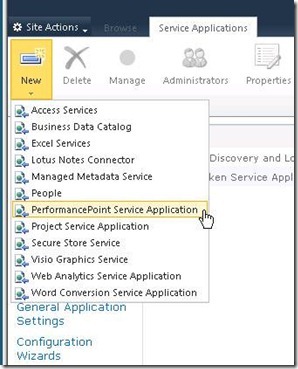 |
| Create a PerformancePoint Service App |
A new PPS service application requires the following properties: Name and Application Pool. The Name is the name of the PPS service application itself. The name is different than the service application’s identity. The identity is a GUID, assigned at creation time, and used to distinguish this service application from any other service application. No two applications can have the same GUID. In the case of PPS, the Name parameter must also be unique. This may not be the case with other SharePoint service applications. In addition to the Name field, the admin must also specify whether this service application instance should exist within the farm’s list of default service applications. However, even though a service application proxy exists within the default group of proxies, it does not need to be the default proxy within the default group.
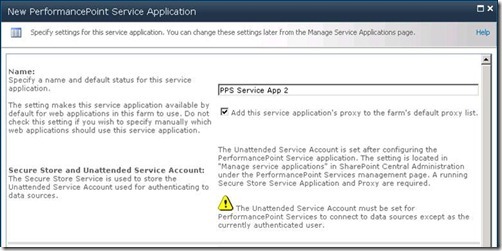 |
| New PerformancePoint Service App |
For a proxy to be the default of the default group, it must be designated as such on the Configure Service Application Associations page. A default proxy means that all service applications, for that SharePoint web application, use that proxy to communicate with that service application’s web service. Only one proxy group can be associated with a web application. Within that proxy group (associated with the web application), you can enable as many proxies as necessary. If you disable proxies, the associated service applications won’t be available to use within SharePoint applications.
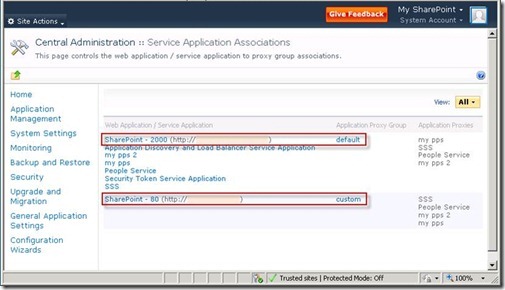 |
| One Proxy Group per Web App |
If a proxy is not enabled, that web application cannot communicate with the service running under that web application. PerformancePoint Services currently doesn’t have properties associated with its proxies, so it doesn’t matter which proxy acts as the default.
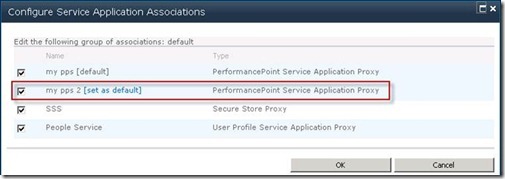 |
| Configure Service App Associations |
In order to change the default association, click the [set as default] link. Once the new Service Application has been named, fill in the Application Pool section. An admin can use an existing application pool or create a new one. The SharePoint Web Services System app pool is the default application pool available to all new service applications (PerformancePoint or otherwise). If a new application pool is created, you will need to use the Configurable option and either choose to run the app pool under an existing account or to register a new managed account. You cannot use the Predefined option when it comes time to create dashboards, so the recommendation is to assign a domain account during this part of the process. Using any of the Predefined options imposes a security risk. Network Service, for example, comes with too many privileged actions to make it a production-worthy service account.
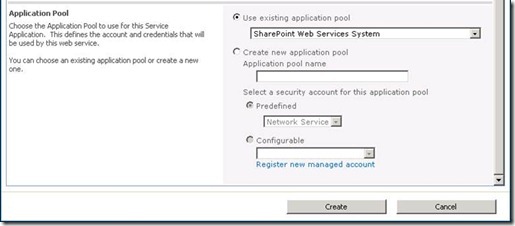 |
| New PPS Service App Pool Picker |
Clicking on the Create button will take you back to the list of SharePoint’s service applications. You can click on the newly created PerformancePoint service application, and it will take you to the PerformancePoint landing page, where several options become available with which to administer settings. Incidentally, new PPS Service applications can also be created using PowerShell cmdlets. The ability to fully administer PerformancePoint with PowerShell is a wonderful thing, but is a bit outside this blog's scope. I'll write up something on that topic shortly.
Service Application Databases
Once you finish installing SharePoint, you can see that it installs a number of different databases. In addition to the SharePoint configuration and content databases, PerformancePoint installs its own database for storing a user’s filter selections, annotations and comments, and temporary first class objects (FCOs). This database is created when you create a new PerformancePoint Services Service application. In order to ensure a unique database name, most of the service app databases created by default include a GUI appended to the name. Some of the service applications allow administrators to change the database name to meet specific business rules. As of this writing, however, the PerformancePoint database name cannot be modified – either before or after its creation – without rendering the product unusable.
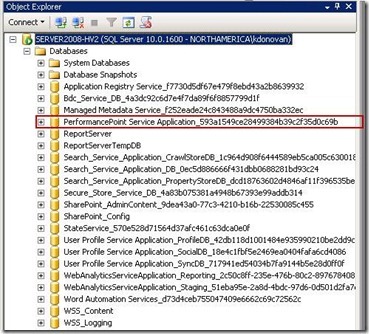 |
| The PerformancePoint Database |
By default, all new PerformancePoint databases will be installed on the same server as SharePoint’s configuration database. But you can use any SQL Server instance to connect PerformancePoint content to dashboards, assuming that the proper security context has been set up for the users who view and create those dashboards.
Most SharePoint topologies use a separate server to house associated databases, but it is also possible to install everything on a single-box environment (this is the Standalone option presented to administrators when installing SharePoint). If you choose this option, SharePoint will automatically install SQL Server 2008 Express to store content and configuration settings. The SQL Server setup and configuration is straightforward, but a detailed install procedure is beyond the scope of this blog.
Setting Up Secure Store
One of those settings is for the Secure Store. Without it, you cannot use PerformancePoint’s unattended service account to connect to data sources. As with the 2007 version of the product, which used the application pool account as the application identity, the unattended account cannot use the application pool identity to connect to data sources. Rather, it must use a domain account, whose password is stored in the secure store. If you have created a new PerformancePoint service application and there is no secure store set up in the default proxy group, you will need to configure the secure store. You can tell whether things have been set up correctly when you go to the PPS settings page. You will see a warning indicating that the secure store hasn’t been configured.
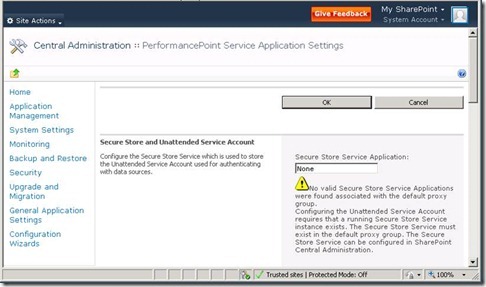 |
| Secure Store Warning |
In order to configure the secure store, you will need to create a secure store service first. Do that by clicking on New (in the ribbon) from the Manage Service Applications page. If the Edit functions in the ribbon appear inactive, make sure that the secure store service has been started. You can check this by going to the Manage services on server page in Central Administration. If it hasn’t been started, start it, and proceed with the steps below. Fill in the parameters, and click OK. Once the service is created, you can configure it.
To configure the secure store for PPS, follow these steps:
- Go to the Central Admin home page
- Under "Application Management" click "Manage Service Applications"
- Click on the Secure Store Service Proxy
- Click "Manage" in the ribbon
- You should get a message to generate a new key. Click "Edit" on the ribbon, then click "Generate New Key". You will be required to enter a pass phrase.
- When this completes, click "Edit" on the ribbon, then click "Refresh Key". Enter the same pass phrase you used in the previous step.
Configure the Unattended Service Account (necessary for using "Unattended Service Account" option on Data Sources)
- Go to the Central Admin home page
- Under "Application Management" click "Manage Service Applications"
- Click on the PerformancePoint Service Application
- Click the "Manage" button in the ribbon
- Click the first link: PerformancePoint Service Settings
- In the "Unattended Service Account" section, enter the user name and password to be used for querying data sources.
This should then store the new credentials in the target application of the secure store. The username is stored in the SharePoint configuration database. If an error occurs, or if you missed one of the above steps, check the Windows event log. It’s likely that the secure store service key wasn’t properly generated or that you forgot to refresh the key after generating it. If everything worked correctly, when you re-enter the PPS settings page, you will see the secure store service name and the user representing the unattended service account.
 |
| Successful Secure Store Setup |
PerformancePoint will always try to use the secure store service in the default proxy group, even if you have multiple secure store service instances. If, for example, you have custom proxy groups on ports 80 and 81 with no secure store service running, and you have port 82 using the default proxy group with a secure store service running, each PerformancePoint service application running under the web applications on ports 80 and 81, will attempt to use the secure store service associated with the default proxy group.
The same steps can also be run from PowerShell. As with the UI, the first step in the process requires the administrator to create a new secure store service application and set the secure store key. Before running the cmdlet to create a new secure store service application, make sure that the secure itself is running. Go to Central Administration --> System Settings --> Manage Services on Server. You should see that it’s in a started state:
| Secure Store Service Started |
You can then launch the SharePoint 2010 Management Console (as an Administrator) and create a new secure store service application.
new-spsecurestoreserviceapplication -Name $serviceApplicationName -partitionmode:$false -sharing:$false -databaseserver $DbServerAddress -databasename $dbName -applicationpool $pool -administrators $commaseparatedadmins -auditingEnabled:$true -auditlogmaxsize 30
Open and Test a PerformancePoint BI Center Site
Creating a new service application enables the Publishing and PerformancePoint site collection features. If you have successfully created a PerformancePoint site collection, you should be able to browse to the BI Center, launch Dashboard Designer, and connect to a data source using the unattended service account. The page below can be accessed by navigating to the URL that was specified when the site collection (or child site) was created.
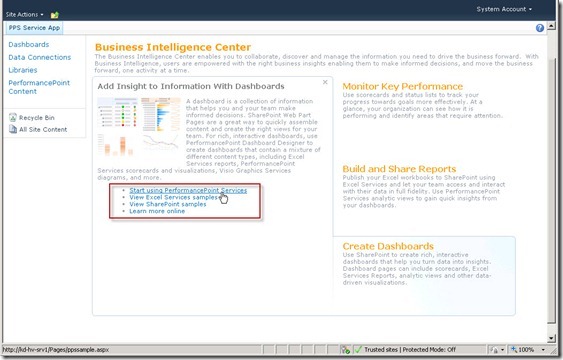 |
| Starting Dashboard Designer |
The Easy Way?
For the most part, I’ve taken you through the manual way of setting up PerformancePoint 2010. If you go back to the section titled, Installation Crossroad, you’ll notice that you can select the first bullet. That selection launches a wizard that will create new service applications for each service in the farm (you are provided the option to create only those that you want). You can assign a single application pool account to run all of the service apps. And each of those service applications will use the default proxy group to connect to the application server. If you want to run different service applications on different application servers, I recommend that you avoid the wizard, making it a lot easier to select just the service applications that you want running on specific application servers. Of course, even by using the wizard, you will still have to configure the secure store and define an unattended service account if you want to use application-based security. But for a quick setup experience on a 3-machine (or smaller farm), the wizard presents a terrific option.
Comments
- Anonymous
December 01, 2009
Hello, When I follow the above steps i'm unable to create new data connections in the client applications. I hadded a few steps to the above instuctions:
- adding system account as administrators for the services
- installed KB976462
- set password for the secure store service But still unable to create new connections or reports. When creating connection im seeing an error message. In the event log I can find the following error message: The Microsoft Secure Store Service application Secure Store Service failed to retrieve credentials. The error returned was 'Access is denied.'. For more information, see the Microsoft SharePoint Products and Technologies Software Development Kit (SDK). PerformancePoint services was unable to retrieve the Unattended Service Account password from the Secure Store. Error Details: Access is denied.
Anonymous
August 22, 2010
hi, same problem here: access denied.Anonymous
September 08, 2010
Hi Everybody, I want to use a performance point dashboard to sharepoint team site web part. I have tried but no progress. I have created reports and dashboard,and to use those in sharepoint team site web part. Plz help me out. Thanks Sudipta GhoshAnonymous
November 12, 2010
You need to give your sharepoint unattended access account permissions to your data sources. Also I had to delete and recreate my PPS Service Account.Anonymous
November 25, 2010
Dear all, I have problem with PPS under windows 7 in standalone mode. I can't start performancepoint services because in central administration > service application the "New" ribbon is disabled. Any suggestion will be great for meAnonymous
January 26, 2011
Thanks for the post it. I've leveraged it several times configuring PerformancePoint. I even referred to it in a blog post I did on using SharePoint Lists with Performance Point. www.threewill.com/.../performancepoint-toe-dippingAnonymous
February 24, 2011
Hi, In my installation of Sharepoint Server 2010 there is no Business Intelligence Center among the Enterprise template items. I've also found that PerformancePoint isn't available in the list of Site Collection Features. What am I missing and what do I need to install? Thanks.Anonymous
March 24, 2011
John, is the PerformancePoint Service application created? is the PerformancePoint Service application proxy created? is the PerformancePoint Service started? have you activated the PerformancePoint site collection features?Anonymous
April 14, 2011
Hi, Did any one got the answer for secure store application, its disabled and it says "Cannot complete this action as the Secure Store Shared Service is not responding. Please contact your administrator."Anonymous
June 22, 2011
Hi Great blog. Walked through all steps and everything worked great! Best instruction I found for performance point! When I go to a desktop and access the url http://sharepoint/sites/performancepoint1 with a generic domain user account I get access denied. However, if I use the sp_farm account I get the dashboard just fine. Any ideas. One not I do not have user profile service configured. Is that required? Thanks JimAnonymous
February 22, 2012
Unfortunately, the original question posted to this blog did not appear to be solved at all as the "default" effect of following these instructions including using the "king account" for the farm FAILS when we get to the last aspect of being able to create a data connection. We need a list of EXACTLY which accounts need access to EXACTLY WHICH resources (name the databases, name the machines if the account needs to be a reader or "admin" on a server) and also if those accesses are NOT given via Sharepoint, HOW to give them. Of all the services on the new Sharepoint, setting up this one pulls all of the great work down by being very rough shod and overly complex. I hope to see a post that answers this. Thanks and looking forward to the next SharePoint. R. Rivas - ChicagoAnonymous
February 22, 2012
The comment has been removedAnonymous
September 21, 2013
I can help. Just give me a few weeks. I'm sorry for your trouble and I'm completely embarrassedAnonymous
October 21, 2013
I agree with Ralph and Steve L - assistance would be greatly appreciated. I'll send pie.Anonymous
October 25, 2013
The comment has been removed