Kicking back with Motley Crue, sippin' my LowenBrau
Introduction
A common complaint about the bootstrapper that shipped with Visual Studio 8 is that it does not accept command-line parameters for launching the MSI. For example, lots of people want to turn on verbose logging or quiet install. The reason for this limitation is because of how the MSI is installed: instead of using msiexec.exe /i to install the package, a call to MsiInstallProduct is used. MsiInstallProduct only accepts command-line parameters which affect the properties used in the install (which the bootstrapper does dutifully pass along). However, if we are willing to circumvent the use of MsiInstallProduct to install the MSI, it is possible to get the command-line options you desire. I'm going to show how it can be done in this entry. The design will be similar to the design I came up with in December 2005 for a different problem.
It was around that time that the ClickOnce design-time team was made aware of a slight problem that the ClickOnce runtime already knew about: launching a ClickOnce application through a browser other than IE simply didn't work (and how this was not a violation of the anti-trust settlement still baffles me to this day). There were blogposts pointing out this little fact. The ClickOnce team's official recommendation to all FireFox users was to use Internet Explorer to launch a ClickOnce application (reading that statement makes me roll my eyes, even 2 years later). But there was one little problem with this work-around they were suggesting: the bootstrapper.
Ahh, the bootstrapper. When the bootstrapper is coming from a website (https://www.foo.com), the bootstrapper's caboose install was nothing more than a ShellExecute to the ClickOnce application (https://www.foo.com/bar.application). The bootstrapper was relying on the shell handler within the OS to route this call to the proper application. It never occurred to the tooling team (us) that FireFox might not be able to correctly handle a .application file. Of course the runtime team knew it wouldn't work: there was no sanctioned way for the FireFox to correctly deal with a .application file. So the runtime team pressured the designtime team to come up with a solution to what was essentially their problem (and if it sounds like I'm still bitter about this, well...). The runtime team's complaint was that their recommended work-around of using IE didn't work when someone used IE to navigate to setup.exe but FireFox was the default browser on the box. After 2 weeks of arguing (which I still can't believe we lost. But I'm not bitter!), our team finally capitulated and agreed to try to come up with a patch for this problem. I wrote up a design document.
Fortunately, the FireFox community doesn't take 2 weeks to solve a problem. By the time the document was written, someone wrote a FireFox plugin that was able to handle a ClickOnce application. So, the plan was never acted upon: with the FireFox plugin there was no need to do it.
But despite the rage I felt (and still feel today, although I'm getting over it. Really), I found the experience to be useful. It was a result of this that I first realized MSBuild was pretty cool. Even though I had written the GenerateBootstrapper task within MSBuild, I didn't really realize what was going on. I wrote the task to serve two different systems: the setup projects (which used COM) and the ClickOnce publishing. I hooked up setup projects to have setup projects use the code in Microsoft.Build.Tasks.dll, while someone else hooked up the task to be used from the ClickOnce publishing system. Although I saw how the GenerateBootstrapper task was part of the publishing system, I still didn't really understand how MSBuild worked. But planning this change helped me realize 2 of the most powerful upsides to MSBuild:
- A user could write their own custom build steps
- Those build steps could be inserted anywhere into the build process
The solution I came up with for the ClickOnce/FireFox problem took advantage of these facts. The simplest fix for the problem would be to change the bootstrapper to always launch Internet Explorer when attempting to launch a ClickOnce application. But in order to do that, we would have had to re-ship the setup.bin that shipped with the .Net SDK and Visual Studio 8. I didn't like that plan given how difficult and expensive it is for Microsoft to produce and support a GDR and how stupid Microsoft would look for producing this so soon after shipping.
My proposed solution was to change what the bootstrapper launched at the end of the installation: instead of calling ShellExecute on the web-address to the ClickOnce deployment manifest, the bootstrapper would call ShellExecute on a stub exe, which would call Internet Explorer to launch the ClickOnce deployment manifest. And to avoid multiple download security prompts, both of these executables would be stuffed as resources inside of what was termed an "uber-bootstrapper" which would extract both of these files to the installing users temporary directory and run the bootstrapper from there. The uber-bootstrapper leverages the existing bootstrapper and all of the prerequisite checking and running that it does.
To accomplish this, I proposed a new MSBuild task called GenerateExtractedBootstrapper. This is the task that would take a "regular" bootstrapper along with the stub exe and stuff them into its resources. Then, to have the publish process start calling this task, all a user had to do was modify the PublishOnlyDependsOn property to include the GenerateExtractedBootstrapper.
I coded this up and it seemed to work. Fortunately, the plans were shelved because someone built the FireFox plugin to handle ClickOnce manifests.
I always thought there was some merit to this solution, though, and could be applied to other areas as well. A solution like the ClickOnce/FireFox solution could alleviate this command-line issue: instead of a stub exe which launched Internet Explorer, why not have the stub exe launch msiexec? We never pursued this possibility because there wasn't enough general outcry for it.
Before I start the process of creating this extracted bootstrapper, I did a little re-arranging of the solution that has been developed thus far. These changes include:
- I created a new namespace, SetupProjects.WindowsInstaller, which now includes everything that has to do with WindowsInstaller: some of the Utility functions and the WindowsInstaller-specific tasks
- Moved windows installer tasks (those that inherited from SetupProjectTask) into SetupProjects.WindowsInstaller.Tasks
- Renamed SetupProjectTask to WindowsInstallerTask
- Re-worked the tests to fix compiler errors and make sure they contine to pass (they do)
- Moved all setup projects and other sample projects into a solution directory, "Examples"
Step 1: The original bootstrapper
Before we go about creating a fancified bootstrapper, let's first discuss how to go about creating the original bootstrapper. Let's create a new project for our bootstrapper experiments, called SetupExtractedBootstrapper. Add a baseline project file to the project which will contain all of our postbuild steps:
 <Project xmlns="https://schemas.microsoft.com/developer/msbuild/2003"  DefaultTargets="PostBuild">
    <Import Project="$(MSBuildExtensionsPath)\SetupProjects\SetupProjects.Targets" />

    <PropertyGroup>
        <PostBuildDependsOn></PostBuildDependsOn>
    </PropertyGroup>

    <Target Name="PostBuild" DependsOnTargets="$(PostBuildDependsOn)">
    </Target>
</Project>
And set the postbuild event to use MSBuild build the project file:
msbuild.exe /p:Configuration="$(Configuration)" /p:BuiltOutputPath="$(BuiltOuputPath)" /p:ProjectDir="$(ProjectDir)\" /p:BuiltOutputDir="$(ProjectDir)$(Configuration)" $(ProjectDir)\PostBuild.proj"
In order to work, you must make sure that MSBuild is on your path. Launching devenv from the Visual Studio 2005 Command Prompt should be sufficient.
To generate the bootstrapper, you need to use the GenerateBootstrapper task. There are many inputs to this task, but let's quickly enumerate the relevant ones:
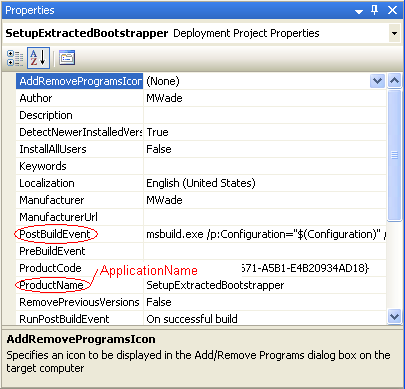
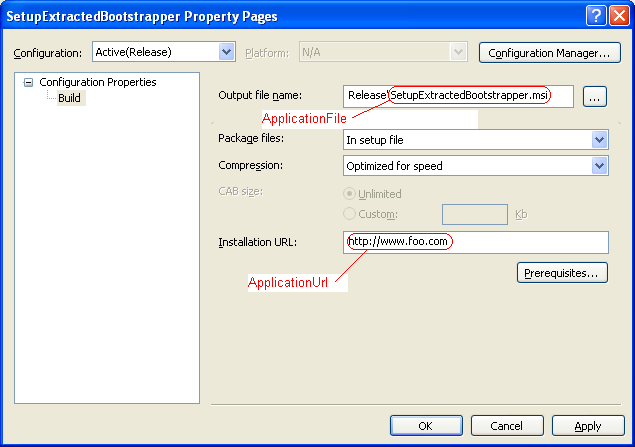
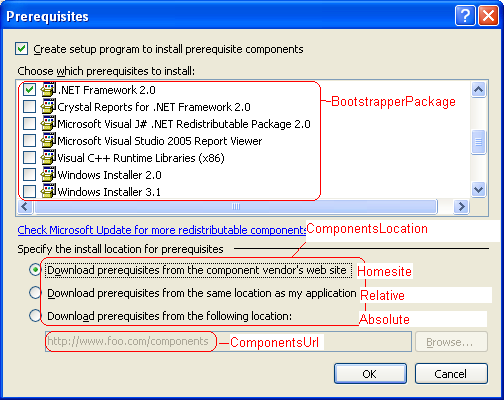
ApplicationFile: The name of the caboose (the Msi to launch once all prerequisites have been installedApplicationName: The name of the application being installed. This value is used with the install UIApplicationUrl: The expected web address of the bootstrapper and msi it will be installingBootstrapperItems: The list of prerequisites the bootstrapper will installComponentsLocation: Where the bootstrapper will get the prerequisites it will be installing. Can be one of three values (if blank,HomeSiteis assumed):HomeSite: Allow the bootstrapper package to be downloaded from the bootstrapper package vendor's websiteRelative: The bootstrapper packages are found relative to the location of setup.exeAbsolute: Bootstrapper package are downloaded from a specific website
ComponentsUrl: The website to use ifComponentsLocationisAbsoluteCulture: Specifies which language the bootstrapper UI should be shown in, and the language of the bootstrapper package to install. Can generally be left blankOutputPath: The path on disk to which the bootstrapper will be built
All of these values correspond to something in the setup project UI, and several are part of the property set passed into the project file. Unfortunately, it won't be possible to avoid some of the duplication. See the pictures below for a summary of how setup project properties map to GenerateBootstrapper task parameters.
For this particular example, the following properties should be set to generate the same default bootstrapping experience:
 <PropertyGroup> <br>    <ApplicationFile>SetupExtractedBootstrapper.msi</ApplicationFile> <br>    <ApplicationName>SetupExtractedBootstrapper</ApplicationName> <br>    <ApplicationUrl></ApplicationUrl> <br>    <ComponentsLocation>HomeSite</ComponentsLocation> <br>    <ComponentsUrl></ComponentsUrl> <br>    <Culture></Culture> <br>    <OutputPath>$(BuiltOutputDir)</OutputPath> <br></PropertyGroup>  <ItemGroup> <br>    <BootstrapperPackage Include="Microsoft.Net.Framework.2.0" /> <br></ItemGroup>


<Target Name="PostBuild" DependsOnTargets="$(PostBuildDependsOn)">
     < GenerateBootstrapper ApplicationFile="$(ApplicationFile)"
                          ApplicationName="$(ApplicationName)"
                          ApplicationUrl="$(ApplicationUrl)"
                          BootstrapperItems="@(BootstrapperPackage)"
                          ComponentsLocation="$(ComponentsLocation)"
                          ComponentsUrl="$(ComponentsUrl)"
                          Culture="$(Culture)"
                          OutputPath="$(OutputPath)" />
</Target>
The most notable thing in here is the BootstrapperPackage item. The Include property is set to "Microsoft.Net.Framework.2.0". Where did that value come from? It corresponds to the ProductCode of the .Net Framework 2.0 bootstrapper package. These values are discoverable if you know where to look. You can find these by going to the product.xml file which represents the bootstrapper package. Perhaps the easiest way, though, is to open the Prerequisites dialog for your project, check off the packages you want, save the project file, and view it in notepad.
Make sure the bootstrapper is turned off in the Prerequisites page. Building the project should succeed, and you should see that a setup.exe was created in your build output directory. Running it seems to work as we would expect.
Step 2: The uber-bootstrapper
In designing the uber-bootstrapper, I'm going to make one important simplifying assumption: the new bootstrapper will not need to work on Windows 98 systems.
The design of the bootstrapper is pretty simple, and borrows quite a bit from the original bootstrapper. Properties wil be set in the resources of the uber-bootstrapper, and can be extracted by a call to FindResource. Files will also be stuffed into the resources of the uber-bootstrapper. There will be 2 different files: the original bootstrapper, and a stub executable that performs the install. When the uber-bootstrapper is invoked, it will extract its 2 files into a temporary directory. Both of these extracted files needs to know something about its origins in order to do their job. The original bootstrapper needs to know where to get the prerequistes it will be installing as well as the caboose application to invoke. The latter is easy (it's the stub exe that was extracted to the temporary directory). The first is a little more challenging.
One of the options for the ComponentsLocation is "Relative". In that case, the relative path should be the source location of the uber-bootstrapper, whether it was from a web-site, CD, or disk path. The bootstrapper is designed to look the caboose in the exact same spot. Because we want the caboose extracted to the temporary directory to be launched, we want the Relative location to be blanked out, signalling the original bootstrapper to look for the caboose next to itself. The uber-bootstrapper will set the the ComponentsUrl to the uber-bootstrapper location of origin to look for application prerequisites. The stub executable will have similar resource information added to it after extraction so that it knows where to download the MSI from.
Step 3: The stub executable
The stub executable itself is pretty simple. It first figures out where the heck msiexec is by using the InstallerLocation registry key described on MSDN. It next finds the location to the msi it will be launching by looking at its resources. Finally, it constrcuts the full spectrum of command-line parameteres (msiexec -i "Path To Msi" ) and runs ShellExecute. It should be noted that one feature the standard bootstrapper does that the stub I developed does not is make calls to WinVerifyTrust to make sure that consistent trust decisions are made regarding a signed bootstrpper package and a signed MSI. Note that the calls are only made when installing from a website. It should be possible to add this information in, I just chose not to to keep the code simpler.
Step 4: The final build task
Having laid the ground work for the binaries that are necessary for this scheme to work, let's get them built. The properties set in the project file should remain exactly the same. However, their usage by the GenerateBootstrapper task are slightly different:
 <Target Name="PostBuild" DependsOnTargets="$(PostBuildDependsOn)">
    <GenerateBootstrapper ApplicationFile="stub.exe"
                          ApplicationName="$(ApplicationName)"
                          ApplicationUrl=""
                          BootstrapperItems="@(BootstrapperPackage)"
                          ComponentsLocation="$(ComponentsLocation)"
                          ComponentsUrl=""
                          Culture="$(Culture)"
                          OutputPath="$(OutputPath)" />
In particular, the ApplicationFile, ApplicationUrl, and ComponentsUrl are all required to change. Don't be alarmed, however: these values simply moved into the GenerateExtractedBootstrapper task:
     <GenerateExtractedBootstrapper ApplicationFile="$(ApplicationFile)"
                                   ApplicationUrl="$(ApplicationUrl)"
                                   ComponentsUrl="$(ComponentsUrl)"
                                   OutputPath="$(OutputPath)"
                                   BootstrapperFile="$(OutputPath)\\setup.exe"
                                   StubExe="$(MSBuildExtensionsPath)\\SetupProjects\\InstallMsi.exe" />
</Target>
Conclusion
So there you have it, a way to modify the behavior of your bootstrapper. Sources are included at the tail end of this post in case you want to add further functionality to the installer. There is also a very small set of helper functions for you to create your own stub exectuable. For completeness sake, I included the source for the original motivation for this endeavor: launching a .application file through Internet Explorer. I only tested these on my laptop, which has VS installed. So I'm a little concerned that I screwed up the properties of the VC projects : in particular, I wanted to statically link in the necessary runtimes, and (I think) build without a manifest. If someone finds I did these wrong, I would love to hear it and correct the mistake.
Updates
11/29/2007: There was a bug in the InstallApplication bootstrapper stub (I mixed around a couple of variables). Attached new sources.
SetupProjects.Tasks-1.0.21129.0-src.zip
Comments
Anonymous
November 29, 2007
In the previous blog entry , I went over the design and implementation of a modified bootstrapper whichAnonymous
November 29, 2007
For completeness sake, I decided to add the postbuild step for using a modified bootstrapper to launchAnonymous
January 22, 2008
The comment has been removedAnonymous
January 22, 2008
I think I've figured it. The arguments that I have sent aren't quite right. I've just got to figure what the correct arguments should be. Cheers - PaulAnonymous
April 07, 2008
This was interesting... I wish you guys published the source for the setup.bin/exe bootstrapper packaged with VS. We need more features out of this thing (make UI pretty, etc.), but we wanted to keep the pre-requisites format to leverage some packages that otherAnonymous
April 21, 2008
Hi Paul, did you ever figure out what the correct parameters were for your Wix project? I suspect I will run into the same issue very soon.


