Enterprise Mobility End to End // Part 3 – Elevate Security using Certificates
The purpose of this module is providing the steps required to implement the Network Device Enrollment Service (NDES) using Configuration Manager with Microsoft Intune. The Network Device Enrollment Service allows network devices to obtain certificates based on the Simple Certificate Enrollment Protocol (SCEP). You can read an overview and details about this service by reviewing Network Device Enrollment Service (NDES) in Active Directory Certificate Services (AD CS). Moving to a certificate based authentication requires some infrastructure components to be implemented, but at the end you will benefit from higher security using certificates for authentication.
Set-Up NDES Configuration
The purpose of this section is to provide operational specialists the steps required to implement the Network Device Enrollment Service (NDES) using Configuration Manager with Microsoft Intune. NDES enables the deployment of Certificate Profiles to Mobile devices using Simple Certificate Enrolment Protocol (SCEP) which allows for the deployment of Wi-Fi, VPN, Email Profiles on the devices and Passport for Work Certificate for Windows 10 devices.
Core Infrastructure Dependencies
This section details core infrastructure dependencies for Microsoft Intune and provides context for the design decisions documented in subsequent sections.
| Item | Description |
||||||||||||||||||||
| Microsoft Intune Subscription | Required to support the Mobile Device Management capability in the environment. | ||||||||||||||||||||
| Verifiable Public Domain Name | All customer user accounts must have a publicly verifiable domain name that can be verified by Microsoft Intune. | ||||||||||||||||||||
| Public Domain UPN | Before on-premises Active Directory user accounts can be synchronized, customer must verify that user accounts have a public domain UPN. | ||||||||||||||||||||
| Directory Synchronization with Azure Active Directory | Directory synchronization lets customer populate Microsoft Intune with synchronized user accounts. The synchronized customer user accounts and security groups are added to Microsoft Intune. | ||||||||||||||||||||
| DNS Server & CNAME Record | The CNAME record is used as part of the enrolment process.
|
||||||||||||||||||||
| Certificates for Mobile Device Management |
|
||||||||||||||||||||
| Certificates for Resource Access Profiles | Use certificate profiles to configure managed devices with the certificates they need so device users can connect to on-premises company resources using connections such as Wi-Fi or VPN. When certificate profiles are deployed, devices are provisioned with a trusted root certificate from the on-premises CA, and are configured to request device specific certificates. | ||||||||||||||||||||
| Azure AD Application Proxy / Web Application Proxy | Supports requests from internet facing devices to connect to on-premises NDES infrastructure. If ADFS and the Web Application Proxy are installed in the customer environment, the Web Application proxy is configured to support NDES by the Enterprise Mobility Pilot. Otherwise, The Azure AD Applications proxy is configured to support NDES. | ||||||||||||||||||||
| Firewall Configuration | Microsoft Intune requires network infrastructure to pass communications between the devices you manage and used to manage your subscription, and the websites on the Internet that the cloud-based service uses. For a complete list of sites, refer to Network infrastructure requirements for Microsoft Intune |
Certificate Management in Configuration Manager
Certificate profiles are Configuration Manager policies that configure managed devices with the certificates they need so device users can connect to your on-premises company resources using connections like Wi-Fi or VPN. When you deploy certificate profiles, you provision devices with a trusted root certificate for your PKI, and configure them to request device specific certificates.
Configuration manager supports the creation of three types of certificate profiles:
- PKCS #12 (.PFX) Certificate Profile: this can be used with Android 4.0 or later, and Windows 10 (desktop and mobile) and later.
- SCEP Certificate Profile: this can be used with iOS 6.0 and later, Android 4.0 or later, and Windows Phone 8.1 and later.
- Trusted Certificate Profile: this can be used with iOS 6.0 and later, Android 4.0 or later, and Windows Phone 8.1 and later.
To use SCEP certificate profiles, you must integrate the following on-premises infrastructure with Configuration Manager with Intune:
- A server that runs the Network Device Enrollment Service
- An Enterprise Certification Authority
- The Policy Module, which installs on the Windows Server 2012 R2 server that runs NDES
- Certificate Registration Point role in SCCM
The Network Device Enrollment Service (NDES) is one of the role services of the Active Directory Certificate Services (AD CS) Windows Server role. It implements SCEP.
Configuration Manager Certificate Profiles enable:
- Management and distribution of certificates
- Virtual private network (VPN) profiles
- Wi-Fi protocol and authentication settings
- Email account profiles
The following platforms are supported for Certificate Management:
- Windows 8.1 and later
- Windows Phone 8.1 and later
- iOS
- Android
NDES Technical Implementation
This section details the implementation of Configuration Manager with Intune developed for the customer environment and the steps to install, configure, and operate the required component that will connect the on-premises NDES to the Microsoft Intune Service. The following high-level activities are needed:
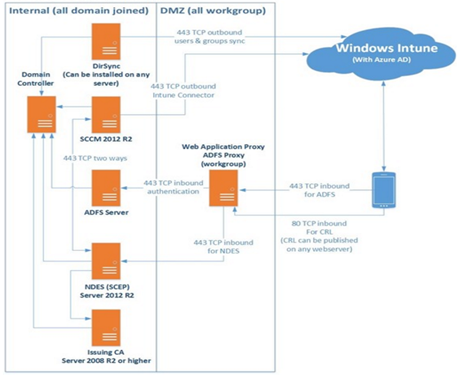
- Administrator configures policy in SCCM.
- Policy is sent to Intune service where details about the cert policy are used to create the challenge for the device(s).
- Policy is pushed to mobile device by Intune service during the next check-in. This policy contains the URL of the NDES server as well as the challenge generated by Intune.
- Device contacts the NDES server using the URL from #3 and provides the challenge response. (This is why your NDES server needs to be available externally in some way.)
- NDES Server (using our SCCM policy module) talks to the SCCM Certificate Registration Point (CRP) to validate challenge. You'll need to make sure that 443 (SSL) is open between the NDES Server and the CRP for this validation to happen.
- CRP responds to NDES server with "true" or "false" to challenge verification. (Again, over 443 SSL.)
- If challenge is OK, then the NDES server communicates with the Certificate Authority to get a certificate for the device. You'll need to make sure that the appropriate ports are open between NDES and CA for this to happen.
- NDES delivers certificate to mobile device.
Setup NDES Pre-Requisites
Pre-requirements
- The issuing CA needs to be Windows Server 2008R2 (with KB2483564) or preferable a higher Windows Server OS.
- The NDES server needs to be Windows Server 2012 R2.
- The NDES server needs to be domain joined to the same domain as the issuing CA. Please consult this TechNet article in case you want to deploy in a separate forest, isolated network or internal domain.
- The NDES server cannot be the same as the issuing CA, even though that configuration is not blocked by setup, the Policy Module will not work as expected in those conditions
Network Requirement
From internet to DMZ:
- Allow port 443 from all hosts/IP's on the internet to the NDES server
From DMZ to trusted:
- Allow all ports and protocols needed for domain access on the domain joined NDES. The NDES servers needs access to the Certificates Servers, DNS Servers, Configuration Manager Server(s) and Domain Controllers.
Create and Configure NDES Service Account User Permissions
Important: NDES server needs to be domain joined to the same domain as the issuing CA
Connect to the Certificate Authority Server or Domain Controller
Navigate to Start > Run > DSA.MSC.
Highlight and right-click Service Accounts OU, select New > User.

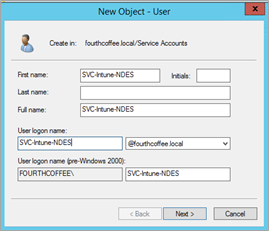
On the New Object – User page, specify the following, and then click Next:
First Name: SVC-Intune-NDES
User logon name: SVC-Intune-NDES
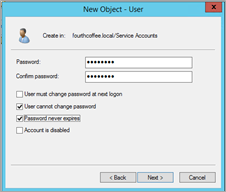
On the New Object –User password page, specify the following, click Next,and then click Finish:
- Clear the User must change password at next logon check box.
- Select the User cannot change password check box.
- Select the Password never expires check box.
Using a Domain Admin, Connect and Login to the NDES Server
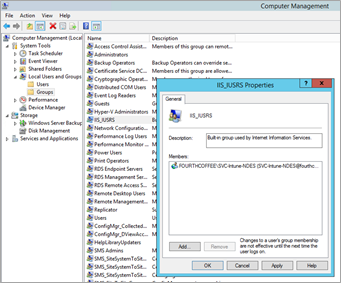
Right-click on the Start button, and then select Computer Management.
Expand Local Users and Groups, and click on Groups.
Double-click on the IIS_IUSRS group, and then add the SVC-Intune-NDES user account to this group.
Make sure you are a Domain Admin, Open Command Prompt (Admin) using the Admin option and run the following command to set the SPN of the NDES Service account:
setspn -s http/<DNS name of NDES Server> <Domain name>\<NDES Service account name>
For example, if your NDES Server is named NDES1, your domain is Contoso.com, and the service account is SVC-Intune-NDES, use: setspn –s http/NDES1.contoso.com Contoso\SVC-Intune-NDES
To check setspn –l <Domain name>\<NDES Service account name>

Note: Do not copy/paste the above command line, but type it to avoid any syntax error issues.
Configure and Create Certificate Templates on the Issuing Certification Authority
Certificate Template for Wi-Fi, VPN, and Email Profile
Using Enterprise Admin, Connect to the Certificate Authority Server
Right-click Start > Run > mmc, and then click OK.
At the UAC prompt, click Yes.
Click on File > Add/Remove
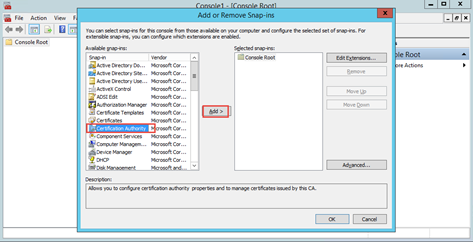
Snap-in… option.On the Add or Remove Snap-ins page, select Certification Authority, and then click Add.
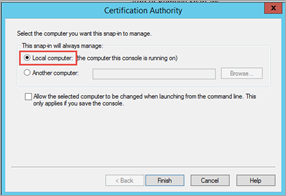
On the Certification Authority page, select Local computer, click Finish, and then click OK.
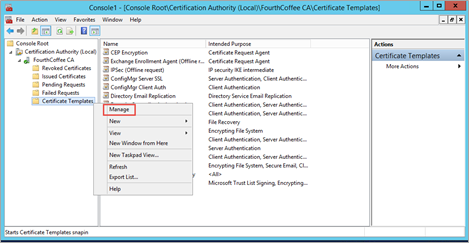
Expand Certification Authority (Local) > Customer Name >Certificate Templates.
Note: To revoke certificates the NDES service account needs Issue and Manage Certificates rights for each certificate templates used by a certificate profile.

Right-click on Certificate Templates, and then select Manage.
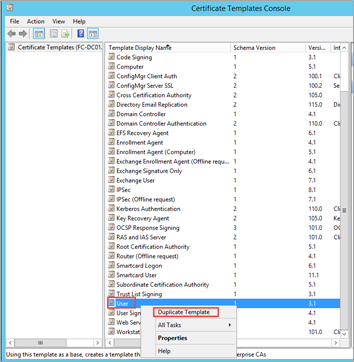
Scroll down, highlight, and right-click on User, and then select Duplicate Template.
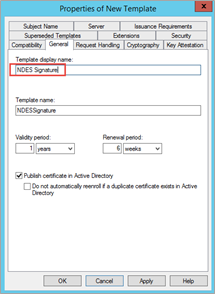
Click on the General tab and change the Template display name to NDES Signature .
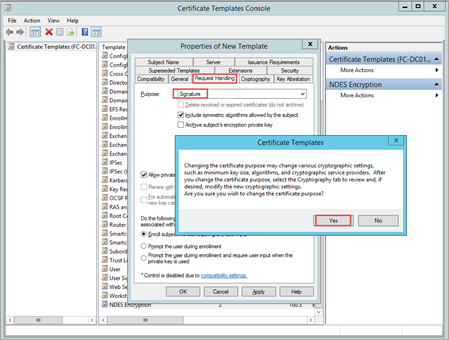
Click on the Request Handling tab, change Purpose to Signature, and then click Yes at the prompt.
Note: Do not select the Allow private key to be exported check box on the Request Handling tab of the properties for the certificate template.
Click on the Extensions tab and ensure that the Description of Application Policies includes Client Authentication.

Note: For iOS and Mac OS X certificate templates, on the Extensions tab, edit Key Usage and ensure Signature is proof of origin is not selected.

- Under Security tab make sure that the Service account SVC-Intune-NDES and Domain Users have granted Read and Enroll rights.
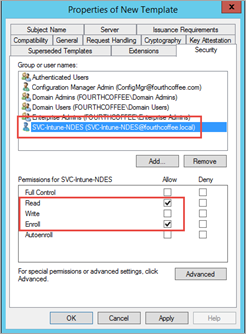
- Click Apply, and then click OK.
Certificate Template for Microsoft Passport for Work Profile
Right-click on the Smartcard Logon template, and then select the Duplicate Template option.

Click on the General tab and change the Template display name to Passport Auth
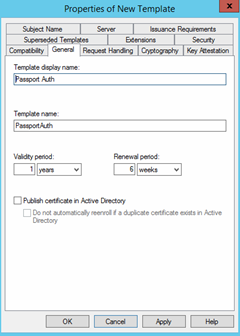
On the Compatibility Tab, under the Certificate Authority drop down, select at minimum Windows Server 2008 or above and under Certificate recipient select at least Windows Vista/Server 2008 or above.
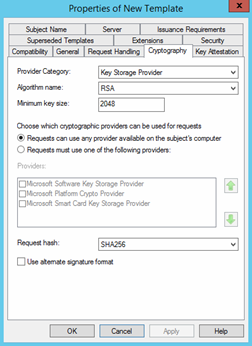
Note: These changes in compatibility will add additional template options especially on the cryptography tab which will add the Key Storage Provider option that will be used for Passport Certificate.

- In the Cryptography Tab, make sure you choose the Key Storage Provider in the Provider Category and SHA256 in the Request Hast options.
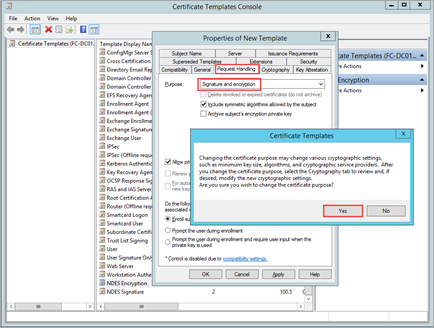
- Click on the Request Handling tab, change Purpose to Signature and Encryption, and then click Yes at the prompt.
Note: Do not select the Allow private key to be exported check box on the Request Handling tab of the properties for the certificate template.
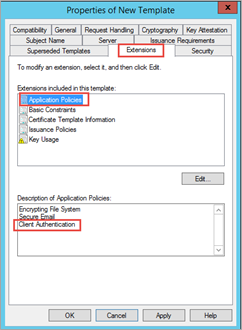
Click on the Extensions tab and ensure that the Description of Application Policies includes Client Authentication.
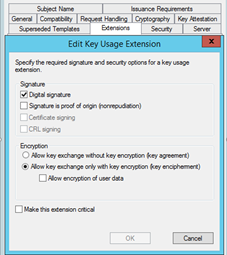
Under Security tab make sure that the Service account SVC-Intune-NDES and Domain Users have granted Read and Enroll rights.
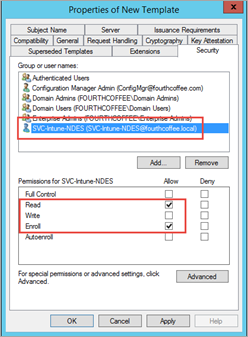
Click Apply, and then click OK.
Review to ensure that all three NDES certificate templates are listed. Close the Certificate Templates
Console. Do not close Certificate Authority console.
Publish/Issue the Certificates Templates
Under the Certification Authority console, go to Certification Authority (Local) > Customer Name> Certificate Templates.
Right-click on Certificate Templates and select New > Certificate Template to Issue.
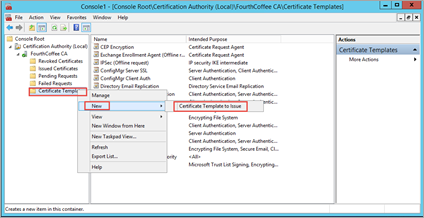
Highlight all the NDES certificates you created in the earlier section, and then click OK.
Ensure that these three certificates are now listed under Certificate Template.
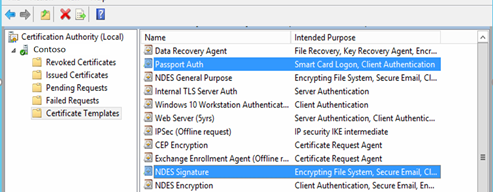
Note: If you make configuration changes for NDES or to the certificate templates that are used by NDES, you must stop and restart NDES, IIS and the CA service.
Configure the Prerequisites of the NDES Server
Connect to The NDES SERVER and logon as an Enterprise Administrator.
Go to Server Manager > Add Roles and features.
On the Installation Type page, accept the default values, and then click Next.
On the Server Selection page, accept the default values, and then click Next.
On the Server Roles page, select the Active Directory Certificate Services check box and add the features and under Add Role and Features, choose Web Server (IIS) and click Add features and then Next.
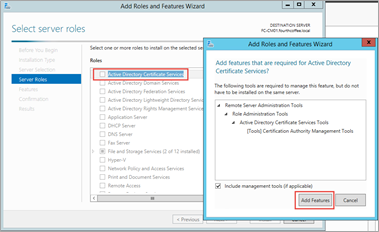
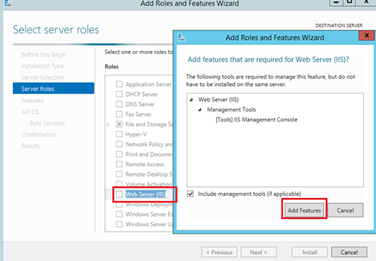
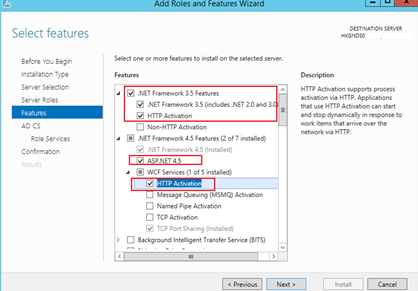
On the Features page, select .NET Framework 3.5 feature and HTTP Activation then click Add Features
Also for NET Framework 4.5 feature, ASP.NET 4.5, and the WCF Services > HTTP Activation feature then click Add Features and Next.
On the AD CS page, click Next.
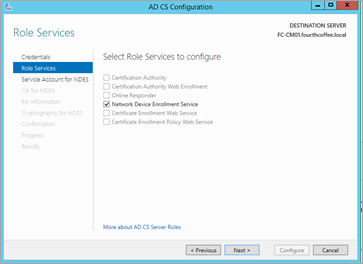
On the Role Services page, clear (untick) the Certification Authority check box, select the Network Device Enrollment Service check box, click Add Features and then click Next.

On the Web Server Role (IIS), click Next.
On the Role Services page, select the following
- Web Server> Security > Request Filtering
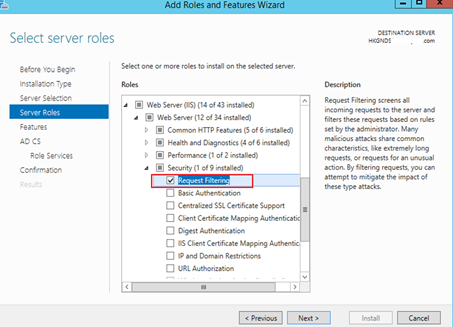
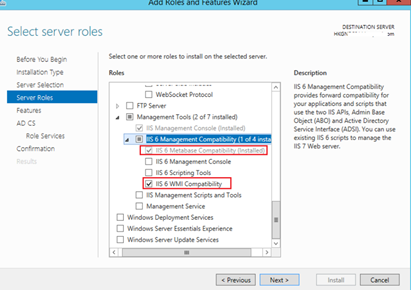
- Web Server > Management Tools > IIS 6 Management Compatibility > IIS 6 Metabase Compatibility
- Web Server > Management Tools > IIS 6 Management Compatibility > IIS 6 WMI Compatibility
- Web Server (IIS) Security > Application Development > ASP.NET 3.5. Installing ASP.NET 3.5 will install .NET Framework 3.5.
- Web Server (IIS) Security > Application Development > ASP.NET 4.5. Installing ASP.NET 4.5 will install .NET Framework 4.5.
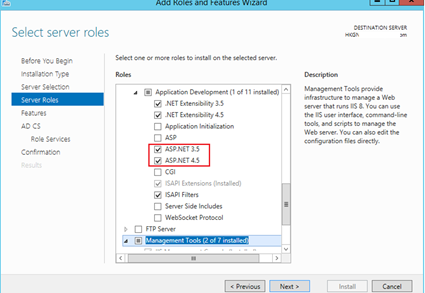
On the Web Server Roles (IIS) page, accept the default value, and then click Next.
On the Role Services page, accept the default value, and then click Next.
On the Confirmation page (Make sure you have the Windows Server ISO in place as the .Net Framework 3.5 will look for the source path. Specify an alternate source path where the Windows Server ISO is located. For example, the ISO is located in drive D i.e. D:\sources\sxs\) click Install.

Do not close the Add Roles and Feature Wizard and wait until the installation is complete. Once the installation is complete, click on Configure Active Directory Certificate Services on the destination server and a new window will open.

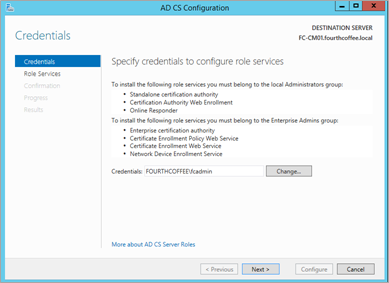
On the Credentials page, accept the default credentials (this should still be your Enterprise Admin) and then click Next.
On the Role Services page, select the Network Device Enrollment Service check box, and then click Next.
On the Service Account for NDES page, click the Select… option and specify your NDES User Account
Note:
- Make sure the Service Account has the "Logon Locally", "Logon as a Service" and "Logon as a batch job" rights. This should be the case by default, however some companies have hardening policies in place to disallow/remove these rights.
- Make this Service Account a member of the local IIS_IUSRS group.
- Make sure this Service Account have Read and Enroll permissions on the NDES Certificate Templates.
- Have Request Security permissions on the configured Certificate Authority
- Make sure the Configuration Manager Admins who will create SCEP profiles have Read rights to the template so they can browse to it when creating SCEP profile configuration items in the Configuration Manager admin console.
Click OK, and then click Next.

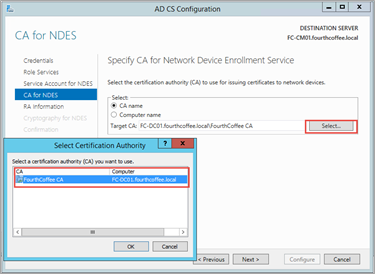
On the CA for NDES page, click Select…, and choose Customer Name This is the Issuing CA to be used , click OK and then click Next.
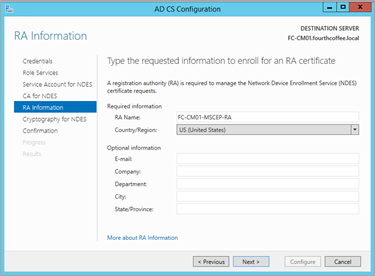
On the RA Information page, accept the default values, and then click Next.
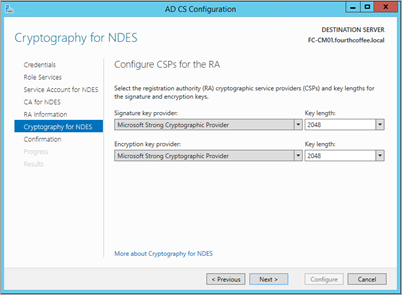
On the Cryptography for NDES page, accept the default values, and then click Next.
On the Confirmation page, click Configure and wait until the configuration is complete. Click Close.
Under notification, review to ensure that both the tasks are completed successfully.

Once the installation completes, edit the following registry keys value on the NDES server to configure the NDES Server to be used with Configuration Manager with Intune.
Important: There should be no spaces when specifying the following values.
HKEY_LOCAL_MACHINE\SOFTWARE\Microsoft\Cryptography\MSCEP\
- GeneralPurposeTemplate: PassportAuth
- SignatureTemplate: NDESSignature

- At the Command Prompt (Admin), run iisreset.
Note: For additional reference: Network Device Enrollment Service Guidance
Configuring and Testing NDES Functionality
On the NDES Server connect to Internet Explorer and open the following URL: https://YOUR-NDESSERVER-FQDN/certsrv/mscep/mscep.dll
Confirm that the output is similar to the following screenshot:

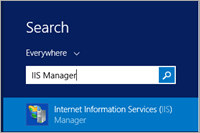
Right-click on Start button, select Search and type IIS Manager. Select Internet Information Services (IIS) Manager from the search results.
Go to Default Web Site and double-click on Request Filtering.
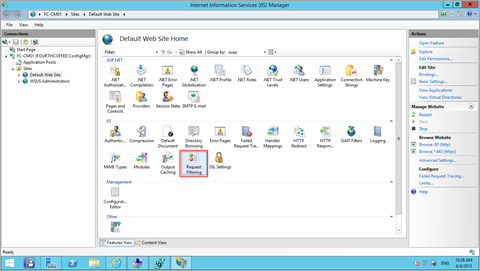
On the Actions pane, click on the Edit Feature Settings… option.

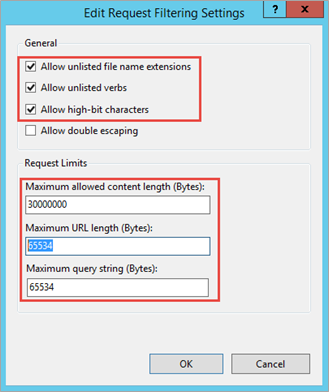
Confirm the following settings for the Edit Request Filtering Settings. We already specified these values, but if these values are not set, then set the following values and reboot NDES server.
- Maximum allowed content length (Bytes): 30000000
- Maximum URL length (Bytes): 65534
- Maximum query string (Bytes): 65534
Note: The NDES Server will receive very long URL's, so some registry changes are required.
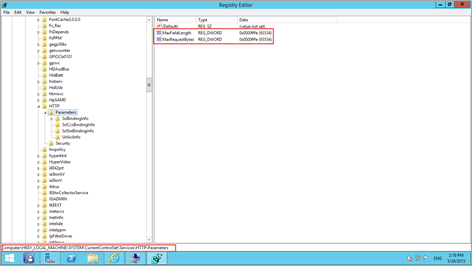
Right-click on the Start button, select Run and type Regedit to open the registry editor. Browse to the following registry keys:
HKLM\SYSTEM\CurrentControlSet\Services\HTTP\Parameters
Confirm that MaxFieldLength and MaxRequestBytes are configured as 65534 values (decimal). If the values are different then change it to 65534 decimals. If it is not there, then create new entries
- Name: MaxFieldLength, with a decimal value of 65534
- Name: MaxRequestBytes, with a decimal value of 65534
Configuring split-brain DNS - Adding External NDES address to Internal DNS zone and External DNS zone.
In this step you perform two tasks:
- Configure split-brain DNS for the NDES Server - For certificate management to work we must ensure that the DNS name that is used externally to contact the NDES server also works internally. As we are using a different domain name for the internal Active Directory and (corp.<YourPubliclyRegisteredFQDN>) to the domain used externally we must setup a split-brain DNS internally.
- Open Server Manager
- Click Tools and select DNS to open the DNS Manager.
- In the console tree, expand the Domain Controller, expand Forward Lookup Zones, right-click <publicly registered domain name>, and then click New Host (A or CNAME).
- In Name, type your external NDES Server name (the one registered in the external DNS provider)
- In IP address, type the internal IP address of your NDES Server (e.g. 10.0.0.7).
- Click Add Host.
- Click OK
- Click Done
- Type the following command in the command prompt, and then press Enter: Ipconfig /flushdns
- Configure external DNS for the NDES Server - As the NDES server will need to be published for external devices, we also need to add the host record of the NDES server to the external DNS server.
- Logon your publicly registered domain Provider (e.g. GoDaddy)
- Add an A(Host) record for "NDES" and point it to the Public Virtual IP (VIP) address of your WAP Server
- Click Save to save all settings
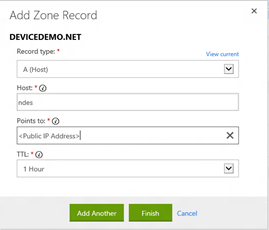

- Click Save Changes to make sure the changes are processed.
Install and Bind Certificates On the NDES Server
On the NDES Server, Request a Certificate with Server Authentication and Client Authentication EKU from your internal CA or public CA.
You will then bind this SSL certificate with Server Authentication EKU in the NDES Server IIS and the SSL Certificate with Client Authentication EKU on the NDES Policy Module configuration later.
Note: The Subject Name or Subject Alternative Name (SAN) of the SSL Certificate with Server Authentication EKU must have a value of the external DNS name of your NDES Server.
The Subject Name or Subject Alternative Name (SAN) of the Certificate with Client Authentication EKU must have a value of the internal DNS name of your NDES Server.
Although it is not a best practice, you can use the same certificate for both server and client authentication as long as the certificate has both Enhance Key Usages (EKU's). You just need to need to use a CA Template that have and support both Server and Client Authentication.
Go to IIS Manager, Expand Sites\Default Web Site in the Connections pane and click on Bindings… under the Actions pane.
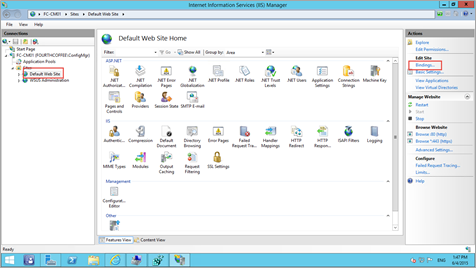
Click Add, set Type to https, and then ensure the port is 443.
Highlight HTTPS, click Edit, and make sure HTTPS is set to port 443, as this is the only supported port for Microsoft Intune (standalone). Ensure that the SSL Certificate is specified (i.e. NDES1).
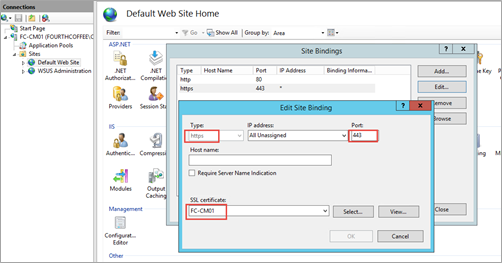
Now try connecting again with HTTPS. This time with https:// YOUR-NDESSERVER-FQDN /certsrv/mscep/mscep.dll. It should provide the similar NDES page. However, you will now have a padlock.

Click the padlock to check the certificate properties.

Select View certificates, click on the Details tab, scroll down, and select Enhanced Key Usage.

Note: The certificate should have both Client Authentication and Server Authentication.
Extended Key Usages (EKUs):
Server Authentication is needed for Secure Sockets Layer (SSL) connection to the Website to request a certificate. Client Authentication is needed to connect to the Certificate Registration Point.
Enable, Install and Configure the Certificate Registration Point (CRP) and Configuration Manager Policy Module
Install and Configure the Certificate Registration Point (CRP)
You must install and configure at least one certificate registration point in the Configuration Manager hierarchy, and you can install this site system role in the central administration site or in a primary site.
Important: Before you install the certificate registration point, see the Site System Requirements section in the Supported Configurations for Configuration Manager topic for operating system requirements and dependencies for the certificate registration point.
To install and configure the certificate registration point :
- In the Configuration Manager console, click Administration.
- In the Administration workspace, expand Site Configuration, click Servers and Site System Roles, and then select the server that you want to use for the certificate registration point.

- On the Home tab, in the Server group, click Add Site System Roles.

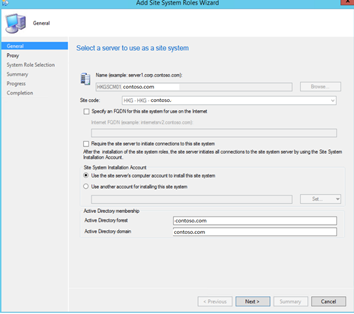
- On the General page, specify the general settings for the site system, and then click Next.
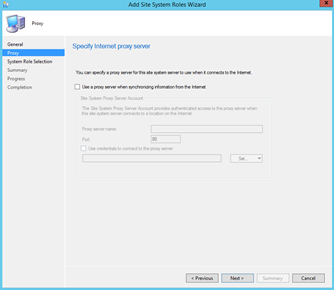
- On the Proxy page, click Next. The certificate registration point does not use Internet proxy settings.
- On the System Role Selection page, select Certificate registration point from the list of available roles, and then click Next.

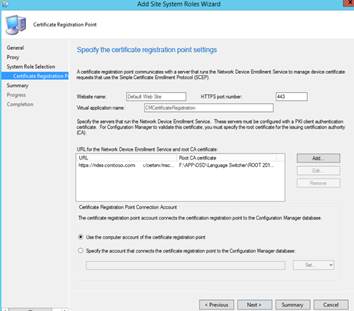
- On the Certificate Registration Point page, accept or change the default settings, and then click Add.
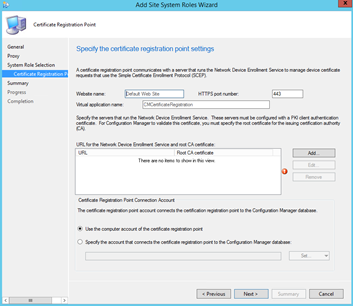
- In the Add URL and Root CA Certificate dialog box, specify the following, and then click OK:

- URL for the Network Device Enrollment Service: Specify the URL in the following format: https:// <server_FQDN> /certsrv/mscep/mscep.dll. For example, if the FQDN of your server that is running the Network Device Enrollment Service is server1.contoso.com, type https://server1.contoso.com/certsrv/mscep/mscep.dll.
- Root CA Certificate: Browse to and select the certificate (.cer) file that you created and saved. This root CA certificate allows the Certificate Registration Point to validate the client authentication certificate that the Configuration Manager Policy Module will use.
Note: If you are using more than one server that is running the Network Device Enrollment Service, click Add to specify the details for the other servers.
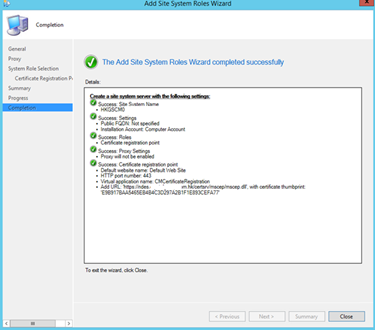
- Click Next and complete the wizard.
- Wait a few minutes to let the installation finish. Click Close
- Verify that the certificate registration point (CRP) was installed successfully by using any of the following methods:
In the Monitoring workspace, expand System Status, click Component Status, and look for status messages from the SMS_CERTIFICATE_REGISTRATION_POINT component.
On the site system server, use the <ConfigMgr Installation Path> \Logs\crpsetup.log file and <ConfigMgr Installation Path> \Logs\crpmsi.log file. A successful installation will return an exit code of 0.

Open C:\Program Files\Microsoft Configuration Manager\Logs\crpsetup.log
This log must read "CRP.msi exited with return code: 0"

If errors like "GetIISWebServiceStringProperty failed" are listed, make sure the correct SSL certificate is bound and no "hostname" is specified in the "Edit Site Bindings"
Open C:\Program Files\SMS_CCM\CRP\Logs\CRP.log
This log should not contain any errors.
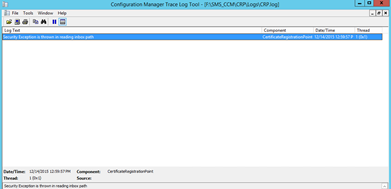
- If you see a "Security Exception is thrown in reading inbox path" error, grant the "Network Service" account Read permissions to the HKLM\SOFTWARE\Microsoft\SMS\MPFDM\Inboxes registry key.

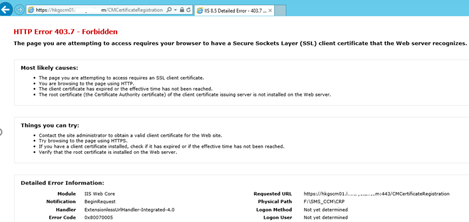
- By using a browser, verify that you can connect to the URL of the certificate registration point—for example, https://sccmserver1.contoso.com/CMCertificateRegistration. You should get a 403 HTTP Forbidden error. If you get anything else (e.g. a 404 or 500, stop right there and check all logs files and/or reboot the server)
Locate the exported Certificate file for the Root CA that the Certificate Registration Point automatically created in the following folder on the primary site server computer: <ConfigMgr Installation Path> \inboxes\certmgr.box

Note: This certificate is not immediately available in this folder. You might need to wait awhile (for example, half an hour) before Configuration Manager copies the file to this location.
- Copy the Policy Module directory containing the installation files, you will find it in the Configuration Manager installation files under SMSSETUP\PolicyModule\X64 to the NDES server to a temporary folder. Take note that your will need it at the next step.
Usually you can find it here F:\Setup\System Center 2012 R2\SC2012 SP1 Upgrade R2 Installation\1. SC2012_SP2_Configmgr_SCEP\SMSSETUP\POLICYMODULE\X64

- Save these files to a secured location that you can securely access when you later install the Configuration Manager Policy Module on the server that is running the NDES.

Now that the certificate registration point is installed and configured, you are ready to install the Configuration Manager Policy Module for the Network Device Enrollment Service.
Install the Configuration Manager Policy Module
You must install and configure the Configuration Manager Policy Module on each server that you specified in Install and Configure the Certificate Registration Point (CRP) section as URL for the Network Device Enrollment Service in the properties for the certificate registration point.
To install the Policy Module:
On the server that runs the NDES, log on as a domain administrator and copy the file you have saved earlier in the Temporary folder. These are following files you have copied from the <ConfigMgrInstallationMedia>\SMSSETUP\POLICYMODULE\X64 folder on the Configuration Manager installation media to a temporary folder:
- PolicyModule.msi
- PolicyModuleSetup.exe
In addition, if you have a Language Pack folder on the installation media, copy this folder and its contents.
From the temporary folder, run PolicyModuleSetup.exe that was copied earlier and to start the Configuration Manager Policy Module Setup wizard.
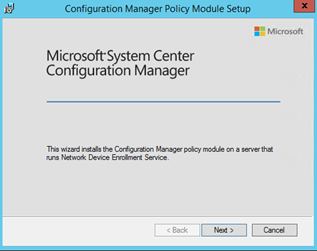
On the initial page of the wizard, click Next, accept the license terms, and then click Next.
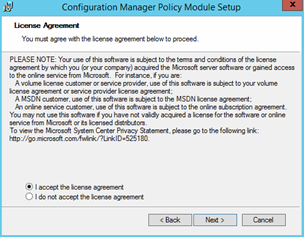
On the Installation Folder page, accept the default installation folder for the policy module or specify an alternative folder, and then click Next.

On the Certificate Registration Point page, specify the URL of the certificate registration point by using the FQDN of the site system server and the virtual application name that is specified in the properties for the certificate registration point. The default virtual application name is CMCertificateRegistration. For example, if the site system server has an FQDN of server1.contoso.com and you used the default virtual application name, specify https://server1.contoso.com/CMCertificateRegistration. (normally this is your SCCM server where you installed the CRP role)
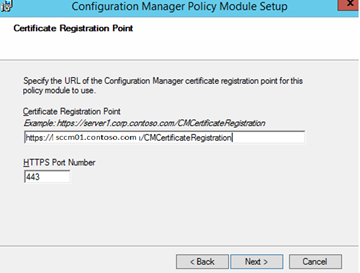
Accept the default port of 443 or specify the alternative port number that the certificate registration point is using, and then click Next.
On the Client Certificate for the Policy Module page, browse to and specify the client authentication certificate that you deployed during the NDES Configuration, and then click Next.
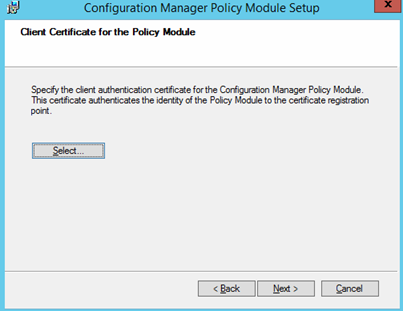
Important: This is the Certificate that have Client Authentication EKU and should have a SAN value of the internal DNS name of the NDES Server. It can also list the external DNS name of the NDES if desired. Typically, this is issued by your internal CA. Just put internal DNS and external DNS both in the SAN to cover all your bases, and the Subject can have internal DNS.
- On the Certificate Registration Point Certificate page, click Browse to select the exported certificate file for the root CA that the Certificate Registration Point automatically created and you saved in the Temporary folder earlier
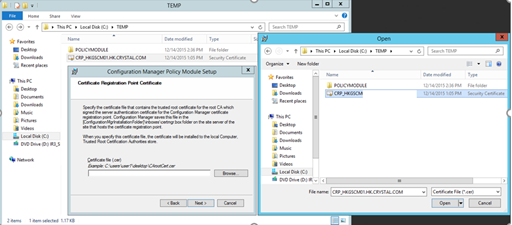
Note: If you did not previously save this certificate file, it is located in the <ConfigMgr Installation Path>\inboxes\certmgr.box on the site server computer.
- Click Next and complete the wizard.


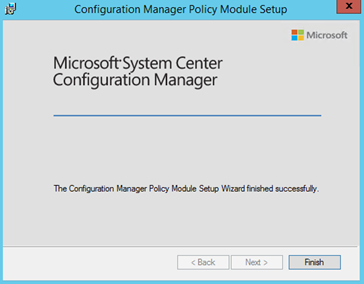
- Verifying the Configuration
Open the registry editor and browse to HKLM\SOFTWARE\Microsoft\Cryptography\MSCEP
Make sure that the values of "GeneralPurposeTemplate" and "SignatureTemplate" or if you have "EncryptionTemplate", match the names of the template on your CA that you want to use. THIS IS IMPORTANT.
- GeneralPurposeTemplate: PassportAuth
- SignatureTemplate: NDESSignature
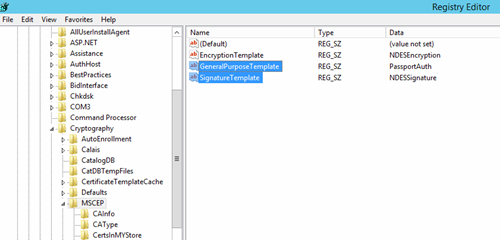
Open an elevated command prompt and run "iisreset".

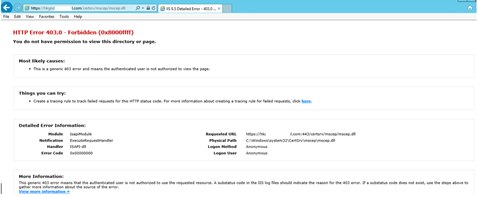
Now open Internet Explorer on the NDES server and browse to https://YOUR-NDES-EXTERNAL-FQDN/certsrv/mscep/mscep.dll, you should no longer see the web page but instead you should see an http 403 - Forbidden error. This is expected.
Now that you have completed the configuration steps to install the Network Device Enrollment Service and dependencies, the certificate registration point, and the Configuration Manager Policy Module, you are ready to deploy certificates to users and devices by creating and deploying certificate profiles.
Publish the NDES via the WAP
Note:
Before you start this process, please make sure "December 2014 update rollup for Windows RT 8.1, Windows 8.1, and Windows Server 2012 R2 https://support.microsoft.com/kb/3013769 " is installed on the WAP server. This rollup includes KB 3011135 Large URI request in Web Application Proxy fails in Windows Server 2012 R2 https://support.microsoft.com/kb/3011135.
You can validate if kb3013769 is installed in Control Panel -> Programs – Programs and Features -> installed Updates. Without this update the NDES server cannot be published through WAP.
Also, the server that hosts WAP must have a SSL certificate that matches the name being published to external clients as well as trust the SSL certificate that is used on the NDES server. These certificates enable the WAP server to terminate the SSL connection from clients, and create a new SSL connection to the NDES server.
For information about certificates for WAP, see the Plan certificates section of Planning to Publish Applications Using Web Application Proxy. For general information about WAP servers, see Working with Web Application Proxy.|
- Connect to the WAP Server
- On the server go to the start screen and type Regedit and click on Regedit.
- Add the following registry keys:
- Location: HKLM\SYSTEM\CurrentControlSet\Services\HTTP\Parameters
- Value: MaxFieldLength
- Type DWORD
- Data: 65534 (decimal)
- Location: HKLM\SYSTEM\CurrentControlSet\Services\HTTP\Parameters
- Value: MaxRequestBytes
- Type DWORD
- Data: 65534 (decimal)
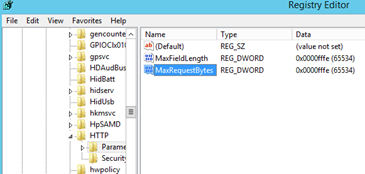
Note: Do this to all of your WAP Servers
- Close Regedit
- On the WAP Server open Server Manager.
- Click Tools and select the Remote Access Management.

- In the Remote Access Management Console select your WAP Server and on the right of the screen click Publish.


- In the Welcome step click Next.
- In the Pre-Authentication step select Pass-through.

- In the Name field type NDES Server

- In the external URL field type, the NDES Server external URL name https://NDES.contoso.com
- For the External Certificate select your public SSL certificate that have the NDES Server external URL in the SAN or Subject Name value
- In the Backend server URL: field type your internal NDES Server name (your ssl server certificate in the NDES should then include the internal and external ndes url in the SAN or if you configure a split dns and use the external ndes url in the ssl certificate in the NDES server IIS then you can also put the ndes external url in this field.
Important: Since normally the WAP servers are in the DMZ and it is not domain-joined, you should not forget to edit the HOST FILE and add the NDES Server internal IP and external url or internal fqdn depends on what you used.

- Click Next.
- In the Confirmation step click Publish.
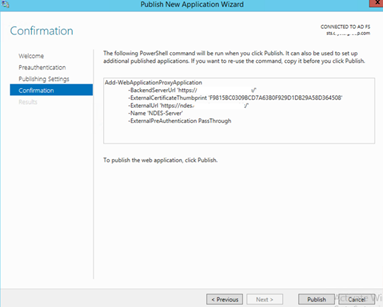
- In the Results step click Close.
- Reboot the WAP server.
Note:
This is a critical step if you don't do this certificate management will fail.
Create and Deploy Certificate Profiles on Configuration Manager
Root CA (Trusted certificate profile) for a Mobile Device.
Logon to your Configuration Manager and open the console.
Open the Assets and Compliance tab -> Compliance Settings -> Company Resource Access -> Certificate Profiles
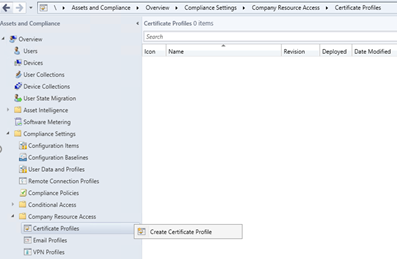
Create a new profile, choose Trusted CA Certificate and hit next.

Import your Root CA certificate and hit next. Select which platforms you will be deploying this against. Hit finish at the end.
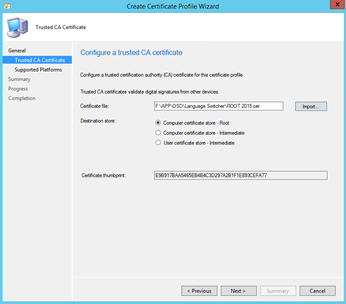
Select the Platform that you want this profile to be provisioned and Click Close.
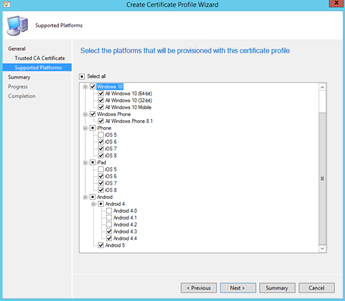
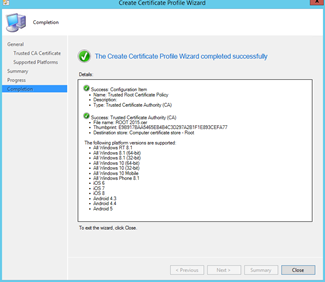
Under the Certificate Profiles, right click the Trusted Root Profile you have created and click Deploy

Click Browse for then select User Collection where you want to deploy the Certificate
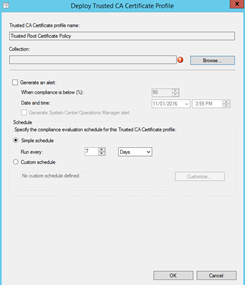
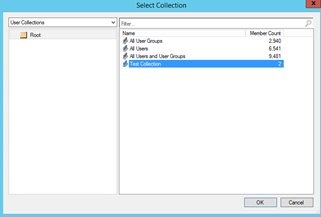
Click Ok once you have selected your Collection.
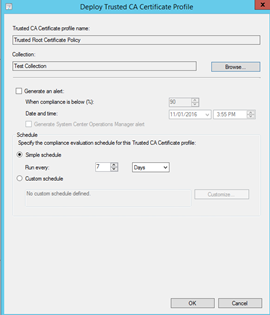
SCEP User Certificate Profile for a Mobile Devices.
Note: You must configure at least one trusted Root CA certificate profile before you can create a SCEP certificate profile.
Create a new Certificate Profile, this time a SCEP profile.

Change the desired options in the "enrollment parameters" window, I would go for the defaults.
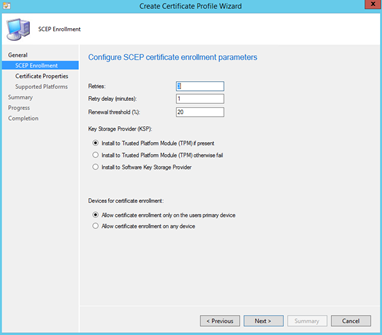
Hit browse in the "Certificate template name", remember this name must match whatever you entered in the registry on the NDES server!!

Note: If the template they created on CA doesn't show when browsing from this wizard, it could be due to one of two likely causes:
- The ConfigMgr administrator does not have "Read" permissions to the template in AD (configure this on the template object from MMC on the CA).
- The template has been created, but not published to AD. (publishing to AD is done using the MMC snapin called "Certification Authority", and you right-click "Certificate Templates" folder, and choose New -> Certificate Template to Issue")
At this point, be-aware that:
- iOS doesn't support fully distinguished name as the subject name format or including e-mail address in subject name.
- You configure the settings according to what you have specified in the template (e.g. SHA-1/SHA-2/SHA-3 and the key-length).
- If the template name contains non-ASCII characters, the cert will not be deployed
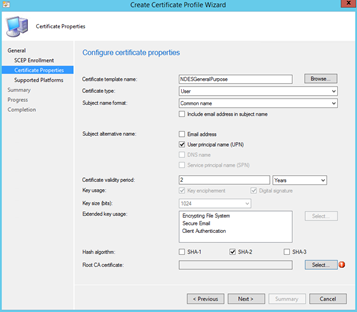
Select the Root CA certificate that you have created earlier and you should be good to go!
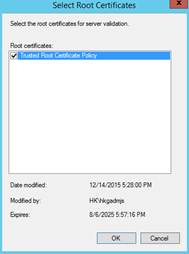
Hit next, select the destination platforms and finish the wizard.

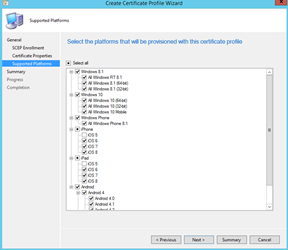
Select the Platform that you want this profile to be provisioned and Click Close.
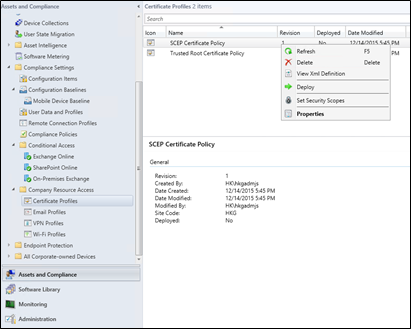
Under the Certificate Profiles, right click the SCEP Profile you have created and click Deploy
Click Browse for then select User Collection where you want to deploy the Certificate

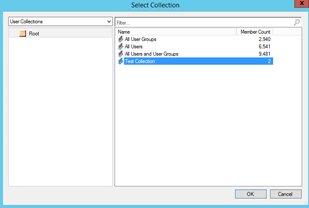
Click Ok once you have selected your Collection.
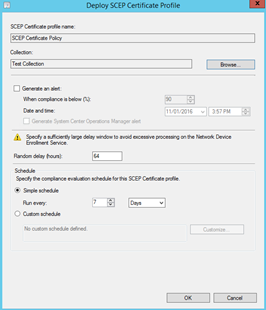
SCEP Certificate Profile for Passport for Work
Note: You must configure at least one trusted Root CA certificate profile before you can create a SCEP certificate profile. We will configure Passport for work later.
Create a new Certificate Profile, this time a SCEP profile for Passport. Click Next

In the Configure SCEP Server, leave the default settings and Click Next
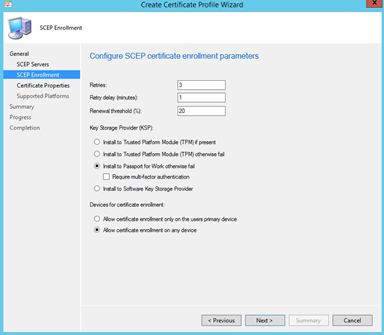
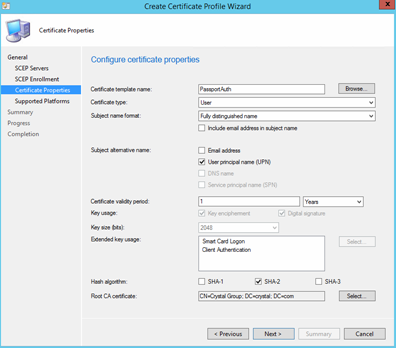
Change the desired options in the "enrollment parameters" window, Under the Key Storage Provider(KSP) select Install to Passport for Work otherwise fail.
Hit browse in the "Certificate template name", remember this name must match whatever you entered in the registry on the NDES server!!
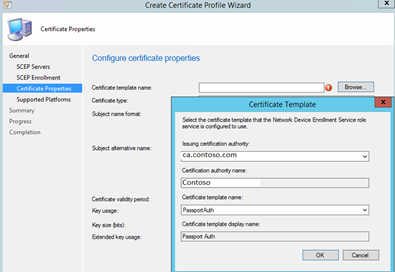
Note: If the template they created on CA doesn't show when browsing from this wizard, it could be due to one of two likely causes:
- The ConfigMgr administrator does not have "Read" permissions to the template in AD (configure this on the template object from MMC on the CA).
- The template has been created, but not published to AD. (publishing to AD is done using the MMC snapin called "Certification Authority", and you right-click "Certificate Templates" folder, and choose New -> Certificate Template to Issue")
At this point, be-aware that:
- You configure the settings according to what you have specified in the template (e.g. SHA-1/SHA-2/SHA-3 and the key-length).
- If the template name contains non-ASCII characters, the cert will not be deployed
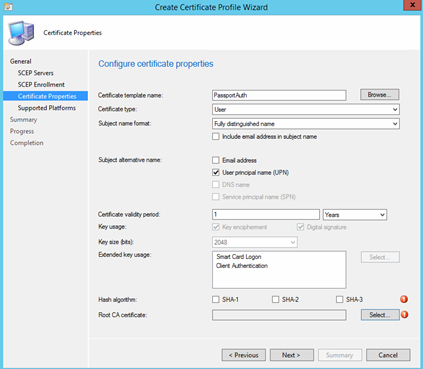
Select the Root CA certificate that you have created earlier and you should be good to go!
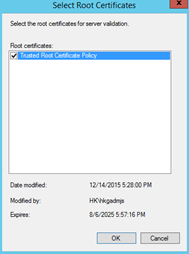
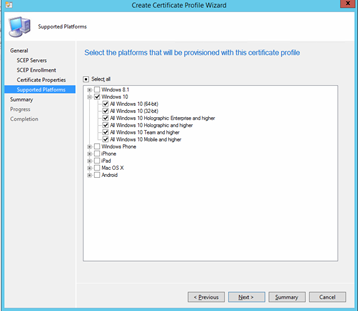
Hit next, select the destination platforms and finish the wizard.
Select Windows 10 in the Platform that you want this profile to be provisioned. Click Close on the next window.
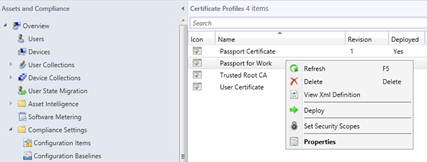
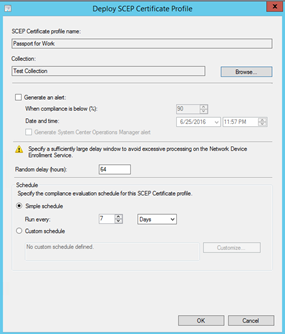
Under the Certificate Profiles, right click the SCEP Profile you have created and click Deploy
Click Browse for then select User Collection where you want to deploy the Certificate
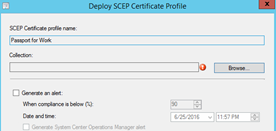
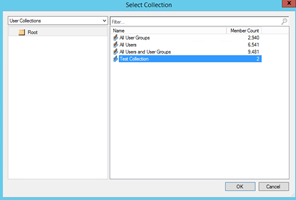
Click Ok once you have selected your Collection.
NDES Troubleshooting
The device time should be accurate. If it's off 5 minutes or more, you will not get SCEP certificate.
Did the Root CA (of the issuing CA) certificate you deployed in ConfigMgr got pushed to the device?
Can you access the NDES URL from the internet using a browser?
- Are you getting any certificate errors?
- Make sure the URL corresponds with what is listed on the certificate (https://ndes.yourdomain.com and not https://ndes.yourinternaldomain.local)
Visit https://ndes.externalfqdn.com/certsrv/mscep?operation=GetCACert&message=MyDeviceID You should get a response and the option to download a file.
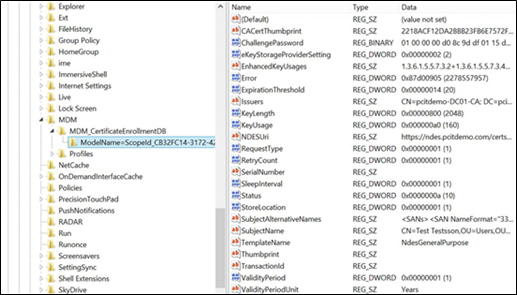
Push a certificate profile to a Windows device and check in the registry whether the request arrived.
- Open the registry editor and locate the following key: HKCU\Software\Microsoft\Windows\CurrentVersion\MDM
- The request will be visible as a sub key like shown in the screen show below.
The certificate thumbprint will be populated when the actual certificate is received.
Open the CRPCTRL.LOG on the ConfigMgr server. The "previous status" should be 0.
Check out the file C:\Program Files\Configuration Manager\Logs\crpctrl.log (could also be in x86 program files folder)
There should be an entry as follows:
CRP's previous status was 0 (0 = Online, 1 = Failed, 4 = Undefined)Do you get any requests logged on the IIS server of the NDES? What is the status code? Should be 200 in most cases!
Check out the last modified log in C:\inetpub\logs\LogFiles\W3SVC1Entries should look similar to this (notice the port number 443):

Do you see any requests logged in the NDES.log?
Check out the log at C:\Program Files\Microsoft Configuration Manager\Logs\NDESPlugin.logEntries should look similar to this:


Do you see any request logged on the IIS server of the CRP? What is the status code? Should be 200 in most cases!
Check out the last modified log in C:\inetpub\logs\LogFiles\W3SVC1Do you see any request logged in the CRP log on the CRP server?
C:\Program Files\SMS_CCM\CRP\Logs\crp.log
Are you getting this error:?
CRP's previous status was 1 (0 = Online, 1 = Failed, 4 = Undefined)
Health check request failed, status code is 403, 'Forbidden'.Make sure you change IIS on your ConfigMgr server - CMCertificateRegistration SSL Settings to Ignore Client Certificates
Do you see a certificate being issued on the issuing CA?


14. Are you getting this output in the ndes log file?
<![LOG[Failed to retrieve client certificate. Error -2147467259]LOG]!><time="20:48:44.215+00" date="08-17-2015" component="NDESPlugin" context="" type="3" thread="4064" file="httprequest.cpp:240">
<![LOG[Exiting VerifyRequest with 0x80004005]LOG]!><time="20:48:44.215+00" date="08-17-2015" component="NDESPlugin" context="" type="1" thread="4064" file="ndesplugin.cpp:874">
The client auth cert needs to have the internal dns name to present to the CRP. The easiest way to do this is to put both DNS names in the SAN of the certificate.
14. Are you getting Event ID 29 in the NDES Plugin Log? The event log might give you this entry:
Event ID: 29
The password in the certificate request cannot be verified. It may have been used already. Obtain a new password to submit with this request.
Internal Name: EVENT_MSCEP_INVALID_PASSWORD
Source: Microsoft-Windows-NetworkDeviceEnrollmentService
Description: The Network Device Enrollment Service failed to process a client device's request because the submitted password is invalid.
Diagnose: Check the IIS log to find out what query string was submitted.
Check the device configuration to ensure that the correct password is being submitted as part of the request.
Use certutil to check whether the PKCS7 package from the client is valid (certutil -v p7request.txt, where p7request.txt is a file in which the query string is captured).
Otherwise, enable CAPI2 diagnostics and, if possible, reproduce the error.
Resolve: If necessary, contact the vendor of the SCEP client and ensure that the request is being submitted correctly.
So what's up with that? Your service certificate (e.g. for Client Authentication) expired or was revoked.
Note: the registry value of HKEY_LOCAL_MACHINE\SOFTWARE\Microsoft\Cryptography\MSCEP\Modules\NDESPolicy\NDESCertThumbprint needs to be MANUALLY update with the thumbprint of the new service certificate, replacing the old certificate's thumbprint, else NDES will continue trying to use the old certificate, even if it's archived.
References:
Network Device Enrollment Service Guidance
https://technet.microsoft.com/en-us/library/hh831498.aspx
Configure certificate infrastructure
https://technet.microsoft.com/en-us/library/mt667938.aspx
Configuring certificate profiles in System Center Configuration Manager
https://technet.microsoft.com/en-us/library/mt629202.aspx
PART 2 - SCEP certificate enrolling using ConfigMgr 2012, CRP, NDES and Windows Intune
Part 3 - Protecting NDES with Web Application Proxy (WAP) in the DMZ
How to Create Certificate Profiles in Configuration Manager
https://technet.microsoft.com/en-us/library/dn270541.aspx
Certificate Profile Troubleshooting
One way of troubleshooting the certificate that you have deployed is by manually evaluating the Certificate Profile Policy and by looking on the CertEnrollAgent Log.
- Go to the Control Panel and select Configuration Manager

- Click on the Configurations tab and select the Certificate Profile Policy that you have deployed and try to force Evaluate it. (i.e. Passport Certificate)

- If it run successfully, the Certificates should now be available in the Certificate Personal Store of the user. To check open the Run command and type certmgr.msc
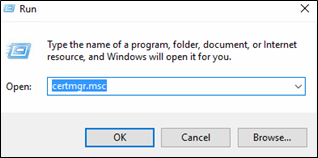
- Open the Personal > Certificate, you should see the certificate that you have deployed. Double check the Intended Purpose and the Certificate Template should match the template you have configured earlier.

- If you don't see the certificate there, you can check the certenrollagent log, but first check the CI Unique ID of the certificate you have try to deploy. To do this, go the Configuration Manager
Asset and Compliance > Company Resource Access > Certificate Profiles > right click on the title pane and add CI Unique ID column

- Once you have added already the CI Unique ID, take note of the ConfigurationPolicy Guid. You will need it later in viewing the logs.

- On the device, you can see the certenrollagent log in C:\Windows \CCM\Logs

Note: It would be easier to view the logs if you can install the cmtrace.exe, you can get the installer from the sccm server under Microsoft Configuration Manager\Tools

- Check the ConfigurationPolicy Guid for your certificate and make sure it already has issued the certificate

This Blog post was published by the authors
Lutz Seidemann (Architect) and Raymond Michael Sy Guan (Consultant). We both with Microsoft Consulting Services – Worldwide Enterprise Mobility Center of Excellence (CoE).
Disclaimer: The information on this site is provided "AS IS" with no warranties, confers no rights, and is not supported by the authors or Microsoft Corporation. Use of included script samples are subject to the terms specified in the Terms of Use.
Comments
- Anonymous
July 13, 2016
To keep it simpler, why not using PFX? it is now supported on iOS too.- Anonymous
July 19, 2016
You are correct PFX is now supported on iOS. Now the question with regard to PFX vs SCEP it is up to your requirement on what to use. But to give you a guideline SCEP Private key is generated on the device and never leaves it making the private key unique for every device(This is the key aspect of using SCEP) and you cannot use it if you have S/MIME requirement. Microsoft Passport Certificate based will also require you to use SCEP. PFX on the other hand can be distributed to multiple devices for the same user which can be used for S/MIME email encryption certificates but cannot be use if you have requirement for Microsoft Passport Certificate based.So for customer that have concern on security and doesn’t mind adding more infrastructure overhead then go for NDES/SCEP otherwise if no requirement for Microsoft Passport then PFX will do the job.
- Anonymous
- Anonymous
July 13, 2016
I believe there is a small error: "Note: To revoke certificates the NDES service account needs Issue and Manage Certificates rights for each certificate templates used by a certificate profile."If I'm not mistaken, those permissions are also needed to be delegated at the CA level.- Anonymous
July 19, 2016
In order for you to revoke a certificates you must be a CA Administrator OR Certificate Manager and for you to be a Certificate Manager you need to have Issue and Manage Certificates permission.https://technet.microsoft.com/en-us/library/cc732590(v=ws.11).aspxhttps://technet.microsoft.com/en-us/library/cc753724(v=ws.11).aspx
- Anonymous
- Anonymous
July 26, 2016
The comment has been removed