Net# 簡介:透過 Azure ML 實作多層網路及卷積神經網路 (Convolution Neural Network)
Net# 是在 Azure ML 中設定類神經網路的簡單 script 語言,讓使用者能在預設的 full bundle 之外 (即,各層間的節點是完全連接的),作出以下的變化,以進行機器學習並建構模型:
-
- Filtered bundles. The user can define a predicate by using the locations of the source layer node and the destination layer node. Nodes are connected whenever the predicate is True.
- Convolutional bundles. The user can define small neighborhoods of nodes in the source layer. Each node in the destination layer is connected to one neighborhood of nodes in the source layer.
- Pooling bundles and Response normalization bundles. These are similar to convolutional bundles in that the user defines small neighborhoods of nodes in the source layer. The difference is that the weights of the edges in these bundles are not trainable. Instead, a predefined function is applied to the source node values to determine the destination node value.
以下所介紹的範例,各位可在瀏覽器中直接打開 (登入 Microsoft Account 即可)。
範例的資料是來自著名的 MINST 網站,當中收集了 7 萬筆手寫阿拉伯數字的影像資料,每個影像都是 28*28 像素。
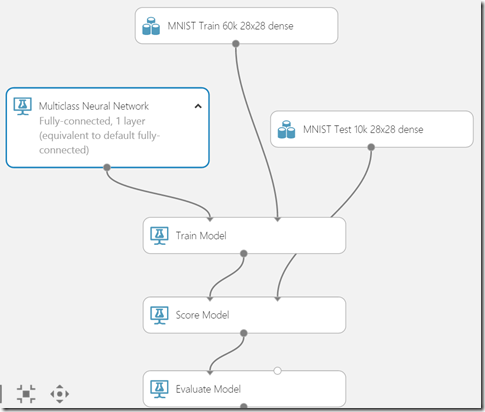
在 Azure ML Studio 中建制的學習模型如下,目的是讓機器判讀這些手寫數字。其中:
- 我們使用 Multiclass Neural Network 作為學習演算法。
- 以 6 萬筆資料作為模型學習、另 1 萬筆資料作驗證。
一、首先實作單一隱藏層、且各層間節點完全連接的網路設定
雖然 one hidden layer, fully connected 是 Azure ML 的預設值,我們還是可以用 Net# 來描述它:
呃…很簡單吧,亦即是以 input, hidden, output 分別定義各層的節點個數。也能加入如 C#/C++ 的註解喔!
 input Picture [28, 28];
 // 也可以寫成:
 // input Picture [28 * 28];
 // 或直接幫它算出來:
 // input Picture [784];
 // Net# compiler 能自動根據資料格式編排出適當的矩陣.
 hidden H [100] from Picture all;
 // 其中 “all” 是指 fully-connected
 output Result [10] softmax from H all;
 // “all” 即表示與 “H” 層 fully-connected,
 // softmax 是所指定的 activation function.
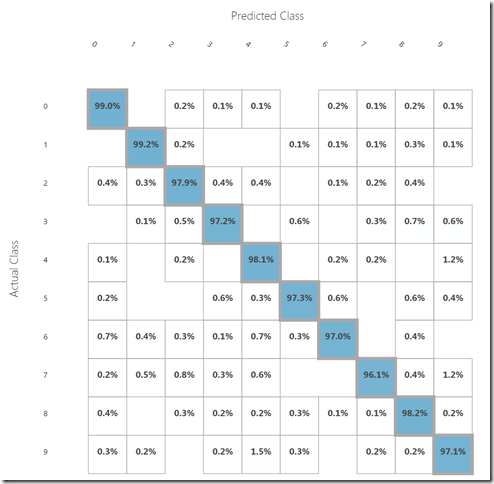
這個實驗可以在 2 分鐘之內執行 (Run) 完畢 (30 iterations)。之後點選 Evaluation Model 下的圓點選擇 Visualize,即可見到每一個數字的判讀準確率:
而整體準確率為 0.9772 (97.72%):
二、實作 2 個隱藏層
我們把 2 個隱藏層的節點數都增加到 200,則 Net# 如以下 (看起來還是很簡單!)。請各位注意層與層之間的對應關係即可 (Picture –> H1 –> H2 –> Result)。
此實驗的學習時間約 4 分半鐘 (30 iterations),準確率會是 0.981 (98.1%)。
 input Picture [28,28];
 hidden H1 [200] from Picture all;
 hidden H2 [200] from H1 all;
 output Result [10] softmax from H2 all;
若各位要進一步實作 CNN 等較進階的設定,即需有類神經網路的知識背景,才能了解各參數如 Stride 等之意義,另請參閱 Net# 官方文件的說明。
以下我仍列出 CNN 及 Deep Net 的 Net# 設定,以及其所達到的準確率給大家參考: (來源: Microsoft Azure Machine Learning Gallery)
三、實作一個簡單的 Convolution Neural Network (CNN):
如以下,跑出來的準確率會是 0.9841 (98.41%)。
 const { T = true; F = false; }
 input Picture [28, 28];
 hidden C1 [5, 12, 12]
   from Picture convolve {
     InputShape  = [28, 28];
     KernelShape = [ 5,  5];
     Stride      = [ 2,  2];
     MapCount = 5;
   }
 hidden C2 [50, 4, 4]
   from C1 convolve {
     InputShape  = [ 5, 12, 12];
     KernelShape = [ 1,  5,  5];
     Stride      = [ 1,  2,  2];
     Sharing     = [ F,  T,  T];
     MapCount = 10;
   }
 hidden H3 [100]
   from C2 all;
 output Result [10] softmax
   from H3 all;
四、實作 Convolution + Pooling Deep Net
如以下,跑出來的準確率會是 0.989 (98.9%)。
 const { T = true; F = false; }
 const {
 // input image size
 ImgW = 28;
 ImgH = 28;

 // first convolutional layer parameters
 C1Maps = 5;
 C1KernW = 5;
 C1KernH = 5;
 C1StrideW = 1;
 C1StrideH = 1;
 // formula computes dimensions with padding enabled.
 C1OutW = (ImgW - 1) / C1StrideW + 1;
 C1OutH = (ImgH - 1) / C1StrideH + 1;

 // first pooling layer parameters
 P1KernW = 2;
 P1KernH = 2;
 P1StrideW = 2;
 P1StrideH = 2;
 // formula computes dimensions with no padding.
 P1OutW = (C1OutW - P1KernW) / P1StrideW + 1;
 P1OutH = (C1OutH - P1KernH) / P1StrideH + 1;

 // second convolutional layer parameters
 C2Maps = 10;
 C2KernW = 5;
 C2KernH = 5;
 C2StrideW = 1;
 C2StrideH = 1;
 // formula computes dimensions w/ padding enabled.
 C2OutW = (P1OutW - 1) / C2StrideW + 1;
 C2OutH = (P1OutH - 1) / C2StrideH + 1;
 // Since Z dimension of the kernel is 1 & sharing is disabled
 // total # of maps is a product of input maps and layer maps.
 C2OutZ = C2Maps * C1Maps;

 // second pooling layer parameters
 P2KernW = 2;
 P2KernH = 2;
 P2StrideW = 2;
 P2StrideH = 2;
 // formula computes dimensions with no padding.
 P2OutW = (C2OutW - P2KernW) / P2StrideW + 1;
 P2OutH = (C2OutH - P2KernH) / P2StrideH + 1;
 }

 input Picture [ImgH, ImgW];
 hidden C1 [C1Maps, C1OutH, C1OutW]
   from Picture convolve {
 InputShape  = [ImgH, ImgW];
 KernelShape = [C1KernH, C1KernW];
 Stride  = [C1StrideH, C1StrideW];
 Padding = [T, T];
 MapCount = C1Maps;
   }
 hidden P1 [C1Maps, P1OutH, P1OutW]
   from C1 max pool {
 InputShape  = [C1Maps, C1OutH, C1OutW];
 KernelShape = [1, P1KernH, P1KernW];
 Stride  = [1, P1StrideH, P1StrideW];
   }
 hidden C2 [C2OutZ, C2OutH, C2OutW]
   from P1 convolve {
 InputShape  = [C1Maps, P1OutH, P1OutW];
 KernelShape = [1, C2KernH, C2KernW];
 Stride  = [1, C2StrideH, C2StrideW];
 Sharing = [F, T, T];
 Padding = [F, T, T];
 MapCount = C2Maps;
   }
 hidden P2 [C2OutZ, P2OutH, P2OutW]
   from C2 max pool {
 InputShape  = [C2OutZ, C2OutH, C2OutW];
 KernelShape = [1,  P2KernH, P2KernW];
 Stride  = [1,  P2StrideH, P2StrideW];
   }
 hidden H3 [100]
   from P2 all;
 output Result [10] softmax
   from H3 all;
延伸閱讀:
1. Neural Nets in Azure ML – Introduction to Net#
2. 本部落格 Machine Learning 系列文章: https://blogs.msdn.com/b/mengtsai/archive/tags/machine+learning/
3. Microsoft Azure 機器學習官方學習網站 (含教學影片及文件): https://azure.microsoft.com/zh-tw/documentation/services/machine-learning/


