Workflow Foundation (WF4) – Custom Activity to Invoke XAML Based Child Workflows (Part 1)
This article is part of a series:
- Part 1
- Part 2
Overview
Using the WF designer to compose workflows from other workflows is trivial providing the child workflow has been compiled. Then it’s simply a case of drag and drop. But what about the scenarios where at design time the child workflow is a XAML file that hasn’t been compiled? Perhaps you’re working in a re-hosted designer environment where compilation is not available, or perhaps the XAML files are generated by some tool? Whatever the scenario, currently there’s no design time support to setup the invocation of XAML file based workflows.
In this post I'm going to introduce you to the ExecuteXamlWorkflow custom activity which can be downloaded from here. Once added to your WF designer toolbox the custom activity will allow you to execute a XAML file based child workflow. You simply drag the activity to the designer surface, specify the XAML file and setup its arguments through a simple dialog. At runtime, it executes the specified child workflow through to completion..
The focus has been to provide a designer experience that is as simple as possible for the user. Full validation using the standard WF designer mechanisms is provided. And to improve performance, child workflows are cached once loaded.
Using the ExecuteXamlWorkflow Custom Activity
- Download the source from here.
- If your intent is to use this from Visual Studio, add the activity to your toolbox by opening the toolbox then selecting right click -> Choose Items … -> Browse …
- Locate the downloaded file Microsoft.Consulting.Workflow.Activities.dll and then select ExecuteXamlWorkflow from the available list.
- You should now see ExecuteXamlWorkflow in your toolbox. Drag it onto the designer surface:
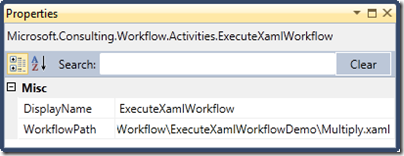
- First you need to specify the location of the XAML file that contains the child workflow you wish to execute. Clicking on the ellipses will open a file dialog where you can locate this file. Alternatively, in the properties grid, you can specify the full file path:
- The file path you specify will be persisted in the parent XAML so it’s important that you don’t specify an absolute path if your intent is to run the workflow in a different environment. Now it’s not possible to specify relative paths (because what would they be relative to?) but there are two other options. First, if you wish to use the file dialog then setup a share that contains your workflows or that is the root of a directory structure you can browse. Secondly, the WorkflowPath property in the Properties box allows environment variables (and they can be nested), so you define a path in terms of the environment variables you have defined:
- Now you can define the arguments that are required by the child workflow. Click on the “Define …” button and the following dialog is shown:
- The only column that should be modified is the Value column since the other column values are derived from the signature of the child workflow and modifying these values will result in validation errors. In the Value column you may specify any valid VB expression. For arguments that have a direction of type In/Out or Out you must specify a variable or argument of the parent workflow.
- That’s it. The custom activity is ready to execute your child workflow!
Using the Demo Project
The source code solution comes complete with a demo project that shows the ExecuteXamlWorkflow custom activity in action. Open the solution file and within the ExecuteXamlWorkflowDemo project open Demo.xaml which looks like this:
This is the parent workflow that invokes two child workflows Increment.xaml and Multiply.xaml. The parent has three variables; val1, val2 and result. In the loop, val1 and val2 are passed to the child workflows Increment.xaml and are each incremented up to the value of 10 (the use of the Parallel activity is just for fun). Once out of the loop, the two variables are passed to the Multiply.xaml child workflow where the two values are multiplied and passed out into the result variable. Finally the result is output to the console.
Remember the tip about absolute paths? The demo references its child workflows by resolving the environment variable “workflowsdir”. Make sure you define this to point to the demo project directory where Increment.xaml and Multiply.xaml reside.
Hit F5 to run the application. The parent will execute and invoke its children where we should see the value 100 displayed in the console!
Next Time
In the next post I'll discuss some of the rationale and gotchas behind implementing this solution. If you're new to implementing custom activities and designers then you may find some of this information valuable so hopefully see you then ...
Written by Christopher Owczarek
![clip_image001_2_25AB2AC0[1] clip_image001_2_25AB2AC0[1]](https://msdntnarchive.z22.web.core.windows.net/media/MSDNBlogsFS/prod.evol.blogs.msdn.com/CommunityServer.Blogs.Components.WeblogFiles/00/00/01/34/14/metablogapi/4846.clip_image001_2_25AB2AC01_thumb_120663DC.png)


