Creating and working with surveys
Surveys are a great way to learn more about what your audiences would like you to keep doing and what needs improvement.
With the great new addition to the Dynamics CRM family, Adxstudio Portals, you can easily create surveys to be exposed to your audiences on your portal(s).
In this blog post we will create a survey to be hosted on a Community Portal. Since Adxstudio Portals are directly linked to Dynamics CRM all the heavy lifting takes place in the familiar Dynamics CRM UI
Creating a survey is accomplished by making customizations in CRM and creating a new entity. Once the entity has been created and its form has been edited to suit your desired layout then a Web Form and steps can be created.
The steps
- Create an entity
- Create fields
- Create forms
- Create a web page
- Create a web form
- Create survey steps
- Add the web page to the Portal
(to create an Adxstudio trial please refer to this blog post) - Try out the survey
- Review the results
Create a new entity
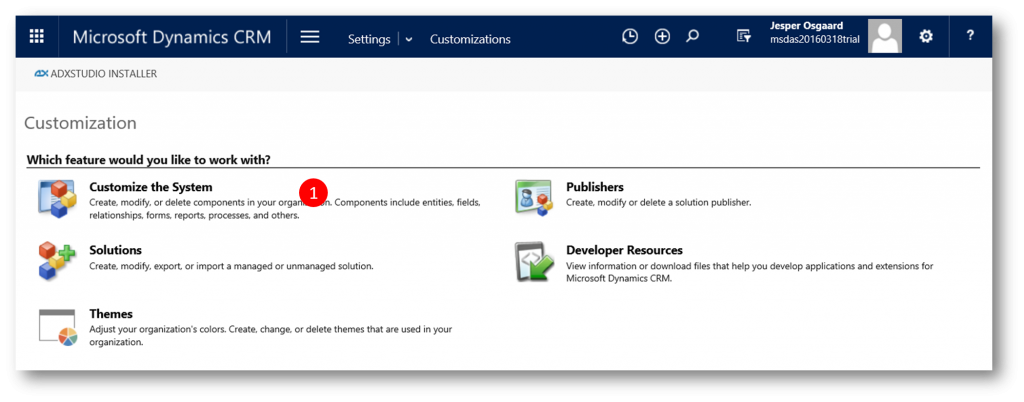
Login to CRM, navigate to Settings, click Customizations, click Customize the System (1)
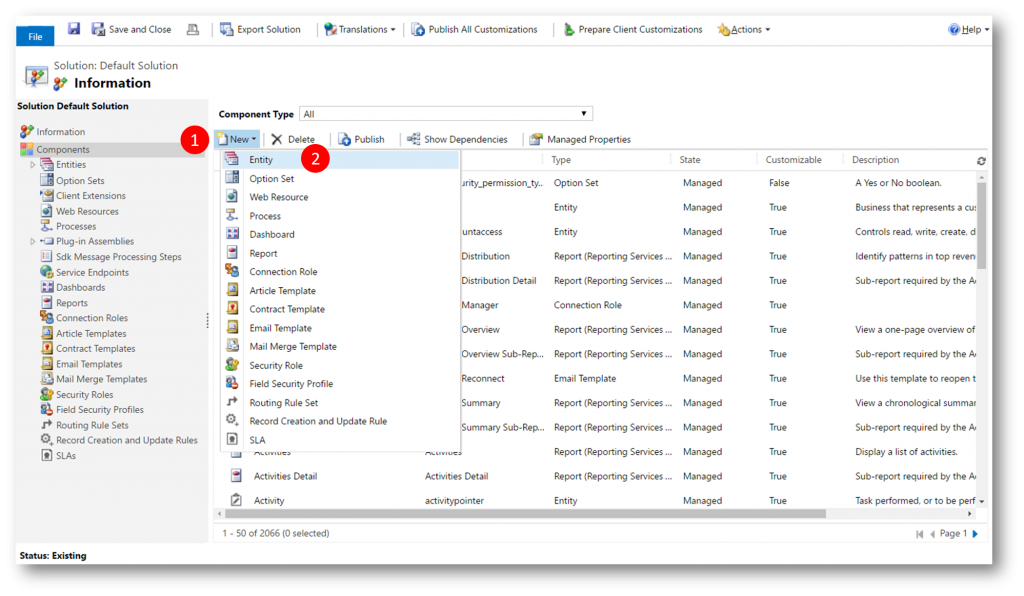
Click New (1) and then Entity (2)
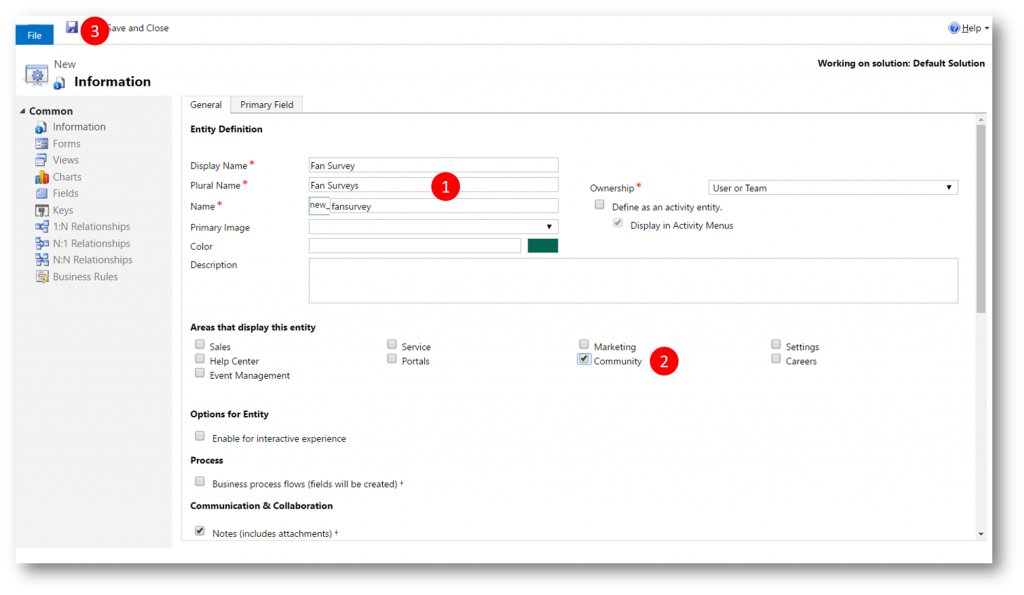
Fill in the required fields for the new entity:
- Choose a Display Name, eg "Fan Survey" (Plural Name: Fan Surveys, logical name: new_fansurvey) (1)
- Set the entity to display in an area of your choice, eg Community (2)
- Click Save (3)
Now we will start building the questions of survey. We will need to create a bunch of fields, and then build three forms. The third form will help us see the answers the responder provides using the first two forms. The fictatious survey is helping the portal owner to understand how the users like a blog on the portal.
Create Fields
We will start with a multiple lines text field to hold a question about how the blog helps the visitor
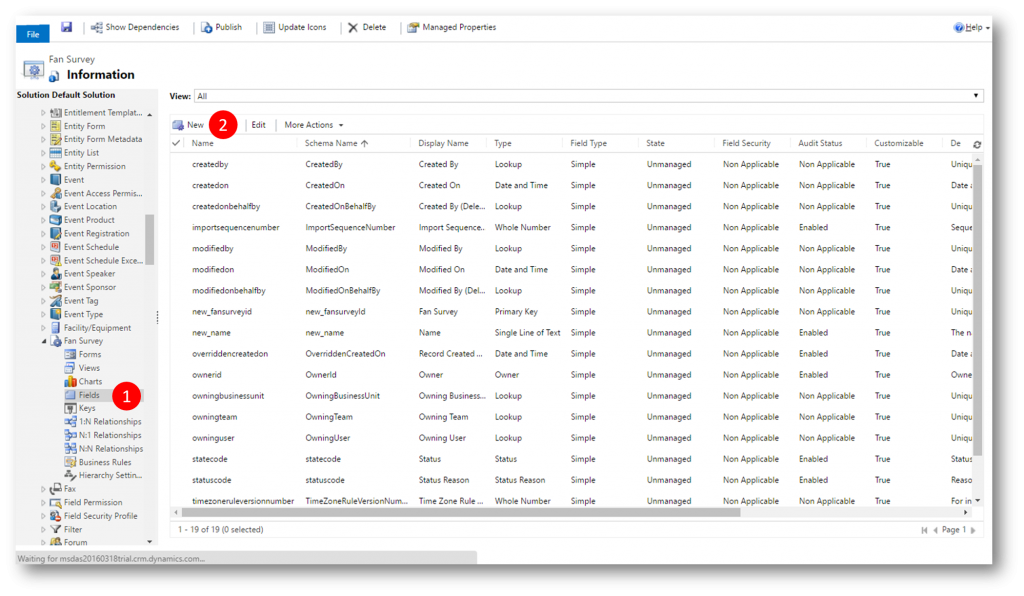
Click Fields (1) and then New (2)
Set the Display Name to eg Description (Logical name: new_description), set the Requirement Level to Business Required, set the Data Type to Multiple Lines of Text, and then click Save & Close 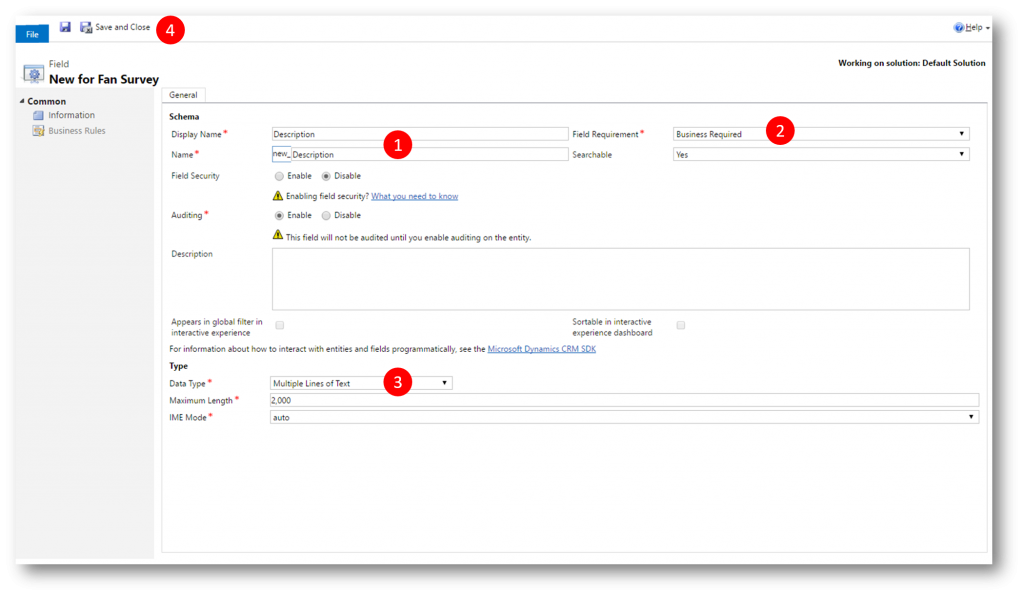
Create two fields to hold answers to to questions about how the responder heard about us and her fictatious level
- Display Name: How Heard (Logical name: new_howheard), Data Type: Single Line of Text
- Display Name: Gold Star (Logical name: new_goldstar) Data Type: Two Options
Create three more fields, each one representing an answer to the question we have planned (“How may we contact you?”)
- Display Name: Email (Logical name: new_mc1_email) Data Type: Two Options
- Display Name: Phone (Logical name: new_mc1_phone) Data Type: Two Options
- Display Name: Social (Logical name: new_mc1_social) Data Type: Two Options
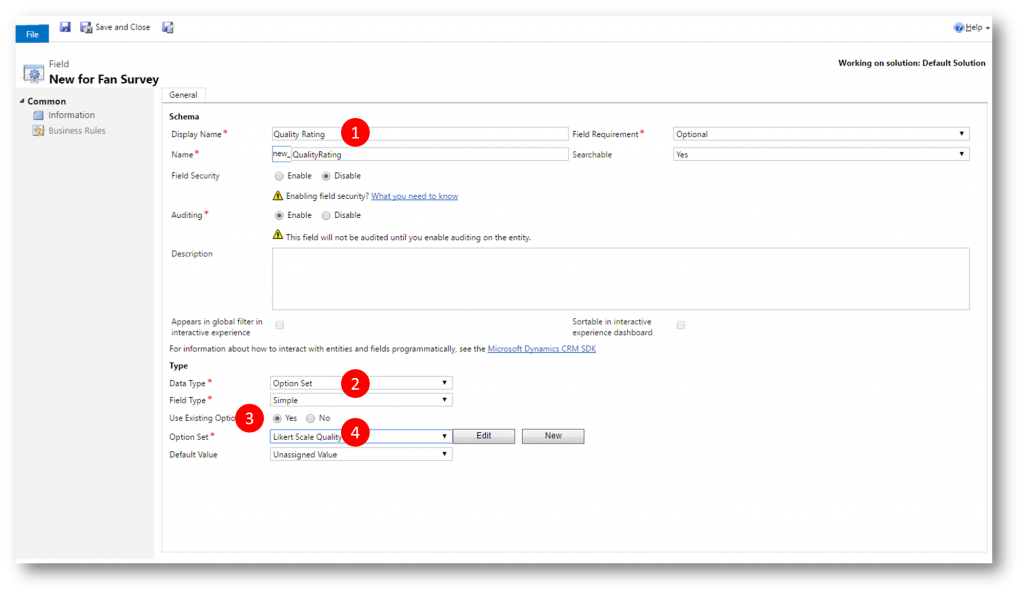
Create a field to hold a quality rating question
- Display Name: Quality Rating (Logical name: new_qualityrating) Data Type: Option Set
- Choose Use an Existing Option Set (3)
- Choose Likert Scale Quality (4) for the Option Set
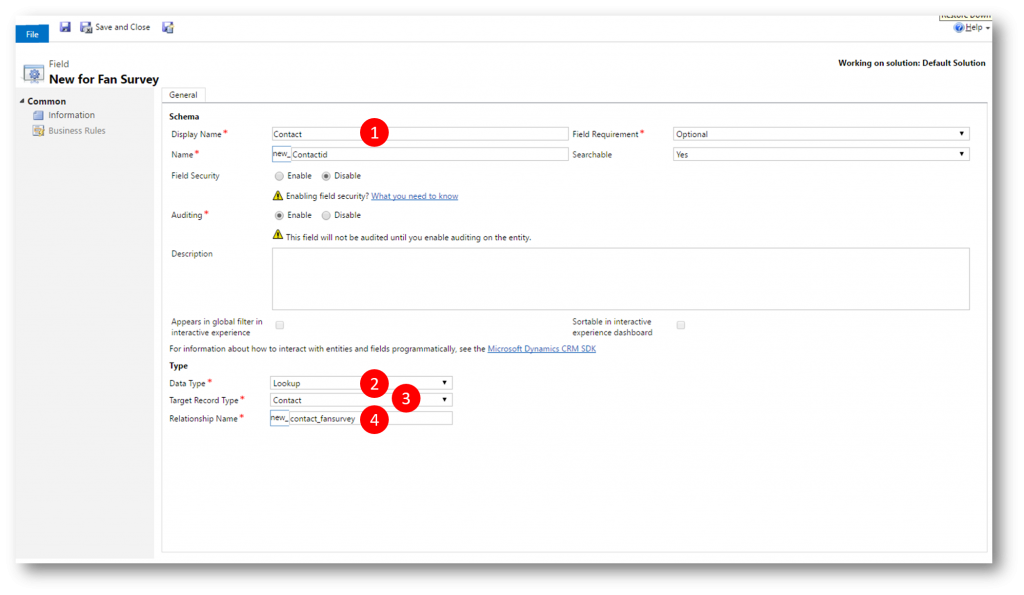
Finally add a field that will record visitor/responder (current portal user)
- Display Name: Contact (Logical name: new_contactid), Data Type: Lookup (2)
- Target Record Type: Contact (3)
- Relationship Name: new_contact_fansurvey (4)
Create Forms
With the fields created we will next build three CRM forms that will be rendered to display the survey. Two of them will be the forms for the survey questions, and the third will be for viewing the survey results.
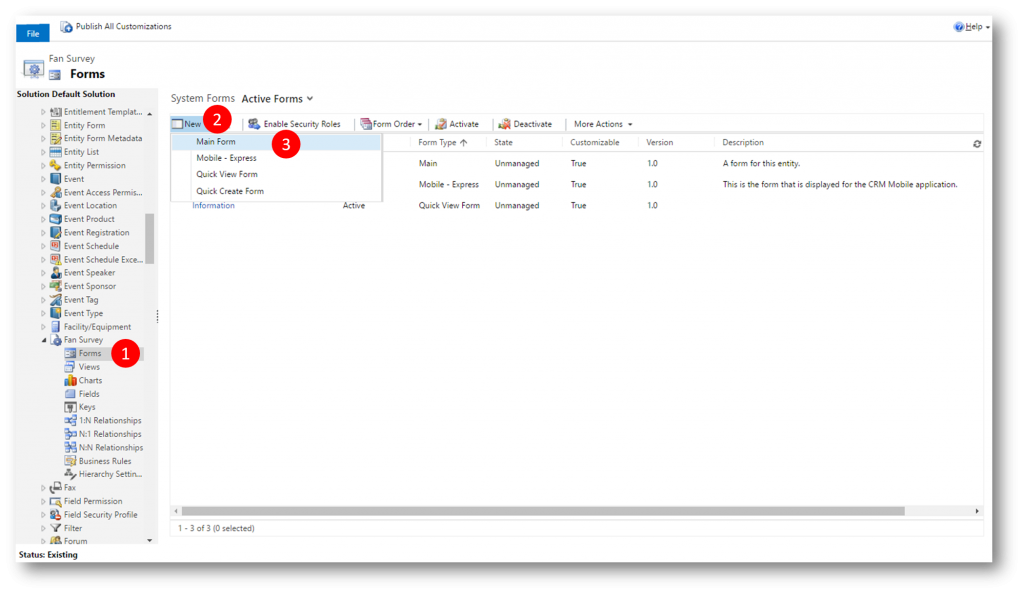
Click Forms, New and then Main Form to create a new main form.
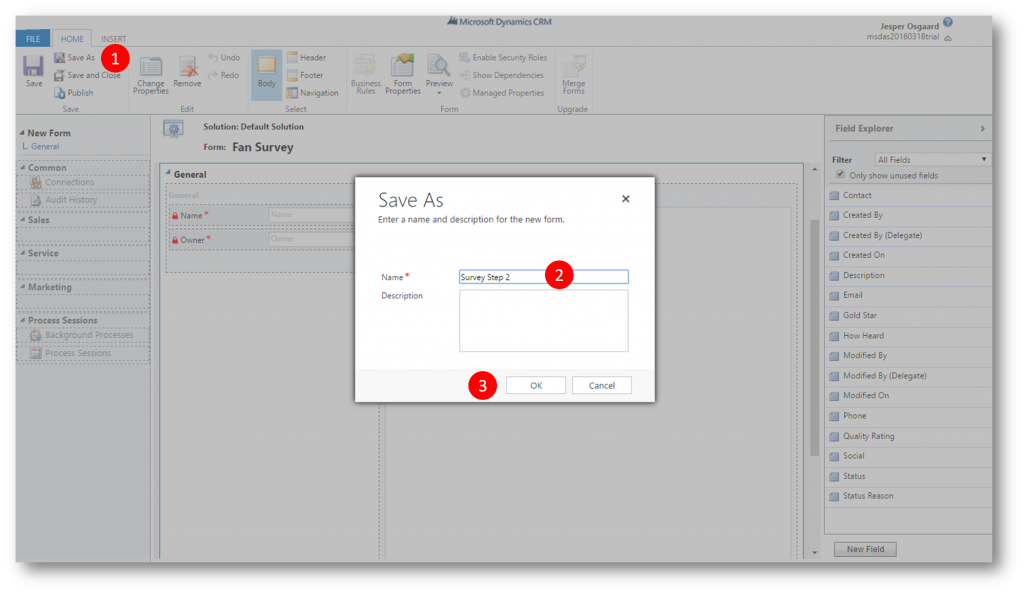
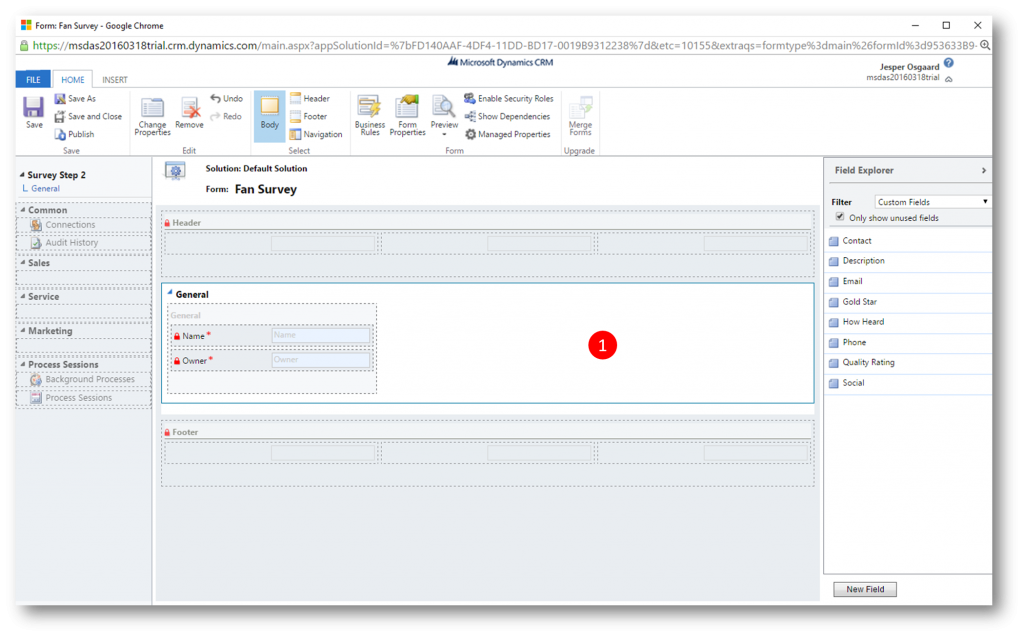
Click Save As and save it as "Survey Step 2"
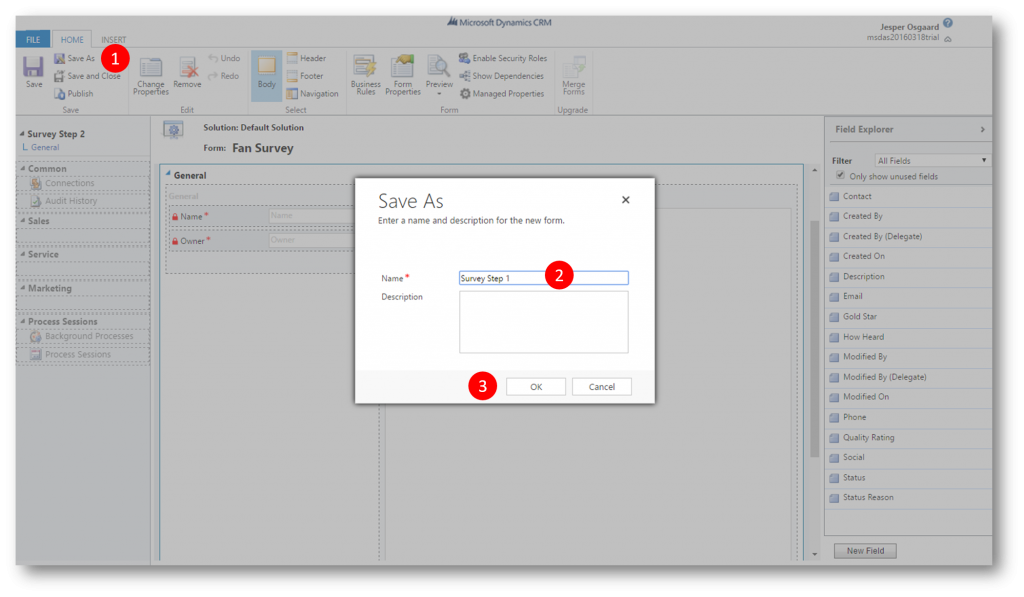
Click Save As and save it as "Survey Step 1"
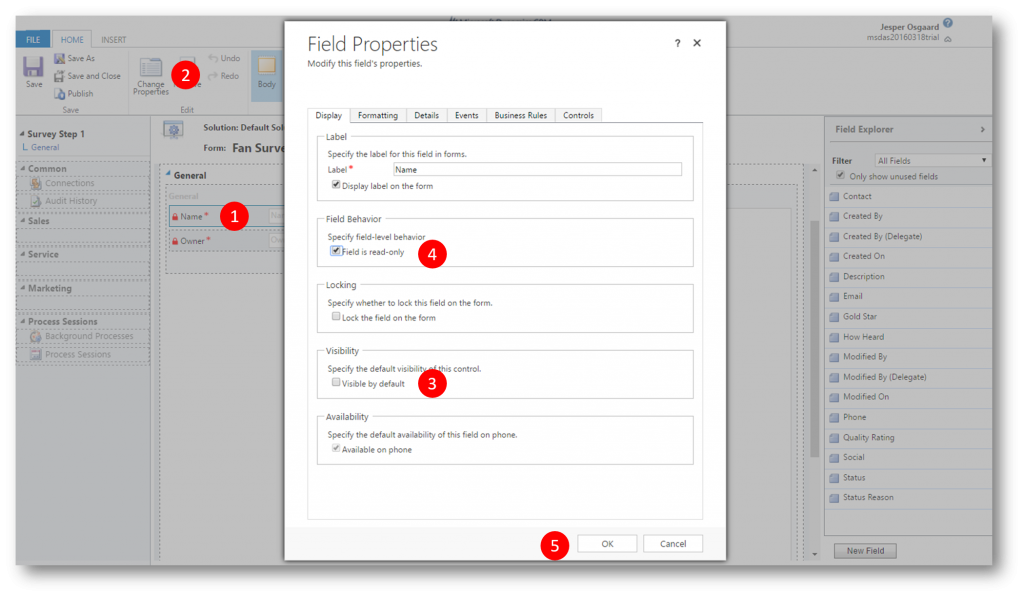
With the form "Survey Step 1" still open hide the fields "Name" and "Owner" and make them Read-Only.
- Click the "Name" field, click Change Properties, uncheck Visible by default, check Field is read-only and then click OK
- Repeat for the "Owner" field
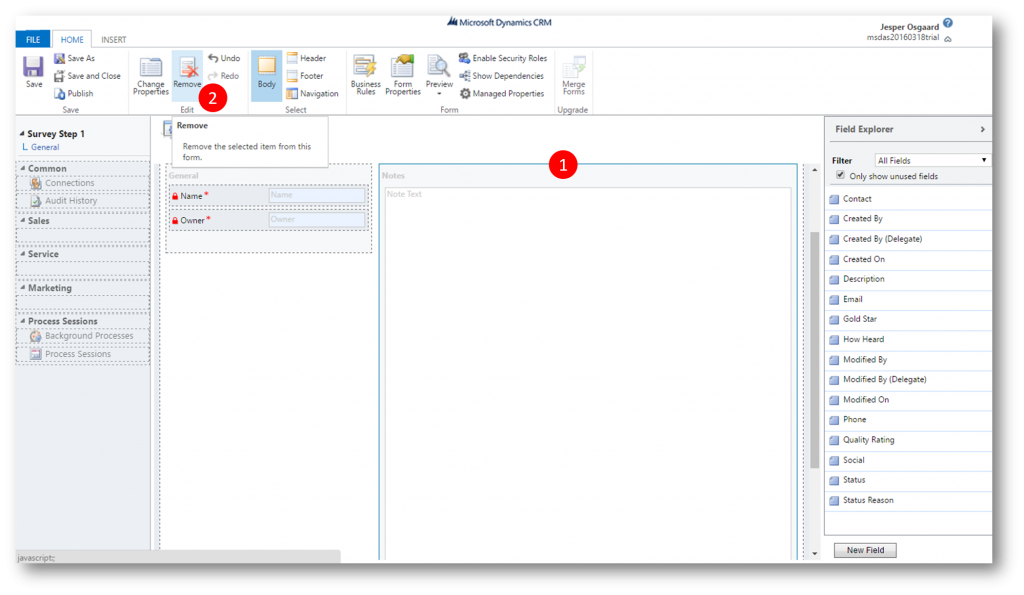
We wont be using the Notes tab either, so we'll remove it
- Select the Notes tab on the form and then click Remove
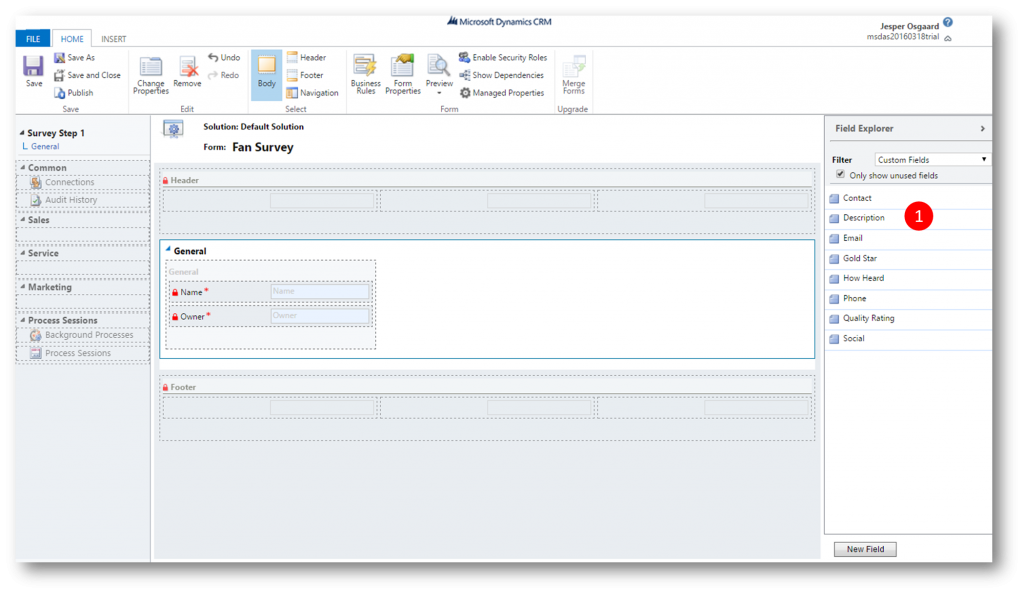
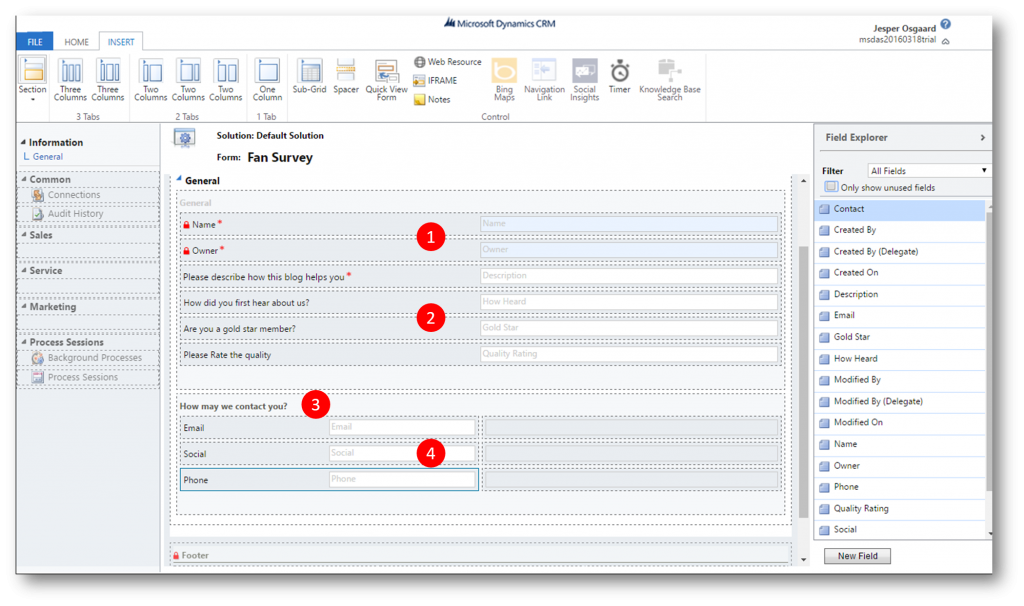
Now we are ready to add the text fields and true/false question to the form (in a layout of our choice)
- Drag and Drop the Description field onto the form
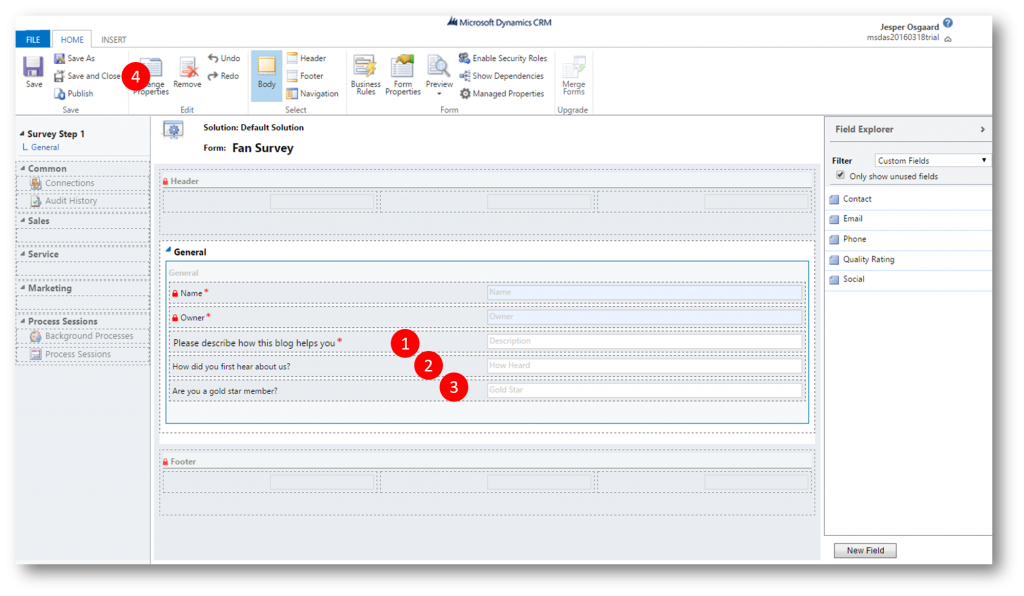
- Click the Description field and click Properties, set the label to "Please give a description of how this blog helps you", and then click OK (1)
- Drag and Drop the How Heard field onto the form, click it and click Properties, set the label to "How did you first hear about us?", and then click OK (2)
- Drag and drop the Gold Star field onto the form, click it and click Properties, set the label to "Are you a gold star member?" (3)
- Click Save & Close (4)
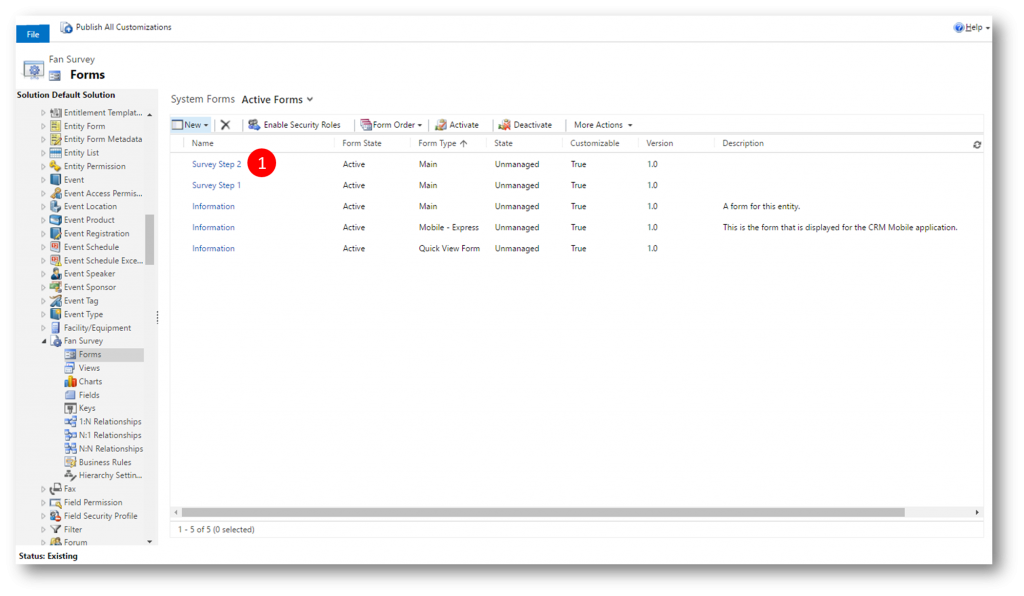
Next task is to edit the form for Step 2 of the survey
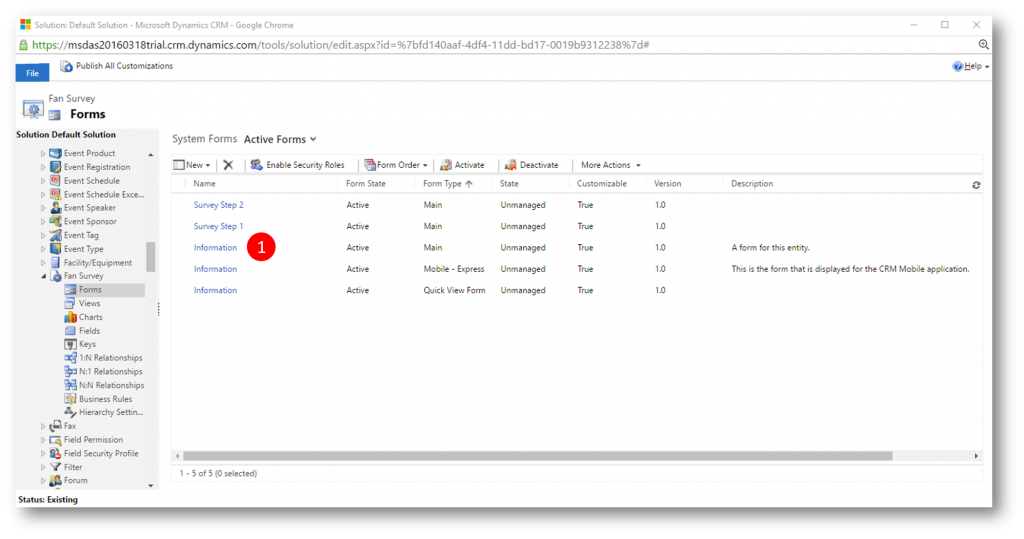
- In the list of Active Forms click Survey Step 2 (1) to open the form
Repeat the steps from the Survey Step 1 form with regards to the Name, Owner, and Notes fields
- Click the Name field on the form and click Properties, uncheck Visible by default, check Field is Read-only
- Click the Owner field on the form, the click Properties, uncheck Visible by default, check Field is Read-only
- Click the Notes tab on the form, Click Remove
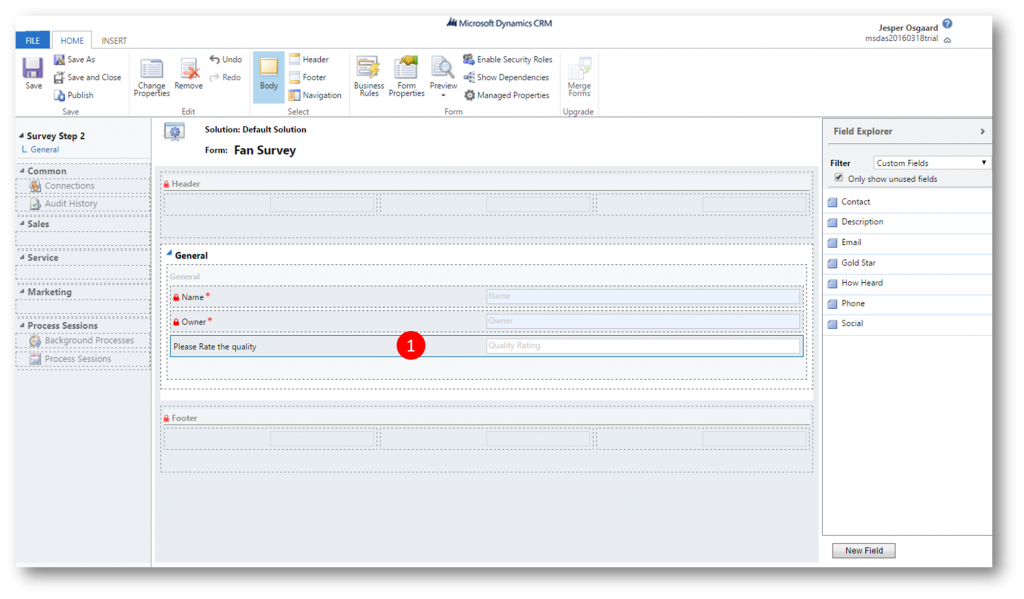
- Drag and drop the Quality Rating field onto the form, click on it, click Properties, and set the label to “Please Rate the quality”
Add the multiple choice question - for the visitor to indicate how we may contact her
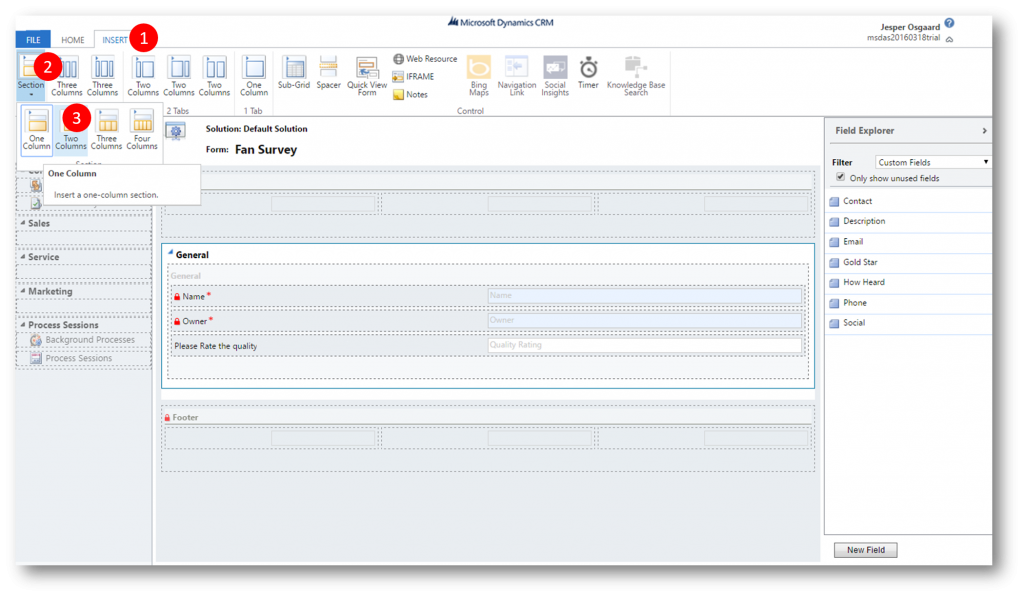
- Click the Insert tab (1), click the Sections button (2) and then click for a Two-Columns (3)
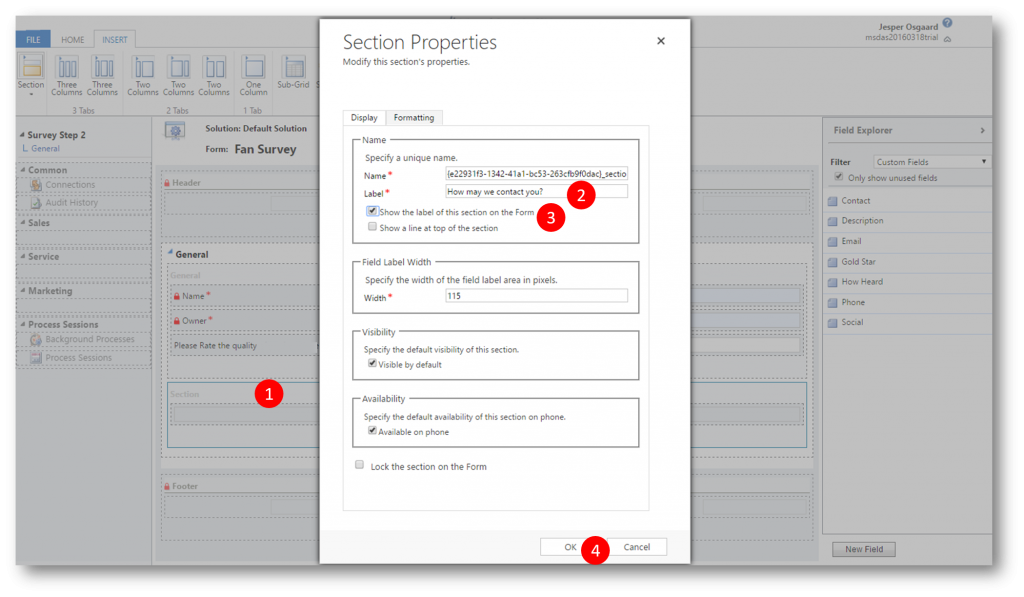
- Double-click the newly created section (1), change the label to: “How may we contact you?” (2), check Show the label of this section on the Form (3) and then click OK
Add each response to this question you created earlier to this section:
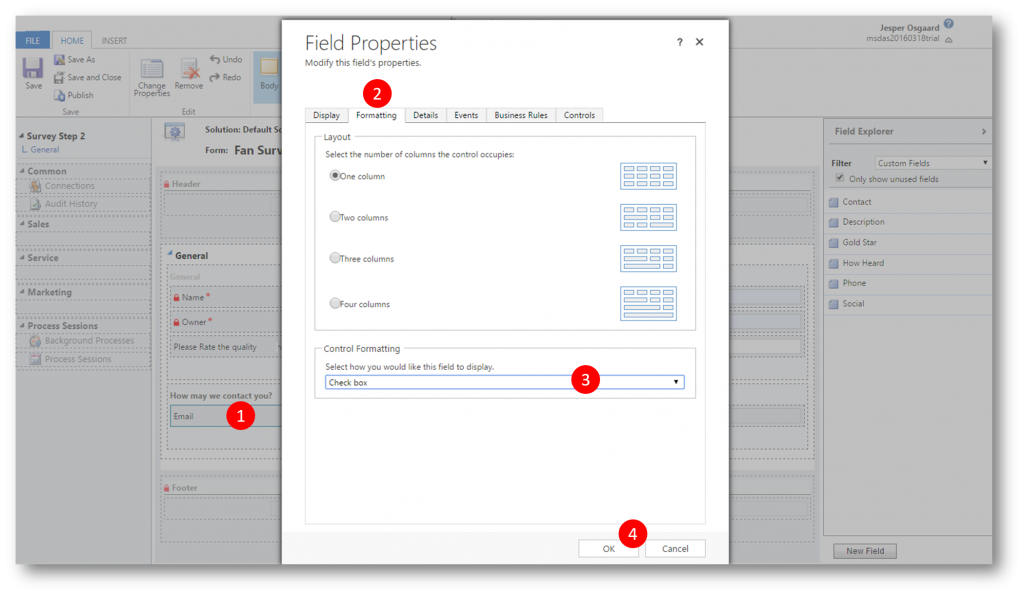
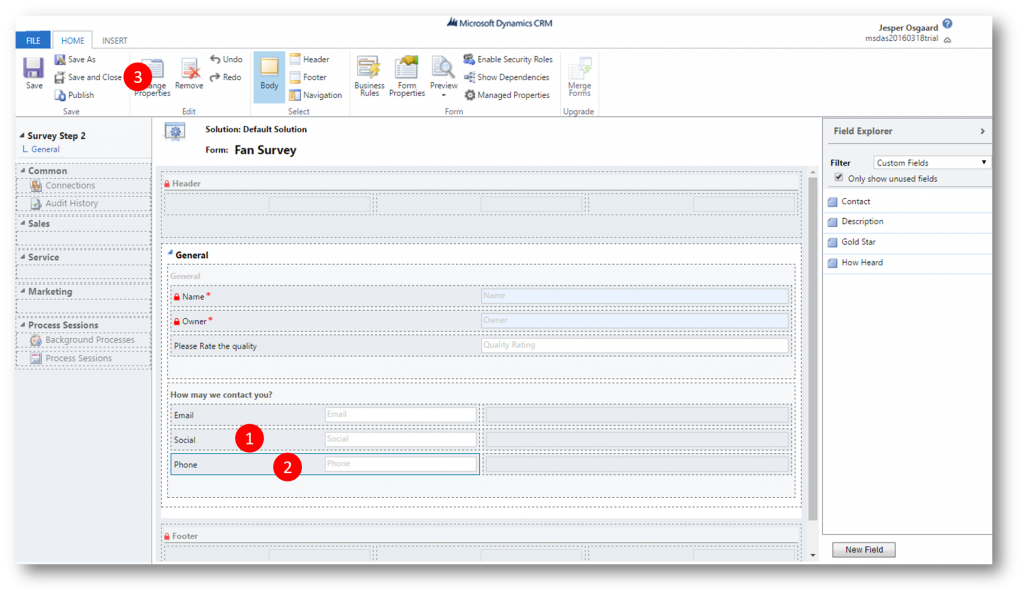
- Drag and drop the Email field onto the form, double-click it (or select it and click Properties), click Formatting, select Check Box as the Control Formatting, and then click OK
- Repeat for the Social and Phone fields
- Click Save & Close to close the form
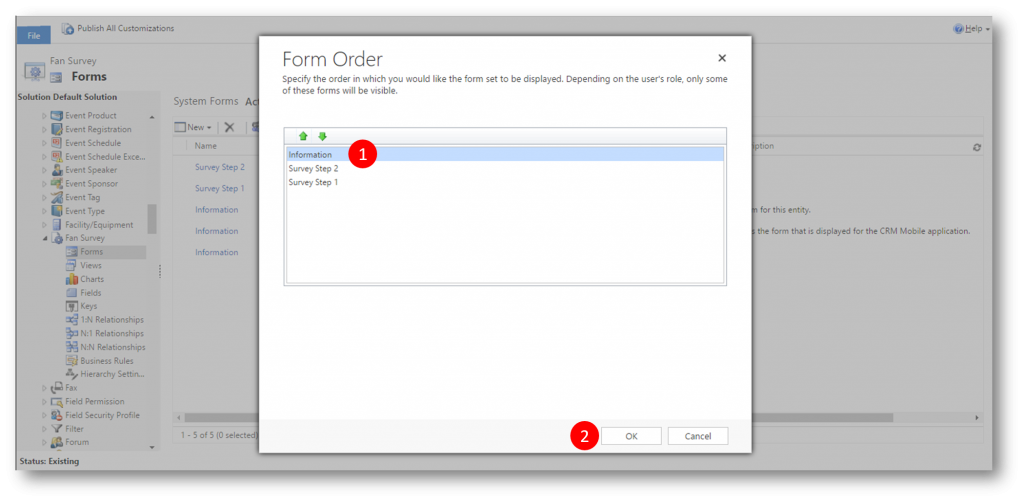
Back in the list of Active forms, click Form Order and choose Main Form Set 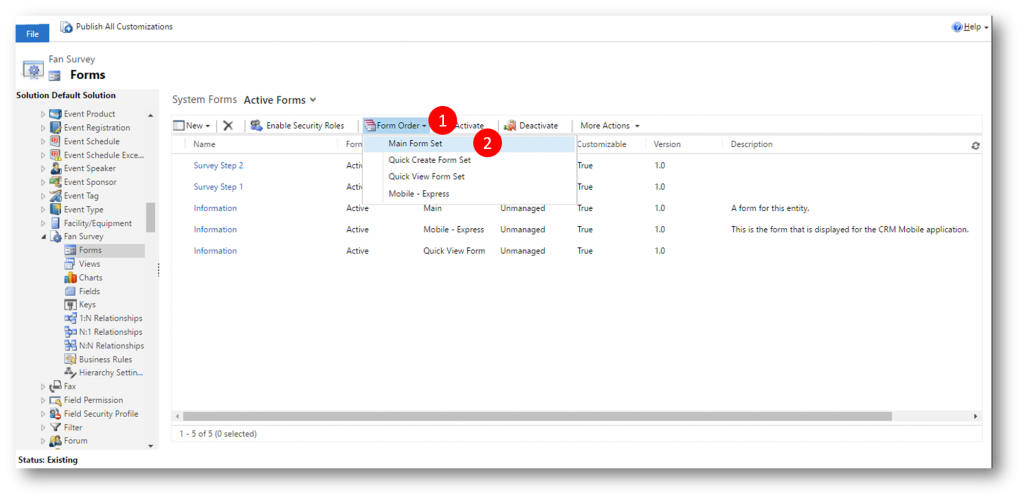
Move the Information form to the top and then click OK (to ensure this form is what we see when we wish to see survey results)
Now we will edit the main information form to display the survey results once they start coming in
Open the Information Form
Optional – hide Name and Owner fields, remove Notes field, edit section layout (1)
Add the text area and true/false question to the form, in a layout that you desire (2):
- Drag and Drop the Description field onto the form, click it and click Properties, set the label to "Please describe how this blog helps you", and then click OK
- Drag and Drop the How Heard field onto the form, click it and click Properties, set the label to "How did you first hear about us?", and then click OK
- Drag and drop the Gold Star field onto the form, click it and click Properties, set the label to “Are you a gold star member?”, and then click OK
- Drag and drop the Quality Rating field onto the form, click it and click Properties, set the label to “Please Rate the quality”
Add the multiple choice question:
- Click the Insert tab in the ribbon, click for a Two-Column section, double-click on the newly created section, set the Label of this section to be: “How may we contact you?”, check Show the label of this section on the Form, click OK (3)
Add each response to this question you created earlier to this section (4):
- Drag and drop the Email field onto the form, double-click it or select it and click Properties, click Formatting, select Check Box as the Control Formatting, click OK
- Repeat for the Social and Phone fields
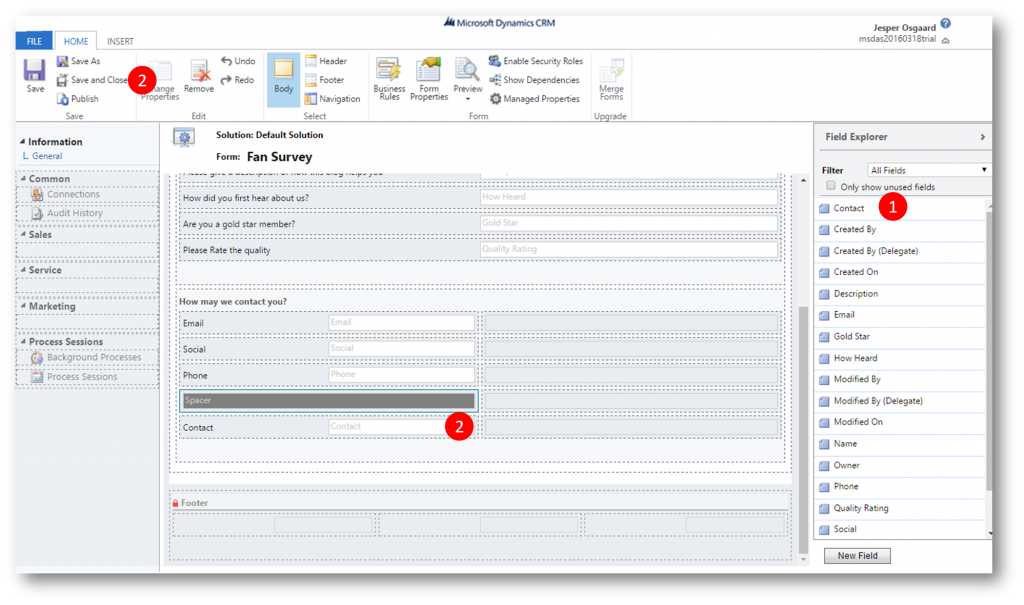
Finally, we will add the Contact Lookup field to the form, to display the name of the responder
- Drag the Contact field (1) onto the form (2) perhaps with a spacer above it
- Save & Close to close the form and Publish All Customizations
Create a Web Page
Now that the entity, fields and the CRM forms have been created, we can create the web form data for our survey and associate the survey with a web page so that it shows up on our portal.
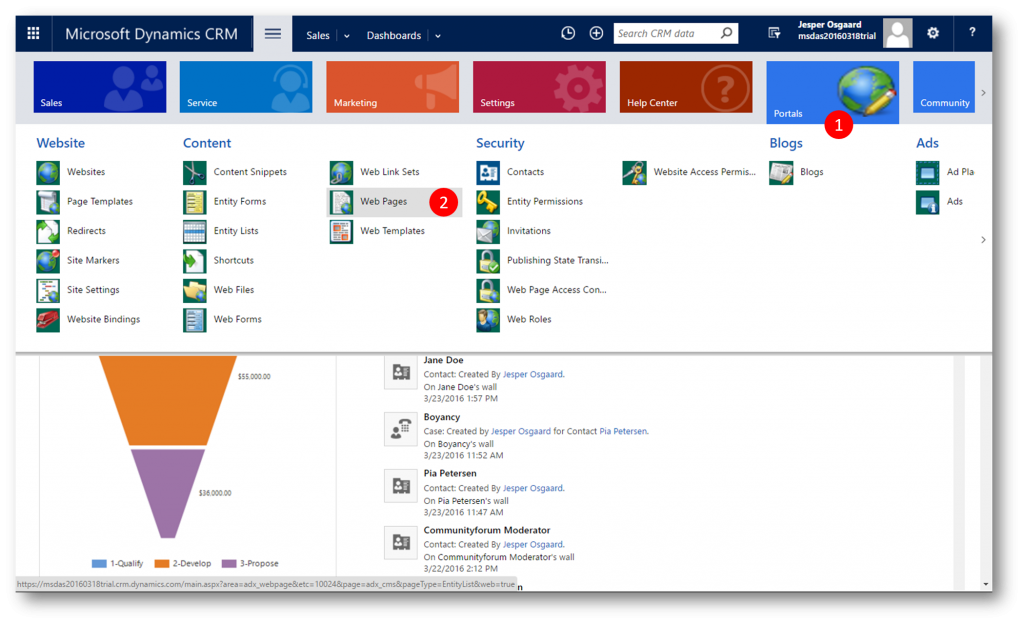
- Navigate to Portals and then Web Pages to display the list of Active Webpages
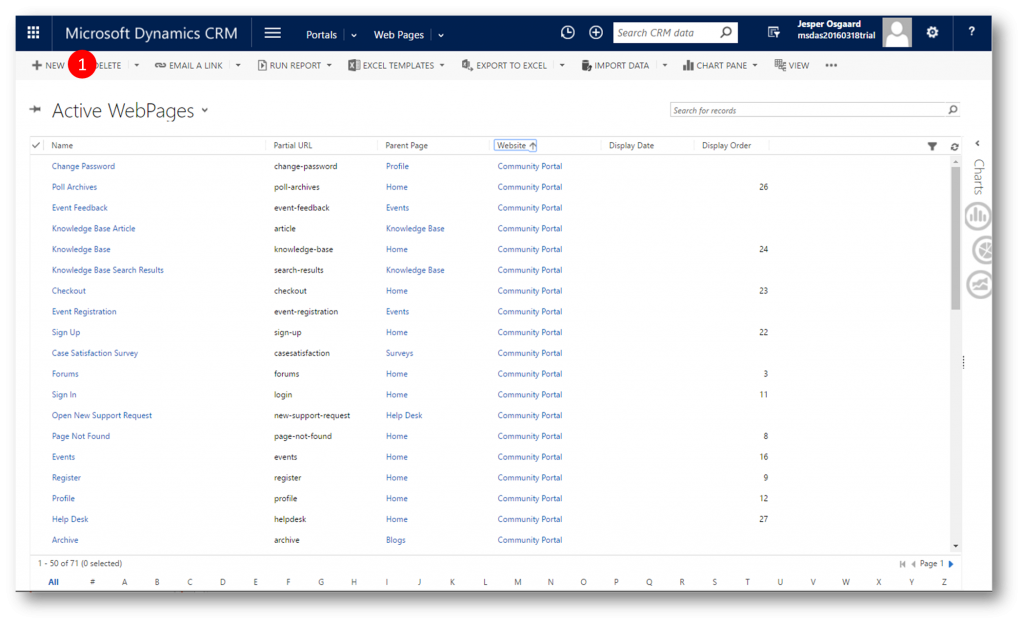
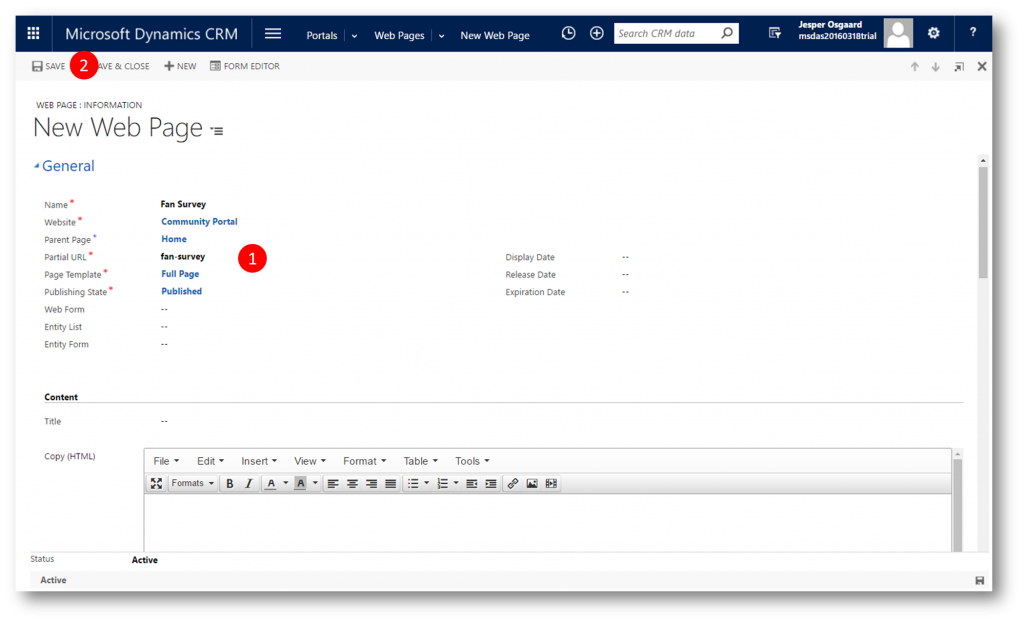
Click New (1) to create a new Web Page
Give the web page the following values:
- Name: Fan Survey
- Website: Community Portal (or another portal depending on your portals)
- Parent Page: Home
- Partial Url : fan-survey
- Page Template: Full Page
- Publishing State: Published
and then click Save to save the Web Page
Create a Web Form to add to the Web Page
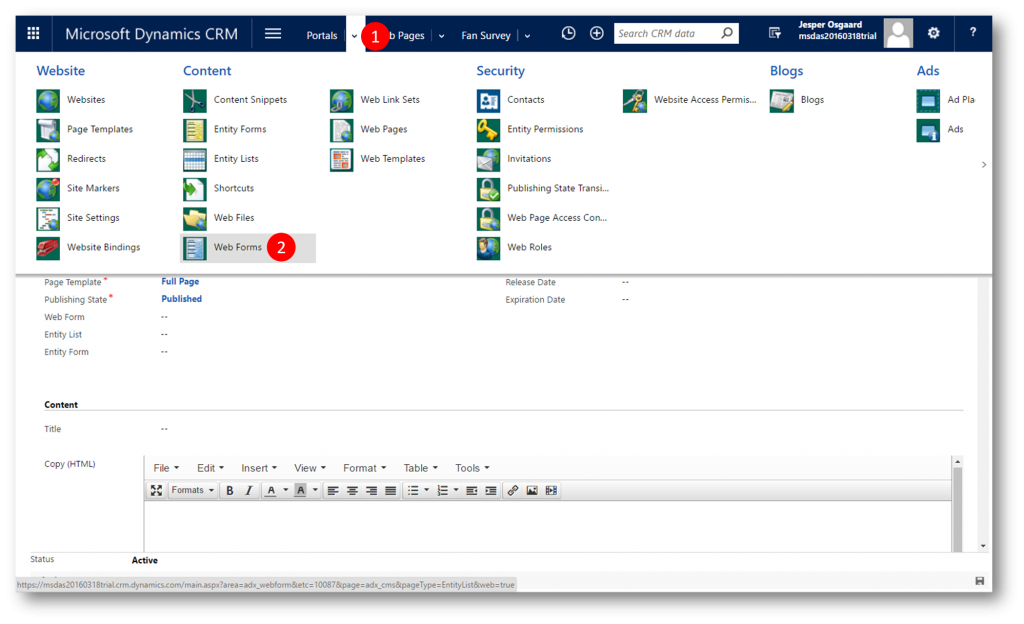
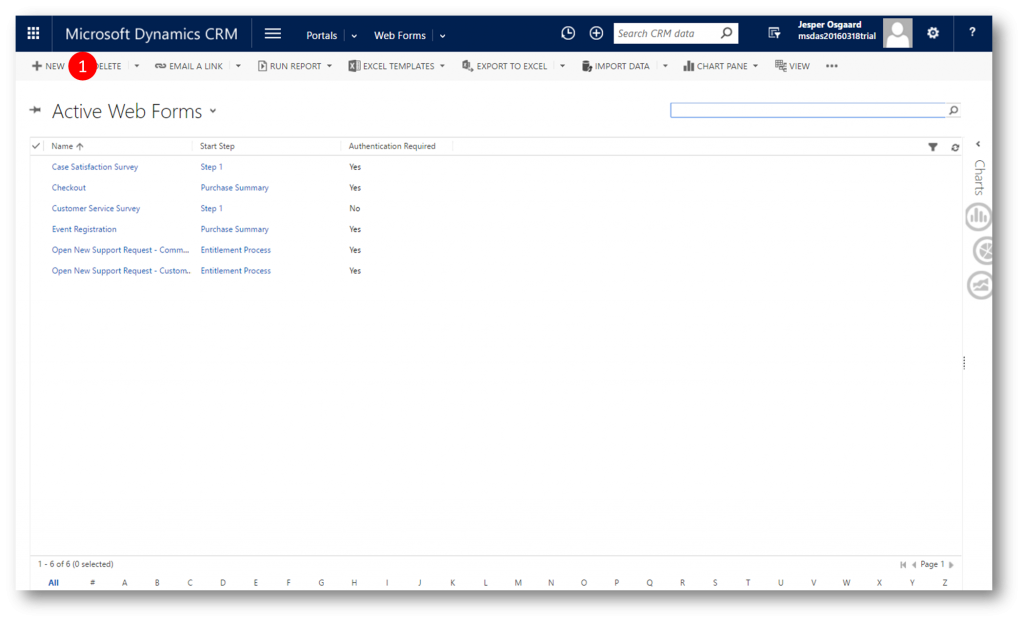
Click Portals and then Web Forms to display the “Active Web Forms” list (note - using this approach we must remember to connect the new web form to the web page once created using the Web Form lookup field)
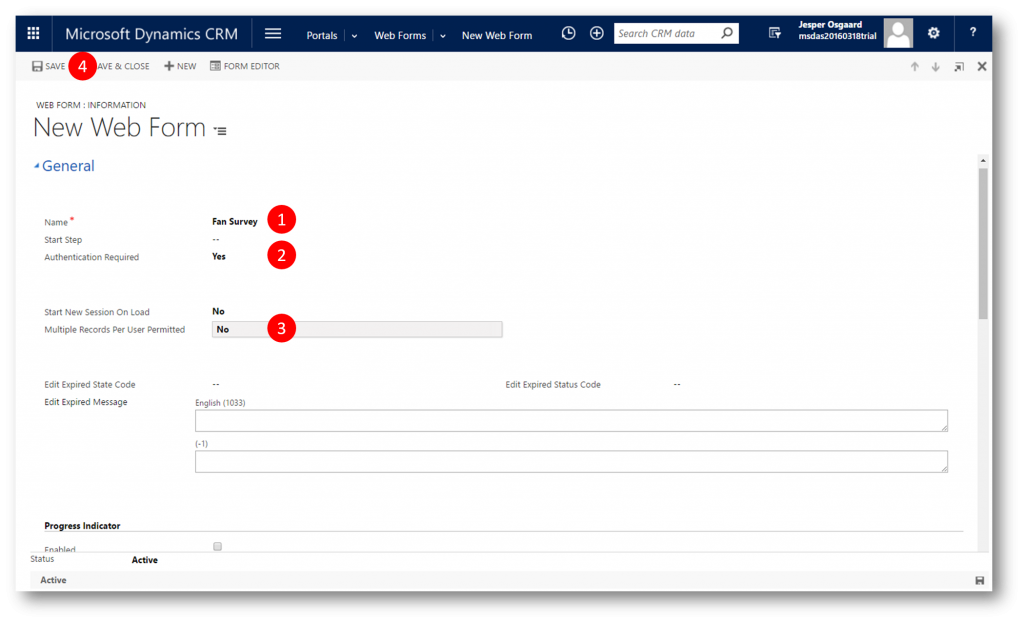
Click New to create a new web form.
- Specify a Name for the Web Form: Fan Survey
- Set Authentication Required to Yes
- Set Multiple Records Per User Permitted to No
- Click Save (do not close the form)
Create survey steps
Next up we will create the two steps comprising the survey
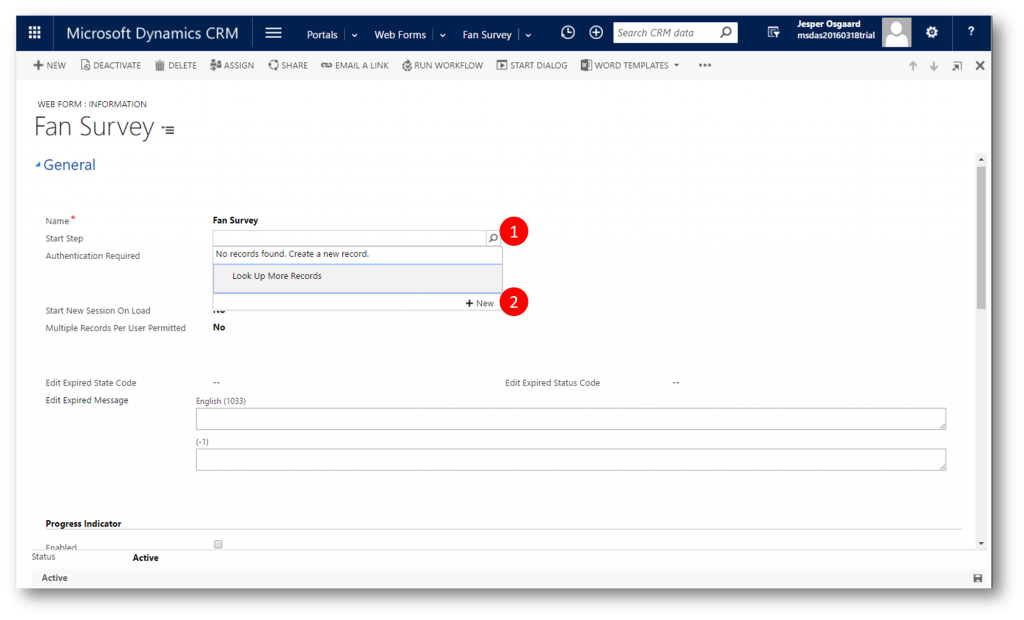
- Click the Start Step lookup (1) and then click New (2) to display the "New Web Form Step" page
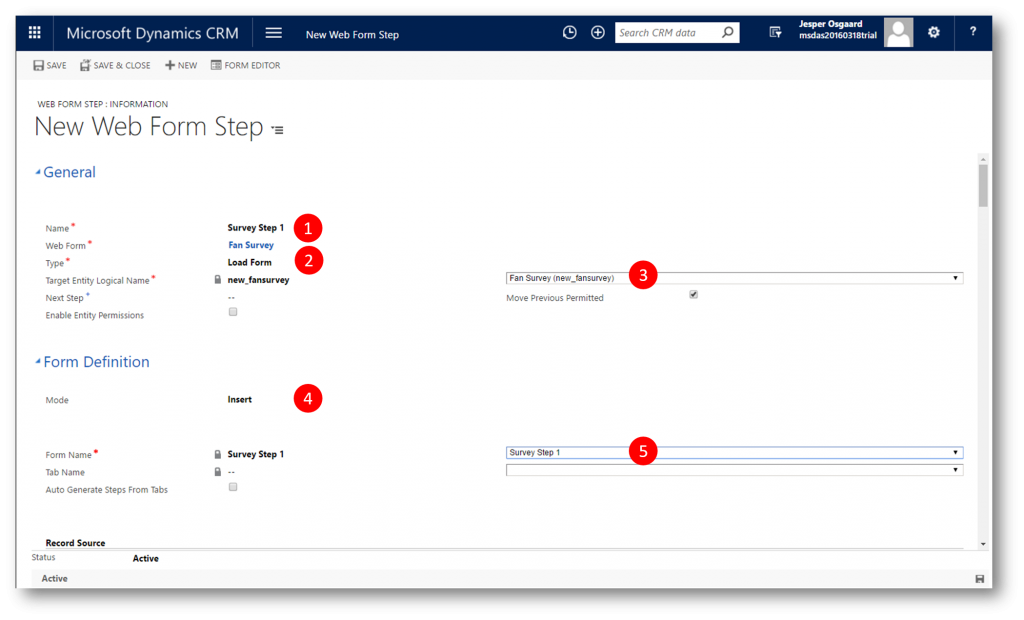
Give the step the following values:
- Name: Survey Step 1
- Type: Load Form (should be set already)
- Entity Logical Name: new_fansurvey (select in drop-down)
- Mode: Insert (should be set already)
- Form Name: Survey Step 1 (CRM form definition, select in drop-down)
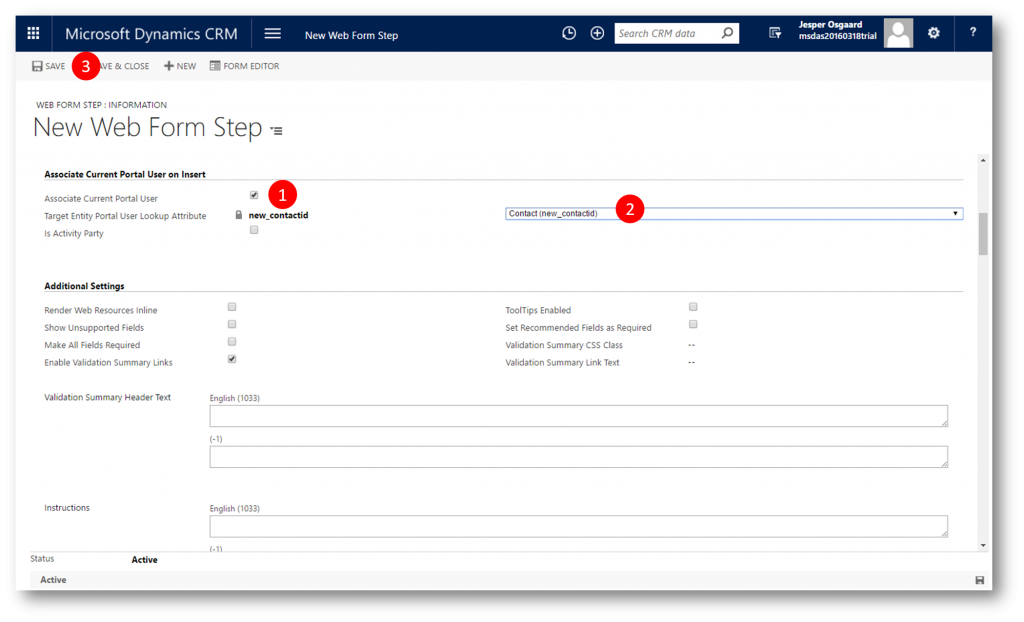
Scroll down if needed
- Check Associate Current Portal User
- Target Entity Portal User Lookup Attribute: Contact (new_contactid)
- Click Save
Click then Next Step lookup button, click New 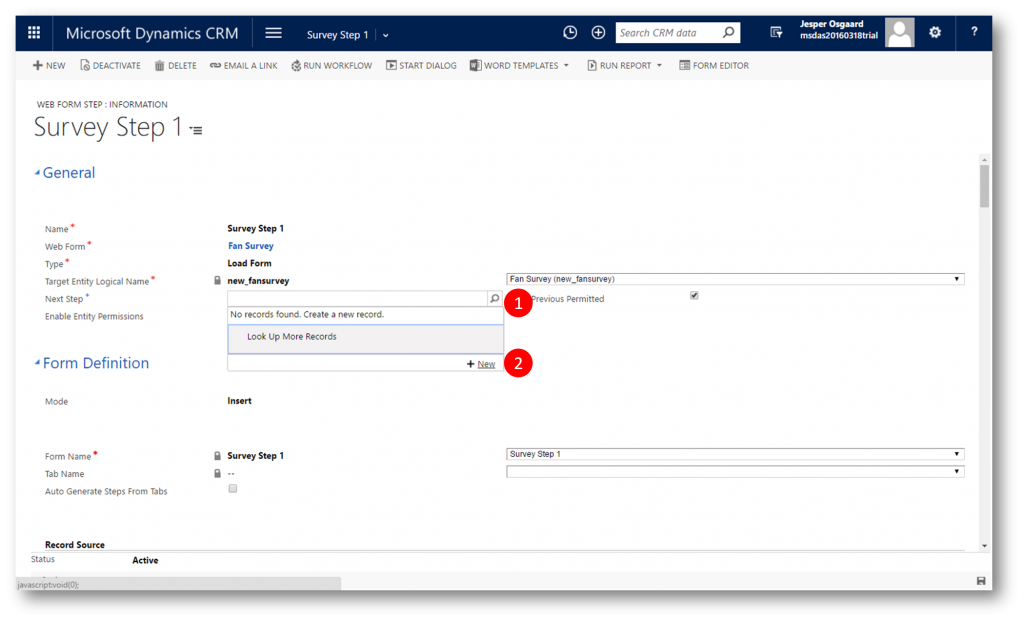
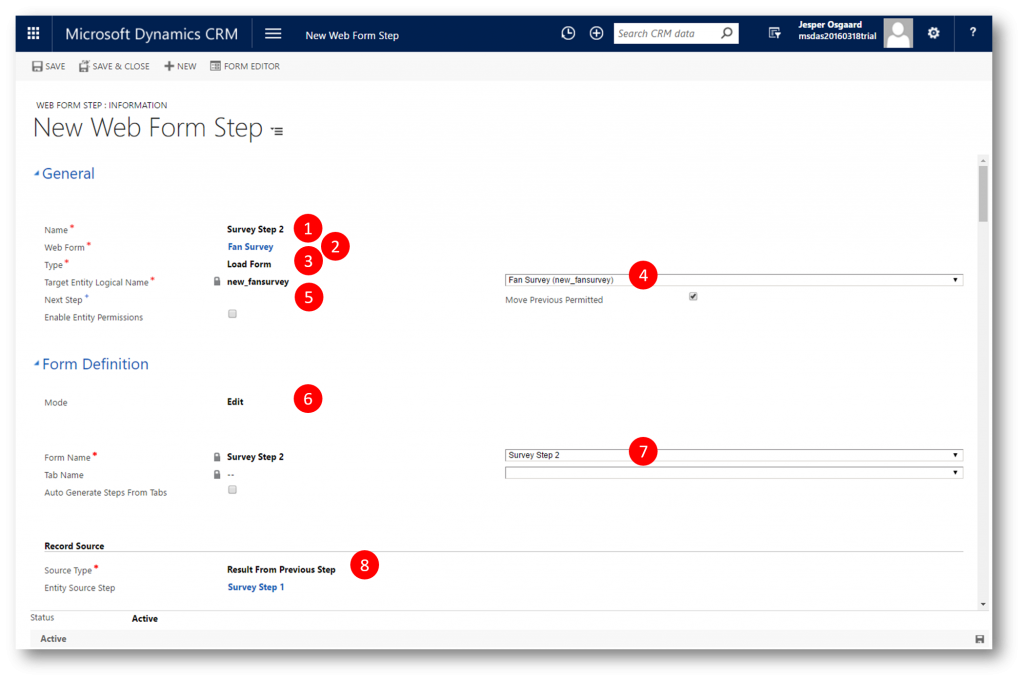
Give the step the follow values:
- Name: Survey Step 2
- Type: Load Form
- Web Form: Fan Survey
- Entity Logical Name: new_fansurvey
- Clear the Next Step field if its showing any values (5) - ensures that this final step displays a Submit button (if this field holds a value a Next button will be displayed on the step)
- Mode: Edit
- Form Name: Survey Step 2
- Source Type: Result From Previous Step
Scroll down to the Form Options section if needed
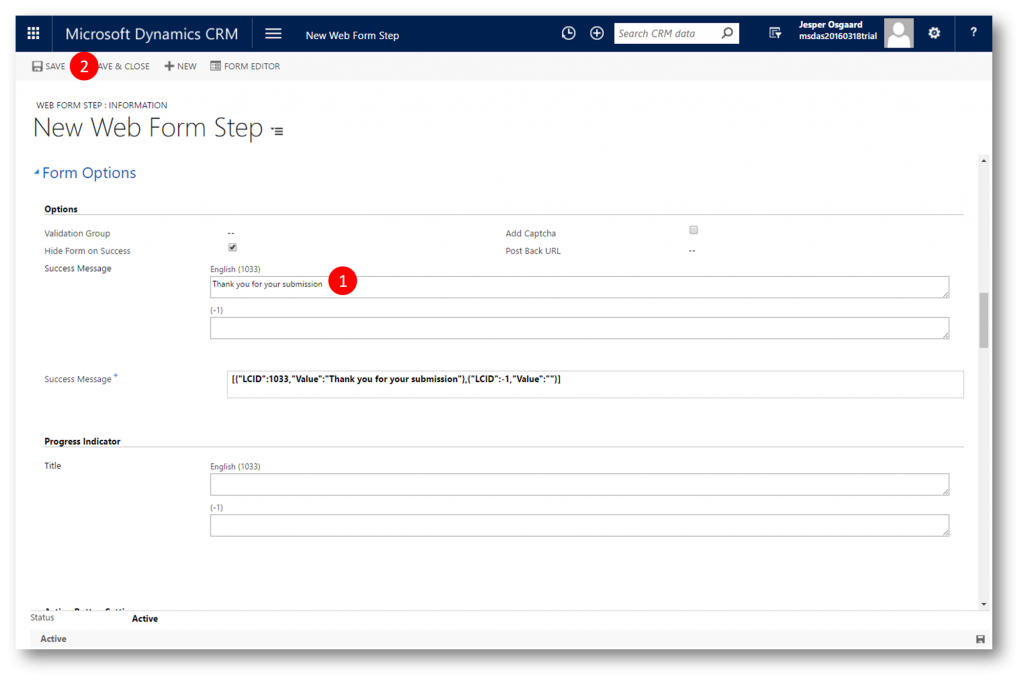
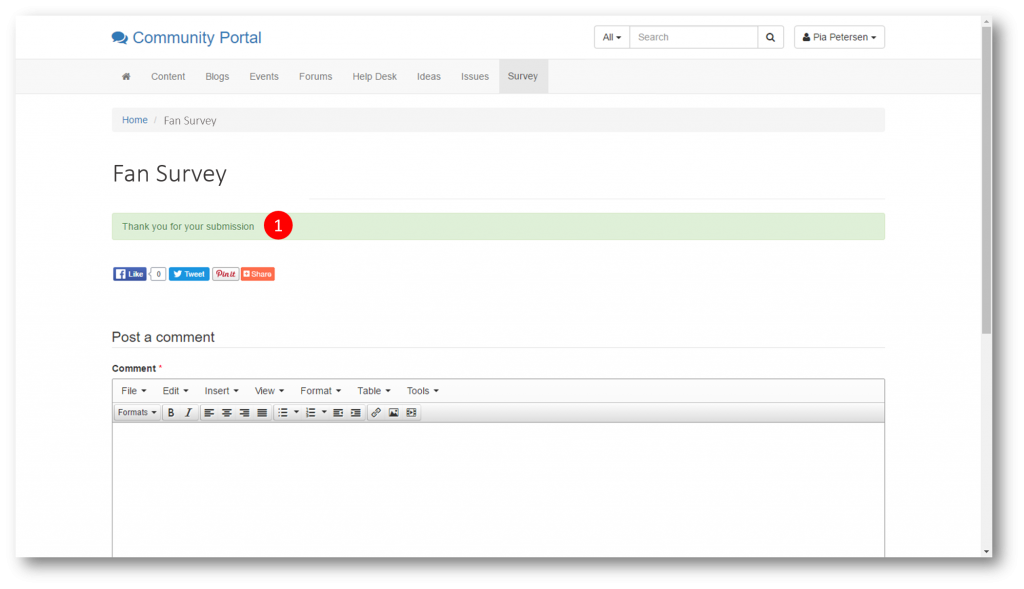
- Success Message: Thank you for your submission (this message will be displayed to the responder after submitting the survey)
- Save (don’t close the form – we are going to add a related entity)
Click the Survey Step 2 arrow in the navigation bar and then Metadata 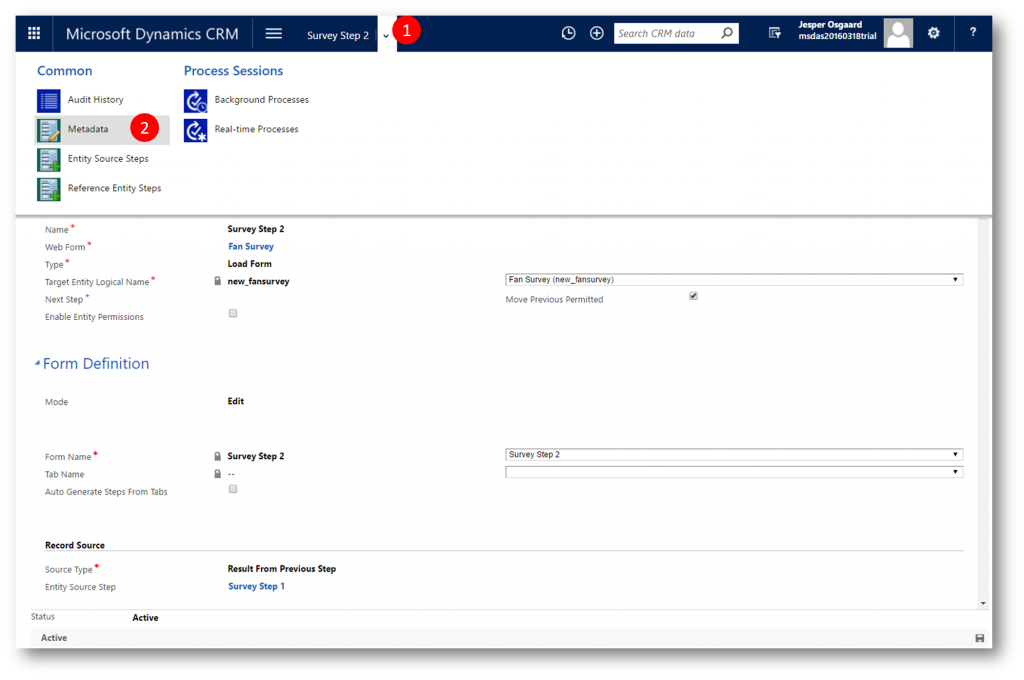
Click Add New Web Form Metadata 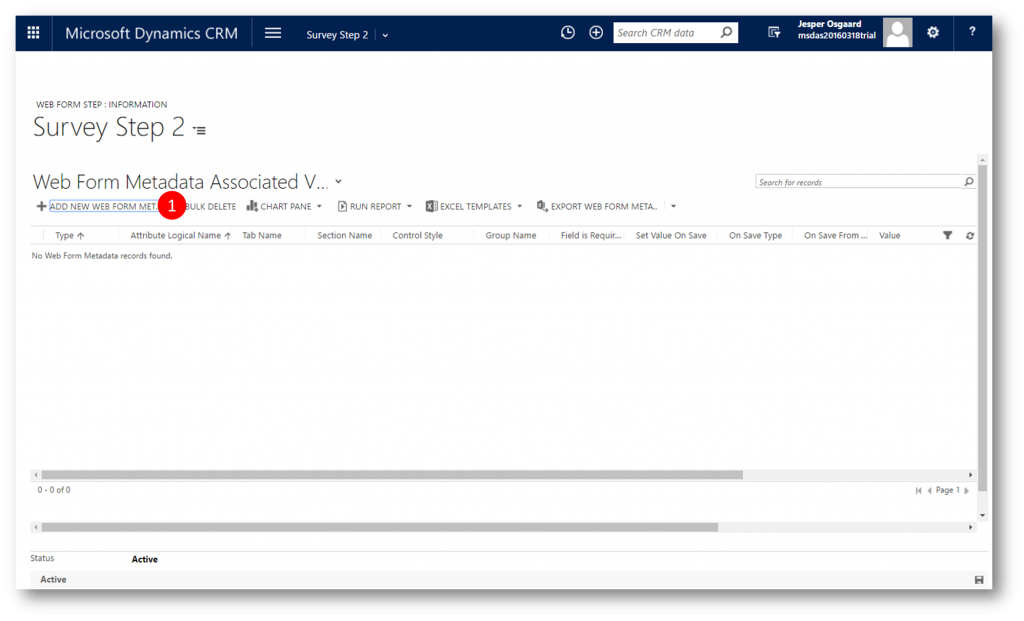
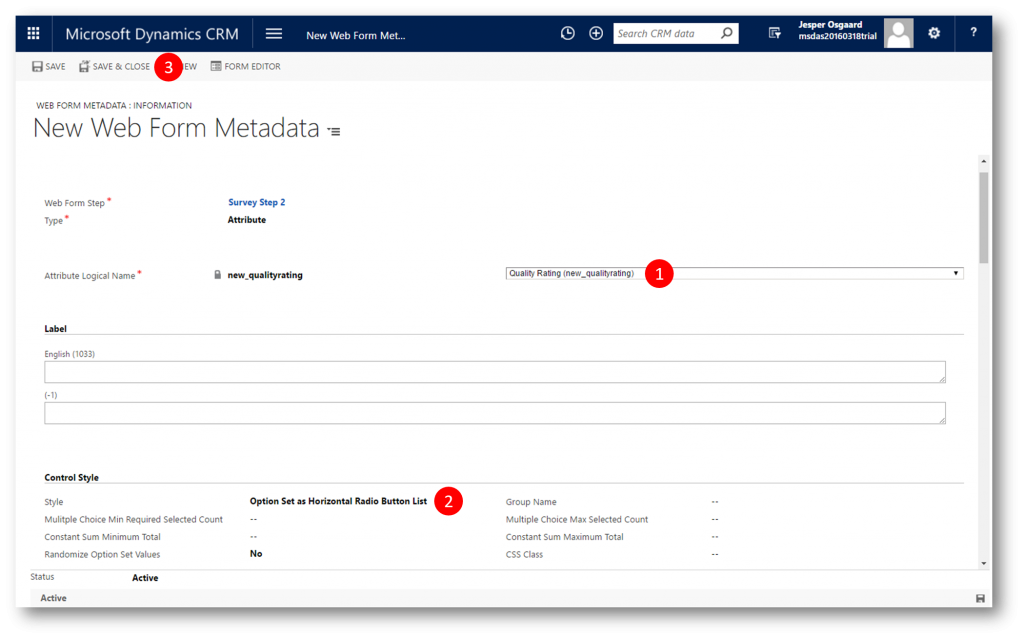
- Specify the Attribute Logical Name to be the logical name of the Likert scale question you created: new_qualityrating
- Select Option Set as Horizontal Radio Button List from the style dropdown in the Control Style section
- Click Save & Close
Finally we will make sure the Web Page and the Web Form we created are linked.
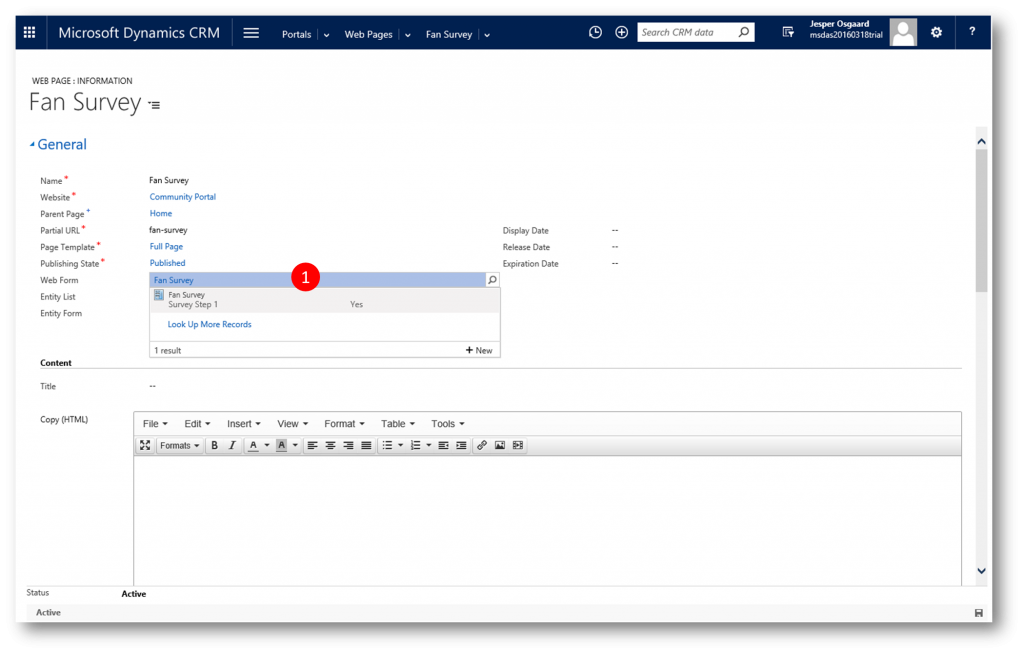
- Open the web page Fan Survey if not still open, click the Web Form drop down (1) and select the web form you created
Save all windows open at this point and Publish All Customizations
Add the web page to the Portal
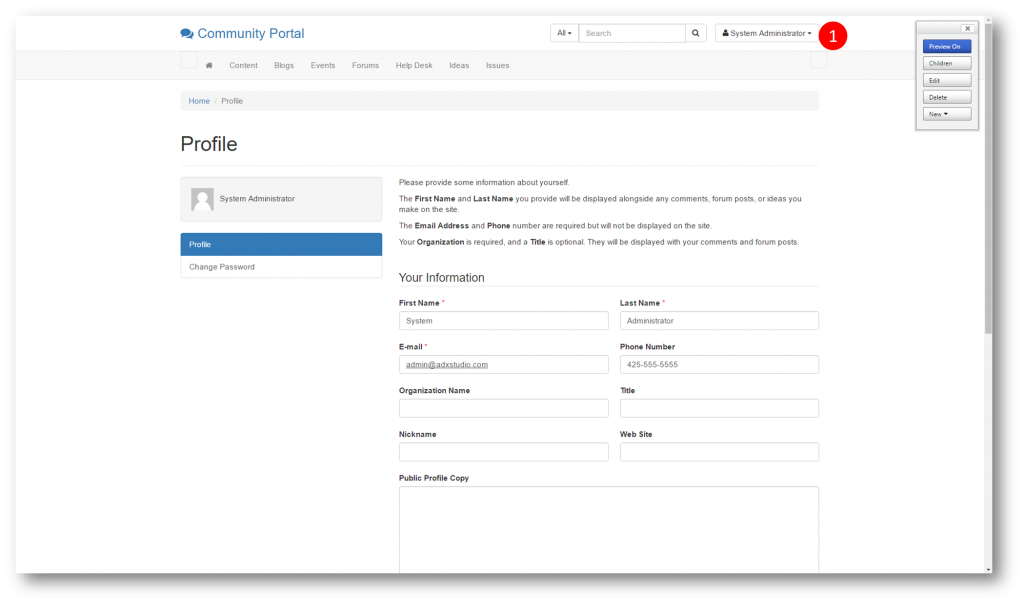
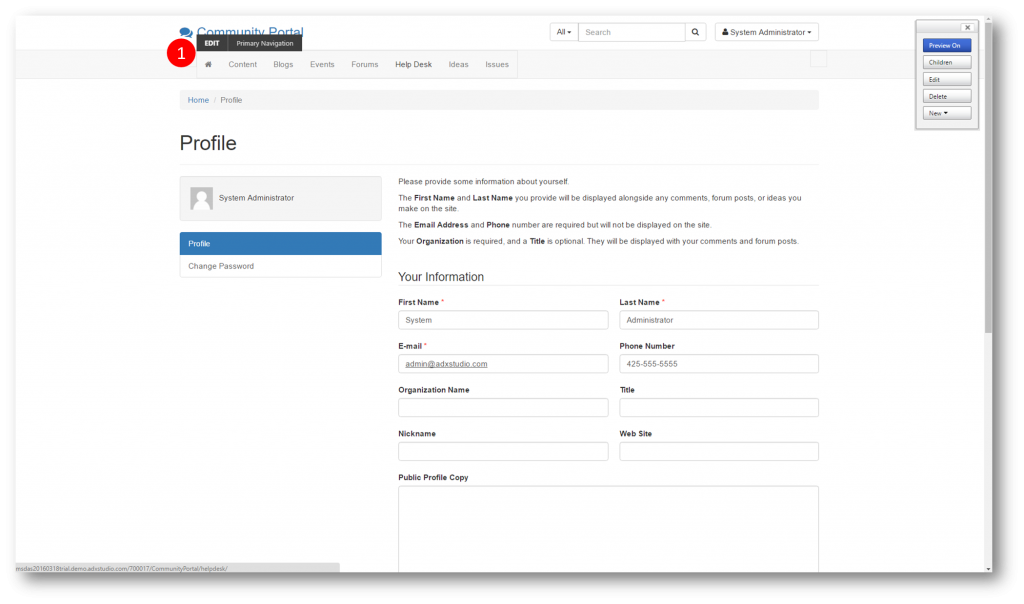
Navigate to your portal and sign in as administrator (1)
Hover over the primary navigation bar to see the Edit option (1) for the primary navigation Web Link Set
- Click the Edit button (1)
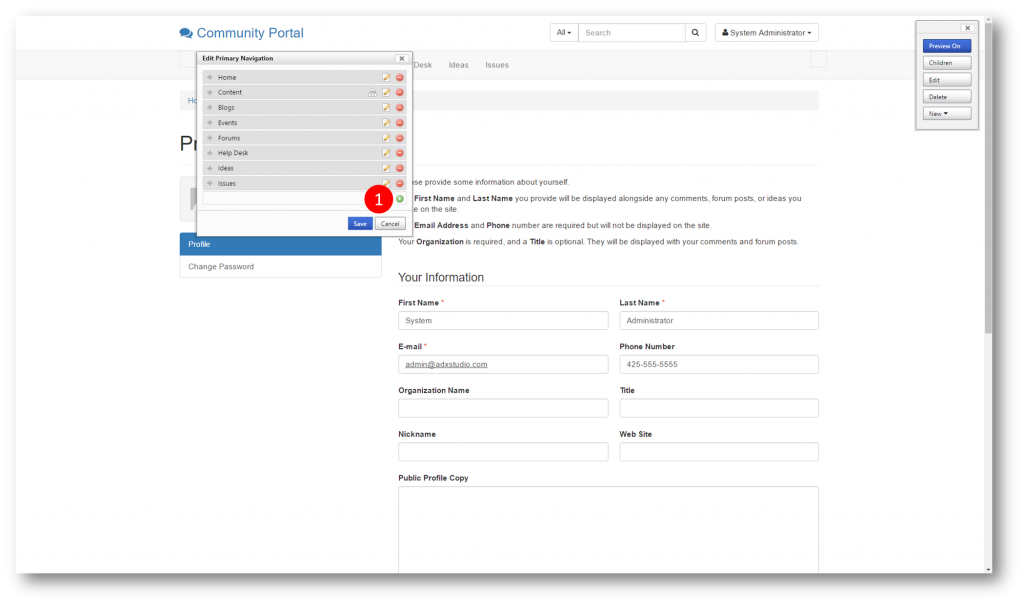
Add a new web link by clicking the “+” icon (1)
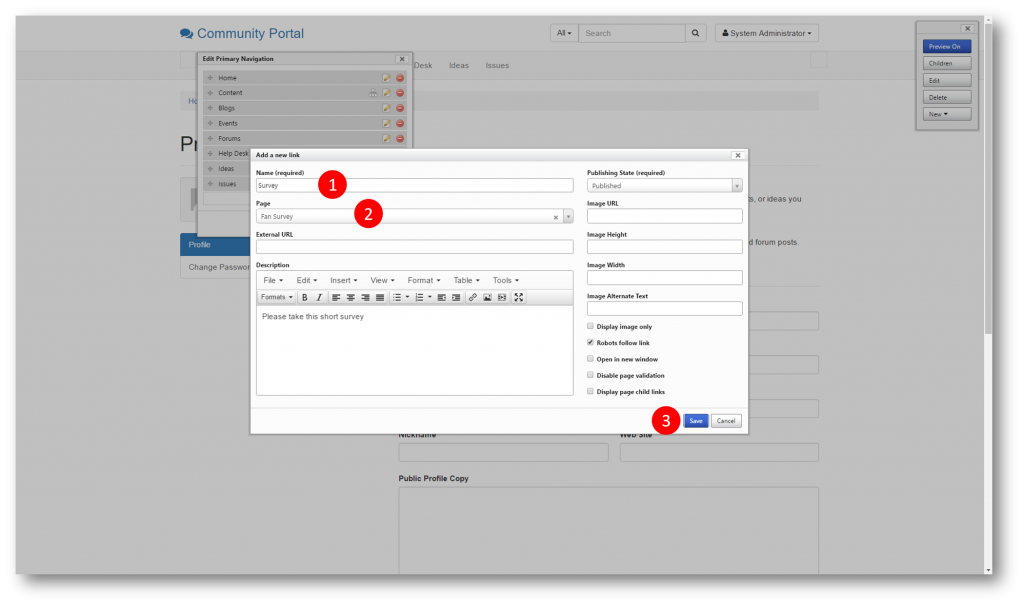
Fill in the following fields
- Name: Survey
- Page: Fan Survey (select in the drop-down)
and then click Save and Save again to close the Primary Navigation editor
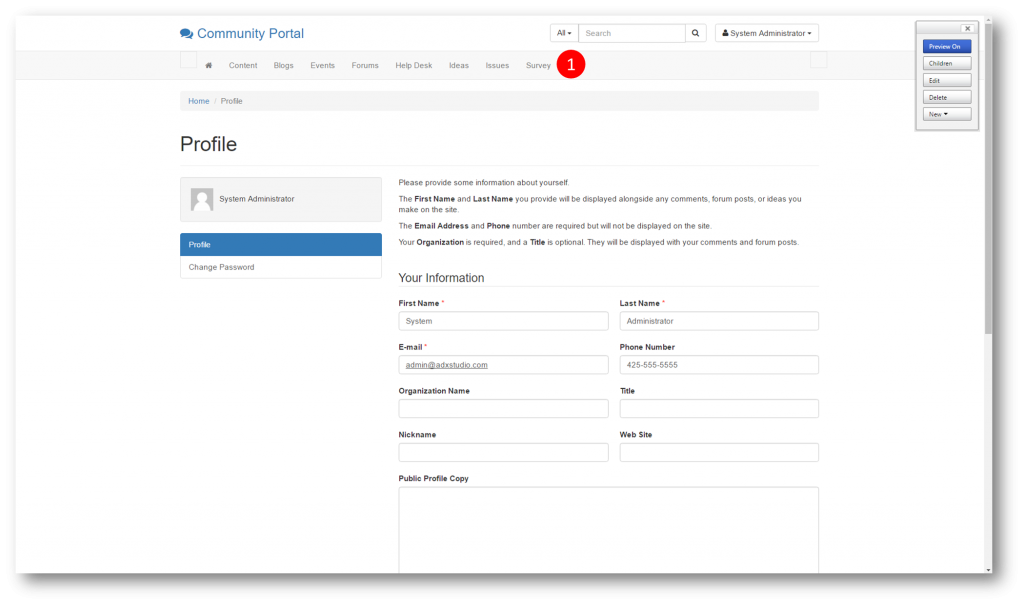
The Primary Navigation bar now displays the new link (1) to the Survey
Try out the survey
Log out of the portal if still logged in as administrator
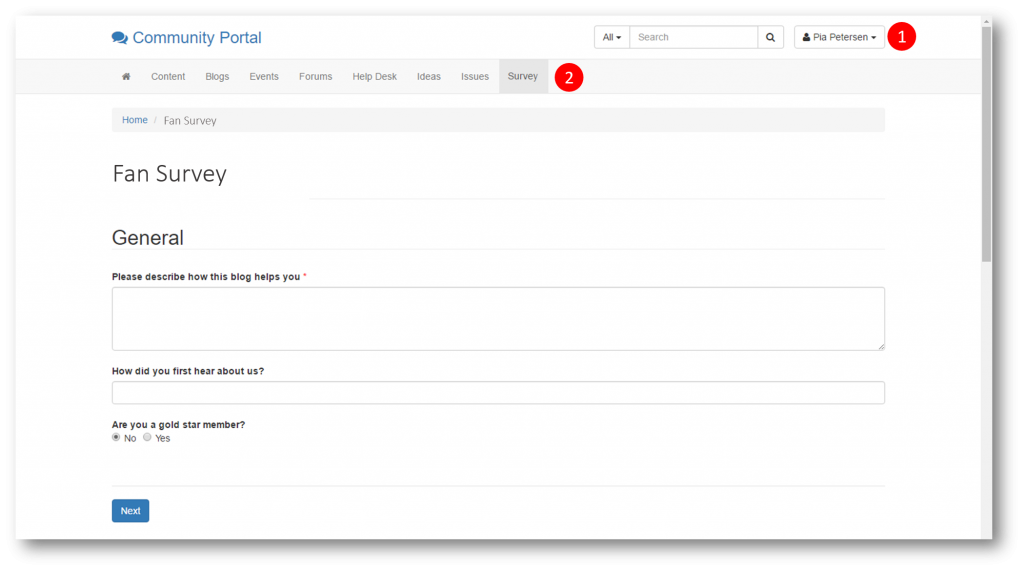
Log in as a user (1) and click the Survey link (2) to open the survey (an anonymous user will be directed to the sign-in page)
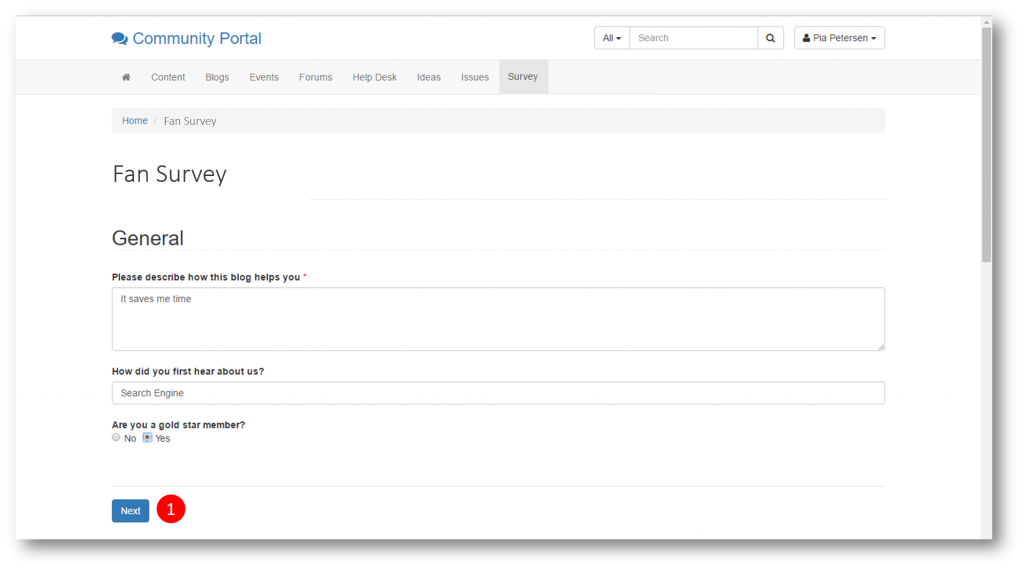
Fill out the survey step 1 and click Next (1)
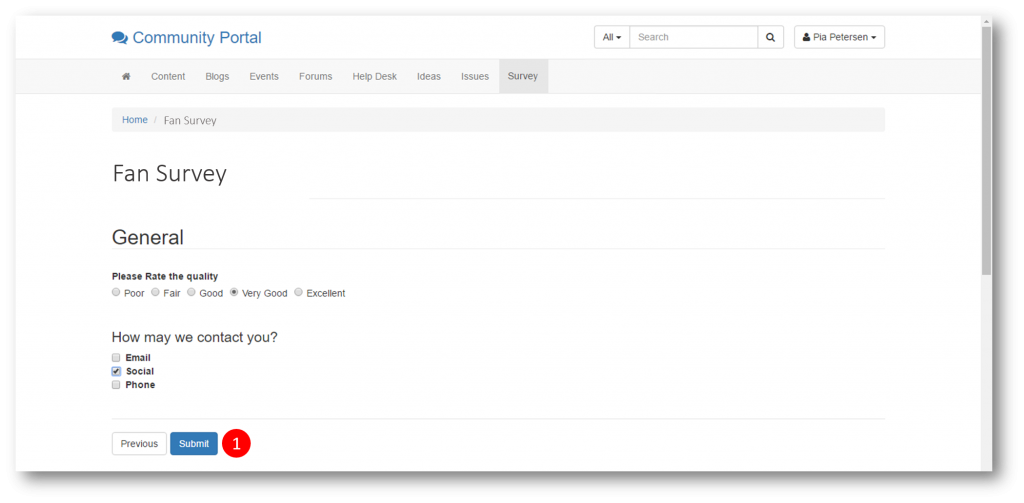
Fill out the survey step 2 and click Submit (1)
The success message we provided is displayed to the responder (1)
Review the results
When visitors (users) start answering surveys the results are availiable to you in Dynamics CRM via the form you defined above.
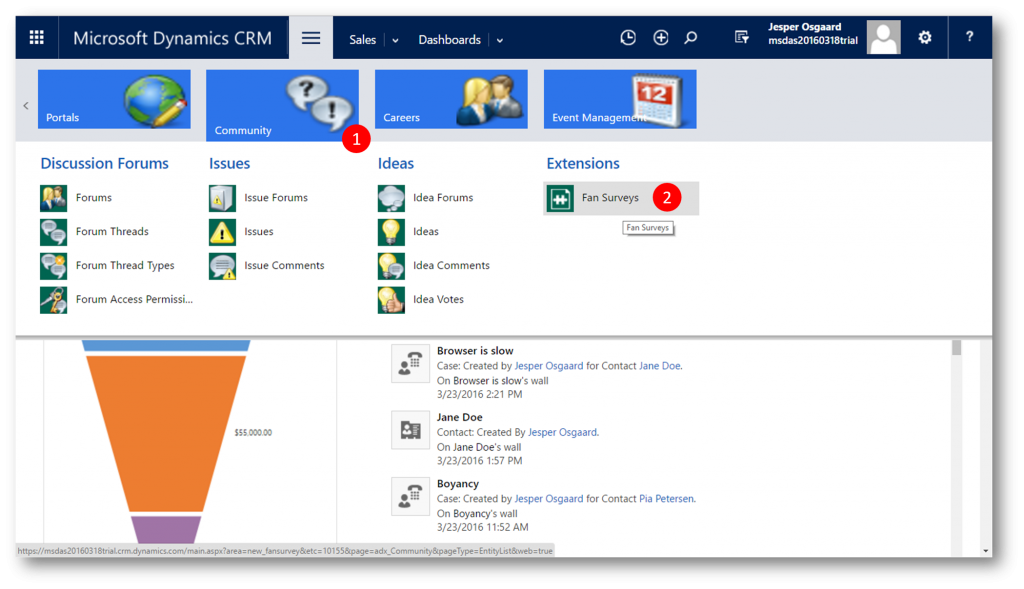
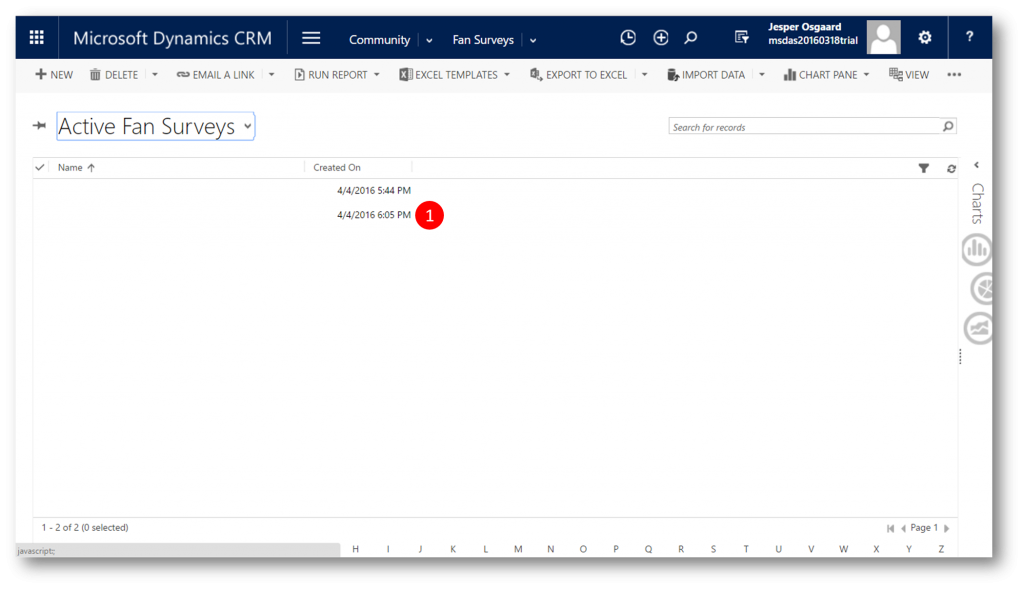
- Navigate to the area in which you placed the new entity - in this example the Community area (1) - and click the entity name - in this example Fan Surveys (2) to open the list of records (results)
Click one of the results
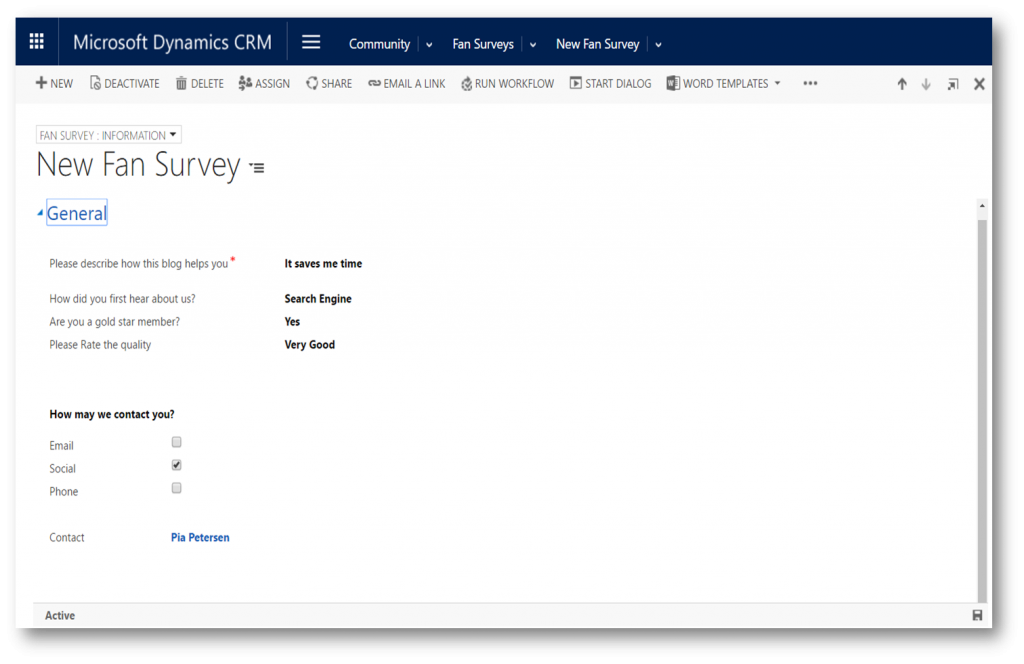
And see the answers the responder provided
Surveys are indeed a great way to learn more about what your audiences would like you to keep doing and what needs improvement.
