Extending Team Projects and Team Explorer in TFS 2010
In this post, I’m going to walk you through a TFS SDK sample that extends Team Projects and Team Explorer in TFS 2010. This solution is implemented as a Visual Studio Industry Partner (VSIP) package and includes a Project Creation Wizard plug-in and a Team Explorer plug-in. To get started, just follow these steps:
- If you haven’t already, install Visual Studio 2010 SP1.
- Download and install the Visual Studio 2010 SP1 SDK since you won’t be able to build the sources without it.
- Download an unzip the ExtendingTeamProjects sample from the TFS SDK on Code Gallery.
- Open the solution, right click on the TeamProjectExtensionPackage project and select Properties. Select the Debug tab and, under “Start Action,” select Start External Program and specify the full path to Visual Studio 2010 (%ProgramFiles(x86)%\Microsoft Visual Studio 10.0\Common7\IDE\DevEnv.exe). Then, under “Start Options” specify the following command line arguments: /rootsuffix Exp.
- Build the solution.
- Start Debugging (F5) the solution – this will start a new instance of Visual Studio.
Project Creation Wizard
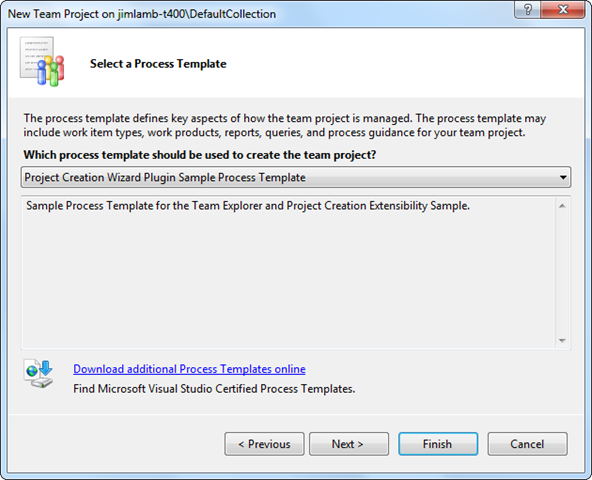
You see the Project Creation Wizard when you select File, New, Team Project… from Visual Studio’s main menu. The wizard lets you specify a name and description for your new team project and then asks you to select a process template. Before you can try the sample out, you’ll need to upload the provided sample process template to your project collection by selecting Team, Team Project Collection Settings, Process Template Manager… and clicking Upload to browse for and upload the process template that’s included with the source code. When you start the sample in the Debugger (F5), it will spawn an experimental instance of Visual Studio with our package already installed and ready to go.

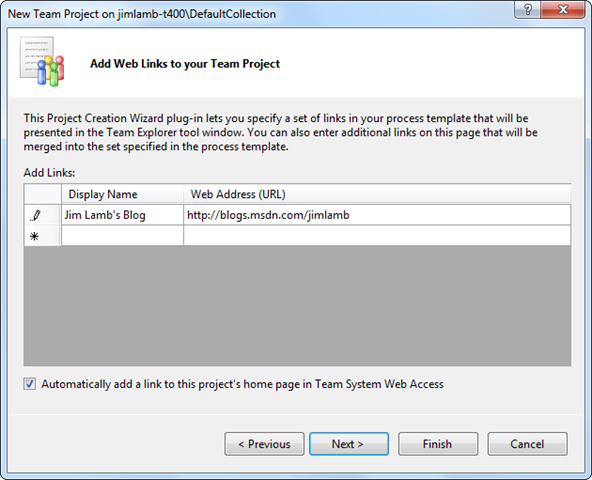
For this sample, we have a custom process template that declares a special group ID that includes a task list from a separate XML file. That XML file includes a set of web links arranged in a folder structure. Those links are passed to our Project Creation Wizard plug-in as the new Team Project is getting created. The plug-in also adds a new page to the wizard that lets the user enter additional web links and, optionally, to add a link to the newly created Team Project in Web Access.

This page derives from the TeamProjectWizardPage class which provides some handy methods to manage the state of the navigation buttons at the bottom of the wizard. The LinksProjectComponentCreator takes the links entered by the user, merges them with the links specified in the process template and stores an XML representation of the data in a property on the Team Project.
Team Explorer
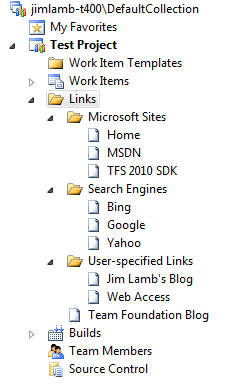
Once your new Team Project has been created, you’ll see a new folder in Team Explorer called Links that shows the links that were specified in the sample process template as well as the links you entered when you went through the Project Creation Wizard.

If you connect to another Team Project that doesn’t use the sample process template, you’ll notice that the Links folder does not appear. That’s because our Team Explorer plug-in implements the ITeamExplorerPluginFilter interface which lets us specify whether or not our plug-in should appear for a particular team project. The Team Explorer plug-in implements a context menu for the root Links node with a single command. It shows how to handle invocations of that command as well as how to handle activation of the links in the hierarchy it presents.
Deployment
When you build the solution, you’ll see that it creates a VSIX package which is a ZIP file that follows a particular set of conventions to make it easy to install into Visual Studio. To hand this extension off to a teammate, just give them access to the TeamProjectExtensionPackage.vsix file which you can find in the output directory. When they open that file, they can click Install to install the extension into Visual Studio.
If you have any questions or comments on this sample, please post below or contact me.